The size and weight constraints of the lifestyle means that they tend towards gear that is compact and multifunctional, the corrosion inherent in the environment and the time they spend away from easy resupply points encourages them to favor durability and repairability, and the fact that their entire living accommodations can be violently moved prompts them to spend time considering how to optimize storage and organization.
One of the blogs in this world that I occasionally follow is The Boat Galley. I’ve been happy with the handful of (mostly kitchen related) purchases I’ve made based off of Carolyn’s recommendation (including the aforementioned toaster). Another mainstay is, of course, Nomadic Research Labs by Steve Roberts who, in my opinion, can do no wrong.
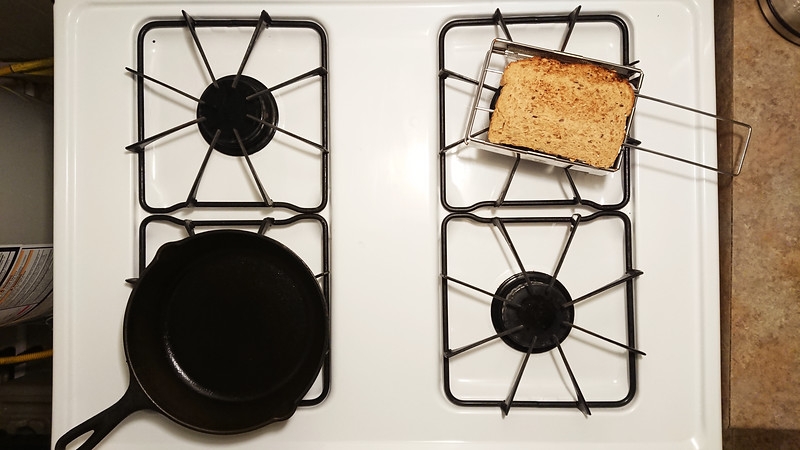
They take up too much space for the limited function they provide. But a few years ago I was convinced to purchase a GSI Glacier Stainless Toaster. It works great to toast a piece of bread, and collapses flat for storage. I appreciate that it works just as well over a fire or camp stove as it does on my kitchen stove top. I’ve never actually taken it outside of the kitchen, and would never consider packing it on a backpacking trip, but for something more luxurious, like car-camping or horse-packing, it seems like a perfectly viable option.
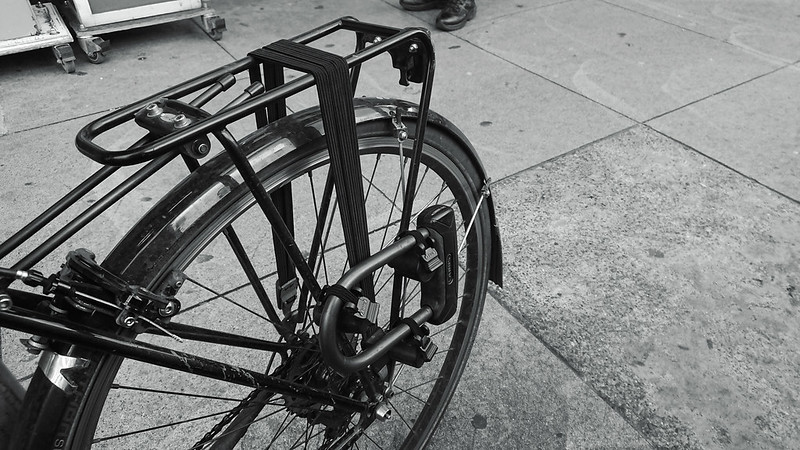
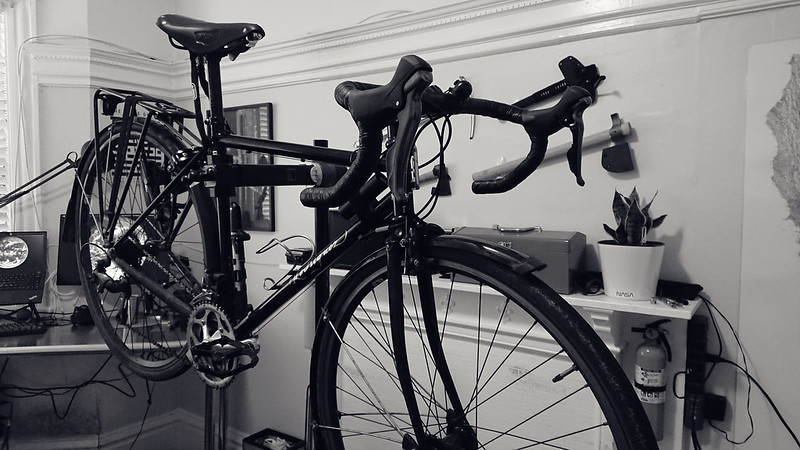
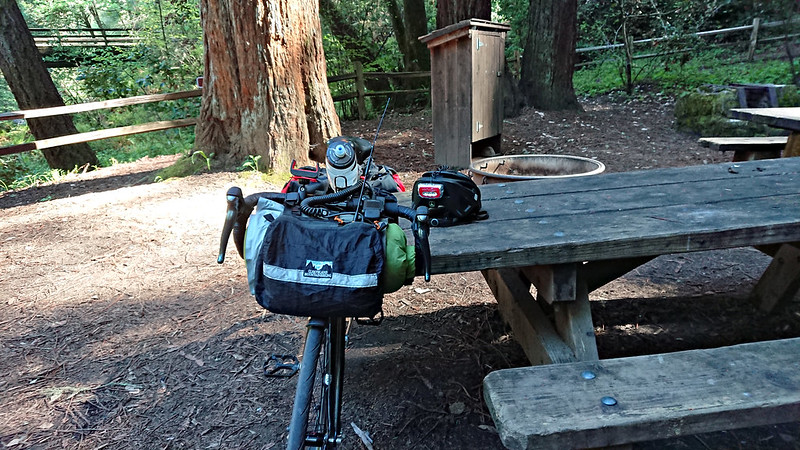
For the majority of my time on a bike I’ve carried a U-lock in my bag. I’d rather have the weight on the bike than on my back, but I’d never found a way to accomplish this without unacceptable compromise. Mounting the lock inside the triangle interferes with throwing the bike on my shoulder when going up or down stairs. Bungee cords on a rear rack can hold the lock securely, but don’t prevent it from rattling around, and I place a very high value on the ability to move silently.
A little over a year ago I solved this problem by purchasing the ABUS Ugh Bracket. The Ugh is a three-piece bracket that mounts to the arms of any rear rack. Each component has a groove which holds the U-Lock arm and a small elastic band with a toggle which locks the arm in place. The bracket is clearly meant for large sized U-Locks, but I was able to make it work with my compact ABUS GRANIT Plus 640 and Tubus Vega rack by mounting at the bottom of the rack where the arms are closest together.
The Ugh holds the lock securely and silently. It gets the weight off of my back and ensures that the lock is always on my bike. It makes accessing the lock quick and easy. I would like to see the elastic strap replaced with some material with a longer life, but other than that I have been very happy with the bracket. I think it’s one of the better options out there for carrying a U-Lock.
When the bracket is installed, a pannier cannot be mounted to the same side of the rack. I use panniers when touring, but I don’t tour with a U-Lock, so this isn’t something I care about most days. It only takes a couple minutes to uninstall, but it is annoying to do and another barrier to heading out on a multi-day trip.
When I purchased the Ugh I couldn’t find anybody selling it in the US. I had to pay for it in Euros and ship it from Germany, which made it an expensive experiment. It is now carried by Lockitt, though at $32.00 it remains a pricey item. I’ve been happy enough with mine that I’d buy it again, but it is definitely pricier than throwing a couple Twofish Blocks on your bike.
Teens say they’d basically do anything to avoid searching for answers to their problems outside of Instagram. Unlike threads, web pages don’t follow any standardized format, and teens say that navigating the open web, especially sites with ads and pop-ups, was a frustrating waste of time.
“The format is just a lot easier to read than stuff like Google,” says Sophie. “You can read longer things in little chunks. It’s not like reading this giant paragraph at once. No one wants to do that.”
Teens say that another benefit of threads is that you don’t have to waste time searching around – the information is delivered to you based on your interests and whom you follow – and that threads feel more trustworthy than search engines.
I’m not sure what sort of dystopic future we’re in for if we manage to raise a generation of people who are intimidated by a paragraph, but I suppose we’ll find out.
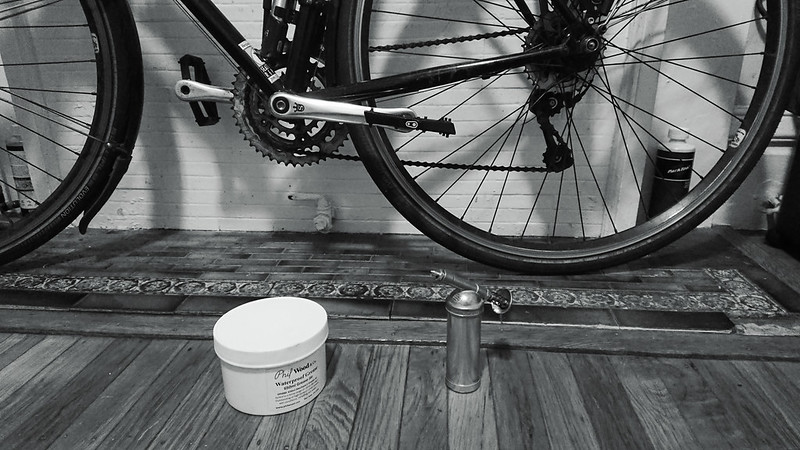
But more frequently you just need a little. A few months ago I bought myself a Dualco 700231 Grease Gun and a Dualco 10547 4.5” nozzle. I filled the gun from a tub of Phil Wood Waterproof Grease that I’ve been working through for a handful of years. This made servicing my pedals much easier and less messy than previous jobs. Purchases like this make me feel more like an adult.
As with rice, “hard boiled” eggs are one of my go-to pressure cooker dishes when I don’t have the time or inclination to cook a full meal. I only began using the pressure cooker for this in the past couple years, but it has proven to be faster and to produce consistently better results than actually boiling the eggs.
To cook the eggs, I put one cup of water in the pressure cooker, drop in a steaming tray, and place the eggs on the tray. I then use the 5-5-5 method, which means:
5 minutes to reach high pressure
5 minutes at high pressure
5 minutes of natural pressure release, followed by quick release of any remaining pressure
After the pressure has been released, the eggs are placed in cold water to cool.
Once every year or two I need to send a fax. Never receive, just send. Usually for something involving the finance industry. Twilio makes this about as painless as it can be in the 21st century.
Unfortunately the Twilio Fax API doesn’t allow you to post the document to it directly, so the first step is to get the PDF online somewhere. After that, it can be faxed via curl.
This queues up the document to be sent, which usually takes a couple minutes. Somewhere in the response will be a URL that looks like https://fax.twilio.com/v1/Faxes/$GIBBERISH. After a few minutes, this URL can be used to check the status.
If the status is queued, processing or sending, check back in a few minutes. If it is delivered, you’re all done and can delete the uploaded PDF. If the status is something else, you probably need to try again. Perhaps ask the recipient to sign out of AOL and hang-up their modem so that their fax machine can accept your call.
What would a viable long-distance communications network in the age of peak oil look like? To begin with, it would use the airwaves rather than land lines, to minimize infrastructure, and its energy needs would be modest enough to be met by local renewable sources. It would take the form of a decentralized network of self-supporting and self-managing stations sharing common standards and operating procedures. It would use a diverse mix of communications modalities, so that operators could climb down the technological ladder as needed, from computerized data transfer all the way to equipment that could be built locally with hand tools. It would have its own subculture, of course, in which technical knowledge and practical expertise would be rewarded, encouraged, and fostered in newcomers. Finally, it would take a particular interest in emergency communications, so that operators could respond to disruptions and disasters with effective workarounds at times when having even the most basic communications net in place could save many lives.
The interesting thing, of course, is that a network that fills exactly these specifications already exists, in the form of amateur radio.
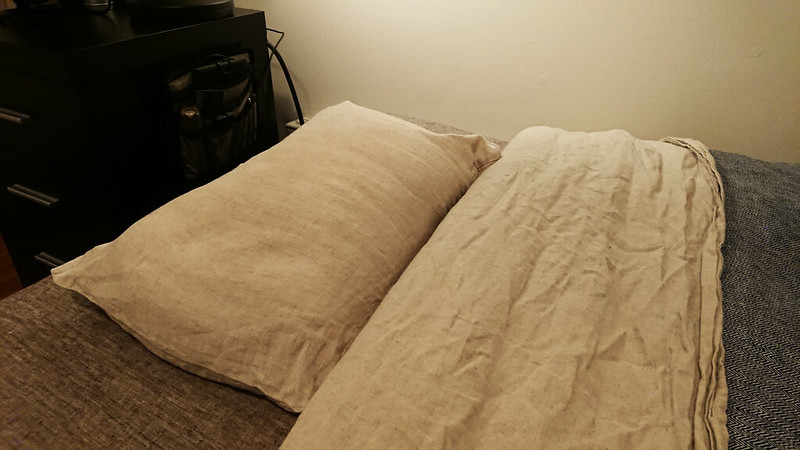
One component of optimizing for sleep is selecting the right tools. Back in 2010 I went looking for a replacement for the stereotypical feather pillow. Feather pillows work well enough when new, but degrade over time and are impossible to thoroughly clean without damaging them. This limited service life is suboptimal, and I assumed there must be a better solution out there.
I settled on buckwheat hulls. I reasoned that these would be easy to replace, which meant the life of the pillow would be determined by the shell rather than the filling. That the hulls were easily removed also meant the pillow could be washed. These two factors addressed my primary complaints against feather pillows.
I already had a zafu filled with buckwheat hulls, so I had some experience with the material that made me think it would work well for sleeping. Buckwheat hulls are lightweight and springy, making them easy to adjust to the contours of the body. The shape of the hulls means that, even under load, they do not compress flat, but instead leave a path for the movement of air. They are hypoallergenic and aren’t a food source for anything, which minimizes the probability of dust mites or other bugs taking up residency.
About the only negative thing one can say about buckwheat hulls is that they are loud. This was never a concern with my zafu, but I was worried that the noise would be unpleasant for a head pillow that I was trying to sleep on.
The solution to this was provided by a (now defunct) company called Serenity Pillows. They offered a patented dual-chamber pillow, which was filled with buckwheat hulls on one side, and a sheet of felted wool on the other side. By placing your head on the wool side you retained all the benefits of a buckwheat hull pillow, plus the temperature-regulation of wool, while the wool also muffled the sound of the hulls. I was sold on this idea as soon as I saw it.
Serenity Pillows offered two sizes of this dual-chamber pillow: one that we in the Western world would call a normal sized pillow, and a smaller version named the Shambho. The smaller size was about 16” x 10” (with a variable depth, depending on the amount of hulls you added or removed), which they claimed was closer to the traditional size of buckwheat hulls pillows used in Japan. I had never questioned the size of a pillow before, but when presented with this choice I couldn’t come up with any rational argument to support the larger size. I purchased the Shambho.
I’ve been sleeping on that same pillow for close to a decade now. It is never too hot or too cold. The amount of hulls can be adjusted to user preference. The shape of the pillow can be molded to support back or side sleeping. And I’ve never thought of a reason to want a larger size. It’s the perfect pillow.
I wash pillow cases regularly, and the pillow shell itself once or twice per year. This is a simple matter of dumping the hulls into a bucket, removing the felted wool sheet, and tossing the empty shell into the laundry machine with a bit of bleach.
Initially, the unusually small size of the pillow did make it difficult to find pillow cases, but I found that you can search for “toddler pillow cases” and find a plethora of appropriately sized (around 20” x 14” flat) options. Or you can have them made. I prefer linen – as in flax – for bedding, which I acquire from the large number of Eastern European sellers on Etsy. Since these products are usually made to order, I’ve found you can just send them the proper dimensions and they’ll sew up whatever you want. I always request a pillow case with an envelope closure, since the non-closing pillow cases more common in this country are dumb and their existence can only be justified by laziness. For this style of pillow case, 18” x 14” is about the right size.
At one point a few years ago I heard that Serenity Pillows had gone out of business, and was disappointed that I would never be able to replace this pillow – until last year, when I discovered a company called Sachi Organics had purchased the designs to both sizes of the Serenity dual-chambered pillows. They sell both the Shambho and the larger model Rejuvenation.
At the end of 2017 I purchased the Sachi Shambho during a sale at one of their dealers. It is identical to the original pillow, except for the tag. The small size of the Shambho makes it easy to store, so I was able to justify to myself the purchase of a second pillow both as a spare for guests, and against the day when the original Shambho must be replaced (if that day ever comes – today it is as good as new, but for some discoloration from use). I also purchased a replacement wool sheet for the original pillow. On top of its comfort, the serviceability of the pillow – that you can rejuvenate it by simply replacing the buckwheat hulls and wool – is another factor that attracts me to the Shambho. I expect I’ll be sleeping on the same pillow for at least another decade.
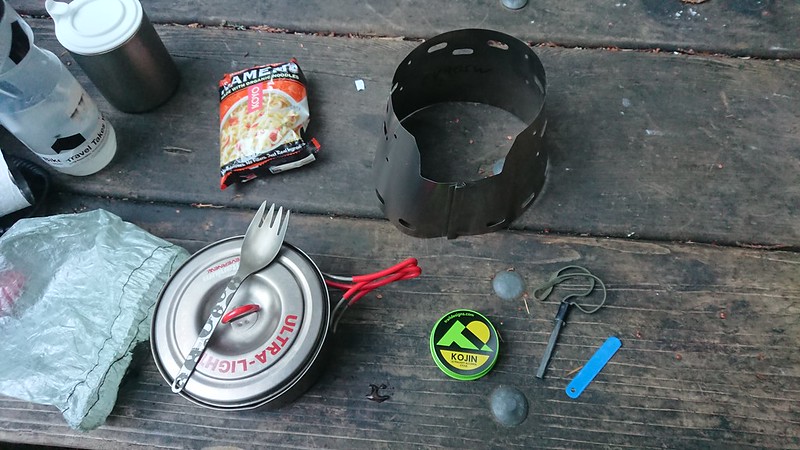
A cast iron skillet and a pressure cooker were two of the first kitchen utensils I purchased when I began cooking for myself back in college. I still have the same two tools, and the vast majority of the things I cook involve one or both of them.
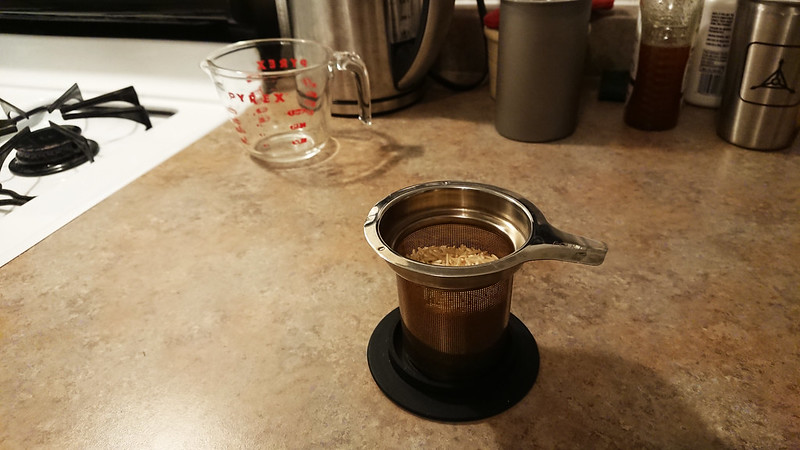
When considering the pressure cooker, the original appeal was that it seemed like an easy way to cook rice while being more versatile than a dedicated rice cooker. This assertion turned out to be true, but the 4-quart volume of my pressure cooker meant that I always had to make multiple servings of rice at a time. Cold, leftover rice is unappealing, which meant that the volume limitation of the pressure cooker diminished the frequency of my rice consumption.
Some years ago the internet came to the rescue, suggesting that a single serving of rice could be cooked in a pressure cooker of any size. Instead of placing the rice directly in the pressure cooker, the rice and water are put in a metal bowl, which is then placed into the pressure cooker on an elevated tray. Additional water is poured into the pressure cooker, outside of the bowl. My pressure cooker didn’t come with a tray, so I purchased an Instant Pot Silicone Steam Rack, which drops right into my pot. For the metal bowl I use a Snow Peak Trek Titanium Bowl, but any metal bowl of roughly the same size will work.
For white rice, my procedure is:
Add 1/2 cup of white rice, 3/4 cup water, 1/4 teaspoon of sea salt into metal bowl
Add 1 cup water into pressure cooker
Place metal bowl into pressure cooker on top of steam rack
Bring to pressure on high heat, about 5 minutes
Keep at high pressure for about 4 minutes, then remove from burner
Natural pressure release for about 6 minutes
For brown rice, I adjust the quantities and time:
Add 1/3 cup of rinsed long grain brown rice, 1/2 cup water, 1/4 teaspoon of sea salt into metal bowl
Add 1 cup water into pressure cooker
Place metal bowl into pressure cooker on top of steam rack
Bring to pressure on high heat, about 5 minutes
Keep at high pressure for about 15 minutes, then remove from burner
Natural pressure release for about 6 minutes
To rinse a single serving like this, I use my FORLIFE Tea Infuser. It’s the right size for this amount of rice, and has a lid in case you want to shake it around a bit while rinsing the grains.
The result is a perfectly cooked bowl of rice in a short period of time, with almost no effort. The cooked rice is consumed directly from the metal bowl, and the pressure cooker itself requires little more than a rinse at the end, so dishes are minimized. The simplicity of this process makes rice and furikake one of my go-to dishes when I don’t have the time or inclination to cook an actual meal. I also frequently cook a fresh, hot serving of rice to mix with cold leftovers, which makes them much more appealing.
Loosely because I own more than one style of shirt, jacket, and pants. But I do try to keep things paired down, and standardizing on the color black means everything goes together and is largely fashion-agnostic. The approach reduces mental taxation.
I am more firm in the area of socks. Darn Tough makes the best socks, and the Tab No Show Light Cushion is the best Darn Tough sock. I bought my first pair in 2009. Over the subsequent years I have added a few additional pairs to my collection, but those original socks continue to be in regular rotation. I maintain a small number of other socks in my arsenal for specialty purposes – a couple pair of boot socks for those rare occasions when I wear tall boots, a couple pair of toe socks for augmenting huarache style sandals, and a pair of waterproof socks I bought to experiment with – but for almost all of my sock-wearing days each year I have the Tab No Show Light Cushion socks on my feet.
I have always had a problem with dry and cracked skin on my hands in the winter months. I do not consider this a cosmetic issue. Dry hands create an additional vector for disease and diminish the fidelity of haptic interactions with the world.
Starting two months prior to my PRK surgery last year, and continuing throughout the recovery period, my surgeon assigned me to take omega-3 supplements – specifically, he was pushing Nordic Naturals ProOmega 2000. This is a standard procedure that the office assigns to all patients in order to increase moisture in the eye. I started on the supplements at the beginning of October 2017 and, coincidentally, that was the first winter I had no problems with dry skin. I stopped taking the omegas last summer, around the time of my six month post-op checkup. This year, as November rolled around, my skin began to dry and crack on my hands, right on schedule. I resumed the omega supplements, and in about a week my hands were back to normal.
I’ve never regularly taken supplements before, preferring to modify my diet to remove its deficiencies rather than masking them by popping pills. The omega supplements have been more effective than any dietary modifications I’ve tried (I like fish, and enjoy eating it frequently), and are preventative instead of the more reactionary balms or salves (ClimbOn is the best I’ve found, being effective, minimally greasy and not stinky). There seems to be no shortage of claims associated with omega supplements, most of which appear to be noise, but I’ll continue to pop them during the winter to promote skin health.
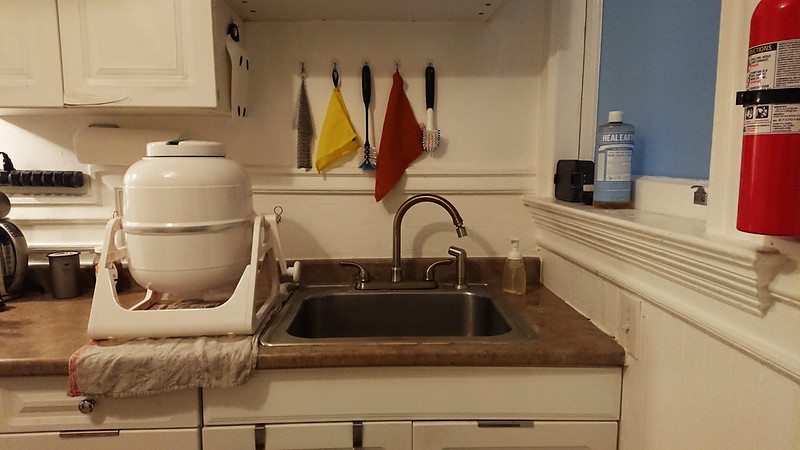
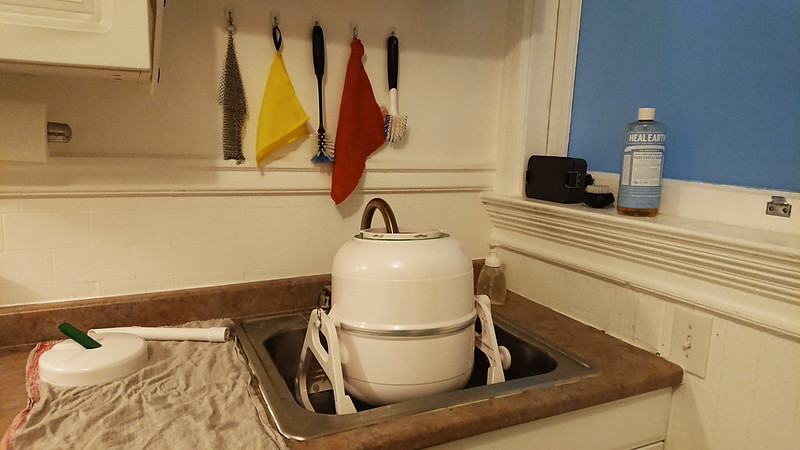
The Laundry Alternative Wonder Wash is a portable, hand-crank washing machine. It is basically a bucket with a sealed lid, mounted on a base via an axle with a handle that allows the bucket to be spun. The bucket is filled with warm water. When the lid is sealed and the machine is spun, the pressure increases, which causes the soapy water to be pushed through the fibers of the fabric being washed. As such, the Wonder Wash results in cleaner garments, and accomplishes this in a shorter period of time, than a traditional electric washing machine that relies on simply agitating the material. It achieves this in a package that is compact, portable, and off-grid compatible.
I purchased a Wonder Wash nine years ago. It has been my primary washing machine for the past five years. It’s a great solution for things like gym clothes that you want to wash frequently and not leave sitting around, getting funky, until you build up a large enough load to justify the use of a typically sized electric washing machine. The small size of the machine makes it easy to store when not in use, which is important for apartment dwelling, as well as the RV market that The Laundry Alternative seems to target. While I doubt the volume of the machine is practical for the laundry generated by a family of four, I find it works great for me. It encourages me to do laundry more frequently than I otherwise would – I typically do 2-3 loads per week – which in turn allows me to own less clothing (and towels, and bedding, etc). I don’t have to consider the it-will-be-AWOL-in-a-laundry-pile-on-the-floor-for-2-weeks factor when determining how many pairs of underwear I need in my life. The gentleness of the Wonder Wash allows me to keep what clothing (and towels, and bedding, etc) I do choose to own in service for longer than I otherwise would if I were regularly treating them to the abuse of a traditional washer and dryer.
I also find the smaller capacity of the Wonder Wash to be useful when washing waterproof garments with a technical wash like Nikwax Tech Wash. I usually only have one or two waterproof garments to wash at a time. With a traditional electric washing machine, I need to use more water and thus more of the expensive soap than is really warranted. With the Wonder Wash I can easily scale down the water and soap to what is appropriate for the load.
My apartment has an electric washer and dryer in the building, but not in my unit. I use it maybe once every 3 months, when I’ve neglected laundry and have enough dirty things that I would need 3+ loads of the Wonder Wash to clean it. If I had an electric washer and dryer in the unit I think I would still favor the Wonder Wash.
Use
The process of using the Wonder Wash is pretty simple.
Add warm water, soap and clothing to the machine.
Seal the bucket and spin, about one rotation per second, for 2-3 minutes.
Dump the soapy water and fill with cold water to rinse.
Seal the bucket and spin, about one rotation per second, for about 1 minute.
Dump the water and remove clothing to dry.
The washing and rinsing part of the process take at most 4 minutes. The most time consuming part is filling the machine with water.
Soap
When I first began using the Wonder Wash I tried it with Seventh Generation Free & Clear Liquid Detergent. This is the soap I have always used in electric washing machines. This detergent is very sudsy, and I found it challenging to use enough soap to clean, but little enough to not require multiple rinse cycles. I quickly gave up on this and moved to Eucalan. I keep this around for occasionally lanolizing wool. Eucalan is a no-rinse soap, which works well in the Wonder Wash. I still performed a single, quick rinse cycle, but if I accidentally used too much soap I didn’t have to worry about ending with excessive suds that would require multiple rinses. Unfortunately Eucalan isn’t the cheapest soap out there.
I used Eucalan in the Wonder Wash for a couple years before realizing that I could probably just use the same soap I used for everything else in my life: Dr. Bronner’s. I shower, shave, wash hands, wash fruit, and clean surfaces with Bronner’s products. It is always effective, tends to be readily available and affordable, and is most likely not giving me cancer. So why not laundry? As it turns out, it works great with the Wonder Wash. I use one tablespoon of the Baby Unscented Castile Liquid Soap for a full load. It’s especially nice for attacking dust mites in bedding.
For the rinse cycle I’ll add about two tablespoons of distilled white vinegar, which helps to remove residue left over from the soap as well as soften the load. This softening is important for heavy cotton things, like towels, which otherwise become quite stiff when air dried.
Drying
Without an additional tool, any time saved by using the Wonder Wash instead of an electric washing machine will be lost after all the wringing required. Laundry removed from the Wonder Wash and placed directly on a drying rack will take days to dry. If electricity is available, the best solution to this is an electric spin dryer. Mine is a discontinued model made by the Laundry Alternative, but they have other models available. These dryers are simply steel drums that spin the clothes really fast to remove the water. It’s similar to the final cycle of an electric washing machine, except they spin much faster (around 1800 RPM). No heat is involved, so they do not shorten the service life of your clothing like a normal heat dryer.
I run the spin dryer until water stops coming out the drain spout, which tends to be around 90-120 seconds. After this cycle, clothing is still damp, but it is impossible to wring any moisture out of it. Something light and quick drying like a Merino wool t-shirt could be worn immediately and dried out with body heat in maybe half an hour, but I move everything from the spin dryer to a drying rack. Anything I wash will dry on the rack within a couple hours. I usually end up doing laundry at night and leaving it on the rack overnight.
Durability
The Wonder Wash is all plastic, except for the axle the machine spins on. I’d like to see a version with more durable metal components, but given the low price of the current design and the availability of replacement parts, this is barely worth mentioning.
Over the nine years I had the original Wonder Wash I cracked the base and snapped off the end of the handle. The machine was still functional with this damage. More recently, the lid began to leak when I spun the machine, which I assume was caused by the degradation of the rubber seal over time. This was enough for me to finally want to replace all three parts. The handle and base were readily available, but The Laundry Alternative released a new version of the Wonder Wash a few years ago, with the primary change being a snap attachment for the lid instead of a nob. I contacted them and they confirmed that they had no more stock of the old lid and that the new lid would not fit on the old bucket. So instead of purchasing replacement parts, I bought the new version of the machine. Given the price of the machine, I’m fine replacing it once every decade or so.
The new snap lid works just as good as the old knob lid worked when it was new. I don’t think there is a practical difference between the two. If for some reason you really want the old lid, the Avalon Bay EcoWash appears to be a direct knock-off of the original Wonder Wash.
The spin dryer is still going strong, in about the same condition it was in when I bought it nine years ago.
While I do not subscribe to Umberto Eco’s idea of the antilibrary – having too great a collection of unread books is a mental weight that I find uncomfortable – I do have a constant collection of books that I have acquired but have yet to consume.
As previouslymentioned, I manage my e-book library with Calibre. Calibre allows the user to create custom metadata properties, which I’ve taken advantage of to add a simple boolean property called read. This allows me to track which books I have read, filter the library for those books that are unread, and easily queue up the next thing whenever I finish reading a book. It also allows me to know that my Calibre library averages around 20% unread.
First I ask Calibre to dump a CSV of my library, including the fields that are most useful, and filtering only for those books that I have marked as read.
The first character in this file is some sort of Unicode weirdness. I make sure this character and anything like it is stripped from the header row with sed.
I want to display this list in a web page using DataTables, allowing users to perform simple sorting and searching. DataTables can read from a JSON source, so the easiest solution was to use csvkit to convert the output.
This is the genius of what happened with computer networks. Using feedback loops, pattern matching and pattern recognition, those systems can understand us quite simply. That we are far more similar to each other than we might think, that my desire for an iPhone as a way of expressing my identity is mirrored by millions of other people who feel exactly the same. We’re not actually that individualistic. We’re very similar to each other and computers know that dirty secret. But because we feel like we’re in control when we hold the magic screen, it allows us to feel like we’re still individuals. And that’s a wonderful way of managing the world.
Its downside is that it’s a static world. It doesn’t have any vision of the future because the way it works is by constantly monitoring what you did yesterday and the day before, and the day before that. And monitoring what I did yesterday and the day before and the day before that and doing the same to billions of other people. And then looking at patterns and then saying: “If you liked that, you’ll like this”.
They’re constantly playing back to you the ghosts of your own behaviour. We live in a modern ghost story. We are haunted by our past behaviour played back to us through the machines in its comparison to millions of other people’s behaviour. We are guided and nudged and shaped by that. It’s benign in a way and it’s an alternative to the old kind of politics. But it locks us into a static world because it’s always looking to the past. It can never imagine something new. It can’t imagine a future that hasn’t already existed. And it’s led to a sense of atrophy and repetition. It’s “Groundhog Day”. And because it doesn’t allow mass politics to challenge power, it has allowed corruption to carry on without it really being challenged properly.
Lawrence had a talent for employing the Great War’s new technologies: semi-automatic pistols, airplanes, electric detonators, machine guns and motorcars. The equipment used by T.E. Lawrence and his colleagues against the Turks was innovative, as was his untraditional approach to the employment of intelligence, aerial reconnaissance and mobile gun platforms. His methodologies were game-changers and would heavily influence what would later be known as special operations in the British military, not to mention guerrilla leaders such as Mao Zedong and Võ Nguyên Giáp.
This past weekend I visited Onedome’s Unreal Garden, which uses the Microsoft Hololens to attempt to provide an immersive art experience. The technology is glitchy and clearly immature, but it is at a level where the locative art of Spook Country is certainly achievable. We seem to be a ways off from daily integration and wetware implants, but I think the future of AR is promising.
Often referred to as “twig tea” on this side of the Pacific Rim, Kukicha is a Japanese tea made from the roasted twigs of Camellia sinensis. It is my everday tea, and probably my second favorite drink (behind water). I can’t comment on the purported health benefits, but I find the nutty, earthy taste to be enjoyable, and I appreciate that it is very low in caffeine.
I also regularly enjoy green tea, but green tea is the only source of caffeine in my life. This makes it a drink that needs some thought as to total consumption quantity and scheduling (caffeine in the morning or evening is the antithesis of optimizing for sleep). Kukicha I can enjoy anytime, including shortly before bed.
I was first introduced to Kukicha years ago by Vavrek, who I assume found it through macrobiotics. Outside of that community, Kukicha hasn’t seemed to have made significant inroads in the West. I rarely see it in stores. As a result I usually purchase mine from Eden Foods (along with the occasional umeboshi – though that I can also resupply that by pedaling over to Japantown), but I’ve not performed a survey to see if there are better sources available.
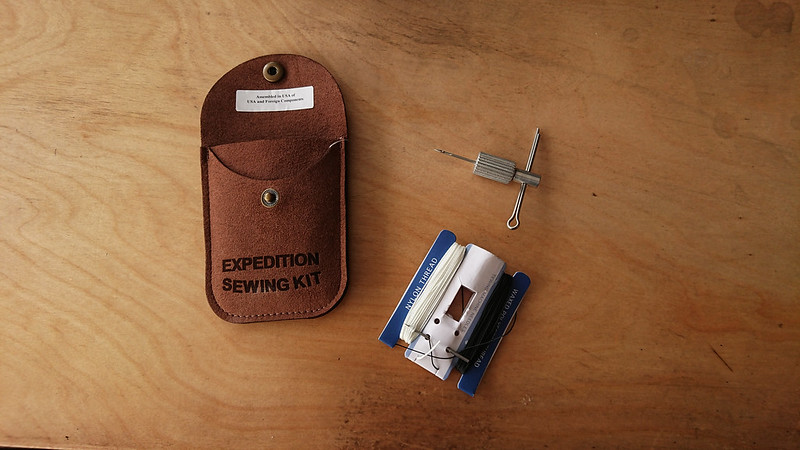
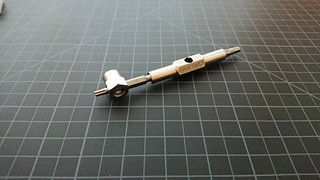
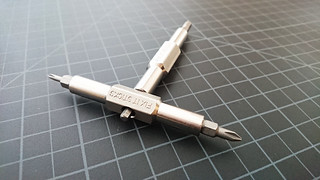
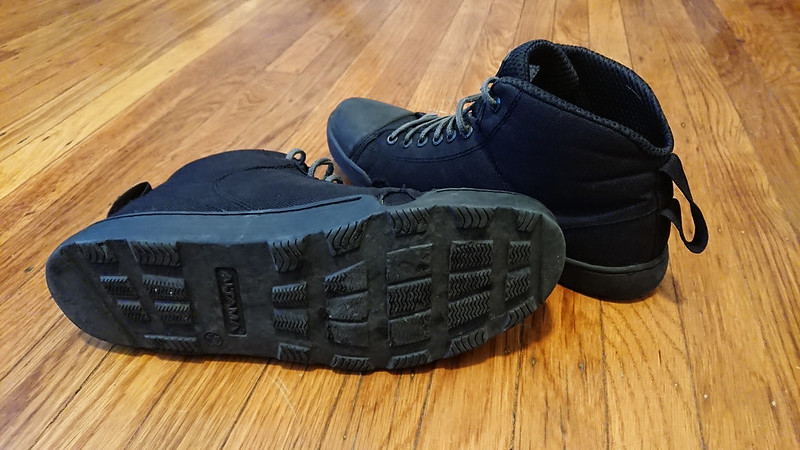
A few months ago I accidentally ripped out the top stitches of the pull tab on one of my Altama OTB boots, making the already-large loop even larger. Normally repairing this would be a job for the Speedy Stitcher, but I decided to use the excuse to try the Patagonia Expedition Sewing Kit.
The Patagonia kit is a reissue of an old piece of kit by Chouinard Equipment. Both the old and new versions come with a chuck that is used to hold a machine needle, and a cotter pin which slides through the chuck to provide a handle. The cotter pin is also intended to aid in rethreading draw strings through a channel on a sleeping bag, pack, or jacket hood.
The instructions included with the Patagonia kit explain the use of both the awl and the cotter pin. Users on the Zombie Hunters forum scanned and cleaned the instructions from the original Chouinard kit, which I have reposted here for comparison. This video also demonstrates the use of an awl for those unfamiliar with the process.
The idea behind the Chouinard awl and the Speedy Stitcher is the same. It provides a way to hold a machine needle, push it through heavy material, and easily create a secure lock-stitch. The immediately apparent difference between the two is in size and weight. The chuck and cotter pin in the Patagonia reissue of the Chouinard awl weigh 10 grams and could fit in the smallest coin pocket. A Speedy Stitcher (with thread, bobbin, and needles removed to make the comparison fair) weighs 64 grams and isn’t going to make the cut in any reasonable backpacking gear list.
I repaired my Altama OTB boots twice so that I could compare the process. First I completed the repair with the Chouinard awl, and then I went back and stitched it again with the Speedy Stitcher. The Speedy Stitcher, living up to its name, was much faster. The primary reason for this is that, between the bobbin within the handle and the thumb tack the thread is wrapped around before going through the eye of the needle, the Speedy Stitcher is able to keep the awl side of the thread under tension when completing a stitch. With the Chouinard awl I had to try to secure the thread with my thumb, which didn’t work terribly well. This made each stitch slower, as I had to carefully manage the tension in order to get a tight stitch but not pull the thread through too far on either side of the project.
Fortunately the solution to this problem was simple and presented itself to me after the boot project. First I tried placing the thread between the two pieces of the cotter pin. This increases tension, but it isn’t so tight that the thread cannot be pulled out. I have taken to doing this and then carefully pulling through the amount of thread I need. When I have the right amount of thread, I cut off a tail that’s an extra few inches long and simply tie it in a clove hitch around the cotter pin. The thread is now as secure as with the Speedy Stitcher and the efficiency of the tool is greatly increased.
DIY
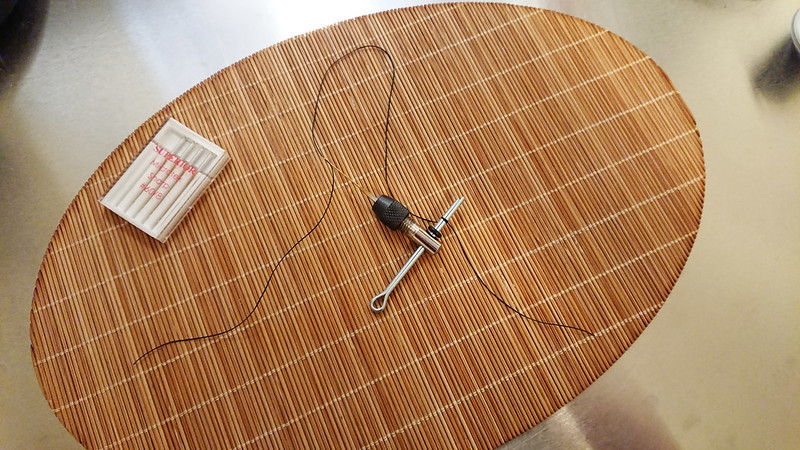
The Chouinard kit was unavailable for many years until Patagonia’s reissue, which has led to people replacing the awl with off-the-shelf components. I thought this sounded like an easy and fun project, and would allow me to return the borrowed Patagonia kit. For the chuck I went with the recommended Mini Keyless Chuck. This comes with a shank that I cut off with a pair of snips, and then filed the cut smooth with the file on a Leatherman. The chuck already has a hole tapped in the side of it, but it is too small to fit a cotter pin or any other useful handle. I drilled this hole out with a 1/8” drill bit, after which it was the perfect fit for a 2.5” cotter pin I found at the hardware store.
The chuck ships with two collets. One is too large to hold any of the needles I tried. The smaller of the two works well.
One of the annoyances I had when using the Chouinard awl was that the chuck would often slide off the cotter pin when both of my hands were occupied on the other side of the project in creating the lock stitch. To solve this for my version, I simply added an O-ring with a 3mm interior diameter to the cotter pin. This prevents the chuck from sliding off the handle, as well as preventing it from sliding over the part of the cotter pin where I have the thread clove-hitched.
This version of the expedition awl – including modified chuck, cotter pin, and O-ring – tips the scale at 13 grams. That is 3 grams heavier than Patagonia’s reissue, but cheap and easy to make. The chuck is also a bit more compact than Patagonia’s.
I’ve used this version of the awl on a couple of small projects, and it works great. It is certainly something I would pack on any kind of extended travel, and for use at home it works just as well as the Speedy Stitcher.
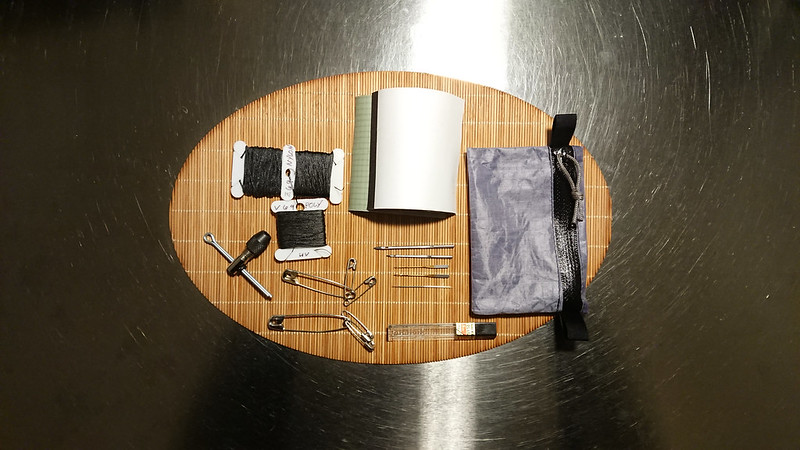
Thread
In order to be able to store thread with the my new awl I purchased a pack of plastic thread bobbins. These have notches to prevent the thread from unwinding, a space to label the bobbin so that you know what thread it contains, and they keep the thread in a flat profile that makes it easy to slide into a small kit.
I chose three different threads to store with the awl. Sunstop V-69 Black Polyester UV from Sailrite, Z-69 Nylon from a spool I bought from Seattle Fabrics something like 15 years ago and have yet to use up, and a waxed nylon thread from Tandy.
Sailrite recommends the UV-treated polyester thread for general outdoor purposes, and the nylon thread for applications where greater strength is wanted but prolonged exposure to the sun is not expected. Between the two I think I have most eventualities covered.
The waxed nylon thread is probably heavier than what I need in a field repair kit given the type of equipment I generally carry, so I may end up removing it.
Needles
For needles, I began with the Straight #4 and Straight #8 from the Speedy Stitcher kit. These are my most frequently used needles with the Speedy Stitcher.
I don’t pretend to understand all the different types of sewing needles out there and when one should use which type, but between these four I feel that I can confidently hack together any kind of field repair I am likely to need.
Despite this kit being built around the awl, I did also add one hand-sewing needle. I’m not sure what size or style it is. I acquired it sometime early in the millennium when I purchased a selection of vintage British sail-making needles (claimed to be from the early 20th century) on eBay. This one is clearly not a sail-making needle – or at least it is much finer than the typical triangular #16 I generally associate with sail-making – but it’s the needle I’ve always come back to for any repair when I have not been using an awl and machine needle.
As I mentioned when discussing my possibles pouch, I’ve always carried repair needles in one of the little plastic cases that you get when you purchase lead for a mechanical pencil. In fact, at some point – probably around the point I became an adult and stopped using mechanical pencils with any frequency – I started purchasing replacement lead just for the containers.
Et cetera
Rounding out the kit is a small selection of safety pins, and three small pieces of Tenacious Tape (black, clear, and green). Despite the fun of using the awl, a small piece of good tape is often a better repair tool for technical materials.
The kit in its entirety weighs 42 grams. In comparison, the complete Patagonia Expedition Sewing Kit weighs 40 grams. I have more and better thread, what I think are probably better needles, and a much nicer pouch to keep it all in. The Patagonia kit does include some different colored thread, but I don’t believe in visual pollution and I think a bit of black thread on earth-tone equipment is fine. Patagonia also includes a needle threader and a couple buttons, but I don’t think those are necessary additions.
All considered I’m very happy with this kit. The original awl from Chouinard Equipment was a great idea, and Patagonia’s reissue is perfectly serviceable. I had fun putting together my own version. It’s an extremely low cost investment that provides a lot of functionality and serves to increase my resiliency on any trip of extended length, as well as being useful at home.
In my experience they are unlikely to be damaged by incidental moisture, whether that be from rain, sweat or the occasional shower. But a single card is small enough that I always worry it will be lost, and it is susceptible to being snapped if carried inappropriately. The Digital Dogtag from N-O-D-E is one of the better solutions I’ve found for carrying a single MicroSD card. It uses a simple spring loaded socket to hold the card securely, and provides enough rigidity that I’m not worried about damaging the card. I added the dogtag to my current APEK iteration this past September and have been happy with the result.
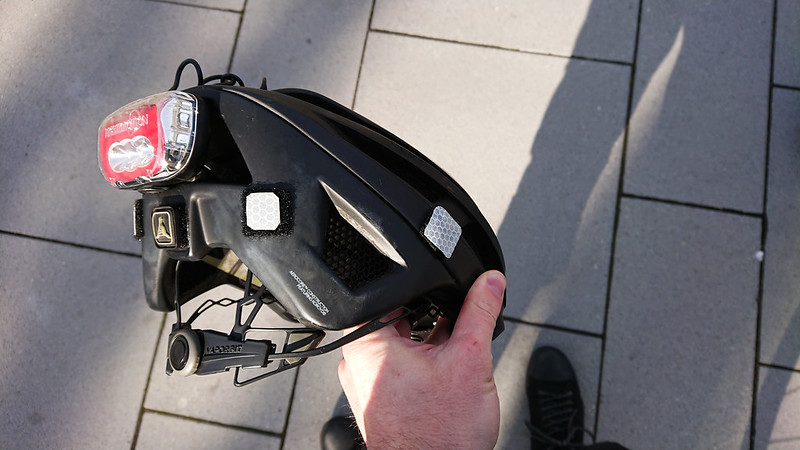
Purchase a roll of 3M Scotchlite 3150A SOLAS Grade Reflective Tape and pack of Velcro 7/8” Squares. Stick a loop square on the tape and trim. The sticky-on-sticky action is unnecessary – sometimes I’ll just place the SOLAS tape on normal, sew-on loop Velcro – but those 7/8” squares are the right size for a ranger eye, and the sticky hook component is useful for putting on whatever object you want to mount the ranger eye too. This can be used to increase side visibility on a helmet, but still give you the option to easily remove the reflective material when you want to decrease visibility.
The story is in the tradition of John le Carré, if John le Carré wrote science fiction, and is well executed on all levels. It includes enjoyable moments of tradecraft, done in a way to communicate something about the characters rather than for the spectacle. I eagerly await the second season.
For earthquakes, I supplement RSOE EDIS with the USGS Earthquake Notification Service, which provides regional-based subscriptions. I subscribe to email alerts for earthquakes greater than 6.0 for all of the US, and greater than 4.0 for my local area.
Apparently this is a phenomena wherein the twatter submits a series of short tweets, each preceded by a sequence number, which when run strung together resembles something that is almost, but not quite, entirely unlike a paragraph, and nearly manages to communicate a complete thought. It is unclear whether users demonstrating this symptom are unaware that there are places on the internet without arbitrary character limits, or if their identity is so heavily invested in a third-party platform that they are simply unable to communicate outside of it. Needless to say, I retreated to saner shores.
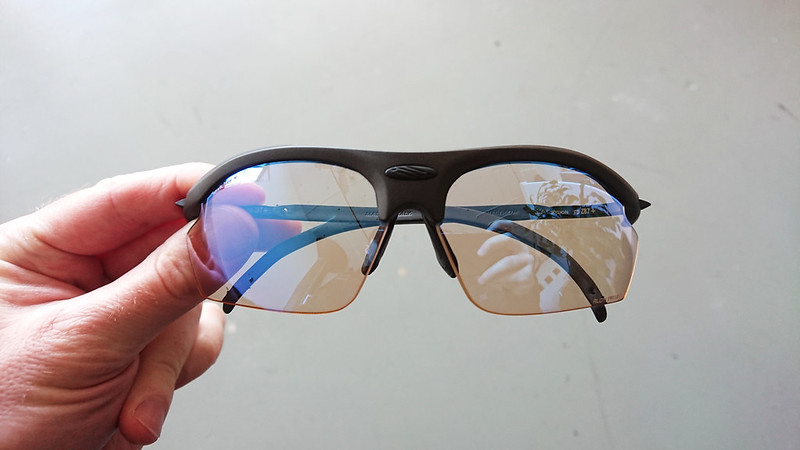
They must offer impact protection. Not protecting my eyeballs has always seemed dumb. Not protecting them after I’ve sunk a few thousand dollars into my cornea would be even dumber. ANSI Z87.1 is a good standard for impact protection, but I will of course happily accept MIL-PRF-31013.
They should offer interchangeable lenses. This is not critical, but it is nice to have. Different lens colors are appropriate in different environments. Good eyewear is usually expensive, which can make purchasing multiple pairs prohibitive. If you do purchase multiple pairs, you still have to carry them, which is much less attractive than carrying one pair of frames and different lenses. Photochromic lenses make the single-lens option more palatable, until you realize that the alternative is interchangeable photochromic lenses.
They should not be butt-ugly.
Prior to PRK, the fourth and most important criteria was that they somehow be prescription compatible. I always assumed this was the most limiting criteria. While recovering from my shine job I lay in bed thinking about eyewear, and assumed that there would be a much wider range of options available to me when I could see again.
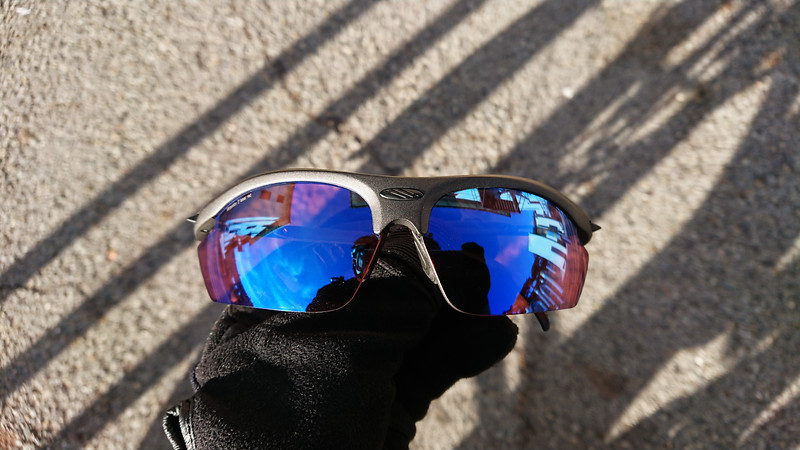
Imagine my disappointment when, after I recovered enough to see a computer, I found that there were actually no compelling new options. Even without the need of prescription lenses, the Rudy Rydon Stealth are still the best thing out there.
Determined to not be so easily dissuaded from spending money, I decided to treat myself to a new pair of lenses for the Rydons. After some consideration I landed on the ImpactX2 Photochromic Laser Red. Red lenses provide excellent contrast and visual depth. I have owned a pair of Rudy’s non-photochromic Racing Red lenses for a while and found them to be the ideal option for overcast days, but their static nature gave them a more narrow window of effectiveness which limited their actual use. The Photochromic Laser Red take the same excellent color and add the dynamism I’ve come to enjoy: the lenses offer 75% light transmission on the clear side and 16% light transmission on the dark side. On the light side that’s actually 1 point higher than the same generation clear-to-black lenses, making them even more appropriate for indoor or night work. On the dark side, that’s right in the middle of the transmission range typical of most sunglasses. The “laser” in the name refers to a light mirrored coating. These aren’t the mirrorshades Bruce Sterling promised you, but the lasering does serve to reduce glare and eye strain by reflecting some of the light away rather than absorbing it. It also adds an attractive bluish sheen.
I bought these lenses last December and I’ve removed them from the Rydons in exactly two situations: on water and on snow. In those environments I think a good, dark polarized brown lens is hard to beat. I opt for the Rudy Polar 3FX. In every other environment I’ve been in over the past year, my preference has been for the Photochromic Laser Red. I wear them whenever I’m on the bike. Even if I’m riding past midnight and it is pitch black, they transmit enough light that I barely notice I have them on. I wear them indoors when things are going bang. I wear them during the equinox when the sun is low on the horizon, pointing directly into my eyes. Like all photochromic lenses, they react to UV light, and so are suboptimal in cars. They will darken, but not completely. I tend to only spend a collective handful of hours per year in cars, so this isn’t a consideration for me.
If I was only going to have one pair of lenses, it’d be these. (But I like interchangeable lenses so I keep the brown lenses in my pack too.)
PRK is a similar procedure to the more popular LASIK. In LASIK a flap is cut in the cornea and set aside, the correction is performed underneath, and the flap is then placed back over the insulted area, providing a natural bandage. The scar from the flap never entirely heals, which is not a problem for most people most of the time. It is a concern if you get punched in the face. I box, which is to say I get punched in the face. In PRK the epithelium is abraded away, the correction performed, and then you just sort of hang out for a few weeks or a few months waiting for the epithelium to regenerate and shed and regenerate a few times – after which point there is no residual effects and you can go back to getting punched in the face, with no more concern than getting punched in the face normally warrants. LASIK was only approved by NASA in 2007, and is still frowned upon at SF HALO and SCUBA schools. The message is clear: if you want to keep the space marine option available, opt for PRK.
I have at times described it as being as if China Miéville had written a book in the Bridge trilogy, with plot devices contributed by Neal Stephenson. Other times I’ve just described it as my favorite William Gibson novel this millenium. Both of which I think communicate the tone of the book and the high regard in which I hold it. With Void Star, Zachary Mason created a sort of ethereal cultural exploration, very Gibsonian in nature, and you won’t like it if you’re reading it for the plot.
The audiobook is also very good. I say this as someone who dislikes audiobooks. Neither audio books nor podcasts fit into my life, and I can count the number of audiobooks I have ever listened to on two hands. But the actors who perform the three main characters of Void Star – especially the woman who voices Irena, who I wish would perform Pattern Recognition – are all perfect in their roles and somehow manage to capture how I imagined the characters when I read the book, which is a thing that I think rarely happens in any adaptation of a book into a different medium. Zachary Mason imbues the prose of his novel with a sort of poetry and rhythm that the actors all capture perfectly. I read the book a second time months after listening to the audiobook and found myself reading it in their voice, emulating their pacing.
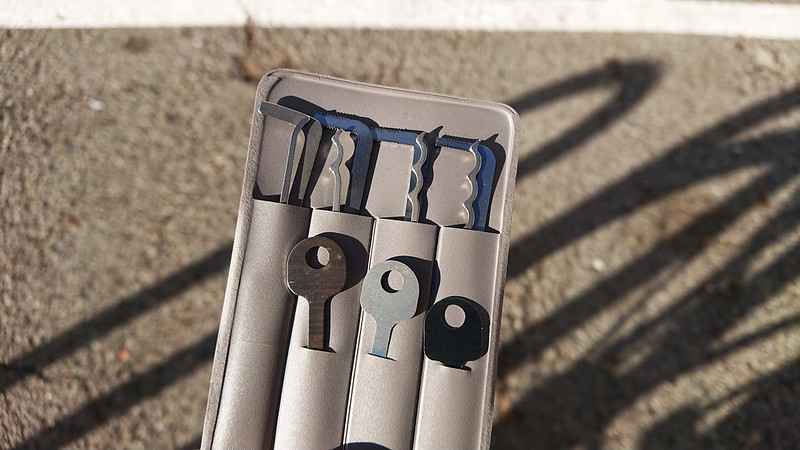
I flew through El Dorado International Airport four times last month. On the final trip security was none too pleased when they spotted the Bogota Pi toolset in my pack. The normal Bogota Titans in my wallet were either missed or deemed not problematic. I found the experience ironic.
The Sparrows Mini Jim met with suspicion, but I just did my smile-nod-no-hablo-español routine and they put it back. One could make a convincing argument that Super Mica Shims are more appropriate for travel.
I first began to use the Schwalbe Marathon Supremes six years ago. Since then I have tried a few other tires, but within a couple months I invariably end up coming back to the Marathon Supremes. They ride well, only get maybe one or two flats per year, and I appreciate the visibility of the reflective sidewall. I tend to replace them after somewhere around a year of use – I think the set I removed today were in service for 15 months. I don’t track miles, so I don’t know what sort of distance the tires get me, but it’s up there. They aren’t cheap, but they’re worth it for the contribution they make to my everyday mobility.
I signed-up for Pinboard in 2014. It provides everything I need from a bookmarking service, which is mostly, you know, bookmarking. I pay for the archival account, meaning that Pinboard downloads a copy of everything I bookmark and provides me with full-text search. I find this useful and well worth the $25 yearly fee, but Pinboard’s archive is only part of the solution. I also need an offline copy of my bookmarks.
Pinboard provides an API that makes it easy to acquire a list of bookmarks. I have a small shell script which pulls down a JSON-formatted list of my bookmarks and adds the file to git-annex. This is controlled via a systemd service and timer, which wraps the script in backitup to ensure daily dumps. The systemd timer itself is controlled by nmtrust, so that it only runs when I am connected to a trusted network.
This provides data portability, ensuring that I could import my tagged URLs to another bookmarking service if I ever found something better than Pinboard (unlikely, competing with Pinboard is futile). But I also want a locally archived copy of the pages themselves, which Pinboard does not offer through the API. I carry very much about being able to work offline. The usefulness of a computer is directly propertional to the amount of data that is accessible without a network connection.
To address this I use bookmark-archiver, a Python script which reads URLs from a variety of input files, including Pinboard’s JSON dumps. It archives each URL via wget, generates a screenshot and PDF via headless Chromium, and submits the URL to the Internet Archive (with WARC hopefully on the way). It will then generate an HTML index page, allowing the archives to be easily browsed. When I want to browse the archive, I simply change into the directory and use python -m http.server to serve the bookmarks at localhost:8000. Once downloaded locally, the archives are of course backed up, via the usual suspects like borg and cryptshot.
The archiver is configured via environment variables. I configure my preferences and point the program at the Pinboard JSON dump in my annex via a shell script (creatively also named bookmark-archiver). This wrapper script is called by the previous script which dumps the JSON from Pinboard.
The result of all of this is that every day I get a fresh dump of all my bookmarks, each URL is archived locally in multiple formats, and the archive enters into my normal backup queue. Link rot may defeat the Supreme Court, but between this and my automated repository tracking I have a pretty good system for backing up useful pieces of other people’s data.
A metaphor can help understand the role of sleep and why alarm clocks are bad. We can compare the brain and its NREM-REM sleep cycles to an ordinary PC. During the day, while learning and experiencing new things, you store your new data in RAM memory. During the night, while first in NREM, you write the data down to the hard disk. During REM, which follows NREM in the night, you do the disk defragmentation, i.e. you organize data, sort them, build new connections, etc. Overnight, you repeat the write-and-defragment cycle until all RAM data is neatly written to the disk (for long-term use), and your RAM is clear and ready for a new day of learning. Upon waking up, you reboot the computer. If you reboot early with the use of an alarm clock, you often leave your disk fragmented. Your data access is slow, and your thinking is confused. Even worse, some of the data may not even get written to the disk. It is as if you have never stored it in RAM in the first place. In conclusion, if you use an alarm clock, you endanger your data.
With climate change, humans are beginning to appreciate that cities are not separate from the environment. They are environments. We should also recognize that the rural is, at least in part, man-made. Cities approaching the changes already in motion with a sense of the Earth as a biological network, rather than adopting psychological siege positions, will be essential for survival. Technology and engineering will need to be deployed in what is currently regarded as wilderness. In turn, what seems rural will have to be deployed in cities: rooftop and vertical gardens, wetland buffer zones, greenery as a sponge for rising waters, and towers that channel polluted air into greenhouses…
One of the things I vainly enjoy about e-books is that I can choose my favorite covers and apply them to whichever edition of the book I happen to have. The cover of a book sets its mood, and browsing through these covers in the Calibre grid offers remembered fragments of the worlds within.
For Joseph Conrad’s Heart of Darkness I use the Vintage Classics cover, slightly modified.
I don’t recall where I acquired the cover for my omnibus The Lord of the Rings.
Sometimes the editions I purchase come with enjoyable covers. I have a few of William Scott Wilson’s translations of historical Japanese works, and I find the covers used for his books by Shambala Publications aesthetically pleasing.
As previously mentioned, I like e-books. Unfortunately many books are still only available as dead trees. Fortunately, the internet provides book scanning services.
These services will professionally scan a book and run the images through an OCR program. The output is usually a PDF. This is a poor format for something like a novel, where you want the text to be able to dynamically reformat itself and flow across pages, but it remains a good choice for technical and reference books, where the layout of the page tends to be fixed around things like tables and graphs.
A couple years ago I tried two book scanning services: Custom Book Scanning and 1DollarScan. Both offer destructive book scanning services, meaning they cut the spine off of the book to ensure a well orientated scan. The output from both services was similar, but since that first trial I’ve come back to Custom Book Scanning rather than 1DollarScan. I appreciate that they perform the scan at 1200 dpi, which is higher than necessary for text but can be useful for documents that include photographs. In addition to the customary PDF, they also include a Microsoft Word document, and will provide e-book formats such as EPUB and MOBI for additional cost.
In my experience the OCR performed on these scans is completely adequate for searchability, which is my main requirement for the scans to be useful. It is not good enough to output something in EPUB or MOBI. Don’t expect to run pdftotext on the document and extract anything that does not require heavy editing by a human, but you’ll certainly be able to point pdfgrep at the file and get useful output.
As an example, here is a PDF extract of the first few pages of Botany in a Day by Thomas J Elpel (7MB). It demonstrates the sort of output one can expect from these services. The full book, with all of its figures and color drawings is 155MB. Botany in a Day is also exemplary of the type of book I find it worthwhile to scan. It’s a book I first read years ago and will probably never read again cover-to-cover, but it has remained on my bookshelf for over a decade because it is an occasionally useful reference. It is worth keeping around, and a digital copy makes it even more valuable: it can be searched, and easily carried with no space or weight penalty.
So far I have not actually sent any of my books in to be scanned. Instead, I’ve purchase new – that is to say, new to me – copies of the books online and have them shipped directly to the scanner. Used books in like-new condition can generally be found fairly cheaply. In the case of reference books, this has often let me upgrade to a newer edition than the one that I previously owned (such was the case with Botany in a Day). But mostly this is just so that I get a clean scan, without worrying about any notes or dog-eared pages that I may have in my old copies. After I receive the PDF, I give away my old hard copy.
Scanning has allowed me to reduce my physical book collection more than would otherwise be possible. I still own books that have yet to be published digitally and that don’t lend themselves to scanning – I am patiently waiting for whatever luddite owns the publishing rights to AB Guthrie Jr to produce digital versions of his books, as I have no expectation that OCR would be able to deal with the mountain man slang – but I’m glad to have these services available.
The Kindle Paperwhite has been my primary medium for consuming books since the beginning of 2014. E Ink is a great display technology that I wish was more wide spread, but beyond the fact that the Kindle (and I assume other e-readers) makes for a pleasant reading experience, the real value in electronic books is storage.
At its peak my physical collection was somewhere north of 200 books. As I mentioned years ago I took inspiration from Gary Snyder’s character in The Dharma Bums and stored my books in milk crates, which stack like a bookcase for normal use and kept the collection pre-boxed for moving. But that many books still take up space, and are still annoying to move. And in some regards they are fragile – redundant data storage is expensive in meatspace.
My digital library currently sits at 572 books and 13 gigabytes (the size skyrocketed after I began to archive a few comics). I could not justify that many physical books in my life. I still have a collection of dead trees, but I’m down to 3 milk crates. I store my digital library in git-annex, allowing me to redundantly replicate my collection across the globe, as well as keep copies in cold storage. I also burn yearly optical backups of the library to M-DISC. The library is managed with Calibre.
When I first bought the Kindle it required internet access to associate with my Amazon account. Ever since then, it has been in airplane mode. I spun up a temporary wireless network for the setup that I then deleted after the process was complete, ensuring that even if Amazon’s airplane mode was untrustworthy, the device would not be able to phone home. The advantages of giving the Kindle internet access seem minute, and are far outweighed by the disadvantage of having to trust Amazon.
If I purchase a book from Amazon, I select the “Download & Transfer via USB” option. This results in a crippled AZW file. I am under the radical delusion that I should own what I purchase, so I import that file into Calibre using the DeDRM_tools plugin. This strips any DRM, making the book ready to be consumed and archived. Books are transferred between my computer and the Kindle via USB, which Calibre makes simple.
When I acquire books through other channels, my preferred format is always EPUB: an open format that is simply a zip archive of HTML files. Calibre’s built-in conversion tools are quite good, giving me confidence that any e-book format I import into the library will be readable at any point in the future, but my preference is to store data in formats that are open, accessible, and understandable. The closer one gets to well-formatted plain text, the closer one gets to god.
While the Kindle excels at the linear reading of novels, I’ve also come to appreciate digital copies of reference books and technical manuals. Often the first reading of these types of books involves lots of flipping back and forth, which is easier in the dead tree variant, but after that first reading the searchability of the digital copy is far more useful for reference. The physical size of these types of books also makes them even more difficult to carry and store than other books, all but guaranteeing you won’t have access to them when you need to reference them. Digital books solve that problem.
I’m confident in my ability to securely store digital data. Whenever I import a book into my library, I know that I now have permanent access to that knowledge for the rest of my life, regardless of environmental disaster, the whims of publishing houses, or the size of my living quarters.
I mounted the saddle at 15,000 feet. Thin air for pushing pedals – everything feels like uphill, until it is, then it feels like something worse – but I like to think it might have prepared me somewhat for the oxygen deprivation of my recent respirator trials. Integrating some sort of hypoxic training into a PT regime may be worth considering.
I’ve taken advantage of the recent fires to perform more respirator trials. I use the respirators when getting around town on my bicycle, which provides a good analog for any aerobic activity, allowing me to evaluate things like breathability, humidity within the respirator, and how well the seal performs when contaminated air is being blown over the respirator at high speeds. I’ve found there are certain characteristics that I desire in a respirator.
Rating
The standard respirators that are most worth considering are N95. The “N” designates that it is not resistant to oil. The “95” designates that it filters 95% of particles 0.3 microns or larger.
After the BP oil spill in 2010 I purchased a P100 respirator. These respirators filter 99.97% of particles, and are “strongly resistant” to oil. They are large, bulky cartridge respirators that are great to keep at home, but you are not going to carry them around.
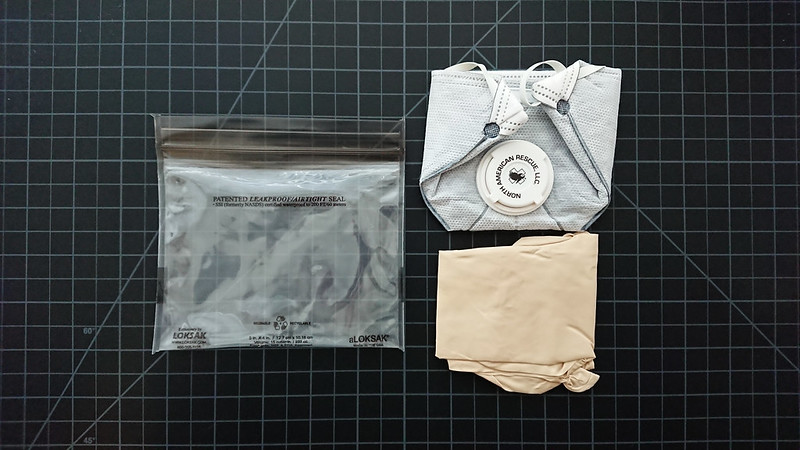
Recently I purchased a box of R95 respirators. These are more similar to the N95 than the P100, but are “somewhat resistant” to oil. They have a service life of 8 hours in environments with airborne oil particles, which is long enough for me to get to my P100 respirator. Unfortunately the R95 respirators are quite a bit thicker than the N95. They could be easily carried in a bag, but they are too thick to fit in my PPE kits (without moving to a larger aLOKSAK). I’m splitting the R95 respirators between home and work, but will continue to carry N95 respirators in my kits.
Back in 2007, when I first started researching respirators, I came across an adhoc study comparing these ratings against common household materials:
I recently assisted in a study to determine how available materials compared to P-100 respirator cartridges. Cartridges were opened, the contents removed, and a series of different materials were attached to the cartridges. The cartridges were installed onto standard North full-face respirators. A Certified Industrial Hygenist performed fit testing on the mask assembly using a standard quantitative fit testing machine, the one that compares particle counts inside the mask to ambient air particulate counts.
The materials tested were:
coffee filters, 1 layer;
t-shirt fabric (knitted fabric), folded into 8 layers, wet, dry, and oiled with petroleum jelly;
bandanas(woven fabric), folded into 8 layers, wet, dry, and oiled with petroleum jelly;
a HEPA vacuum cleaner filter, dry.
We boiled the cloth to shrink it before testing.
The performance of the coffee filter, HEPA filter, and the dry fabric was terrible. Abysmal. Worthless. Bad.
The wet fabrics were a bit better, but still bad. Why firefighters use wet bandanas to filter smoke is beyond me. They are practically worthless.
The HEPA filter was so moisture-resistant that the mask fogged up to where you couldn’t see out. And it didn’t perform that well. Perhaps its stiffness made the seal leak, it really should have done much better.
But the 8-layer oiled bandana and oiled t-shirt performed about 80% as well as the P-100 filter, and in fact passed about half the tests. This makes it equivalent to about a N-90, which is 90% as good as a N-95 filter. It was nothing short of amazing how well the oiled fabric filtered air.
Now it’s interesting that there is a report (page 1, page 2) from WW1 that a doctor on a troop ship made everyone wear oiled gauze masks, and did not lose a single person on the trip across the Atlantic.
Using an old-style cloth surgical mask and oiling it with petroleum jelly increases its filtration efficiency something like 1000 times. And oiled cloth filters actually filter better the dirtier they get, until they clog up. They are used in high-perforance cars.
Oh, and I suppose I ought to admit it was my kid’s science fair project.
Harness
Most respirators either have a single continuous harness that goes around the crown of the head and back of the neck, or two separate straps. I’ve not noticed a significant difference between these two options, though the single continuous harness can easily be adjusted for smaller heads with a single knot.
The two-piece harness is usually attached to the respirator via staples, the penetration of which may reduce the efficacy of the respirator, but only if the puncture results in a tear.
When staple punctures tear holes in the filter medium, the concentration of particles leaking through those openings is considerable and resembles face seal leakage… The findings of this study suggest that stapling head straps directly onto the filtering material of a respirator has the potential to create leaks in amounts similar to that of face seal leaks.
I look for a textile harness. Cheaper respirators use thin rubber bands. For single use these are adequate, but they snap if you are frequently donning and doffing the respirator.
Valve
A valve to vent exhalation is critical. Non-vented respirators are useless to me. Even if all you’re doing is sitting around not moving, the non-vented respirator will build up humidity over time, making long-term wear quite uncomfortable. Add in any physical activity and the process is accelerated.
At a minimum the vent should be closed at the top of the respirator. This prevents the warm, humid air from moving directly up and fogging your eyewear. On some respirators, the vent is closed on both the top and sides, forcing the exhaled air to escape downwards only. This is desirable.
Non-vented respirators are appropriate in healthcare environments when sterility needs to be maintained. That is to say: where you are concerned about your exhalation impacting the sterility outside the respirator, not the other way around. Vented respirators meet the same protection requirements as their non-vented counterparts.
If you’re worried about keeping your operating theater sterile, get a respirator without a valve and embrace the suck. Otherwise don’t.
Fold-Flat
I want to carry the respirator, which means I need to be able to fold it flat. There are two variants of fold-flat respirators: those that fold vertically along the center, and those that fold horizontally.
A center fold respirator provides more volume across the front of the face. When a respirator fits properly and provides a good seal, it should collapse slightly due to suction when inhaling during aerobic activity. When wearing a center fold respirator, this collapse happens along the cheek area. I find I tend not to notice it. With a horizontal fold respirator the collapse is more likely to happen across the front. The respirator touches my lips with each heavy inhalation, so I constantly notice it. I do not think there is a functional difference here, but it is a factor in long-term comfort.
A horizontal fold respirator can be more comfortably pulled down below the chin. A center fold respirator can not (unless perhaps you have an unusually long neck). If you need to temporarily remove the respirator – perhaps to take a drink – it can still be pushed down, such that the nose clip rides on the chin. I find this uncomfortable for more than a brief period of time. When the air quality index (AQI) is red or worse (151+), I generally want to wear the respirator whenever I’m outdoors. When the AQI is orange (101-150), I don’t feel I need a respirator if I’m just walking or standing outdoors, but I do want it when I’m breathing heavily. It’s in these conditions that I appreciate the ability to wear a horizontal fold respirator pulled down on my neck. I can easily (and quickly) pull it up when I begin breathing more heavily (ie, when I get on the bike). With a center fold respirator I’m more likely to temporarily store the unused respirator in a pocket, increasing the time requirement to don it.
Horizontal fold respirators place the valve in the center. On center fold respirators, the valve is offset to one side. When using horizontal fold respirators, I find that close-fitting eyewear is more likely to fog if I’m not moving (when moving more than a few miles per hour, air flow across the eyewear eliminates any fogging). I experience less fogging with center fold respirators. I’m not sure if this is due to the position of the valve – perhaps the offset valve encourages the warm, moist exhalations to be vented to the side, rather than immediately up to the lenses – or due to the seal. A center fold respirator, I find, provides a superior seal across the top of the face because the respirator naturally wants to pinch the bridge of the nose and hug the cheeks.
Color
Most disposable respirators are white. Some come in gray. The fashion market offers respirators in dark colors and patterns. These look cool, but I prefer white. White shows dirt, encouraging me to replace the respirator more frequently than I probably otherwise would. Despite the lack of a NIOSH standard for respirator reuse (including those labeled “single use” by the manufacturer), particle build up on the surface of the respirator will increase pressure, which will increase leaks. If you’re using the respirator out of concern of influenza or flu, the color of the respirator is probably irrelevant. For smoke and other pollutants that leave visible residue, white may be better.
Recommendations
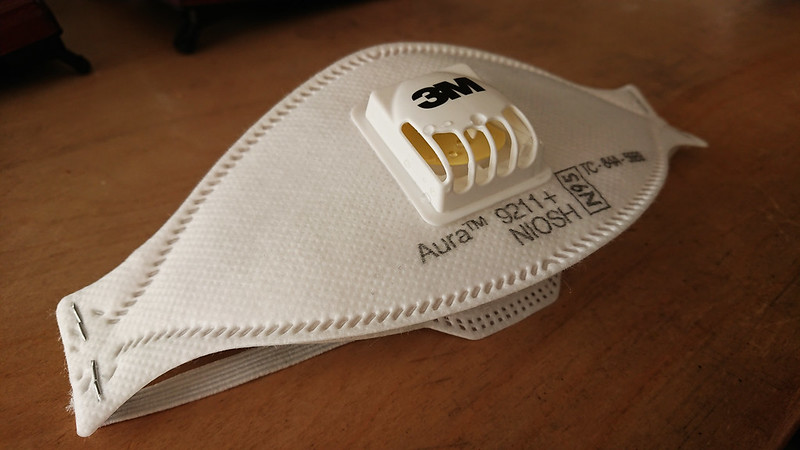
3M has a large, sprawling product line that seems to have a lot of redundancy and overlapping offerings. The 3M Aura 9211+/37193 checks most the boxes and is the nicest horizontal fold respirator I’ve used. The material is about 1.5mm thick, and the valve sits about 15mm off the face of the respirator at its tallest point. The wings easily fold in, allowing the respirator to fit in a small aLOKSAK for one of my PPE kits. Because of how the respirator folds, when the wings are folded in, the thickest part of the respirator excluding the valve is 13mm. I feel the respirator is a bit loose around my chin and jaw, but the seal still seems effective. Condensation becomes visible on the outside of the valve, which shows you it is working. The material that makes up the upper portion of the respirator has a perforated layer between inner and outer shells, which I imagine contributes to the respirator’s breathability, but this upward facing exhaust causes the respirator to fog eyewear a bit more than it otherwise would. The center portion of the respirator has some sort of stiff interfacing that feels a bit like a thin foil. This stiffness seems to prevent the suction collapse I usually experience with horizontal fold respirators (although the perforated upper portion and the loose fit on the lower portion of the respirator could also contribute to this). The harness is two pieces, textile, and stapled.
The Dräger X-plore 1760 is a vented, center-fold R95 respirator. It is the highest quality respirator I’ve tried. Being an R95, it is too thick to fit into my PPE kits. The material is 3mm thick. Folding along the center line, and then folded again such that it would be the right dimensions to fit in my desired aLOKSAK, it ends up being 18mm thick (excluding valve), which doesn’t work. The valve sits about 11mm off the face of the respirator. If you want some oil resistance, and don’t need to fold the respirator more than once, this is an excellent option. I stay significantly more comfortable underneath this respirator than others. It has a tight seal on my face that provides good suction on inhalation, and you can hear and feel the valve flutter on exhalation. Condensation becomes visible on the outside of the valve, which shows you it is working. I have attempted to fog the lenses of my Rudy Rydons while wearing this respirator, and failed. They only fog when I break the seal of the respirator to adjust its placement. It has a single-piece, continuous, textile harness.
After discovering how great the 1760 was, I purchased the Dräger X-plore 1750, hoping that it would be the same thing but thinner. That ended up being exactly what it is. This respirator is the N95 variant, which explains the difference in thickness. It is just under 2mm thick. Folded to fit in the aLOKSAK, the thickest part of the respirator excluding the valve is 7mm. I find myself leaning toward center fold respirators, and this is a perfect center fold N95. If you just want to buy a box of respirators and be done with, I’d recommend getting these.
Dräger also produces a version of the 1760 with activated carbon that I would like to try. If it isn’t any thicker than the standard 1750, the extra odor protection provided by the activated carbon could be a nice bonus. My respirator budget is depleted for now, and I have more than I need for a while, so you’ll have to wait until a future fire season for a review of that one.
My P100 respirator is a 3M 6391. It has not seen much use, as I’ve yet to be in an environment where it is needed. I’m as happy as I can be given the limited wear time I’ve logged with it over the past 8 years. You’ll have to wait until the next oil spill before I can give a meaningful review. One consideration worth keeping in mind when shopping for a respirator like this is that the height of the nose piece can interfere with some eyewear.
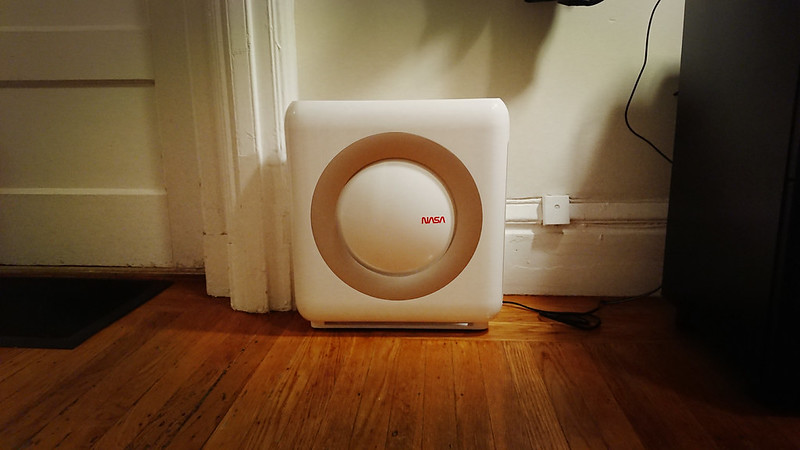
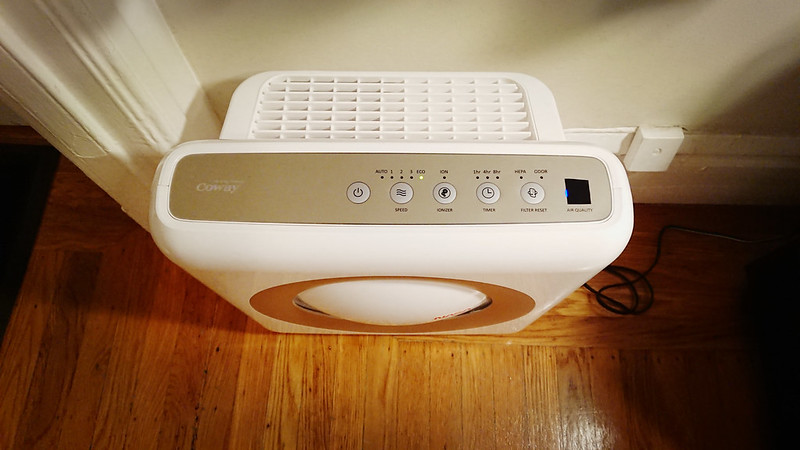
The unit has three different filters: a pre-filter intended for large dust particles, hair, and the like; a carbon filter to remove odors; and a HEPA filter that does the heavy lifting.
The pre-filter I clean by vacuuming every 4-6 weeks (when I think of it). The carbon filter I’ve never attempted to clean. The HEPA filter has a 12-month lifespan. The air quality sensor is also supposed to be cleaned every couple months. I’ve cleaned this once, after about 8 months of service, when I noticed that the unit was constantly registering a high pollution level that I disagreed with. Cleaning the sensor immediately fixed the problem.
The Coway is supposed to light an LED when the HEPA filter needs replacing. My unit has been in use for 12 months now, and that LED has never turned on. I’m not sure why that is, but since the replacement cycle is yearly, and the LED alert is nothing more intelligent than a timer, I simply offloaded the problem to taskwarrior.
$taskaddproject:airdue:2018-12-15recur:yearlywait:due-8weeks"replace Coway AP1512HH filter set (3304899)"
The filter detects pollution and, when placed in automatic mode, adjusts the fan speed appropriately. The current pollution level is indicated by a ridiculously bright LED that can light up a whole room. I’ve placed a piece of tape over this. This is necessary if the unit is in the same room that you sleep in.
I’ve enjoyed using the filter throughout the year. It takes care of cooking smells, so that I’m not smelling my dinner all night. I assume the copious dust I clean out of its pre-filter would otherwise end up in my lungs. At its lowest two settings it is quiet enough to leave on overnight, providing pleasant airflow even if I don’t need the filtering. During the cooler months when I don’t want the extra airflow, I keep the unit in “eco” mode, which disables the fan module when no pollution has been detected for 30 minutes.
However, I had not felt that the cost of the unit justified what I was getting out of it, until California caught fire again. Since last Thursday San Francisco has been inundated with smoke, requiring the use of a mask during outdoor activity. But I’ve had clean, clear air indoors. I tried turning the Coway off for a few hours when the Air Quality Index was in red. The difference was immediately noticeable. I don’t have any measurements to measure the efficacy of the unit on wildfire smoke, but in my qualitative experience, it makes a huge difference.
Living in an area where air quality can become tainted – which, given climate change, seems to be most areas of human habitation – I think a personal air filtration system is as important as water filtration and storage. It is the kind of thing you won’t spend much thought on until you need it, at which point its presence or absence can make a significant impact on quality of life.
I have not used any other air filter, so I’m not sure what the best option is, but I have no complaints about the Coway AP-1512HH beyond the LEDs. This past week has moved it from the would-not-purchase-again category firmly into my would-purchase-again-immediately category.
Recently I went through my Eneloop batteries, cycling those that I keep in devices. I decided to purchase another pack of AA and AAA batteries, not because I needed to replace any but because I have more devices to power. After ordering the new batch, I realized this was the first time I had purchased AA batteries in seven years. (I had purchased AAAs more recently – three years ago – again not to replace any, but because I needed more.) My seven year old batteries are still in service and hold on average 85% of their factory charge. I don’t intentionally cycle through the full set of batteries, so some sit in storage holding their charge for years.
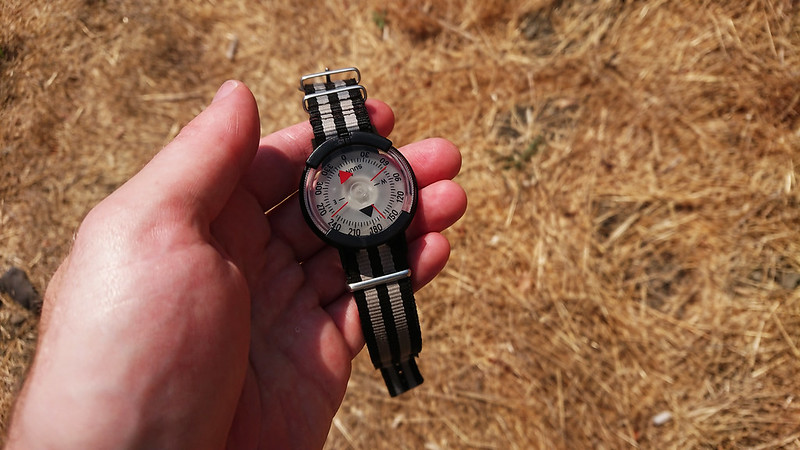
I wanted a compact compass for an upcoming trip. Not a real orienteering compass, but something more than a button compass like Suunto Clipper. I ended up with the Suunto M9. At 1.5 inches in diameter, it is roughly the size of a small watch. It features 5 degree gradations and a sighting notch for rough bearings. A ratcheting face with orientation indicators allows you to set direction of travel. To work with the sighting notch and window, the compass card uses a reverse numbering scheme: instead of looking at 12:00 to read your bearing, you look at the 6:00 position. This is unintuitive at first, but easy enough to adjust to. Suunto advertises the compass as waterproof, and the bastion of truth that is the Internet claims it to be divable to at least 200 feet. Tipping my scale at 10 grams, the M9 packs an impressive amount of capability for its miniscule size and weight.
Unfortunately, the Velcro strap it comes with is garbage. It’ll hold it on your wrist, but it is uncomfortable and I question the longevity and security of the attachment after prolonged exposure to mud, sweat, blood, and the tears of my enemies. Fortunately the M9 has 19mm lugs, which matches an old watch I had about a decade ago. I dug out the NATO Regimental strap I had used on that watch, threaded it onto the M9, and now I have a wrist compass I can feel pretty good about.
I only wish it had a global needle, but that would probably require a larger housing.
I’m on my third pair of SKD PIG Alpha Gloves. My previous two pairs have lasted around 15 months. This current pair is on track for the same.
The gloves are lightweight, synthetic, and highly dexterous. While wearing them I am able to tie my shoes, pick up a penny, and load a .22 caliber magazine – all reliable tests for the dexterity of any glove. I wear the PIG Alpha Gloves every day on the bike, and am happy with the 15 month lifespan given both the intent of the glove and their cost.
They are a mechanics gloves, and should be compared to things like the Mechanix Original Covert. The Mechanix were my every day glove prior to purchasing my first pair of PIG Alpha Gloves in 2014. I find that the dexterity is the same in both, but the PIG Alpha Gloves are more comfortable and a bit more durable.
The greatest selling point of the PIG Alpha Gloves over most Mechanix models is the touch-screen compatible fingers. In earlier generations, SKD accomplished this by sewing silver thread into the index finger. This worked when the gloves were new, but quickly failed as the thread became dirty and began to fall out. SKD fixed this a couple years ago by replacing the silver thread with a conductive synthetic suede on the index finger and thumb. I’ve found that this works great, and continues to do so until the whole glove fails.
When the glove does begin to fail, it does so in the fingers. The fingers and palm are covered in ventilation holes, which slowly grow as the glove is abused. After this I find the stitching in the fingers will start to blow out. At that point I move on to the next pair.
The lightweight, synthetic materials of the PIG Alpha Gloves stay acceptably cool in hot weather. They’re not as cool as wearing no glove, and my hands will sweat wearing them, but I’ve never found them so uncomfortable that I want to take them off. The gloves provide no protection from the rain, but they dry within a few hours of being soaked.
Paracord loops on each cuff allow the gloves to be easily secured when not in use. I cut the D-ring off of the left shoulder strap of my Litespeed and replace it with an ITW Grimloc. This is where the gloves live when I’m off the bike.
The gloves do run a little small. I wear a size medium in just about every glove out there. In the PIG Alpha Gloves, size large fits me perfectly.
I purchased a pair of Magpul Core Technical Gloves back in 2015 when Magpul got into the glove game. These are meant to be in the same category of lightweight, dexterous, mechanics glove as the PIG Alpha Gloves and Mechanix, but I found them to be inferior to both offerings. The lack of adjustability in the wrist makes them annoying to put on and take off. The thicker material cuts down on dexterity (while probably improving durability) and makes them too warm to wear in hot weather. The touch screen finger tips are unreliable when the glove is dirty.
Dexterity and durability are inversely related in a glove, but the SKD PIG Alpha Gloves find a happy medium for my use. For poor weather conditions or mountain excursions, I still like gloves like the Kuiu Guide Gloves, but the mechanics glove is a better style for every day use. Right now I think the PIG Alpha Gloves are the best glove of this type on the market. I’ll continue to wear them every day and replace them every 15 months.
We took a short hike up to Ground Equipment Facility J-33 on the West Peak of Mt. Tam. This was the first time I’d been back up there since Field Day 2017. I was able to get two contacts on 2 meters with my VX-8DR, and another two on 20 meters with one of the other operator’s KX3. The club has more photos.
Last October I bought an Elecom HUGE trackball for use at home. I liked it enough that a month later I bought a second one to replace my CST LaserTRAC at work. Elecom is a Japanese company which has a reputation for making nice trackballs that tend to be a little too small for typical Western-sized hands. The HUGE is their answer to that. It’s a well-sized trackball with a smooth operation and a nice selection of buttons, all of which are supported by the Linux kernel.
The HUGE can be made even more comfortable by tilting it. This elevates the ball, leaves the wrist in a slightly more natural position, and also helps to address the position of the scroll wheel, which is otherwise slightly too far back. Some people have printed stands to hold the trackball at an angle. About a month ago I saw someone tilt the HUGE using aluminum keyboard feet. I thought that looked like a great idea and easier than trying to get something printed, so I went to AliExpress and ordered a pair of black feet from one seller and a pair of red feet from another.
When the feet arrived I attached them with hook and loop squares so that I could expriment with different positions and take them off if I didn’t like them. The position that I’ve settled on provides a comfortable angle, and the trackball still remains stable during use. I think it’s a great improvement. If you own a HUGE, it’s worth picking up a couple feet to elevate your ball.
Last year I demonstrated setting up the USB Armory for PGP key management. The two management operations I perform on the Armory are key signing and key renewal. I set my keys to expire each year, so that each year I need to confirm that I am not dead, still control the keys, and still consider them trustworthy.
After booting up the Armory, I first verify that NTP is disabled and set the current UTC date and time. Time is critical for any cryptography operations, and the Armory has no battery to maintain a clock.
I perform each renewal in a directory specific to the current year, but the GNUPGHOME directory I set for this year’s renewal doesn’t exist yet. Better create it.
$mkdir-p$GNUPGHOME
$chmod700$GNUPGHOME
I keep a copy of my gpg.conf on the microSD card. That needs to be copied in to the new directory, and I’ll need to tell GnuPG what pinentry program to use.
When performing the actual renewal, I’ll set the expiration to 13 months. This needs to be done for the master key, the signing subkey, the encryption subkey, and the authentication subkey.
$gpg--edit-key$KEYID
trust
5
expire
13m
y
key1
key2
key3
expire
y
13m
y
save
That’s the renewal. I’ll list the keys to make sure they look as expected.
$gpg--list-keys
Before moving the subkeys to my Yubikey, I back everything up. This will be what I import the following year.
When I list the secret keys, I expect them to all be stubs (showing as ssb>).
$gpg--list-secret-keys
Of course, for this to be useful I need to export my renewed public key and copy it to some place where it can be brought to a networked machine for dissemination.
I purchase a modified StarLyte a couple years ago but haven’t used it much. It burns well but is difficult to light with a spark unless it is slightly overfilled. The Kojin takes a spark easily. It is lightweight, durable, can be snuffed with its lid, and holds enough fuel for a short overnight trip. I haven’t measured fuel consumption or boil times, but it seems difficult to find anything to fault with the Kojin. I doubt I’ll carry a 12-10 with my Ti-Tri again.
Fix It Sticks are 1/4” magnetic bit drivers, originally intended as bicycle repair tools. Each stick holds two bits, and can be used individually or connected together in a “T” when more torque is wanted.
I backed the Fix It Sticks Kickstarter campaign back in 2014, selecting the $99 pledge level for the titanium Fix It Sticks reward. For the past 4 years, the titanium Fix It Sticks have been part of my EDC. I carry them with a selection a bits optimized for bike repair, as well as a few supplemental bits that are not intended for my vehicle, but are useful to have on hand for general screwing. Extra bits are carried in a Toolcool bit holder.
At home I have an excessive collection of 1/4” bits, including things like socket adapters, extensions, and the Fix It Sticks Glock kit. What’s most attractive about the bit and driver system to me is that these 80-some bits take up a miniscule fraction of the space that I would otherwise need for the tools. I keep a Wera Kraftofmr 816 RA driver at home for those times when I want something that ratchets, but the Fix It Sticks are what I pull out the vast majority of the time.
At work I keep some additional bits, along with a few other tools, in a GPP1. Some of these duplicate my EDC bits, but most of them are things that are not common enough to warrant carrying, but common enough that I like to have them around.
The bits I EDC are fairly standard. 4mm and 5mm hex bolts live in one stick. Those two attack the majority of bolts on my bike. A Phillips #0 and #1 live in the other stick. Those two are most useful for general screwing. In the bracket, I keep:
Phillips #2
Hex 2mm, 2.5mm, 3mm, 6mm, and 8mm
Security Torx 7, 10, 25, and 30
Slotted 5mm
1/4” to 4mm adapter, with a Slotted 1.5mm Micro
Carrying the “security” Torx instead of the standard Torx allows me to tamper with tamper-resistant electronics, which is a useful capability to have. They drive normal Torx bits screws just fine, which accounts for the majority of their use. The T25 is a longer (50mm) bit. I use this one as leverage when operating my Pitlocks.
The 1/4” to 4mm adapter allows me to run any 4mm micro bit in the Fix It Sticks. Part of the collection of bits in my GPP1 at work are micro bits that I use to attack electronics (at home I have the iFixit 64-bit Kit, which is a great hardware hacking kit for the price). A slotted 1.5mm bit is the right answer for most eyewear, which is why I carry that bit in the adapter every day.
On my scale, a single titanium stick without bits weighs in at 28 grams. Both sticks, with the 4 bits that I keep in them, tip the scale at 74 grams. When I add the bracket with 12 additional bits, the total weight is 148 grams. Adding the chain tool and two tire lever attachments to that, the whole kit is 228 grams, or 8 ounces. That’s pretty reasonable for all the capability those items offer.
Fix It Sticks only made a small number of the titanium sticks for the Kickstarter campaign. The sticks they sell today are steel. The weight of the steel Fix It Sticks Replaceable Edition is listed as 116 grams. I assume that weight is for both sticks and the 8 included bits. With my titanium sticks and the same 8 bits, I’m at 100 grams. So the titanium sticks shave off a little weight, but not really a notable amount – particularly considering that the titanium sticks were the reward for donations at 3x the cost of the steel sticks. I think my titanium sticks are perfect, and if offered I would purchase them again, but if they were lost I’d immediately replace them with the steel version with only a little heartbreak.
Bicycles are fun. So are radios. Why not combine them.
For overnight trips I run my Yaesu VX-8DR in the handlebar bag, with the MH-74A7A hand mic and FGPS-2 module, and a Diamond SRH320A. This let’s me broadcast APRS, letting people know where I am, and is everything I need to hit area repeaters to see if there’s anything interesting going on. Calling in as “bicycle mobile” usually generates interest, and it’s fun to check into a net without having to stop pedaling.
After pitching camp I can kill time by making more contacts. Also on this trip was a Nelson Antennas Slim Jim, but I didn’t bother putting it up.
I’m not quite up to Steve Roberts’ level, but I’m also only pushing a fraction of the weight.
I’ve been using an isolation tank every few weeks since the beginning of the year. The tanks are large, enclosed bathtubs, filled with body-temperature salt water, in which you float and not much else.
Before my first float I wasn’t sure if claustrophobia would be a problem. I’d never experienced claustrophobia, but I’d never enclosed myself in a bathtub before either. What I was missing here is the key component of the experience: sensory deprivation. With the tank closed, there’s no light, and the tank is large enough that I don’t touch the sides. Without any incoming data telling you that you’re in a small tank, you could be in an Olympic-sized pool, or simply floating through space.
There are odd an unusual claims about the benefits of isolation tanks which match the odd and unusual experience of the tanks themselves. To me, the tank is just a venue for meditation. It eliminates distraction, making the process a bit easier, but does not offer any additional benefits of its own. (Telekinesis has yet to manifest.) If you are not comfortable in your own head, you won’t have a good time.
I enjoy playing music during my sessions, sometimes for the whole hour, more often just for the first and last 15 minutes. Ambient textures are best, as anything with a beat requires too much attention. I tune in to SomaFM’s Drone Zone every now and then, which usually ends with at least one new purchase that I’ll queue up for the next tank session. Tom Heasley’s Where The Earth Meets the Sky and Massergy’s The Vast Colure have recently been useful. I’ll also sometimes go a less electronic route, opting for chanting from Gyuto or Georgian monks. It should go without saying that I’ve tried ending a session with Akira’s Requiem.
The Altama OTB Maritime Assault Boots are a great pair of everyday footwear. Modeled off of Chuck Taylors, they’re a fairly simple concept: a 1000D Cordura upper, large rubber toe cap, and low-profile outsole with minimal lugs.
The boots provide excellent grip on wet and dry concrete. Altama claims to use some sort of special sticky rubber, though it feels like typical shoe rubber to me. It is not noticeably sticky, like Five Ten’s rubber. The lug pattern is not ideal for dirt and mud, but for an everyday urban shoe I have no complaints. After 6 months, my boots shoe a reasonable amount of wear.
I bought them in a size US 10 / EUR 43, which fit me perfect. In most brands I alternate between a US 9.5 or 10, which usually translates to a fairly consistent EUR 42. They tip my scale at 29.3 oz (832 grams) for the pair.
The laces that come with the boots are ridiculously long. Unless you tuck them into the boot, they’ll catch on things. They constitute a hazard on the bike. I replaced them with Lawson Toughlaces, laced in a double helix and tied in a bowknot. Lawson’s laces are just heavy pieces of Technora with metal aglets on the end. Abrasian resistant, fire resistant to 932 degrees Fahrenheit, and with a breaking strength in excess of 1,000 lbs – you can saw through restraints all day with the Toughlaces and they will still probably last until the heat death of the universe. I have them cut to 58” for these boots.
Altama ships the boots with removable polyurethane insoles. This material makes sense for the intended water application of the boot, but I worried that they would be hot and uncomfortable for my more pedestrian use. So far I’ve not found that to be the case, but I’ve only had the boots since the end of September, so I can’t comment on their comfort in hot weather.
Neither the insole nor the boots themselves have any arch support, but they are not zero drop. There’s a heel to toe differential that feels like it is probably in the 6mm-8mm range. All of this lift, however, comes from the insole. After replacing the laces, my second modification was to purchase a pair of Ortholite Fusion Insoles. These are completely flat. The size 10 insole fit perfectly in my boots without any trimming, transforming them into zero-drop footwear. Unfortunately, the boots really want a slightly higher volume insole. With the Ortholites installed, I get a small amount of heel slippage that cannot be addressed by lacing. This is not an issue for my typical everyday wear, but would become problematic if hiking.
I still find myself switching between the stock polyurethane insoles and the Ortholites, but I lean toward the Ortholite being a more comfortable choice. It’s worth experimenting with them if you find high heels uncomfortable.
Feather blades have a reputation for being the sharpest on the market. I would occasionally use them in my Merkur, but generally I stayed away. They were too sharp and would result in knicks or burn for the first few shaves, after which point they would have dulled enough to be comparable to other, more normal razor blades.
So I was not entirely sure what to expect with the AS-D2. As it turns out, Feather knows what they’re doing. The Feather razor blades and AS-D2 were clearly engineered to work together. I’ve seen it described as a mild shave, which is true in that Feather blades in the AS-D2 result in no knicks or burns, but is a somewhat misleading term, in that it also consistently provides me with the best, closest shave I’ve ever had, with little effort.
My technique with the AS-D2 is the same as it was with the Merkur. One pass with the grain, one pass across the grain, and a final pass against the grain. The only difference is the angle. Compared to the Merkur, I hold the AS-D2 handle at a more obtuse angle (placing the head and the blade at a more acute angle against my face). I generally kept the handle of the Merkur at about 30 degrees. The AS-D2 is held at (or slightly above) 45 degrees.
The AS-D2 wants sharp blades. I find that the first 2 shaves with a new blade are great, the 3rd is mediocre (what I would have described as a good shave with the Merkur), and the 4th is poor. I have been replacing the blade every 3 shaves, where with my old Merkur setup I would get 5 or so shaves out of a blade. I buy Feather blades in packs of 100, which works out to about $0.25 per blade, and I generally only shave twice a week. A quarter every 1.5 weeks is an acceptable shaving expense.
Between the Feather and the Merkur, my sample size is only two, but it’s hard to imagine a better safety razor.
Discovery Trekking‘s Extreme Ultralight Travel Towels are the best quick-drying, packable towels I’ve found. Typical microfiber towels are scratchy and quick to stink. The Extreme Ultralight Travel Towel forgoes microfiber for Polartec Power Dry with a Polygiene treatment. They are soft, pleasant to use, and resistant to funk.
It’s use may be somewhat unintuitive for those who cut their teeth on traditional towels. Rather than the typical rubbing action, the Extreme Ultralight Travel Towels work best when you pat yourself down.
I bought my first of their towels in 2015. I go to the boxing gym in the morning and shower before work, so I’ve used that single towel multiple times per week for the past 3 years. It has no smell. In fact it is indistinguishable from the new towel I just bought last week.
I prefer the towels in size medium, which measure 28” by 34”. It’s the right size to dry off my whole body, though if I had long hair I may opt for the larger size. The only shortcoming of the towel is that it has no loop to hang it from, but this is easily remedied with a piece of paracord and some thread. On my scale, the size medium (with paracord hanging loop added) weighs 3.4 oz (98 grams).
I own the towels in charcoal and olive brown. The olive brown color is similar to that shown on Discovery Trekking’s website, but is what the rest of the world would call coyote brown. The charcoal color is nothing like what they show on their site. In their images it appears black, but in reality it is a grayish green, similar to foliage green, but slightly darker. I like it.
Normally I would not care about the color of a towel, but I note the colors here because the fabric is comfortable enough that I actually use the towel as a scarf – something which I cannot say about any microfiber towel. It provides warmth in cooler weather, and sun protection in hot weather. The Power Dry fabric is rated at UPF 15. This dual use makes it easy to justify the towel’s miniscule weight and volume in a pack, ensuring you always know where your towel is.
Any man who can hitch the length and breadth of the galaxy, rough it, slum it, struggle against terrible odds, win through, and still know where his towel is, is clearly a man to be reckoned with.
I began carrying an N95 respirator in my bag every day around 2007. The masks can be easily added to any first aid kit without much of a weight or size penalty, and offer respiratory protection far superior to that of a bandanna or a surgical mask. While useful during an influenza pandemic, my motivation for carrying the mask was centered more around urban disaster. Any time there are buildings coming down, I assume there will be asbestos, concrete dust, and similar contaminants in the air that I don’t in my lungs.
Most discussion of the extended use and reuse of respirators centers around contagions and the influenza use-case. While it seems safe enough to assume that the masks have an unlimited functional shelf life if stored properly, I’ve not found any information related to visual inspection of the masks for proper use. My own respirators get cycled every two or three years, but there is still a lot of room for abrasion in the pack, which I assume diminishes the protection the masks offer.
I had not thought much about this until last year. The respirator was something I carried but didn’t use. After a decade of carry, my first time actually needing to take the respirator out of my pack was this past October during the Napa and Sonoma fires.
After using the masks I had on hand during the fires (and unsuccessfully attempting to barter my surplus for chocolate), I began to better store the replacement batch for next time.
By keeping the respirator in a 5” x 4” aLOKSAK I’m ensured that no damage is done to during storage. The airtight seal offered by the bag means that the inside of the mask stays clean, at least until the first time I take it out in a contaminated setting. By added a pair of nitrile gloves to the bag, I create a compact, wallet-sized PPE kit. The same thing can be purchased, but all the prebuilt kits I’ve seen are too bulky for me to want to carry. My PPE kits can easily be slid in with the medical supplies in various my first aid and disaster kits. Pair that with EDC eye protection and you have a decently comprehensive solution.
The only appreciable thickness comes from the vent on the respirator, but I’ve found that vented respirators are key. A properly fitted respirator without a vent hampers my ability to perform physically, which isn’t a great trade-off in any situation where I find myself needing to wear a respirator.