The Expedition Sewing Kit
A few months ago I accidentally ripped out the top stitches of the pull tab on one of my Altama OTB boots, making the already-large loop even larger. Normally repairing this would be a job for the Speedy Stitcher, but I decided to use the excuse to try the Patagonia Expedition Sewing Kit.
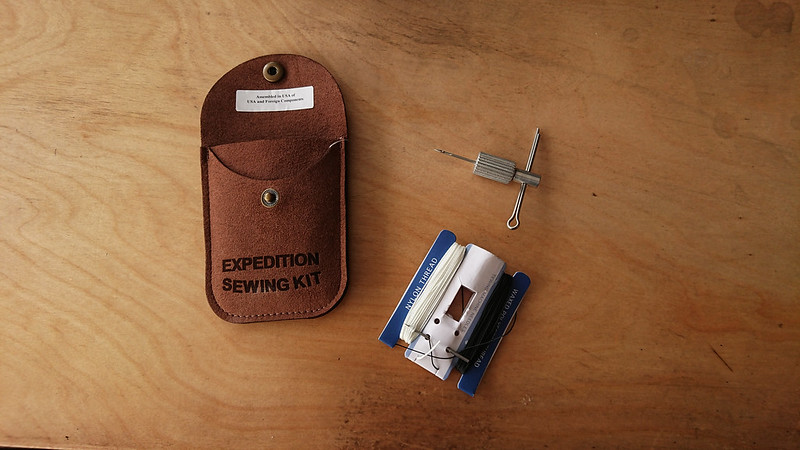
The Patagonia kit is a reissue of an old piece of kit by Chouinard Equipment. Both the old and new versions come with a chuck that is used to hold a machine needle, and a cotter pin which slides through the chuck to provide a handle. The cotter pin is also intended to aid in rethreading draw strings through a channel on a sleeping bag, pack, or jacket hood.
The instructions included with the Patagonia kit explain the use of both the awl and the cotter pin. Users on the Zombie Hunters forum scanned and cleaned the instructions from the original Chouinard kit, which I have reposted here for comparison. This video also demonstrates the use of an awl for those unfamiliar with the process.


The idea behind the Chouinard awl and the Speedy Stitcher is the same. It provides a way to hold a machine needle, push it through heavy material, and easily create a secure lock-stitch. The immediately apparent difference between the two is in size and weight. The chuck and cotter pin in the Patagonia reissue of the Chouinard awl weigh 10 grams and could fit in the smallest coin pocket. A Speedy Stitcher (with thread, bobbin, and needles removed to make the comparison fair) weighs 64 grams and isn’t going to make the cut in any reasonable backpacking gear list.
I repaired my Altama OTB boots twice so that I could compare the process. First I completed the repair with the Chouinard awl, and then I went back and stitched it again with the Speedy Stitcher. The Speedy Stitcher, living up to its name, was much faster. The primary reason for this is that, between the bobbin within the handle and the thumb tack the thread is wrapped around before going through the eye of the needle, the Speedy Stitcher is able to keep the awl side of the thread under tension when completing a stitch. With the Chouinard awl I had to try to secure the thread with my thumb, which didn’t work terribly well. This made each stitch slower, as I had to carefully manage the tension in order to get a tight stitch but not pull the thread through too far on either side of the project.
Fortunately the solution to this problem was simple and presented itself to me after the boot project. First I tried placing the thread between the two pieces of the cotter pin. This increases tension, but it isn’t so tight that the thread cannot be pulled out. I have taken to doing this and then carefully pulling through the amount of thread I need. When I have the right amount of thread, I cut off a tail that’s an extra few inches long and simply tie it in a clove hitch around the cotter pin. The thread is now as secure as with the Speedy Stitcher and the efficiency of the tool is greatly increased.
DIY
The Chouinard kit was unavailable for many years until Patagonia’s reissue, which has led to people replacing the awl with off-the-shelf components. I thought this sounded like an easy and fun project, and would allow me to return the borrowed Patagonia kit. For the chuck I went with the recommended Mini Keyless Chuck. This comes with a shank that I cut off with a pair of snips, and then filed the cut smooth with the file on a Leatherman. The chuck already has a hole tapped in the side of it, but it is too small to fit a cotter pin or any other useful handle. I drilled this hole out with a 1/8” drill bit, after which it was the perfect fit for a 2.5” cotter pin I found at the hardware store.
The chuck ships with two collets. One is too large to hold any of the needles I tried. The smaller of the two works well.
One of the annoyances I had when using the Chouinard awl was that the chuck would often slide off the cotter pin when both of my hands were occupied on the other side of the project in creating the lock stitch. To solve this for my version, I simply added an O-ring with a 3mm interior diameter to the cotter pin. This prevents the chuck from sliding off the handle, as well as preventing it from sliding over the part of the cotter pin where I have the thread clove-hitched.
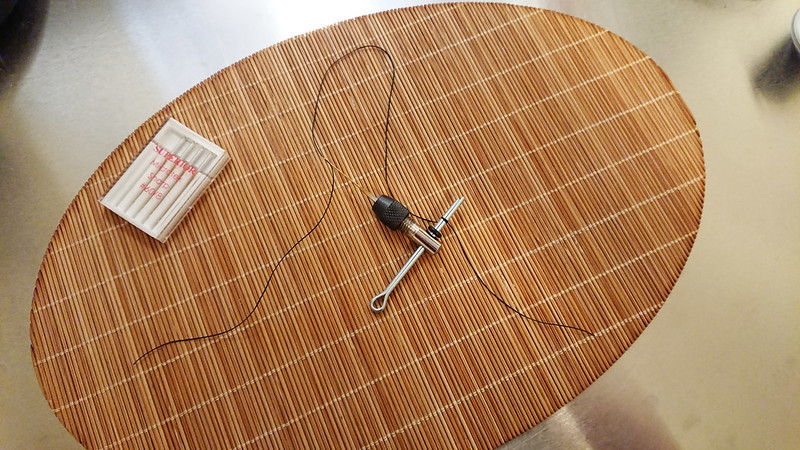
This version of the expedition awl – including modified chuck, cotter pin, and O-ring – tips the scale at 13 grams. That is 3 grams heavier than Patagonia’s reissue, but cheap and easy to make. The chuck is also a bit more compact than Patagonia’s.
I’ve used this version of the awl on a couple of small projects, and it works great. It is certainly something I would pack on any kind of extended travel, and for use at home it works just as well as the Speedy Stitcher.
Thread
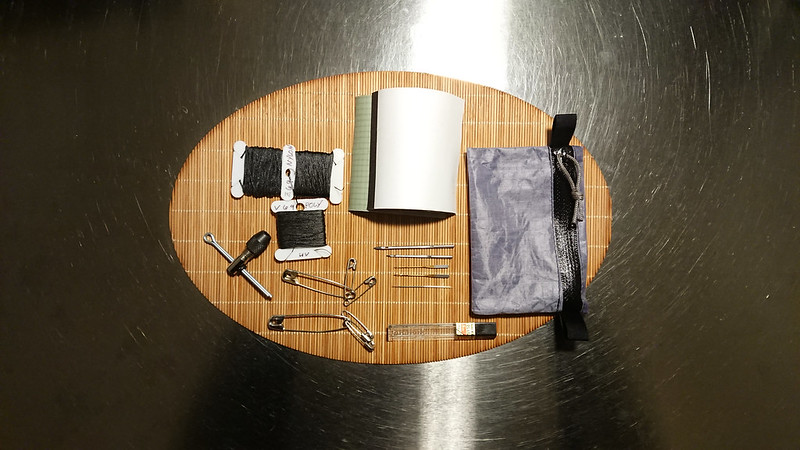
In order to be able to store thread with the my new awl I purchased a pack of plastic thread bobbins. These have notches to prevent the thread from unwinding, a space to label the bobbin so that you know what thread it contains, and they keep the thread in a flat profile that makes it easy to slide into a small kit.
I chose three different threads to store with the awl. Sunstop V-69 Black Polyester UV from Sailrite, Z-69 Nylon from a spool I bought from Seattle Fabrics something like 15 years ago and have yet to use up, and a waxed nylon thread from Tandy.
Sailrite recommends the UV-treated polyester thread for general outdoor purposes, and the nylon thread for applications where greater strength is wanted but prolonged exposure to the sun is not expected. Between the two I think I have most eventualities covered.
The waxed nylon thread is probably heavier than what I need in a field repair kit given the type of equipment I generally carry, so I may end up removing it.
Needles
For needles, I began with the Straight #4 and Straight #8 from the Speedy Stitcher kit. These are my most frequently used needles with the Speedy Stitcher.
To supplement these two needles I copied the well-considered Chouinard kit recreation at Three Points of the Compass and purchased two needle sets from Superior Threads. I added one of the #60/8 Microtex Sharp Titanium-coated Needles and a #80/12 Topstitch Titanium-coated Needle to my kit. The Microtex #60/8 is a very sharp, fine needle that would be my choice when using the awl on lighter fabrics, like clothing or a silnylon tarp. The Topstitch #80/12 is a little larger, and also incredibly sharp, making it a good bridge between the Microtex and the two needles from the Speedy Stitcher.
I don’t pretend to understand all the different types of sewing needles out there and when one should use which type, but between these four I feel that I can confidently hack together any kind of field repair I am likely to need.
Despite this kit being built around the awl, I did also add one hand-sewing needle. I’m not sure what size or style it is. I acquired it sometime early in the millennium when I purchased a selection of vintage British sail-making needles (claimed to be from the early 20th century) on eBay. This one is clearly not a sail-making needle – or at least it is much finer than the typical triangular #16 I generally associate with sail-making – but it’s the needle I’ve always come back to for any repair when I have not been using an awl and machine needle.
As I mentioned when discussing my possibles pouch, I’ve always carried repair needles in one of the little plastic cases that you get when you purchase lead for a mechanical pencil. In fact, at some point – probably around the point I became an adult and stopped using mechanical pencils with any frequency – I started purchasing replacement lead just for the containers.
Et cetera
Rounding out the kit is a small selection of safety pins, and three small pieces of Tenacious Tape (black, clear, and green). Despite the fun of using the awl, a small piece of good tape is often a better repair tool for technical materials.
I’ve placed all of these items in a spare Zpacks Wallet Zip Pouch.
The kit in its entirety weighs 42 grams. In comparison, the complete Patagonia Expedition Sewing Kit weighs 40 grams. I have more and better thread, what I think are probably better needles, and a much nicer pouch to keep it all in. The Patagonia kit does include some different colored thread, but I don’t believe in visual pollution and I think a bit of black thread on earth-tone equipment is fine. Patagonia also includes a needle threader and a couple buttons, but I don’t think those are necessary additions.
All considered I’m very happy with this kit. The original awl from Chouinard Equipment was a great idea, and Patagonia’s reissue is perfectly serviceable. I had fun putting together my own version. It’s an extremely low cost investment that provides a lot of functionality and serves to increase my resiliency on any trip of extended length, as well as being useful at home.