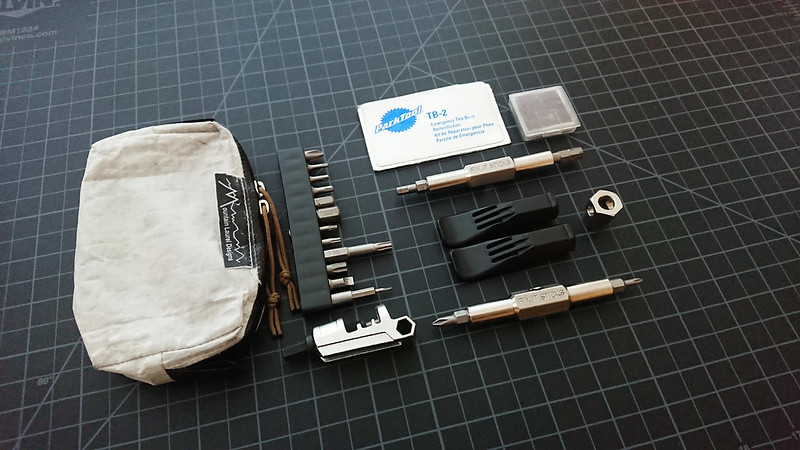
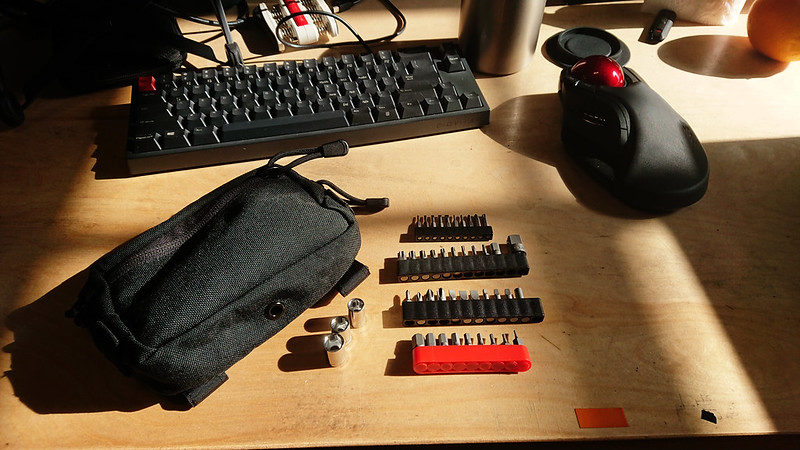
Since I outlined it in 2018, my EDC tool kit has not changed much. It is still based around the same titanium Fix It Sticks, and intended primarily as a vehicular repair kit.
It is still carried in the same cuben fiber packing cube from Mountain Laurel Designs (since discontinued and replaced by the otherwise equivalent Ultra X 100 Packing Cubes), though said cube is much worse for wear. Some of the smaller bits have poked a couple holes in the bottom of the pouch. I’ve patched this with Tenacious Tape on both the inside and the outside.
The bit selection has been augmented slightly. Installed in the Fix It Sticks are my most frequently used 1/4” drive bits.
Torx T20s
Torx T25s
Phillips #2
Hex 4mm
In the bit holder, I carry additional 1/4” drive bits.
Hex 1.5mm
Hex 2mm
Hex 2.5mm
Hex 3mm
Hex 5mm
Hex 5mm x 50mm
Hex 6mm
Hex 8mm
Torx T8s
Phillips #0
Slotted 0.6mm x 4.5mm
4mm MicroBit Adapter, holding a slotted 0.25mm x 1.5mm
Keen eyed readers will notice two 5mm hex bits. The longer, 50mm bit is needed to reach into my Gevenalle CX Shifters to adjust the mounting bolt. This longer bit can also be used to provide a turning tool to be used with my Pitlock key. (In 2018 I discussed using the longer Torx T25 bit for this. I now carry a standard length T25s, since I need the longer 5mm hex for the shifters.) My rear Phil Wood Touring Hub takes two 5mm wrenches to remove the end caps. Doing this allows the cassette to be removed from the wheel, providing easy access to repair a broken drive-side spoke without messing around with cassette removal tools.
Mini Knipex Cobra Pliers are only used infrequently, but are so useful when I do need them that I put up with their extra weight in the kit.
The Fix It Sticks tire levels and chain breaker still live in the kit, though I have been debating removing the chain breaker. It is compact but heavy, and it has been about 15 years since I last had an incident that required a chain breaker on the road. It would definitely be in the kit for any multi-day trips.
A small cuben fiber zip pouch holds my patch kit and one FiberFix, including that little spoke wrench that comes with the FiberFix (annoying to use, yes, but agreeably small and light).
But more frequently you just need a little. A few months ago I bought myself a Dualco 700231 Grease Gun and a Dualco 10547 4.5” nozzle. I filled the gun from a tub of Phil Wood Waterproof Grease that I’ve been working through for a handful of years. This made servicing my pedals much easier and less messy than previous jobs. Purchases like this make me feel more like an adult.
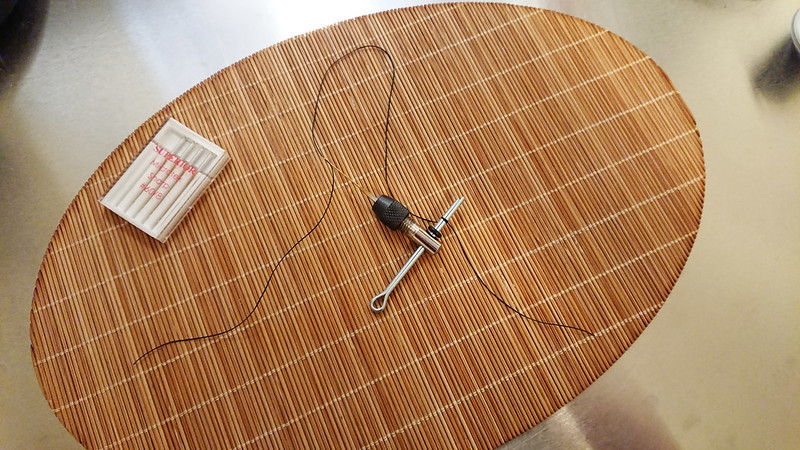
A few months ago I accidentally ripped out the top stitches of the pull tab on one of my Altama OTB boots, making the already-large loop even larger. Normally repairing this would be a job for the Speedy Stitcher, but I decided to use the excuse to try the Patagonia Expedition Sewing Kit.
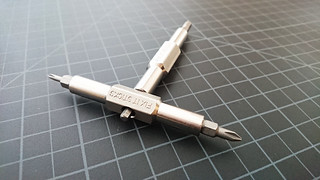
The Patagonia kit is a reissue of an old piece of kit by Chouinard Equipment. Both the old and new versions come with a chuck that is used to hold a machine needle, and a cotter pin which slides through the chuck to provide a handle. The cotter pin is also intended to aid in rethreading draw strings through a channel on a sleeping bag, pack, or jacket hood.
The instructions included with the Patagonia kit explain the use of both the awl and the cotter pin. Users on the Zombie Hunters forum scanned and cleaned the instructions from the original Chouinard kit, which I have reposted here for comparison. This video also demonstrates the use of an awl for those unfamiliar with the process.
The idea behind the Chouinard awl and the Speedy Stitcher is the same. It provides a way to hold a machine needle, push it through heavy material, and easily create a secure lock-stitch. The immediately apparent difference between the two is in size and weight. The chuck and cotter pin in the Patagonia reissue of the Chouinard awl weigh 10 grams and could fit in the smallest coin pocket. A Speedy Stitcher (with thread, bobbin, and needles removed to make the comparison fair) weighs 64 grams and isn’t going to make the cut in any reasonable backpacking gear list.
I repaired my Altama OTB boots twice so that I could compare the process. First I completed the repair with the Chouinard awl, and then I went back and stitched it again with the Speedy Stitcher. The Speedy Stitcher, living up to its name, was much faster. The primary reason for this is that, between the bobbin within the handle and the thumb tack the thread is wrapped around before going through the eye of the needle, the Speedy Stitcher is able to keep the awl side of the thread under tension when completing a stitch. With the Chouinard awl I had to try to secure the thread with my thumb, which didn’t work terribly well. This made each stitch slower, as I had to carefully manage the tension in order to get a tight stitch but not pull the thread through too far on either side of the project.
Fortunately the solution to this problem was simple and presented itself to me after the boot project. First I tried placing the thread between the two pieces of the cotter pin. This increases tension, but it isn’t so tight that the thread cannot be pulled out. I have taken to doing this and then carefully pulling through the amount of thread I need. When I have the right amount of thread, I cut off a tail that’s an extra few inches long and simply tie it in a clove hitch around the cotter pin. The thread is now as secure as with the Speedy Stitcher and the efficiency of the tool is greatly increased.
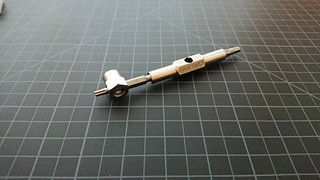
DIY
The Chouinard kit was unavailable for many years until Patagonia’s reissue, which has led to people replacing the awl with off-the-shelf components. I thought this sounded like an easy and fun project, and would allow me to return the borrowed Patagonia kit. For the chuck I went with the recommended Mini Keyless Chuck. This comes with a shank that I cut off with a pair of snips, and then filed the cut smooth with the file on a Leatherman. The chuck already has a hole tapped in the side of it, but it is too small to fit a cotter pin or any other useful handle. I drilled this hole out with a 1/8” drill bit, after which it was the perfect fit for a 2.5” cotter pin I found at the hardware store.
The chuck ships with two collets. One is too large to hold any of the needles I tried. The smaller of the two works well.
One of the annoyances I had when using the Chouinard awl was that the chuck would often slide off the cotter pin when both of my hands were occupied on the other side of the project in creating the lock stitch. To solve this for my version, I simply added an O-ring with a 3mm interior diameter to the cotter pin. This prevents the chuck from sliding off the handle, as well as preventing it from sliding over the part of the cotter pin where I have the thread clove-hitched.
This version of the expedition awl – including modified chuck, cotter pin, and O-ring – tips the scale at 13 grams. That is 3 grams heavier than Patagonia’s reissue, but cheap and easy to make. The chuck is also a bit more compact than Patagonia’s.
I’ve used this version of the awl on a couple of small projects, and it works great. It is certainly something I would pack on any kind of extended travel, and for use at home it works just as well as the Speedy Stitcher.
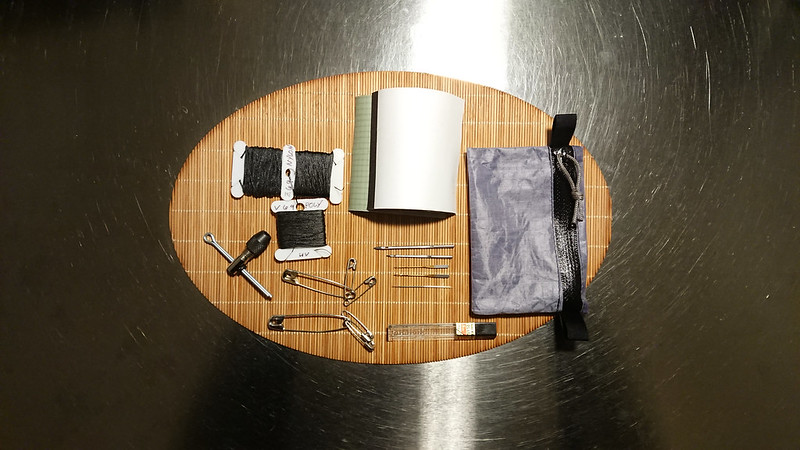
Thread
In order to be able to store thread with the my new awl I purchased a pack of plastic thread bobbins. These have notches to prevent the thread from unwinding, a space to label the bobbin so that you know what thread it contains, and they keep the thread in a flat profile that makes it easy to slide into a small kit.
I chose three different threads to store with the awl. Sunstop V-69 Black Polyester UV from Sailrite, Z-69 Nylon from a spool I bought from Seattle Fabrics something like 15 years ago and have yet to use up, and a waxed nylon thread from Tandy.
Sailrite recommends the UV-treated polyester thread for general outdoor purposes, and the nylon thread for applications where greater strength is wanted but prolonged exposure to the sun is not expected. Between the two I think I have most eventualities covered.
The waxed nylon thread is probably heavier than what I need in a field repair kit given the type of equipment I generally carry, so I may end up removing it.
Needles
For needles, I began with the Straight #4 and Straight #8 from the Speedy Stitcher kit. These are my most frequently used needles with the Speedy Stitcher.
I don’t pretend to understand all the different types of sewing needles out there and when one should use which type, but between these four I feel that I can confidently hack together any kind of field repair I am likely to need.
Despite this kit being built around the awl, I did also add one hand-sewing needle. I’m not sure what size or style it is. I acquired it sometime early in the millennium when I purchased a selection of vintage British sail-making needles (claimed to be from the early 20th century) on eBay. This one is clearly not a sail-making needle – or at least it is much finer than the typical triangular #16 I generally associate with sail-making – but it’s the needle I’ve always come back to for any repair when I have not been using an awl and machine needle.
As I mentioned when discussing my possibles pouch, I’ve always carried repair needles in one of the little plastic cases that you get when you purchase lead for a mechanical pencil. In fact, at some point – probably around the point I became an adult and stopped using mechanical pencils with any frequency – I started purchasing replacement lead just for the containers.
Et cetera
Rounding out the kit is a small selection of safety pins, and three small pieces of Tenacious Tape (black, clear, and green). Despite the fun of using the awl, a small piece of good tape is often a better repair tool for technical materials.
The kit in its entirety weighs 42 grams. In comparison, the complete Patagonia Expedition Sewing Kit weighs 40 grams. I have more and better thread, what I think are probably better needles, and a much nicer pouch to keep it all in. The Patagonia kit does include some different colored thread, but I don’t believe in visual pollution and I think a bit of black thread on earth-tone equipment is fine. Patagonia also includes a needle threader and a couple buttons, but I don’t think those are necessary additions.
All considered I’m very happy with this kit. The original awl from Chouinard Equipment was a great idea, and Patagonia’s reissue is perfectly serviceable. I had fun putting together my own version. It’s an extremely low cost investment that provides a lot of functionality and serves to increase my resiliency on any trip of extended length, as well as being useful at home.
Fix It Sticks are 1/4” magnetic bit drivers, originally intended as bicycle repair tools. Each stick holds two bits, and can be used individually or connected together in a “T” when more torque is wanted.
I backed the Fix It Sticks Kickstarter campaign back in 2014, selecting the $99 pledge level for the titanium Fix It Sticks reward. For the past 4 years, the titanium Fix It Sticks have been part of my EDC. I carry them with a selection a bits optimized for bike repair, as well as a few supplemental bits that are not intended for my vehicle, but are useful to have on hand for general screwing. Extra bits are carried in a Toolcool bit holder.
At home I have an excessive collection of 1/4” bits, including things like socket adapters, extensions, and the Fix It Sticks Glock kit. What’s most attractive about the bit and driver system to me is that these 80-some bits take up a miniscule fraction of the space that I would otherwise need for the tools. I keep a Wera Kraftofmr 816 RA driver at home for those times when I want something that ratchets, but the Fix It Sticks are what I pull out the vast majority of the time.
At work I keep some additional bits, along with a few other tools, in a GPP1. Some of these duplicate my EDC bits, but most of them are things that are not common enough to warrant carrying, but common enough that I like to have them around.
The bits I EDC are fairly standard. 4mm and 5mm hex bolts live in one stick. Those two attack the majority of bolts on my bike. A Phillips #0 and #1 live in the other stick. Those two are most useful for general screwing. In the bracket, I keep:
Phillips #2
Hex 2mm, 2.5mm, 3mm, 6mm, and 8mm
Security Torx 7, 10, 25, and 30
Slotted 5mm
1/4” to 4mm adapter, with a Slotted 1.5mm Micro
Carrying the “security” Torx instead of the standard Torx allows me to tamper with tamper-resistant electronics, which is a useful capability to have. They drive normal Torx bits screws just fine, which accounts for the majority of their use. The T25 is a longer (50mm) bit. I use this one as leverage when operating my Pitlocks.
The 1/4” to 4mm adapter allows me to run any 4mm micro bit in the Fix It Sticks. Part of the collection of bits in my GPP1 at work are micro bits that I use to attack electronics (at home I have the iFixit 64-bit Kit, which is a great hardware hacking kit for the price). A slotted 1.5mm bit is the right answer for most eyewear, which is why I carry that bit in the adapter every day.
On my scale, a single titanium stick without bits weighs in at 28 grams. Both sticks, with the 4 bits that I keep in them, tip the scale at 74 grams. When I add the bracket with 12 additional bits, the total weight is 148 grams. Adding the chain tool and two tire lever attachments to that, the whole kit is 228 grams, or 8 ounces. That’s pretty reasonable for all the capability those items offer.
Fix It Sticks only made a small number of the titanium sticks for the Kickstarter campaign. The sticks they sell today are steel. The weight of the steel Fix It Sticks Replaceable Edition is listed as 116 grams. I assume that weight is for both sticks and the 8 included bits. With my titanium sticks and the same 8 bits, I’m at 100 grams. So the titanium sticks shave off a little weight, but not really a notable amount – particularly considering that the titanium sticks were the reward for donations at 3x the cost of the steel sticks. I think my titanium sticks are perfect, and if offered I would purchase them again, but if they were lost I’d immediately replace them with the steel version with only a little heartbreak.
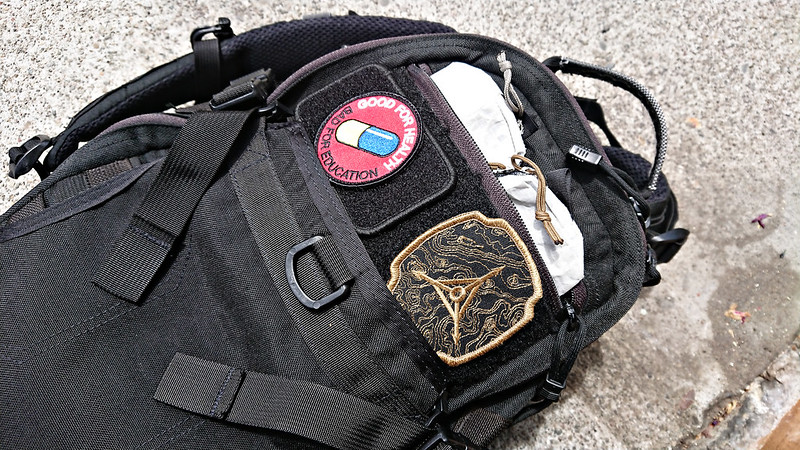
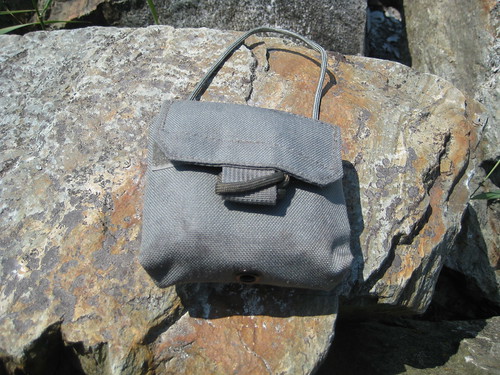
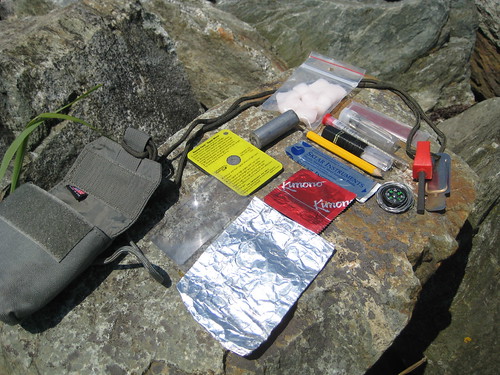
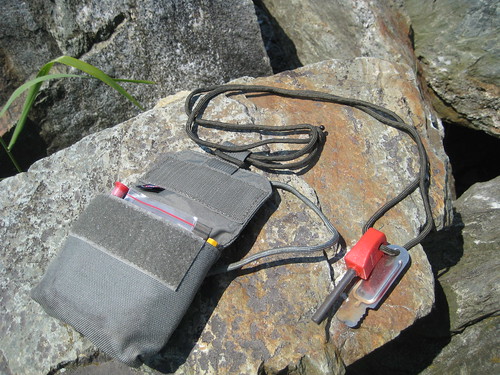
My possibles pouch began as being simply a Doug Ritter Pocket Survival Pak. The Survival Pak comes in a waterproof envelope that is meant to be carried in a pocket. I prefer a belt-mounted solution, so I ditched the waterproof envelope and moved the contents to a TAD Gear SERE SP pouch. The SERE pouch has velcro webbing on the back, which allows it to be mounted to be mounted to any sort of belt or PALS webbing.
When using the possibles pouch, I’m often traveling with my Kifaru ZXR. The ZXR is built upon Kifaru’s WrapTech Plus Suspension system, one of the primary components of which is the belt. The belt is a very thick, wide belt that is designed to work with the anatomy of the body and allow the user to comfortable carry obscenely heavy loads. The design of the ZXR’s belt makes it unpractical to have many pouches mounted to your own pants belt. Because of this, I didn’t want to actually mount the SERE pouch to my belt itself, but instead mount it so that it dropped down a bit below my waist, thus not interfering with the ZXR belt. To accomplish this, I simply tied a short loop of paracord through the pouch’s webbing. To mount the pouch, I pull the loop through the backside of my belt and run the pouch through the loop. This allows me to both don and doff the pouch without removing my belt.
The contents of the pouch have changed since I first removed them from the waterproof envelope. The Doug Ritter Pocket Survival Pak still forms the base of the pouch, but I’ve added and removed other items to cut down on redundancy and better compliment the other gear that I carry. I also don’t intend the possibles pouch to be strictly a “survival” item. All of the pouch’s contents have utility in a survival situation, but some of them are not intended explicitly for that.
The contents are as follows:
Ferrocerium rod, striker and paracord
Duct tape (26" x 2")
Pencil
Aluminum Foil (3 sq. ft.)
Condom
2 match strikers
8 Coghlan's Emergency Tinder
Sterile stainless steel surgical blade
20mm compass
Stainless steel utility wire (6' of .020")
Signal mirror
Magnifying lens
4 large safety pins
Repair kit
Fishing kit
The components that remain from the Doug Ritter Pocket Survival Pak are the duct tape, pencil, safety pins, 20mm compass, stainless steel utility wire, sterile stainless steel surgical blade, magnifying lens, signal mirror, and aluminum foil. The other items I’ll cover here.
Ferrocerium rod, striker and paracord
This is a standard Light My Fire Scout firesteel and striker. It is not my primary firesteel, but a backup that I can be sure of always having securely attached. You might have noticed that the paracord that I use to secure the rod and striker to the pouch is rather long (about 3.5’). Paracord, of course, has hundreds of uses, so carrying a bit more of it than is strictly necessary isn’t always a bad idea. But the primary reason for the length of this particular piece of cord is that I can use it as a bow string on a fire-bow set.
Condom
This is just one standard latex condom. It can be used as a water carrier, a makeshift glove for a few fingers while taking care of a wound, a barrier to help stop the creation of a new species of half humans half wood nymphs, or utilized in the creation of emergency balloon animals.
Match Strikers
REI Storm Proof Matches always come with 2 spare strikers sealed within a piece of plastic. I find that so-called “strike anywhere” matches can be hit and miss, so by carrying this, I assure myself of always having a dry, reliable surface to strike any kind of match on.
Coghlan's Emergency Tinder
This stuff is not my favorite fire starting tinder, but it does work, and I have a bit of it kicking around, so I tossed it in. They’re stored within a small waterproof bag.
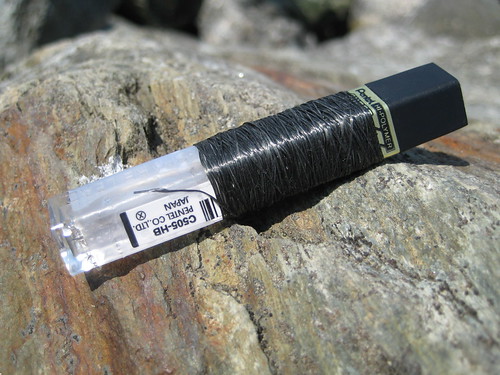
Repair Kit
My repair kit, I think, is somewhat ingenious. I like it, at least. I previously carried a small leather pouch with an assortment of different needles, types of thread, and safety pins. The whole thing was far larger and heavier than I could ever justify it being, so I ditched it and started from scratch. I got the idea for this new kit from the BackpackingLight Forums.
The container is an old Pentel mechanical pencil led refill case. This is the perfect size to secure the two needles I’ve chosen to carry and the case itself is light enough to make me happy. (And it’s free.)
Around the outside of the case, I’ve wrapped a length of black Kevlar thread. When I built this kit, I just wrapped till I got bored, so I have no idea how much thread there is. Enough, I think, for any repairs that I am likely to encounter. I chose Kevlar thread as the best complement of weight and strength. Previously, I carried a bit of standard, thin sewing thread. The thinness of that thread is suitable for sewing things like clothing, but it is decidedly weak. Kevlar thread is the same thickness, not noticeably heavier, but much stronger. I also previously carried a bit of thick waxed nylon string that is appropriate for sewing things like thick leather, heavy cotton canvas, or thick nylon. This is very heavy by my standards and overkill for most repair jobs. Out of all the gear I carry, it would probably be appropriate for repairing only my Kifaru rucksack. And Kifaru rucksacks don’t fail. If by some strange happenstance it did fail, the Kevlar thread would probably be strong enough to get be back home or to some place where a more permanent repair could be made.
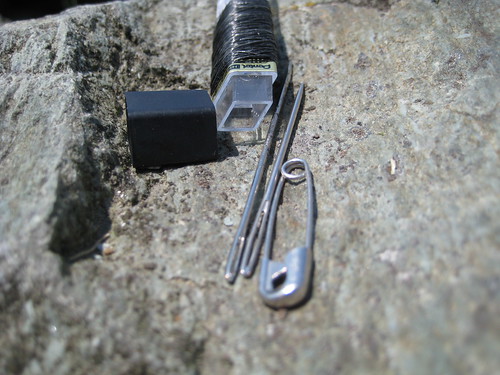
Inside the case I carry two needles. One that is thicker and stronger than most thin needles used for the hand-repair of clothing, but still small enough to qualify as small in my eye (just under 5mm in length and thin enough to not punch overly large holes in a thin cotton material). I believe this is the needle that comes with the Doug Ritter Survival Pak, but I could be wrong. The other needle is slightly longer (about 6mm) and has a slightly thicker head, making it more appropriate for heavier material. (I believe this one is technically a sail maker’s needle, but I could be wrong. I have a variety of different needles I’ve picked up over the years and lack the expertise to be able to identify their intended purpose.)
Also inside the case is a small safety pin. The purpose of this is actually just to take up more area inside the case so that the two needles don’t bounce around and make noise.
This repair kit, along with the 4 large safety pins also carried in the possibles pouch, makes for a very small and lightweight repair kit that is able to tackle any of the problems that I may encounter. In addition to this, I also carry a half dozen safety pins of a varying sizes and a couple spare buttons within the rucksack itself. The guts of paracord and the floss in my toiletry kit can also be appropriated as thread.
Fishing Kit
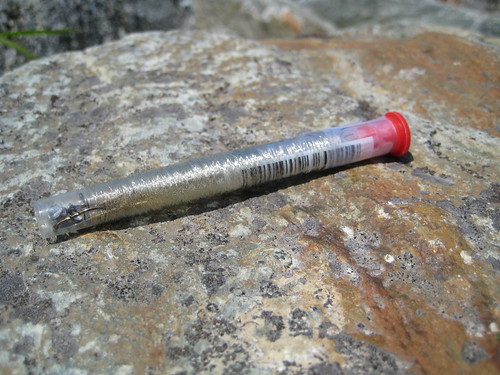
My fishing kit is actually a combination fishing kit and glasses repair kit. An odd combination, you say? I agree.
I am dependent on my glasses, so I have always carried a glasses repair kit. Such kits are available in any drug store in the country and usually consist of a small tube that contains a few of the small screws that most glasses use, a small screwdriver to match, and a couple spare rubber nose pieces.
A year and a half ago I purchased a new pair of glasses that happen to have plastic nose pieces integrated into the frames. Recently, I was going through the possibles pouch, rethinking each item, and came upon the glasses repair kit. I opened it up and was shocked – shocked, I tell you – to discover that it contained two of those small rubber nose piece replacements. With my new glasses, these were completely useless to me. I had been carrying around an extra 2 grams (or so) all this time! I disposed of the offending pieces and felt better immediately.
But then I looked at the tube and its contents and decided that it really was a waste of space. The tube was far too large for the spare screws and screwdriver that it now contained. I shrugged, moved on to looking at the rest of the contents of the possibles pouch, and then had a stroke of brilliance. I would turn the glasses repair kit into a fishing kit!
It follows on the same principle as the repair kit.
Around the outside of the tube, I wrapped a length of 4 lb monofilament fishing line (“ultragreen” in color). Again, I did not measure the length, but it is plenty for such an emergency kit.
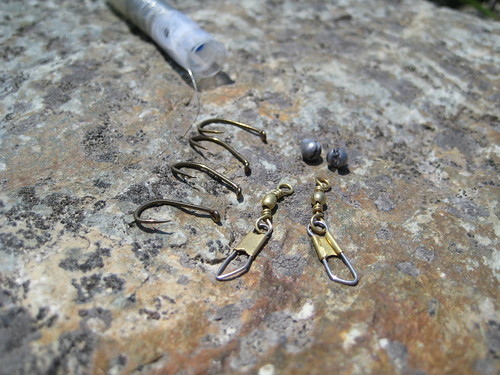
Inside the tube, I placed 4 small hooks, 2 split shot, and 2 snap swivels. This is clearly a very minimalist fishing kit, meant for emergencies only, not for when one intends to actually catch fish for a main form of sustenance, but I have used it. It does work.
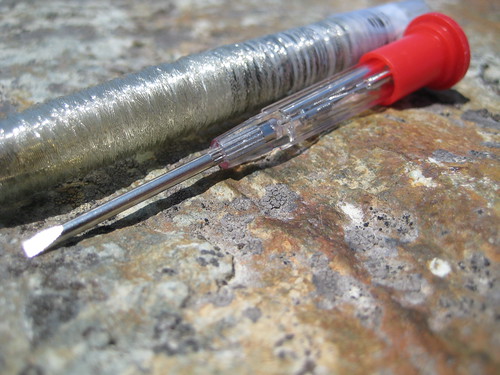
This particular glasses repair tube is well-suited for such a kit because the lid for the tube is the screwdriver itself. The top of the screwdriver can then be removed, exposing the inside of the hollow handle. It is in here that the spare screws are stored. This allows the glasses repair bit to be separate from the fishing bit.
It should also be noted that the fishing line wrapped around the outside can also be used as repair thread.