You are currently viewing all posts tagged with annex.

Organizing Ledger

Ledger is a double-entry accounting system that stores data in plain text. I began using it in 2012. Almost every dollar that has passed through my world since then is tracked by Ledger.1

Ledger is not the only plain text accounting system out there. It has inspired others, such as hledger and beancount. I began with Ledger for lack of a compelling argument in favor of the alternatives. After close to a decade of use, my only regret is that I didn’t start using earlier.

My Ledger repository is stored at ~/library/ledger. This repository contains a data directory, which includes yearly Ledger journal files such as data/2019.ldg and data/2020.ldg. Ledger files don’t necessarily need to be split at all, but I like having one file per year. In January, after I clear the last transaction from the previous year, I know the year is locked and the file never gets touched again (unless I go back in to rejigger my account structure).

The root of the directory has a .ledger file which includes all of these data files, plus a special journal file with periodic transactions that I sometimes use for budgeting. My ~/.ledgerrc file tells Ledger to use the .ledger file as the primary journal, which has the effect of including all the yearly files.

$ cat ~/.ledgerrc
--file ~/library/ledger/.ledger
--date-format=%Y-%m-%d

$ cat ~/library/ledger/.ledger
include data/periodic.ldg
include data/2012.ldg
include data/2013.ldg
include data/2014.ldg
include data/2015.ldg
include data/2016.ldg
include data/2017.ldg
include data/2018.ldg
include data/2019.ldg
include data/2020.ldg

Ledger’s include format does support globbing (ie include data/*.ldg) but the ordering of the transactions can get weird, so I prefer to be explicit.

The repository also contains receipts in the receipts directory, invoices in the invoices directory, scans of checks (remember those?) in the checks directory, and CSV dumps from banks in the dump directory.

$ tree -d ~/library/ledger
/home/pigmonkey/library/ledger
├── checks
├── data
├── dump
├── invoices
└── receipts

5 directories

The repository is managed using a mix of vanilla git and git-annex.2 It is important to me that the Ledger journal files in the data directory are stored directly in git. I want the ability to diff changes before committing them, and to be able to pull the history of those files. Every other file I want stored in git-annex. I don’t care about the history of files like PDF receipts. They never change. In fact, I want to make them read-only so I can’t accidentally change them. I want encrypted versions of them distributed to my numerous special remotes for safekeeping, and someday I may even want to drop old receipts or invoices from my local store so that they don’t take up disk space until I actually need to read them. That sounds like asking a lot, but git-annex magically solves all the problems with its largefiles configuration option.

$ cat ~/library/ledger/.gitattributes
*.ldg annex.largefiles=nothing

This tells git-annex that any file ending with *.ldg should not be treated as a “large file”, which means it should be added directly to git. Any other file should be added to git-annex and locked, making it read-only. Having this configured means that I can just blindly git annex add . or git add . within the repository and git-annex will always do the right thing.

I don’t run the git-annex assistant in this repository because I don’t want any automatic commits. Like a traditional git repository, I only commit changes to Ledger’s journal files after reviewing the diffs, and I want those commits to have meaningful messages.

Notes

  1. I do not always track miscellaneous cash transactions less than $20. If a thing costs more than that, it is worth tracking, regardless of what it is or how it was purchased. If it costs less than that, and it isn't part of a meaningful expense account, I'll probably let laziness win out. If I buy a $8 sandwich for lunch with cash, it'll get logged, because I care about tracking dining expenses. If I buy a $1 pencil erasure, I probably won't log it, because it isn't part of an account worth considering.
  2. I bet you saw that coming.

Whenever I buy a new piece of equipment, I store its manual as a PDF.

If an internet search doesn’t come up with a copy of the manual, I’ll scan the dead tree version and OCR it. The document is then stored in an annex at ~/documents/manuals/. I rarely reference the product manual after initial setup, but when I need it, it’s extremely valuable to have it available – immediately and offline – as a PDF with a searchable text layer.

Some products don’t have manuals, but do have specification sheets. I store these in the same location. Sometimes I’ll just save the product page from the manufacturer’s website as a PDF. This allows me to easily lookup the dimensions of a thing I bought 14 years ago, despite the product being long discontinued by the manufacturer, or the manufacturer no longer existing.

Music Organization with Beets

I organize my music with Beets.

Beets imports music into my library, warns me if I’m missing tracks, identifies tracks based on their accoustic fingerprint, scrubs extraneous metadata, fetches and stores album art, cleans genres, fetches lyrics, and – most importantly – fetches metadata from MusicBrainz. After some basic configuration, all of this happens automatically when I import new files into my library.

After the files have been imported, beets makes it easy to query my library based on any of the clean, consistent, high quality, crowd-sourced metadata.

$ beet stats genre:ambient
Tracks: 649
Total time: 2.7 days
Approximate total size: 22.4 GiB
Artists: 76
Albums: 53
Album artists: 34

$ beet ls -a 'added:2019-07-01..'
Deathcount in Silicon Valley - Acheron
Dlareme - Compass
The Higher Intelligence Agency & Biosphere - Polar Sequences
JK/47 - Tokyo Empires
Matt Morton - Apollo 11 Soundtrack

$ beet ls -ap albumartist:joplin
/home/pigmonkey/library/audio/music/Janis Joplin/Full Tilt Boogie
/home/pigmonkey/library/audio/music/Janis Joplin/I Got Dem Ol' Kozmic Blues Again Mama!

As regular readers will have surmised, the files themselves are stored in git-annex.

Optical Backups of Financial Archives

Every year I burn an optical archive of my financial documents, similar to how (and why) I create optical backups of photos. I schedule this financial archive for the spring, after the previous year’s taxes have been submitted and accepted. Taskwarrior solves the problem of remembering to complete the archive.

$ task add project:finance due:2019-04-30 recur:yearly wait:due-4weeks "burn optical financial archive with parity"

The archive includes two git-annex repositories.

The first is my ledger repository. Ledger is the double-entry accounting system I began using in 2012 to record the movement of every penny that crosses one of my bank accounts (small cash transactions, less than about $20, are usually-but-not-always except from being recorded). In addition to the plain-text ledger files, this repository also holds PDF or JPG images of receipts.

The second repository holds my tax information. Each tax year gets a ctmg container which contains any documents used to complete my tax returns, the returns themselves, and any notifications of those returns being accepted.

The yearly optical archive that I create holds the entirety of these two repositories – not just the information from the previous year – so really each disc only needs to have a shelf life of 12 months. Keeping the older discs around just provides redundancy for prior years.

Creating the Archive

The process of creating the archive is very similar to the process I outlined six years ago for the photo archives.

The two repositories, combined, are about 2GB (most of that is the directory of receipts from the ledger repository). I burn these to a 25GB BD-R disc, so file size is not a concern. I’ll tar them, but skip any compression, which would just add extra complexity for no gain.

$ mkdir ~/tmp/archive
$ cd ~/library
$ tar cvf ~/tmp/archive/ledger.tar ledger
$ tar cvf ~/tmp/archive/tax.tar tax

The ledger archive will get signed and encrypted with my PGP key. The contents of the tax repository are already encrypted, so I’ll skip encryption and just sign the archive. I like using detached signatures for this.

$ cd ~/tmp/archive
$ gpg -e -r peter@havenaut.net -o ledger.tar.gpg ledger.tar
$ gpg -bo ledger.tar.gpg.sig ledger.tar.gpg
$ gpg -bo tax.tar.sig tax.tar
$ rm ledger.tar

Previously, when creating optical photo archives, I used DVDisaster to create the disc image with parity. DVDisaster no longer exists. The code can still be found, and the program still works, but nobody is developing it and it doesn’t even an official web presence. This makes me uncomfortable for a tool that is part of my long-term archiving plans. As a result, I’ve moved back to using Parchive for parity. Parchive also does not have much in the way of active development around it, but it is still maintained, has been around for a long period of time, is still used by a wide community, and will probably continue to exist as long as people share files on less-than-perfectly-reliable mediums.

As previously mentioned, I’m not worried about the storage space for these files, so I tell par2create to create PAR2 files with 30% redundancy. I suppose I could go even higher, but 30% seems like a good number. By default this process will be allowed to use 16MB of memory, which is cute, but RAM is cheap and I usually have enough to spare so I’ll give it permission to use up to 8GB.

$ par2create -r30 -m8000 recovery.par2 *

Next I’ll use hashdeep to generate message digests for all the files in the archive.

$ hashdeep * > hashes

At this point all the file processing is completed. I’ll put a blank disc in my burner (a Pioneer BDR-XD05B) and burn the directory using growisofs.

$ growisofs -Z /dev/sr0 -V "Finances 2019" -r *

Verification

The final step is to verify the disc. I have a few options on this front. These are the same steps I’d take years down the road if I actually needed to recover data from the archive.

I can use the previous hashes to find any files that do not match, which is a quick way to identify bit rot.

$ hashdeep -x -k hashes *.{gpg,tar,sig,par2}

I can check the integrity of the PGP signatures.

$ gpg --verify tax.tar.gpg{.sig,}
$ gpg --verify tax.tar{.sig,}

I can use the PAR2 files to verify the original data files.

$ par2 verify recovery.par2

Archiving Bookmarks

I signed-up for Pinboard in 2014. It provides everything I need from a bookmarking service, which is mostly, you know, bookmarking. I pay for the archival account, meaning that Pinboard downloads a copy of everything I bookmark and provides me with full-text search. I find this useful and well worth the $25 yearly fee, but Pinboard’s archive is only part of the solution. I also need an offline copy of my bookmarks.

Pinboard provides an API that makes it easy to acquire a list of bookmarks. I have a small shell script which pulls down a JSON-formatted list of my bookmarks and adds the file to git-annex. This is controlled via a systemd service and timer, which wraps the script in backitup to ensure daily dumps. The systemd timer itself is controlled by nmtrust, so that it only runs when I am connected to a trusted network.

This provides data portability, ensuring that I could import my tagged URLs to another bookmarking service if I ever found something better than Pinboard (unlikely, competing with Pinboard is futile). But I also want a locally archived copy of the pages themselves, which Pinboard does not offer through the API. I carry very much about being able to work offline. The usefulness of a computer is directly propertional to the amount of data that is accessible without a network connection.

To address this I use bookmark-archiver, a Python script which reads URLs from a variety of input files, including Pinboard’s JSON dumps. It archives each URL via wget, generates a screenshot and PDF via headless Chromium, and submits the URL to the Internet Archive (with WARC hopefully on the way). It will then generate an HTML index page, allowing the archives to be easily browsed. When I want to browse the archive, I simply change into the directory and use python -m http.server to serve the bookmarks at localhost:8000. Once downloaded locally, the archives are of course backed up, via the usual suspects like borg and cryptshot.

The archiver is configured via environment variables. I configure my preferences and point the program at the Pinboard JSON dump in my annex via a shell script (creatively also named bookmark-archiver). This wrapper script is called by the previous script which dumps the JSON from Pinboard.

The result of all of this is that every day I get a fresh dump of all my bookmarks, each URL is archived locally in multiple formats, and the archive enters into my normal backup queue. Link rot may defeat the Supreme Court, but between this and my automated repository tracking I have a pretty good system for backing up useful pieces of other people’s data.

On E-Books

The Kindle Paperwhite has been my primary medium for consuming books since the beginning of 2014. E Ink is a great display technology that I wish was more wide spread, but beyond the fact that the Kindle (and I assume other e-readers) makes for a pleasant reading experience, the real value in electronic books is storage.

At its peak my physical collection was somewhere north of 200 books. As I mentioned years ago I took inspiration from Gary Snyder’s character in The Dharma Bums and stored my books in milk crates, which stack like a bookcase for normal use and kept the collection pre-boxed for moving. But that many books still take up space, and are still annoying to move. And in some regards they are fragile – redundant data storage is expensive in meatspace.

My digital library currently sits at 572 books and 13 gigabytes (the size skyrocketed after I began to archive a few comics). I could not justify that many physical books in my life. I still have a collection of dead trees, but I’m down to 3 milk crates. I store my digital library in git-annex, allowing me to redundantly replicate my collection across the globe, as well as keep copies in cold storage. I also burn yearly optical backups of the library to M-DISC. The library is managed with Calibre.

When I first bought the Kindle it required internet access to associate with my Amazon account. Ever since then, it has been in airplane mode. I spun up a temporary wireless network for the setup that I then deleted after the process was complete, ensuring that even if Amazon’s airplane mode was untrustworthy, the device would not be able to phone home. The advantages of giving the Kindle internet access seem minute, and are far outweighed by the disadvantage of having to trust Amazon.

If I purchase a book from Amazon, I select the “Download & Transfer via USB” option. This results in a crippled AZW file. I am under the radical delusion that I should own what I purchase, so I import that file into Calibre using the DeDRM_tools plugin. This strips any DRM, making the book ready to be consumed and archived. Books are transferred between my computer and the Kindle via USB, which Calibre makes simple.

When I acquire books through other channels, my preferred format is always EPUB: an open format that is simply a zip archive of HTML files. Calibre’s built-in conversion tools are quite good, giving me confidence that any e-book format I import into the library will be readable at any point in the future, but my preference is to store data in formats that are open, accessible, and understandable. The closer one gets to well-formatted plain text, the closer one gets to god.

While the Kindle excels at the linear reading of novels, I’ve also come to appreciate digital copies of reference books and technical manuals. Often the first reading of these types of books involves lots of flipping back and forth, which is easier in the dead tree variant, but after that first reading the searchability of the digital copy is far more useful for reference. The physical size of these types of books also makes them even more difficult to carry and store than other books, all but guaranteeing you won’t have access to them when you need to reference them. Digital books solve that problem.

I’m confident in my ability to securely store digital data. Whenever I import a book into my library, I know that I now have permanent access to that knowledge for the rest of my life, regardless of environmental disaster, the whims of publishing houses, or the size of my living quarters.

Cold Storage

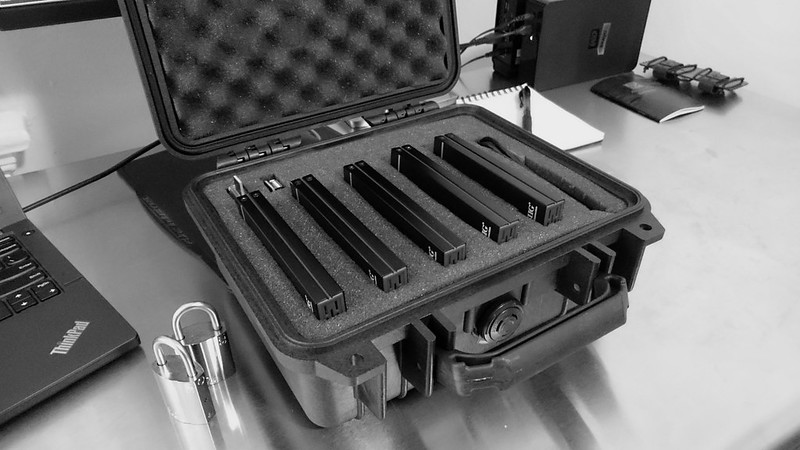
This past spring I mentioned my cold storage setup: a number of encrypted 2.5” drives in external enclosures, stored inside a Pelican 1200 case, secured with Abloy Protec2 321 locks. Offline, secure, and infrequently accessed storage is an important component of any strategy for resilient data. The ease with which this can be managed with git-annex only increases my infatuation with the software.

Data Data Data Data Data

I’ve been happy with the Seagate ST2000LM003 drives for this application. Unfortunately the enclosures I first purchased did not work out so well. I had two die within a few weeks. They’ve been replaced with the SIG JU-SA0Q12-S1. These claim to be compatible with drives up to 8TB (someday I’ll be able to buy 8TB 2.5” drives) and support USB 3.1. They’re also a bit thinner than the previous enclosures, so I can easily fit five in my box. The Seagate drives offer about 1.7 terabytes of usable space, giving this setup a total capacity of 8.5 terabytes.

Setting up git-annex to support this type of cold storage is fairly straightforward, but does necessitate some familiarity with how the program works. Personally, I prefer to do all my setup manually. I’m happy to let the assistant watch my repositories and manage them after the setup, and I’ll occasionally fire up the web app to see what the assistant daemon is doing, but I like the control and understanding provided by a manual setup. The power and flexibility of git-annex is deceptive. Using it solely through the simplified interface of the web app greatly limits what can be accomplished with it.

Encryption

Before even getting into git-annex, the drive should be encrypted with LUKS/dm-crypt. The need for this could be avoided by using something like gcrypt, but LUKS/dm-crypt is an ingrained habit and part of my workflow for all external drives. Assuming the drive is /dev/sdc, pass cryptsetup some sane defaults:

$ sudo cryptsetup --cipher aes-xts-plain64 --key-size 512 --hash sha512 luksFormat /dev/sdc

With the drive encrypted, it can then be opened and formatted. I’ll give the drive a human-friendly label of themisto.

$ sudo cryptsetup luksOpen /dev/sdc themisto_crypt
$ sudo mkfs.ext4 -L themisto /dev/mapper/themisto_crypt

At this point the drive is ready. I close it and then mount it with udiskie to make sure everything is working. How the drive is mounted doesn’t matter, but I like udiskie because it can integrate with my password manager to get the drive passphrase.

$ sudo cryptsetup luksClose /dev/mapper/themisto_crypt
$ udiskie-mount -r /dev/sdc

Git-Annex

With the encryption handled, the drive should now be mounted at /media/themisto. For the first few steps, we’ll basically follow the git-annex walkthrough. Let’s assume that we are setting up this drive to be a repository of the annex ~/video. The first step is to go to the drive, clone the repository, and initialize the annex. When initializing the annex I prepend the name of the remote with satellite :. My cold storage drives are all named after satellites, and doing this allows me to easily identify them when looking at a list of remotes.

$ cd /media/themisto
$ git clone ~/video
$ cd video
$ git annex init "satellite : themisto"

Disk Reserve

Whenever dealing with a repository that is bigger (or may become bigger) than the drive it is being stored on, it is important to set a disk reserve. This tells git-annex to always keep some free space around. I generally like to set this to 1 GB, which is way larger than it needs to be.

$ git config annex.diskreserve "1 gb"

Adding Remotes

I’ll then tell this new repository where the original repository is located. In this case I’ll refer to the original using the name of my computer, nous.

$ git remote add nous ~/video

If other remotes already exist, now is a good time to add them. These could be special remotes or normal ones. For this example, let’s say that we have already completed this whole process for another cold storage drive called sinope, and that we have an s3 remote creatively named s3.

$ git remote add sinope /media/sinope/video
$ export AWS_ACCESS_KEY_ID="..."
$ export AWS_SECRET_ACCESS_KEY="..."
$ git annex enableremote s3

Trust

Trust is a critical component of how git-annex works. Any new annex will default to being semi-trusted, which means that when running operations within the annex on the main computer – say, dropping a file – git-annex will want to confirm that themisto has the files that it is supposed to have. In the case of themisto being a USB drive that is rarely connected, this is not very useful. I tell git-annex to trust my cold storage drives, which means that if git-annex has a record of a certain file being on the drive, it will be satisfied with that. This increases the risk for potential data-loss, but for this application I feel it is appropriate.

$ git annex trust .

Preferred Content

The final step that needs to be taken on the new repository is to tell it what files it should want. This is done using preferred content. The standard groups that git-annex ships with cover most of the bases. Of interest for this application is the archive group, which wants all content except that which has already found its way to another archive. This is the behaviour I want, but I will duplicate it into a custom group called satellite. This keeps my cold storage drives as standalone things that do not influence any other remotes where I may want to use the default archive.

$ git annex groupwanted satellite "(not copies=satellite:1) or approxlackingcopies=1"
$ git annex group . satellite
$ git annex wanted . groupwanted

For other repositories, I may want to store the data on multiple cold storage drives. In that case I would create a redundantsatellite group that wants all content which is not already present in two other members of the group.

$ git annex groupwanted redundantsatellite "(not copies=redundantsatellite:2) or approxlackingcopies=1"
$ git annex group . redundantsatellite
$ git annex wanted . groupwanted

Syncing

With everything setup, the new repository is ready to sync and to start to ingest content from the remotes it knows about!

$ git annex sync --content

However, the original repository also needs to know about the new remote.

$ cd ~/video
$ git remote add themisto /media/themisto/video
$ git annex sync

The same is the case for any other previously existing repository, such as sinope.

Redundant File Storage

As I’ve mentioned previously, I store just about everything that matters in git-annex (the only exception is code, which is stored directly in regular git). One of git-annex’s many killer features is special remotes. They make tenable this whole “cloud storage” thing that we do now.

A special remote allows me to store my files with a large number of service providers. It makes this easy to do by abstracting away the particulars of the provider, allowing me to interact with all of them in the same way. It makes this safe to do by providing encryption. These factors encourage redundancy, reducing my reliance on any one provider.

Recently I began playing with rclone. Rclone is a program that supports file syncing for a handful of cloud storage providers. That’s semi-interesting by itself but, more significantly, there is a git-annex special remote wrapper. That means any of the providers supported by rclone can be used as a special remote. I looked through all of rclone’s supported providers and decided there were a few that I had no reason not to use.

Hubic

Hubic is a storage provider from OVH with a data center in France. Their pricing is attractive. I’d happily pay €50 per year for 10TB of storage. Unfortunately they limit connections to 10 Mbit/s. In my experience they ended up being even slower than this. Slow enough that I don’t want to give them money, but there’s still no reason not to take advantage of their free 25 GB plan.

After signing up, I setup a new remote in rclone.

$ rclone config
n) New remote
s) Set configuration password
q) Quit config
n/s/q> n
name> hubic-annex
Type of storage to configure.
Choose a number from below, or type in your own value
 1 / Amazon Drive
   \ "amazon cloud drive"
 2 / Amazon S3 (also Dreamhost, Ceph)
   \ "s3"
 3 / Backblaze B2
   \ "b2"
 4 / Dropbox
   \ "dropbox"
 5 / Google Cloud Storage (this is not Google Drive)
   \ "google cloud storage"
 6 / Google Drive
   \ "drive"
 7 / Hubic
   \ "hubic"
 8 / Local Disk
   \ "local"
 9 / Microsoft OneDrive
   \ "onedrive"
10 / Openstack Swift (Rackspace Cloud Files, Memset Memstore, OVH)
   \ "swift"
11 / Yandex Disk
   \ "yandex"
Storage> 7
Hubic Client Id - leave blank normally.
client_id> 
Hubic Client Secret - leave blank normally.
client_secret> 
Remote config
Use auto config?
 * Say Y if not sure
 * Say N if you are working on a remote or headless machine
y) Yes
n) No
y/n> y
If your browser doesn't open automatically go to the following link: http://127.0.0.1:53682/auth
Log in and authorize rclone for access
Waiting for code...
Got code
--------------------
[remote]
client_id = 
client_secret = 
token = {"access_token":"XXXXXX"}
--------------------
y) Yes this is OK
e) Edit this remote
d) Delete this remote
y/e/d> y

With that setup, I went into my ~/documents annex and added the remote.

$ git annex initremote hubic type=external externaltype=rclone target=hubic-annex prefix=annex-documents chunk=50MiB encryption=shared rclone_layout=lower mac=HMACSHA512

I want git-annex to automatically send everything to Hubic, so I took advantage of standard groups and put the repository in the backup group.

$ git annex wanted hubic standard
$ git annex group hubic backup

Given Hubic’s slow speed, I don’t really want to download files from it unless I need to. This can be configured in git-annex by setting the cost of the remote. Local repositories default to 100 and remote repositories default to 200. I gave the Hubic remote a high cost so that it will only be used if no other remotes are available.

$ git config remote.hubic.annex-cost 500

If you would like to try Hubic, I have a referral code which gives us both an extra 5GB for free.

Backblaze B2

B2 is the cloud storage offering from backup company Backblaze. I don’t know anything about them, but at $0.005 per GB I like their pricing. A quick search of reviews shows that the main complaint about the service is that they offer no geographic redundancy, which is entirely irrelevant to me since I build my own redundancy with my half-dozen or so remotes per repository.

Signing up with Backblaze took a bit longer. They wanted a phone number for 2-factor authentication, I wanted to give them a credit card so that I could use more than the 10GB they offer for free, and I had to generate an application key to use with rclone. After that, the rclone setup was simple.

$ rclone config
n) New remote
s) Set configuration password
q) Quit config
n/s/q> n
name> b2-annex
Type of storage to configure.
Choose a number from below, or type in your own value
 1 / Amazon Drive
   \ "amazon cloud drive"
 2 / Amazon S3 (also Dreamhost, Ceph)
   \ "s3"
 3 / Backblaze B2
   \ "b2"
 4 / Dropbox
   \ "dropbox"
 5 / Google Cloud Storage (this is not Google Drive)
   \ "google cloud storage"
 6 / Google Drive
   \ "drive"
 7 / Hubic
   \ "hubic"
 8 / Local Disk
   \ "local"
 9 / Microsoft OneDrive
   \ "onedrive"
10 / Openstack Swift (Rackspace Cloud Files, Memset Memstore, OVH)
   \ "swift"
11 / Yandex Disk
   \ "yandex"
Storage> 3
Account ID
account> 123456789abc
Application Key
key> 0123456789abcdef0123456789abcdef0123456789
Endpoint for the service - leave blank normally.
endpoint> 
Remote config
--------------------
[remote]
account = 123456789abc
key = 0123456789abcdef0123456789abcdef0123456789
endpoint = 
--------------------
y) Yes this is OK
e) Edit this remote
d) Delete this remote
y/e/d> y

With that, it was back to ~/documents to initialize the remote and send it all the things

$ git annex initremote b2 type=external externaltype=rclone target=b2-annex prefix=annex-documents chunk=50MiB encryption=shared rclone_layout=lower mac=HMACSHA512
$ git annex wanted b2 standard
$ git annex group b2 backup

While I did not measure the speed with B2, it feels as fast as my S3 or rsync.net remotes, so I didn’t bother setting the cost.

Google Drive

While I do not regularly use Google services for personal things, I do have a Google account for Android stuff. Google Drive offers 15 GB of storage for free and rclone supports it, so why not take advantage?

$ rclone config
n) New remote
s) Set configuration password
q) Quit config
n/s/q> n
name> gdrive-annex
Type of storage to configure.
Choose a number from below, or type in your own value
 1 / Amazon Drive
   \ "amazon cloud drive"
 2 / Amazon S3 (also Dreamhost, Ceph)
   \ "s3"
 3 / Backblaze B2
   \ "b2"
 4 / Dropbox
   \ "dropbox"
 5 / Google Cloud Storage (this is not Google Drive)
   \ "google cloud storage"
 6 / Google Drive
   \ "drive"
 7 / Hubic
   \ "hubic"
 8 / Local Disk
   \ "local"
 9 / Microsoft OneDrive
   \ "onedrive"
10 / Openstack Swift (Rackspace Cloud Files, Memset Memstore, OVH)
   \ "swift"
11 / Yandex Disk
   \ "yandex"
Storage> 6
Google Application Client Id - leave blank normally.
client_id> 
Google Application Client Secret - leave blank normally.
client_secret> 
Remote config
Use auto config?
 * Say Y if not sure
 * Say N if you are working on a remote or headless machine or Y didn't work
y) Yes
n) No
y/n> y
If your browser doesn't open automatically go to the following link: http://127.0.0.1:53682/auth
Log in and authorize rclone for access
Waiting for code...
Got code
--------------------
[remote]
client_id = 
client_secret = 
token = {"AccessToken":"xxxx.x.xxxxx_xxxxxxxxxxx_xxxxxxxxxxxxxxxxxxxxxxxxxxxxxxxxxxxxxxxxxxxxx","RefreshToken":"1/xxxxxxxxxxxxxxxx_xxxxxxxxxxxxxxxxxxxxxxxxxx","Expiry":"2014-03-16T13:57:58.955387075Z","Extra":null}
--------------------
y) Yes this is OK
e) Edit this remote
d) Delete this remote
y/e/d> y

And again, to ~/documents.

$ git annex initremote gdrive type=external externaltype=rclone target=gdrive-annex prefix=annex-documents chunk=50MiB encryption=shared rclone_layout=lower mac=HMACSHA512
$ git annex wanted gdrive standard
$ git annex group gdrive backup

Rinse and repeat the process for other annexes. Revel in having simple, secure, and redundant storage.