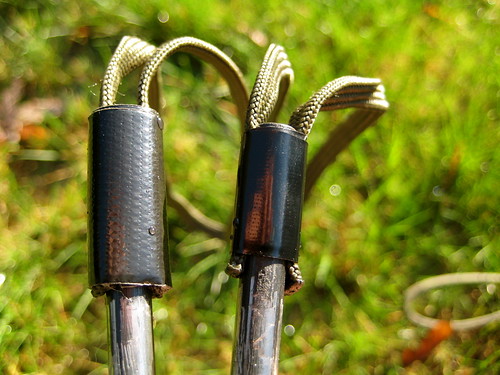
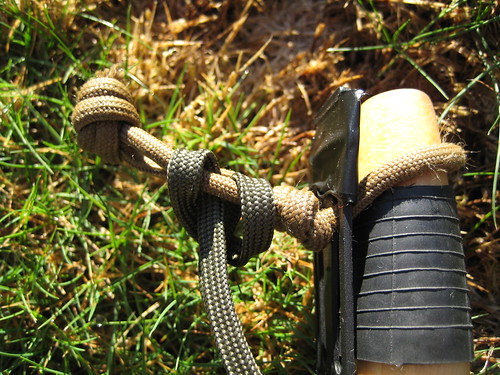
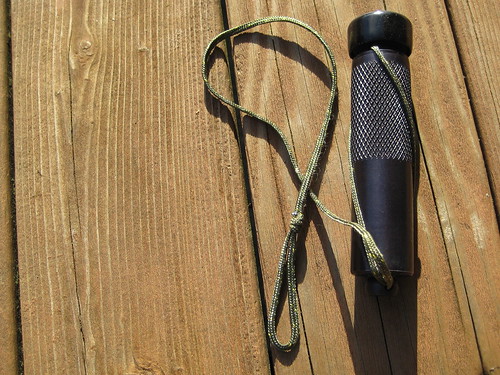
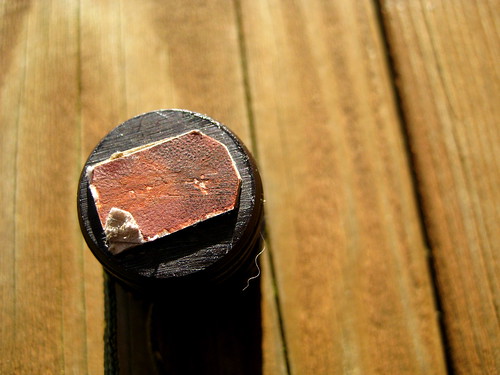
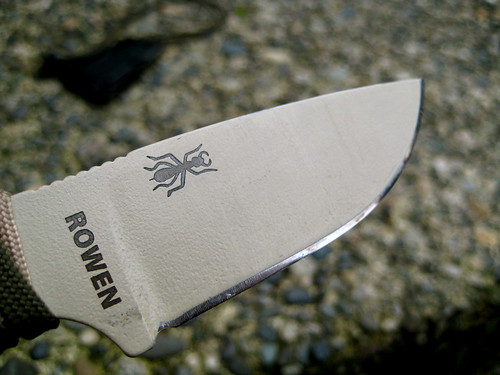
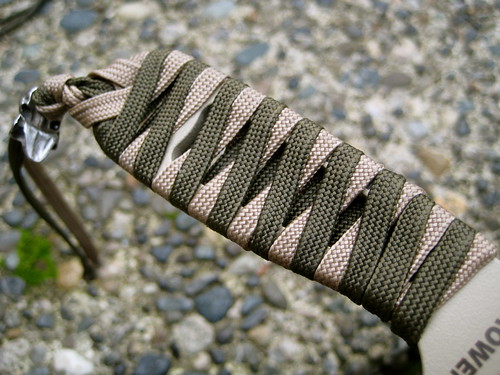
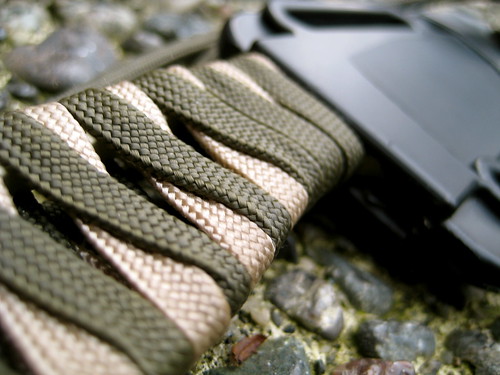
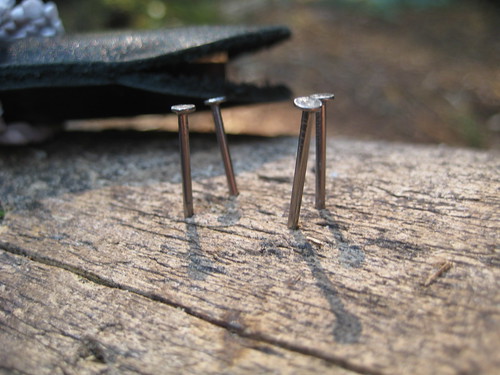
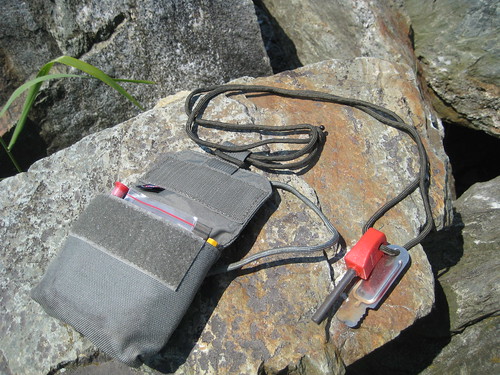
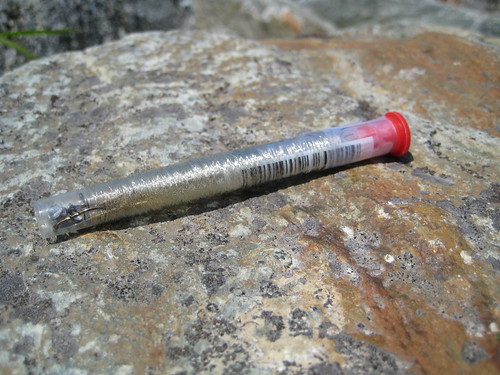
I don’t like paying for brand-name ferrocerium rods with handles when blanks can be got for much cheaper – usually $5 less than their handled counterparts. But I do like to have a handle on the rod, and I require some sort of lanyard. When it comes to something as important as a ferro rod, I find comfort in knowing that it is secured to this-or-that.
The simplest solution is to tape a loop of paracord to one end of the rod. I use gutted paracord. The tape can be wrapped a few extra times to make a handle however thick I like.
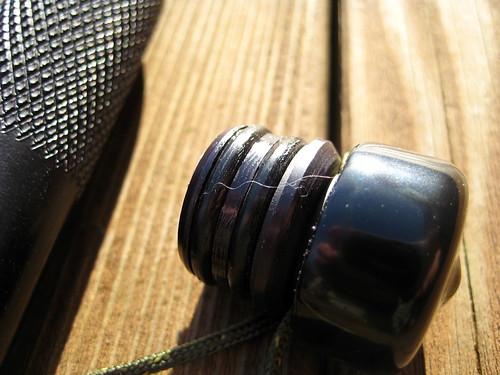
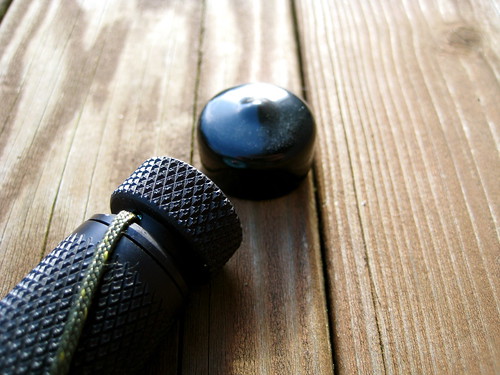
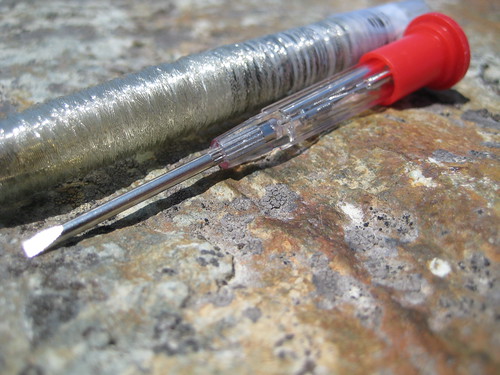
The other rod in the above photo has a similar lanyard attached in a different manner. The paracord is first taped to the rod with a small piece of electrical tape. Then, on top of that, I slid a small piece of heat-shrink tubing (the kind used for electrical wiring). That was blasted with a hair dryer, causing it to shrink.
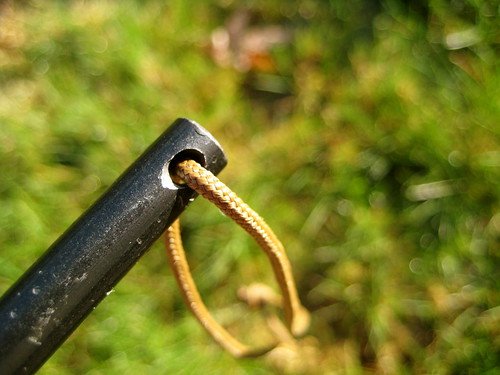
A small hole could also be drilled in one end of the rod. This is something of a fire hazard: the drill and rod will be throwing a whole lot of sparks as the drill works its way through. And it requires access to power tools, which isn’t always practical.
My favorite method is the tape. The lanyard is secure and the tape provides a thick, padded handle.
I like to buy my blanks from Ben’s Backwoods. If you like misch metal blanks, Going Gear is the place to be.
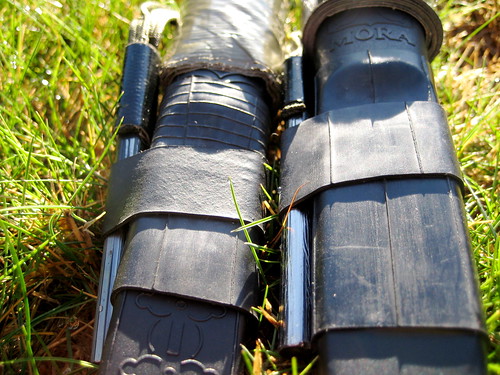
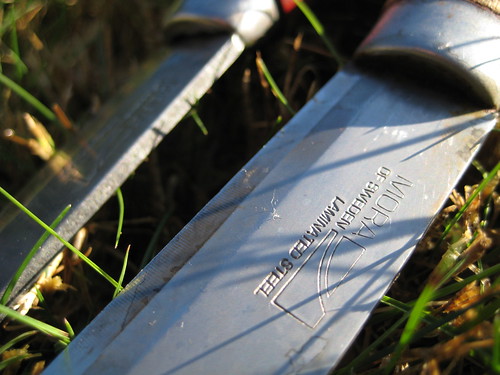
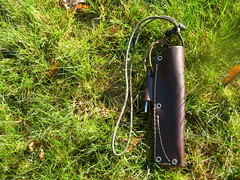
The greatest disappointment about any Mora knife is the sheath: a flimsy, plastic thing that won’t easily fit on a decent sized belt and does not even hold the knife very securely. As they come, I consider them unusable. But a few simple modifications and additions make them quite acceptable.
The Mora knife sheaths are designed to be mounted either on a button on a pair of coveralls or through a belt. Apparently people wear very small, skinny belts in Sweden. Over here in the United States of Gun Belts, that doesn’t fly. The belt slot on the sheath can be forcefully enlarged by shoving in a piece of wood, such as a ruler, and applying heat to cause the plastic to expand, but I don’t trust that such an act will not over weaken the plastic. I’m not a big fan of carrying a Mora directly on my belt, anyway. Usually, I’ll carry the knife either on a lanyard around my neck or as a dangler off my belt. But both of these setups allow the possibility of the knife and sheath to swing freely, accentuating the problem of an insecure fit.
Both the problem of how to carry the sheath and the problem of the insecure fit can be addressed with a single piece of paracord.
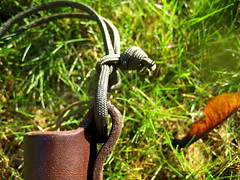
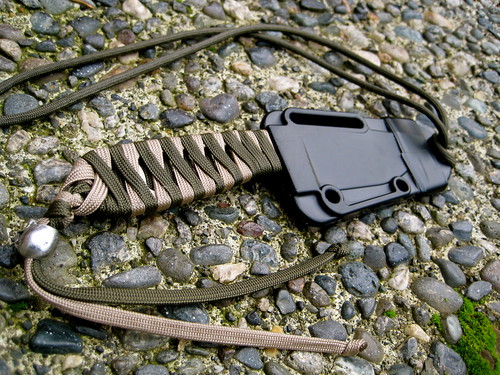
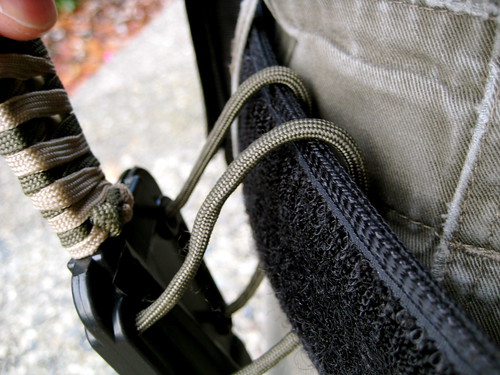
With the knife in the sheath, I take a piece of paracord and run both ends around the handle and through the slot for the belt. Then, tight against the back of the sheath, I tie an overhand knot in either end of the cord. This creates a loop of paracord on the front of the sheath that can be made smaller, but cannot become any wider than the bottom third of the handle. Because the handles on Mora knifes are somewhat tapered – fatter in the middle than on either end – this loop prevents the knife from being removed from the sheath. Even if the knife is only lightly dropped into the sheath rather than securely pressed, it cannot be removed without first sliding off the loop of paracord.
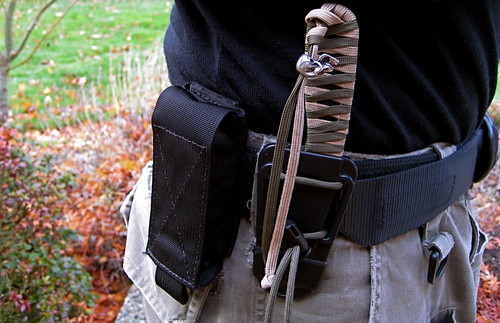
After tying the two knots against the back of the sheath in either end of the paracord, I take both ends and tie them together, forming a loop on the back of the sheath. This provides my carry options.
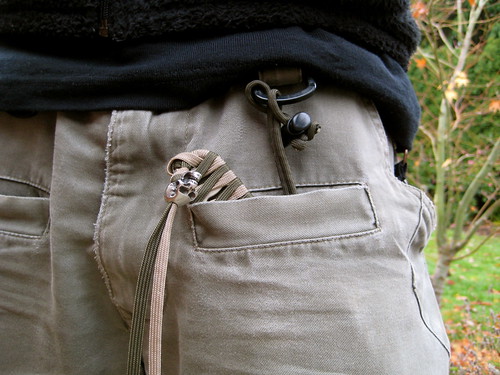
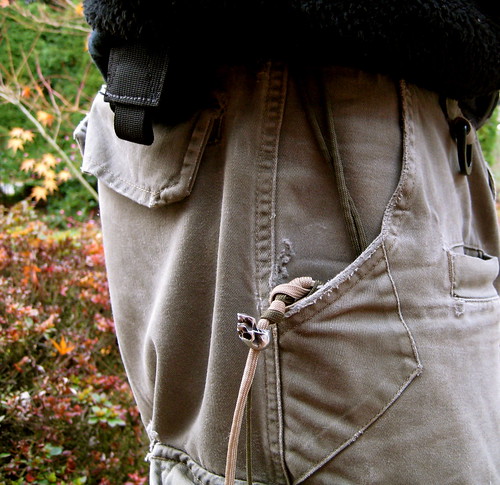
To carry the knife in a dangler system, I prefer to use a Maxpedition Keyper rather than a carabiner. The Keyper is mounted on my belt and clipped into the loop of paracord on the sheath. (To reduce movement in this setup, I’ll stick the knife and sheath in my pocket.)
The last thing that I do to this part of the sheath is add a small wrap of electrical tape around the very top, covering the upper bit of the belt loop and the button hole. This prevents the paracord from sliding to the top of the sheath and forces the securing loop to be about .75” from the very end of the handle. I’ve found that if this is not done, the securing loop is like to slip off the handle.
That’s all that is needed to make the sheath usable, but a few other additions can be made to increase its utility.
Around the top of the sheath, I wrap tape. In the sheaths pictured here, one has 2” olive drab duct tape, the other has 1” black Gorilla Tape (which is like duct tape, but thicker and stickier). One can never carry enough tape. I imagine, also, that the tape likely increases the structural integrity of the sheath.
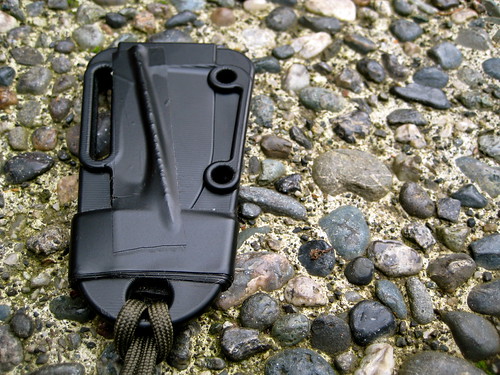
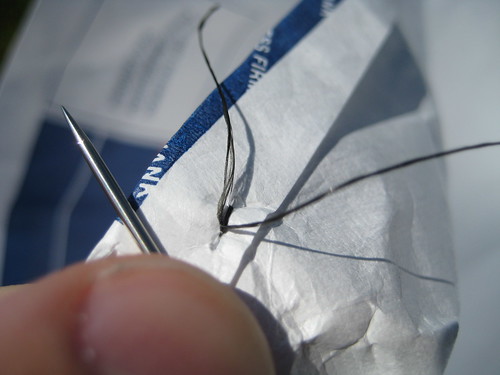
On the back of both sheaths, I have a #17 sailmaking needle, pre-threaded with black kevlar thread, taped down with some electrical tape. As I mentioned in my review of the RAT Izula, this is an idea I first picked up from one Dave Canterbury’s videos. The extra needle and thread adds no noticeable weight and could be a welcome addition to the sheath if you ever find yourself separated from your pack, with the knife and sheath as your only piece of gear.
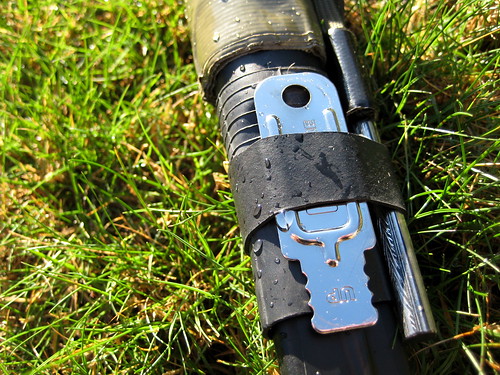
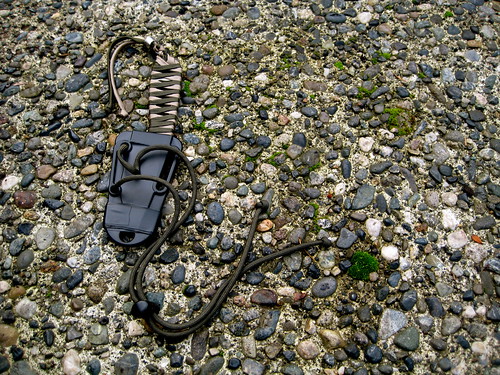
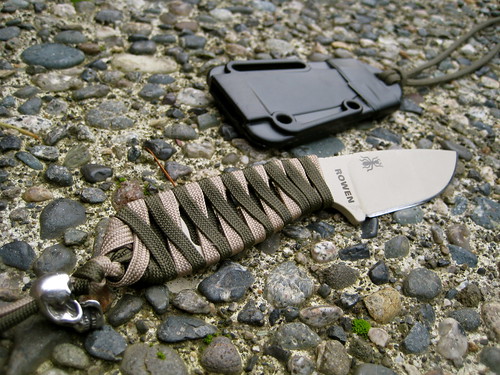
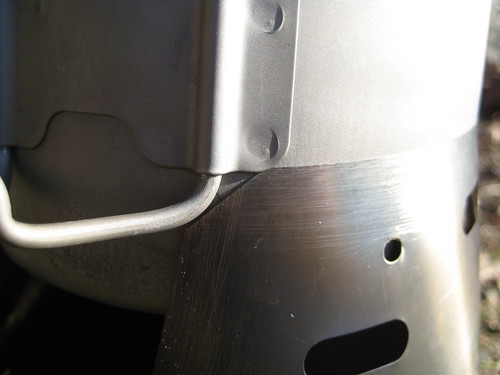
The next modification on the body of the sheath was also inspired by Dave Cantebury. In another of his videos, he showed how he had layered different width pieces of inner-tube on a machete sheath to create pockets that could store small items, such as a sharpening stone and magnesium fire starter. With that in mind, I add a wide piece of inner-tube onto the middle of the Mora sheath (which also serves to cover and further secure the taped down needle). Then, on top of that, I put a skinnier piece of inner-tube. Slid between both pieces is a backup ferro rod. Because the rod has rubber below it and rubber atop, there is an incredible amount of friction. The ferro rod becomes difficult to remove. I have carried blank rods in these “pockets” and they have never fallen out. Still, I prefer to carry rods with a lanyard of some sort on them. I loop the rod through its lanyard around the paracord loop on the top of the sheath, guaranteeing that the rod is secured.
The sheath for my KJ #1 knife has only a ferro rod. That knife is carbon steel and can generate sparks off the spine. On the sheath for the larger SL-2, however, I have added a small striker slid between the two pieces of inner-tube on the back. The SL-2 is made of laminated steel, which is too soft to reliably produce sparks.
These modifications made to the Mora sheath help to secure the knife, allow for different carry options, guarantee a source of fire, and provide a needle, thread and tape for repairs. They turn what is otherwise a near useless sheath into a functional item worthy of being matched with the Mora blade.
(I also own a high-quality leather sheath made by JRE Industries for the KJ #1 knife. I tie a loop of paracord through the top loop of leather on the sheath so that the knife may be carried around the neck or on a dangler, similar to the modified plastic sheath. The leather sheath does not require a loop of paracord on the front to secure the handle. Nor does it need pieces of inner-tube to create a pocket for a ferro rod. The only thing that it lacks is a repair needle, but I have found that most tape does not adhere very well to leather, so I cannot stick one on the back.)
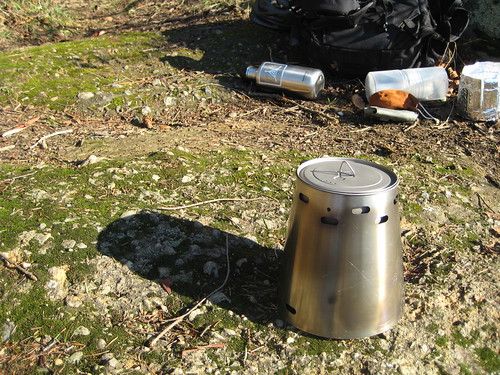
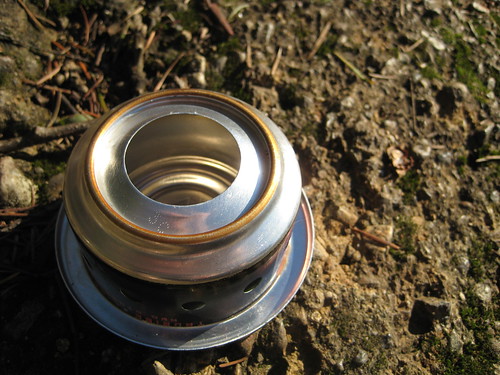
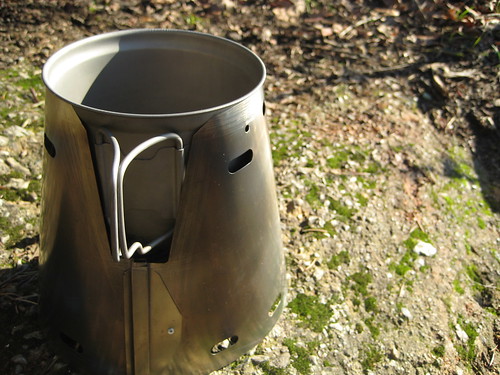
Yesterday, Avagdu asked me if the Vargo Triad XE stove could be burned inside the cone of my Trail Designs Ti-Tri Stove System. I’ve used it in the cone a couple of different times, but never performed any direct comparisons between it and the 12-10 alcohol stove that comes with the Ti-Tri system. Today, I spent some time with both stoves to do just that. Temperatures were around 42 degrees Fahrenheit.
I burned both stoves with the same amount of fuel. One of the downsides of the Triad XE stove is that because the main fuel source is enclosed within the inner container, it cannot be directly lit. Instead, some fuel must be placed within the outer section of the stove. This is then lit to prime the main fuel source. On an alcohol stove where the main fuel is directly accessible, such as the 12-10, the outer priming ring is not always required. It will usually be used when operating in colder temperatures. To be fair for these tests, I primed both stoves with the same amount of alcohol.
The Triad XE stove had to be tested in two different modes: with support legs extended and with support legs collapsed. With the legs collapsed, the stove sits a little lower than the 12-10. With legs extended, it’s a bit higher. The tests were done on a hard, solid surface so that when the legs were extended they were not pushed into the ground (as they might be when using the stove on dirt). The Triad XE took longer to bring the 2 cups of water to a boil with the legs collapsed, which is to be expected, since the flames are further from the pot.
Interestingly, when the Triad XE’s legs were extended, it took a significantly shorter period of time than the 12-10 stove to bring the same amount of water to a boil. One would think that the 12-10 stove, being designed by Trail Designs specifically to work within the Ti-Tri cone, would be superior to a general-purpose stove like the Triad XE burning inside the same cone. The Triad XE also had a longer burn time than the 12-10, suggesting that it makes more efficient use of the same amount of fuel (although, in practice, it may require more fuel than the 12-10 since the Triad XE must always be primed and the 12-10 must not).
All in all, it seems that leaving the 12-10 at home and bringing the Triad XE with the rest of the Ti-Tri system would be a smart move. But then, there are the weights. The Triad XE weighs three times as much as the 12-10 – certainly a significant amount. Though it must be remembered that the Triad XE is not just an alcohol stove: it is designed to burn solid fuel tabs (Esbit) as well. So, to be fair, if I switched out the 12-10 with the Triad XE, I would also leave Trail Design’s GramCracker burner at home. But the GramCracker tips my scale at 0.1 oz, so it does not really factor in to the decision much. (I also think that the GramCracker most likely burns fuel tabs slightly more efficiently than the Triad XE, but I haven’t done this comparison yet.)
The other factor in comparing the two stoves is durability. The Triad XE, being made out of titanium is a tough little guy, not phased by the occasional drop or riding around loose in my pack. In contrast, the 12-10 stove is made out of two thin aluminum cans, making it very delicate. Even though it lives within the protective plastic caddy of the Ti-Tri, it has numerous scratches and dents to show for its year in use.
I’m not sure what conclusion to draw. If the Triad XE weighed closer to 1.0 oz, it would be without doubt superior.
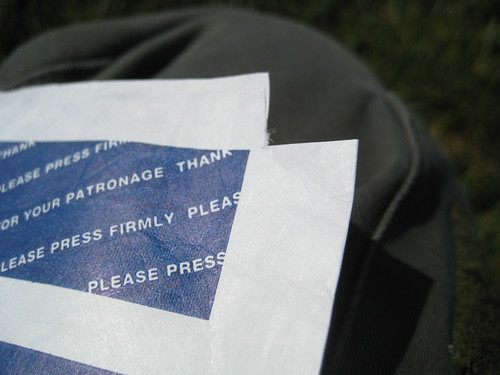
The K & M Industries Match Case has long been considered one of the top waterproof match cases available. Each case is hand made in the Elk River, Idaho garage of Keith and Marge Lunders.
The match cases are available in either brass or aluminum and come in two different sizes. The standard length cases are 3 7/8”, designed to fit 2 3/8” strike-anywhere matches. The long length cases, measuring in at 4 1/4”, are designed for REI Storm Proof Matches. Aluminum cases are available in black, silver, green, or red.
Last winter, I bought a standard length, black aluminum case. It has been part of my wilderness EDC for close to a year.
Though I don’t always use them, I always carry matches into the wilderness, in addition to at least one BIC lighter and a multitude of ferro rods. Ferro rods are my primary means of starting fire – usually with some synthetic tinder, such as Vaseline soaked cotton balls. It’s also my primary way of starting my alcohol stoves. If I’m not having luck with the rod, or all my tinder is wet, I can move to a lighter or a match to get the fire going. I’ve also found that when it gets to about 20 degrees Fahrenheit or below, denatured alcohol does not like to take a spark – instead requiring a match or lighter to start my stove.
A lighter is of course the easiest way of starting a fire, but because I carry a BIC lighter, it is not always dependable. If it was submerged, it will need some time to dry out before working. If there are high winds, the flame will no doubt get blown out. I have previously carried waterproof, windproof butane lighters, but those seem to eat through the fuel way too fast to be practical wilderness devices. It is difficult to justify the huge price increase in one compared to a BIC lighter. The other problem with BIC lighters is that it can be hard to determine how much fuel you have left. You can judge the weight, shake it around next to your ear and listen, but it’s a rough estimate at best. That’s what I like about matches: you can count how many you have. For this simple reason, I am sometimes likely to go to my matches rather than my lighter when I need ready-made flame.
Carrying the aforementioned REI Storm Proof Matches also addresses some of the other concerns of the BIC lighter: they will light when wet (if lit and then submerged, they will quickly relight themselves after you remove them from the water) and are nigh impossible to blow out. This makes them a great emergency fire source, but, like the fancy butane lighters, are relatively expensive compared to standard strike-anywhere matches. Because of this, I carry both: normal strike-anywhere matches for general use and REI Storm Proof Matches for when the elements are against me. The REI Storm Proof Matches, being pretty darn waterproof, aren’t in much need of a waterproof case (I imagine that they will get soggy and useless if they’re kept underwater for a long period of time, but if you accidentally take a bath during a river crossing and crawl out within a couple minutes, the matches should be fine). Strike-anywhere matches, on the other hand, do need extra protection. Hence why I decided to start with the standard size K & M case.
All K & M match cases feature a unique closure system. The lid itself has two o-rings on it to prevent any water leakage (guaranteed to 2000 psi of water pressure). It’s not a screw on lid, but simply pressed onto the case. After the lid is on, you then twist the cap, which in turn twists and tightens the thin nylon lanyard around the body of the case, ensuring that the fit remains tight. Ingenious, simple, and effective.
The body of the case itself is about 3” (not including the cap). The bottom half is smooth, while the top bit is etched with a pattern that ensures a good grip can be had on the case, even when you and it are soaked.
The top of the lid sports a small Suunto compass for general direction finding, greatly increasing the utility of the item. This isn’t some cheap, $1 knock-off button compass, either. Suunto compasses can be depended upon.
The outer rim of the lid has been etched in the same manner as the top half of the body for grip, but the case also comes with a small protective piece of plastic that slides snugly over the lid, protecting the face of the compass. With this installed, you loose the extra grip on the lid. This may be a problem in some conditions.
The lanyard, after it does its thing tightening the lid, extends down past the body of the case for about 12”, terminating in a loop, which allows the case to be securely fastened to your person.
The inside of the lid is roughened, which is supposed to provide a surface for striking the matches. Perhaps I don’t know how to strike a match, but it’s never worked for me. In fact, as a general rule, I find strike-anywhere matches to actually be strike-anywhere-there-is-a-commercial-match-striking-surface matches. I never have luck attempting to strike matches on any old rough surface. But that’s not a problem: all REI Storm Proof Matches come with extra striking surfaces inside the box. They’re pretty heavy duty, work with all types of matches, and come sealed in plastic. I tend to collect them and stash them everywhere. For the K & M match case, I cut off a small piece that would fit on the bottom of the lid and super-glued it on. This guarantees me a working surface to strike my matches.
The rest of the striker I put back in it’s plastic cover and store in the body of the case, for use as a backup. The plastic prevents it from striking and lighting any of the matches.
Because of the striking surface on the lid, I store all the matches tip down, so that they won’t accidentally light and turn the case into a bomb. With the the extra striker stored, I can jam in about 25 matches, give or take a few. You could fit in more if you removed the striker. The match case is also a nice place to carry a pre-threaded needle or two for emergency repairs.
Around the outside of the case, I keep a length of that same 700x35 bicycle inner-tube that I have around my BIC and a couple of my Moras. The inner-tube, along with matches that are guaranteed to be dry, gives me a sure-fire method of fire starting.
Both the brass and aluminum cases sell for $19 each. That may seem like a lot of money for a simple match case, particularly when you can pick up a cheap-o plastic one for $1.75, but I think it is well worth the money. The brass case looks a lot nicer and is more durable, but is a good deal heavier than the aluminum.
Some day I would like to acquire one of the long aluminum cases for my REI Storm Proof Matches, even though it is not strictly necessary.
I also own a TAD Gear Life Capsule O.K., which makes a good match case. The TAD Capsule is equally waterproof and also includes a compass in one end (albeit a cheaper one), but because of the significantly increased weight of the TAD capsule over the K & M case, I think the K & M is a superior product.
Another review of the case, along with some discussion of matches, can be found at British Blades. I thought I remembered Schwert doing a review of the case on the now defunct Outdoors Magazine, but I cannot find it in the archives.
My primary EDC knife for the past few years has been a plain-edge Emerson Mini-Commander. It’s a great little knife: an ideal size for EDC and extraordinarily tough for a folder. I’ve used it as a pry-bar a few different times on objects that I would be afraid to pry with some fixed-blade knives. The Mini-Commander is no worse for the wear.
Still, I’ve often thought that I would like to EDC a fixed blade. After all, despite it’s toughness, the Mini-Commander is a folder and that gives it some limitations. I’ve also found that the grind and shape of the blade is not ideal for some wood-working and wilderness survival tasks. Making feather sticks with it isn’t easy.
I have carried a small Nemesis Hellion around my neck most every day for the past couple years. It’s a fixed blade, but quite small. As I’ve stated elsewhere, I think of the Hellion as a novelty item and a fun toy more than a tool. It’s extremely concealable due to its size, but could by no means replace the Mini-Commander.
Folding knives are fairly common and tend not to frighten many people. Fixed blades, on the other hand, are not so common out of the wilderness and rural areas. Now, I’ll admit that I have no idea concerning the legality of carrying a fixed blade in urban environments. I tried reading up on knife laws a number of years ago and quickly gave up – they are so convoluted and contradictory as to be meaningless. And so, for me, they are. I ignore them. So far that seems to work out pretty well. I don’t seem to recall granting any government the right to regulate a tool such as a knife, anyways. Still, I do concern myself with other people’s feelings and, as odd as it is, some people feel nervous around folks with fixed blade knives strapped to their hips. Even something like a nice 4-5” bushcraft blade on the belt doesn’t seem to fly in a city. I needed something more concealable, but still of a size large enough to be of some use.
Two products immediately jump out as a perfect solution (well, three, but I can’t afford another Chris Reeve knife): the RAT Izula and the Becker Necker. Both knives are small and flat, which lends them to a number of different carry options, but large enough to function as utilitarian tools. The Izula is 6.25” over all, with a 2.88” blade and 3.37” handle. The Becker Necker comes in with a larger 3.25” blade and 3.5” handle for an overall length of 6.75”. For the slight difference in overall length, one would think that jumping on the Becker Necker for the larger blade would be the way to go. After all, that extra .37” of blade could equate to more utility. But in searching around the internet and reading a number of comparisons, it became evident that the RAT Izula was the favored knife. It seems to be the consensus that, comparatively, the Becker Necker has too little handle for its length of blade. I don’t consider my hands to be large, but they certainly aren’t small, and I know that having too small a handle could completely ruin a knife for me, regardless of the quality of the blade. So, I chose the Izula.
Izula Options
The Izula can be purchased in two different packages: either the standard knife and sheath, which RAT asks around $80 for (way overpriced) but can easily be got for closer to $50 (a reasonable price) or as part of a “survival kit”. The “survival kit” starts with the same knife and sheath, but also includes a MOLLE lock, paracord, cord lock, snap, split ring, ferro rod, and whistle. RAT asks $100 for this complete kit (crazy) though $60-$70 seems the going rate for most merchants. The “survival kit” did not appeal to me. I already have paracord, ferro rods, cord locks, and split rings. The only useful item in the kit seemed to be the MOLLE lock. I decided to save the money and get only the basic knife and sheath.
The Izula also comes in four different colors, which is a bit fun: black, desert tan, olive drab, and, best of all, pink. I was quite tempted to get the pink, especially given my concern over other people’s feelings of fixed blades. Who could be afraid of a man with a pink knife? But it turns out that I was able to find the desert tan knife for less money on eBay than I could get the pink knife for, so I went with tan.
Edge
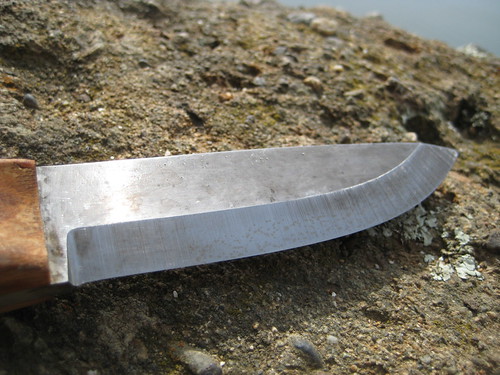
The flat ground 1095 steel takes an edge very easily on my Japanese water stones. With the stones and a leather strop, I can get Izula as sharp as my high-carbon, scandi-grind, bushcraft blades. Scary sharp. In fact, the knife is very, very impressive in what it can do. Its only limitation is its short blade and, for longer sessions of use, the bare, skeletonized handle.
Handle
When I first got the knife, I took some olive drab paracord and wrapped it in the way instructed on the back of the Izula instruction sheet. The current paracord wrap that I have on the handle is a 180 degree katana wrap. I first did this with normal paracord, but found that it made the handle a little too thick, so I went back and did it again with gutted paracord. That worked out better, but, being gutted, the paracord does not add a whole lot of extra padding. At the end of the day, the katana wrap is more for looks. The wrap that RAT recommends is a more practical way to pad the handle and carry spare paracord, but it doesn’t look anywhere near as cool!
At the end of the handle, I finished the wrap with a simple overhand knot. I had a unused skull bead laying around, so I decided to leave the two tail ends of paracord a bit long and thread the skull bead through them. By sliding the skull bead to the end, I create a loop for my wrist. Rather than tying the ends of the cord together, I tied an overhand knot in each one separately, which prevents me from accidentally pulling the bead off, but also means that I can slide the bead to the top and just have two loose ends of cord, rather than a loop that will no doubt get caught on things. Honestly, I’m not a big fan of wrist lanyards on knives. I rarely ever use them. But I am a fan of skull beads. Like the rest of the wrap, this lanyard bit is on there just because it looks cool.
Sheath
The sheath itself was the surprise in this whole package. It is some sort of “injection molded thermoplastic” that is supposed to be more cold tolerant than Kydex. I’ve never had a problem with Kydex in the winter, but apparently extreme cold makes the Kydex brittle and prone to crack. The fit of the sheath was what most impressed me. It is, without doubt, the best fitting sheath I have ever had for a knife. The knife pops right in there and is completely locked – no wiggling or movement what-so-ever.
Mods
I’ve taken a size 14 sail-making needle pre-threaded with a length of black Kevlar thread and taped this to the back of the sheath with a piece of electrical tape. Dave Cantebury did this in a video on a Mora knife sheath a few months back. I thought it was a great idea.
It doesn’t add any noticeable weight. Even though I carry a sewing kit in my possibles pouch, I’ve since taped a prethreaded needle to the back of all my plastic knife sheaths. (Tape doesn’t stick too well to leather, so I haven’t figured out how to carry a needle on my leather sheaths). Around the bottom of the sheath, I wrapped a bit more electrical tape (I was out of 1” duct tape at the time). There probably isn’t more than 2 or 3 feet. It never hurts to carry extra tape!
Carry Options
Some people have complained about the sheath because it doesn’t come with a belt clip of any sort. This worried me as well. I wasn’t sure that I would want to carry it around the neck all the time and, since I didn’t go for the expensive kit that included the MOLLE clip, I did not know what other mounting options I would be able to come up with. It turns out that with only a cord lock (self supplied out of my repair box, since I didn’t get the “survival kit”) and a little over two feet of paracord, the sheath becomes remarkably configurable.
Neck Carry
To carry it around the neck, I simply slide the cord lock over both ends of the paracord, put the cord through the top hole in the sheath, and loop it through itself. The cord lock allows me to adjust how high or low it sits on my chest. As with the wrist lanyard, I put an overhand knot in each end of the paracord to prevent me from accidentally pulling the cord lock off, but refrain from tying the two ends of cord together. I don’t want to create a secondary, smaller loop on the back of my neck for things to get caught on when I adjust the cord lock up.
As I mentioned above, I initially thought that I might not want to carry the Izula around my neck. It’s a good deal bigger, heavier, and bulkier than the Nemesis Hellion neck knife that I’m used to. But I was pleasantly surprised. The profile of the knife is slim enough so that it can almost completely disappear under only a t-shirt. Unlike the Hellion, you are probably not going to forget that it’s there because of the weight, but it is by no means uncomfortable.
A lot of folks who carry a neck knife go on about the danger of using knotted paracord as a lanyard. Paracord is very strong. Someone sneaking up from behind could grab the cord and strangle the wearer rather easily. If this concerns you, you could use some weaker cord (or chain), tie a slip knot, or invest in some sort of break away device. Personally, I’m more concerned with the security of the knife around my neck (which sort of rules out slip knots) and I like the simplicity of this system. In the years that I have been carrying the Nemesis Hellion around my neck on gutted paracord, I have yet to be strangled. But it is something to be aware of – especially if you find yourself getting in a tussle fairly frequently. Do remember, though, that the paracord around you neck is attached to a knife, and knives cut things.
Front Pocket (TAD style)
My favorite way to carry the Izula is in one of the two front pockets that Triple Aught Design places on their pants. In my Legionnaires, I carry the knife in the left front pocket. It sits in the pocket rather securely, with only the top half of the handle exposed, leaning to the right. This allows for a very fast, right-handed cross draw. I have the paracord and cord lock setup and attached to the sheath the same as in the above neck carry option, but in this setup I’ll put the cord through the plastic D-ring above the front pocket and loop it through itself so that the sheath and knife are securely attached me. Normally, when I draw from this setup, I’ll grab the handle and push against the sheath with my thumb, popping the knife free. But because the cord is attached to the D-ring, I can also just grab the handle and yank it to my right, extending the cord till it reaches its full length and pops the knife free. Personally, I feel that this is too obtuse a movement, so I prefer popping the knife free of the sheath with my thumb. If you prefer the latter option of yanking the knife, you could move the cord lock a few inches up the cord, thus shortening the distance you have to pull before fully extending the cord and popping the knife free. I will usually leave the cord lock all the way against the knots at the end of the cord and stuff the excess amount of cordage in the bottom of the same front pocket.
Side Pocket
As much as I prefer the above option, not all of us wear TAD pants every single day. When wearing another pair of pants, I will carry the Izula in the right side pocket, tip down. I found that most pockets are sized so that the tip of the sheath reaches the bottom of the pocket with only about the top 1/4” of the handle sticking out. Again, I keep the paracord and cord lock attached as before, with the cord lock slid all the way against the knots at the end, creating a big loop. This loop I run through my belt, guaranteeing the the sheath and knife are securely attached to me. To draw, I reach my hand in the pocket, grab the handle, and push against the sheath with my thumb, popping free the knife. I’m required to get my whole hand into the pocket to grasp the handle, which makes the knife slightly slower to draw than a folding pocket knife clipped into the same pocket (especially compared to an Emerson with the wave feature, such as the Mini-Commander).
Because the cord is attached to my belt I could just grab the handle and pull out or up, extending the cord till the knife pops free, but this is even more obtuse a movement than when drawing in the same manner from a front pocket. I’m not a fan.
Belt
The paracord and cord lock really become useful when you decide you want to carry the Izula on your belt. The first step is to unloop the cord from the sheath. Then remove the knot in either end of the cord so that the cord lock can be removed. Next, thread either end of the cord through the two holes in the side of the sheath and the reinstall the cord lock, retying the same knot in either end of the cord to prevent the cord lock from being removed.
Move the cord lock about halfway up the cord, grab a bit of the cord and pull it through the large slit opposite the two holes on the sheath. What you now have on the front of the sheath is a line of paracord crossing the top horizontally and, on the bottom, the cord coming together horizontally to the cord lock. On the back of the sheath you have two vertical loops that you can thread your belt through.
With the sheath attached to your belt, you can then move the cord lock tight against the sheath, pulling as much paracord through the lock as you can. The Izula will then be mounted on your belt.
When I first saw this carry option pictured in the manual that RAT provides with the Izula, I was skeptical of using the paracord this way. I didn’t think that you could could get the paracord tight enough to eliminate any wiggling or movement. I’ve now carried the knife a good deal like this and I am perfectly happy with it. The sheath is just as secure as a sheath with a belt clip or malice clip (albeit easier to cut off). If you keep it attached to your belt consistently for a few days, the cord lock will eventually slide down a bit, loosening up the cord and causing the sheath to move a little when the knife is drawn. This can be addressed by checking the tightness of the lock once a day every time you put on your pants, which I don’t think is too much to ask.
The downside to this method is that, because we’re using the same piece of paracord as we use when wearing the knife around our neck, the paracord is necessarily long. You will have 6” or so or cord dangling below the lowest point of the sheath. This would be a problem if the two ends of the cord had been tied together, forming a loop, but because they have not been tied thusly, the two ends are loose and will not get caught on anything. They don’t bother me.
Spine
The spine itself is .156” thick, with about 1/2” of a grooved thumb ramp at the start of the blade. I’ve never found these thumb ramps to be necessary on any knife, but they don’t get in the way, either.
Initially, I found that I could not generate any sparks by sparking the spine of the Izula against a ferro rod. I know 1095 is high-carbon, so I figured it must either be the tan-colored paint that was preventing me from getting any sparks, or the corner of the spine was slightly rounded. To address both potential problems I set the spine flat on top of a coarse silicon-carbide stone and slowly ground down the first 2” from the tip. This removes the paint and squares off the edge, giving a 90 degree angle that should be ideal for striking sparks. With that change made, the Izula will throw a decent shower of sparks.
Overall
I’ve been EDCing the RAT Izula for just over two months now. So far, I have been extremely impressed with the knife. Unless I am for some reason forced to carry a folder instead of a fixed blade, I doubt that I will go back to carrying the Emerson Mini-Commander. Direct comparison between a fixed blade and a folder is not exactly fair since they have both been designed with different intentions and are markedly different tools, but I find the Izula to be a superior knife. If I woke up in the zombie apocalypse, I’d much rather find the Izula in my pocket than the Mini-Commander.
If you think you can get away with EDCing a fixed blade, I’d strongly urge you to consider the Izula. As I mentioned in the beginning, the $80 that RAT asks for the knife is overpriced, but it’s not hard to pick up an Izula for closer to $50, which I think is a very good value. (It’s certainly cheaper than a quality folder like an Emerson!)
Does the road wind uphill all the way?
Yes, to the very end.
Will the day's journey take the whole long day?
From morn to night, my friend.
But is there for the night a resting-place?
A roof for when the slow, dark hours begin.
May not the darkness hide it from my face?
You cannot miss that inn.
Shall I meet other wayfarers at night?
Those who have gone before.
Then must I knock, or call when just in sight?
They will not keep you waiting at that door.
Shall I find comfort, travel-sore and weak?
Of labour you shall find the sum.
Will there be beds for me and all who seek?
Yea, beds for all who come.
Christina Georgina Rossetti, Uphill
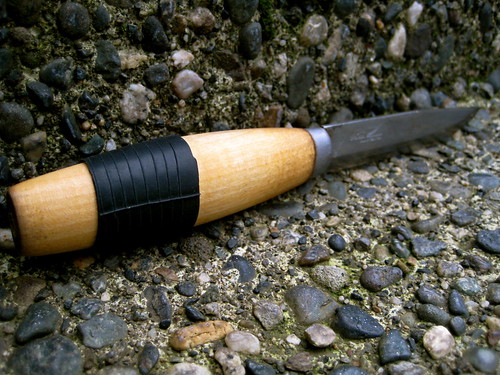
One of the pesky traits of the wooden handled Mora knives is their lack of grip when wet. One could acquire a Mora with a rubber handle, but, let’s face it: those are ugly. Instead, I cut a piece of 700x35 bicycle inner-tube about an inch wide and slide this just less than halfway on to the handle. The grip is immediately improved. If you were so inclined, you cut a piece the length of the handle and cover the whole thing, but so far it seems that this small piece is enough.
As with the rubberized BIC, this also provides another way to carry tinder that will work even when wet (though it will require a lighter or candle to start).
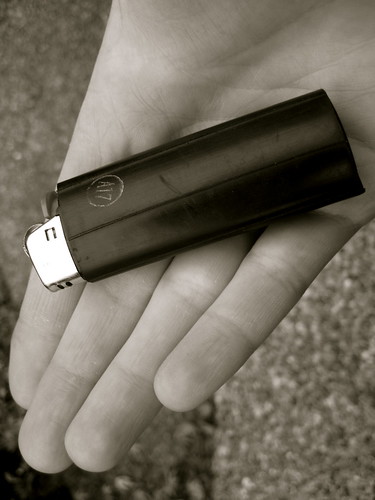
Here’s a neat trick I picked up from Dusty’s YouTube video. In the video, he shows how to use a couple of old bicycle inner-tubes to make a semi-waterproof pouch for a BIC lighter. That didn’t appeal to me too much: I always carry a BIC in my pocket and his idea added to much bulk for my liking. But, at the end of the video, he cut a smaller piece of inner-tube to make a sort of sheath for the lighter.
I thought that was a great idea. It gives you a nice, rubberized grip for the BIC and provides a simple way of always carrying waterproof tinder.
I’ve now cut off pieces from a 700x35 bicycle inner-tube and made this modification to all my lighters.
Linseed oil is a popular product used to coat and protect wooden handles on knives, axes, and other tools. I’ve tried it a couple times, but I’m not a big fan of the stuff. It takes multiple coatings over a long period of time to get a decent finish, it seems to rub off easily with use, and that whole spontaneous-ignition-of-linseed-oil-soaked-rags thing makes me a little nervous.
My preference is with Howard Citrus-Shield Premium Natural Paste Wax. I first stumbled upon this stuff in a hardware store while I was looking for linseed oil. The store didn’t seem to stock the oil, but the “Citrus Shield” can caught my eye. I remembered reading that Ragnar sometimes used some sort of orange-scented wax on certain wooden knife handles, so I brought the can home to try it out.
It turns out that the stuff works really well. All it consists of is a mixture of natural wax and oil. Initially, there is a very strong citrus scent, but this quickly wears off after application. I use it on all my wooden handled blades now, including the specially processed bamboo handle on the BCNW-O1 (which is supposed to be water resistant, but I found that it would swell some when damp before I treated it with the wax).
The application is very simple. The instructions on the can say to apply a thin coat with a clean rag, but I just use my fingers. After rubbing it into handle, I let it sit for 5 minutes before wiping it off with a clean rag. If this is the first time I’m treating the wood, I’ll apply and wipe off the wax about 3 times. After the final wipe down, I rub the handle with fine 0000 steel wool. I don’t put a whole lot of time or effort into this buffing, though. I’m not seeking a shiny finish, just practical protection.
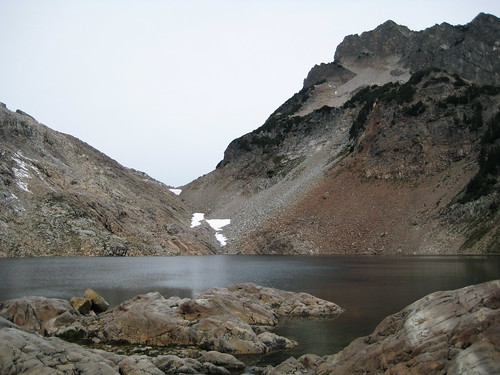
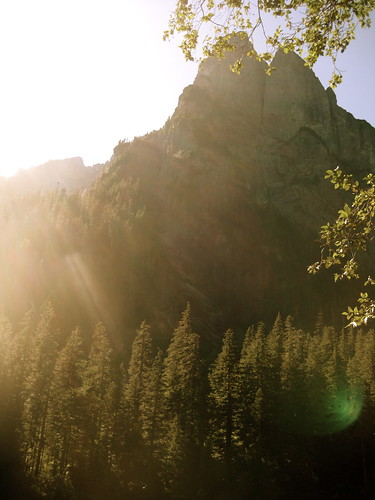
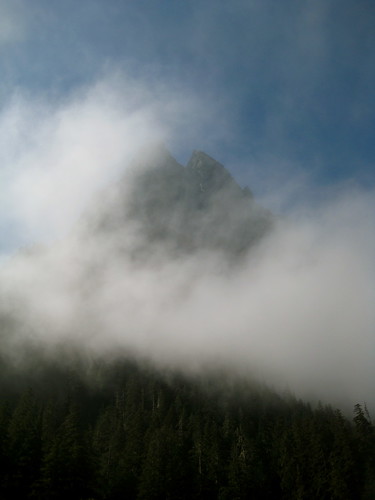
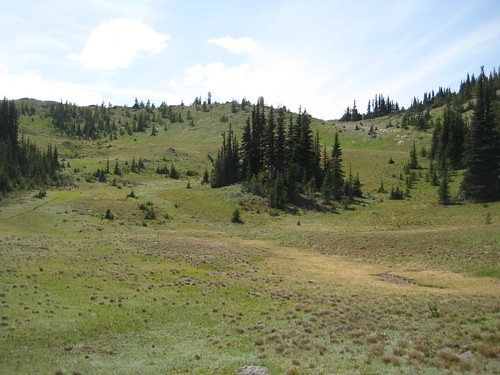
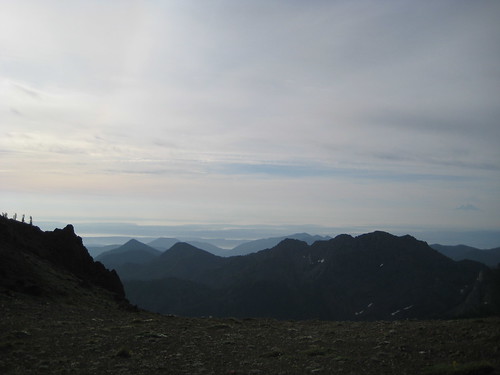
I ventured into Gothic Basin today, an impressive glacier carved wilderness of the Mt. Baker-Snoqualmie National Forest. It lies near what was once a mining area.
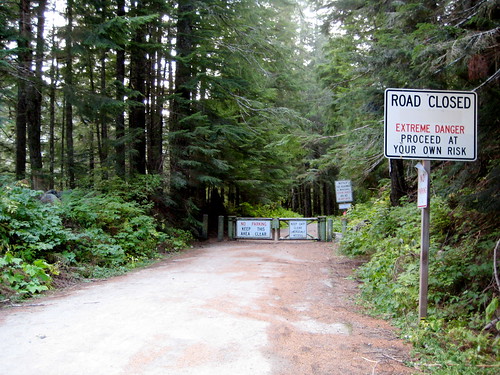
The way to the basin begins on the old, fenced-off road into the ghost town of Monte Cristo. This bit of trail is littered with signs warning of extreme danger, proceed at your own risk, hazardous materials such as aresenic in the soil, balrogs, and other such frivolities. I couldn’t see what all the fuss was about: the trail was wide, level, and well-maintained.
About 1.5 miles down the road, there used to be a bridge crossing over the Sauk River, but, some time ago, the river apparently found itself unable to suffer such indignities and washed the bridge away. At this point, my path branched off and began to climb its way to the basin along trail and old mining paths. The total elevation gain along this section is about 3,000 feet spread out over a good 4 miles or so, making it a steady, but leisurely climb – just enough to warm one’s self up on a crisp Autumn day.
There are a number of small waterfalls that deposit their loads on the west side of the trail, allowing to the water to trickle across the path and make its way down to join the river. Earlier in the year I imagine that these crossings could be tricky, but the headwaters had frozen up by now, leaving these mostly dry. I’ve heard that one of these such falls has been wittingly dubbed “King Kong’s Showerbath,” though I saw nothing worthy of the name.
Some of the crossings higher up had not dried completely, but instead froze while crossing the trail, leaving ice covered rocks in my way. These rocks required some scrambling up, over and around, which was made interesting by the slippery ice. (I reminded myself that last Saturday’s body recovery had occurred only 20 miles east of here.)
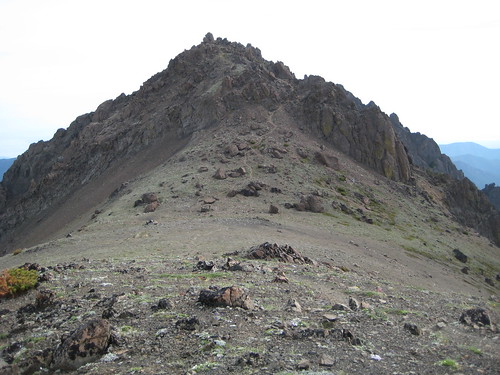
Near the top, I stopped to munch on some granola, raisins, and dried banana slices. I did not don any further clothing upon stopping, however, and my break was thus cut short by the chill and the desire to warm up again. After resuming my walk, I pushed on over bare rock and soon thereafter found myself at a small tarn that marked the entrance to Gothic Basin.
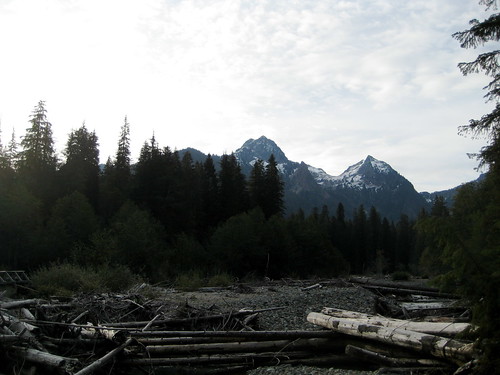
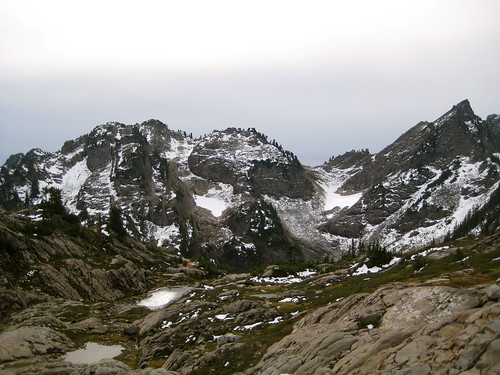
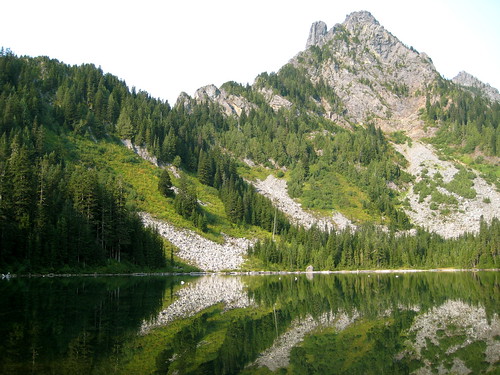
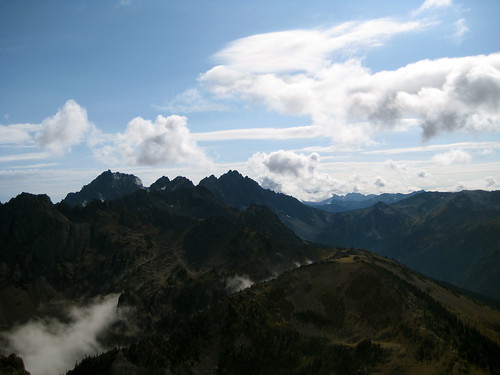
The basin is one of the more spectacular places that I have yet found myself in. In character it bears a striking resemblance to a Gothic cathedral, but larger and grander in scope, being carved out of the mountains over centuries by the minute movements of glaciers. A temple of rock.
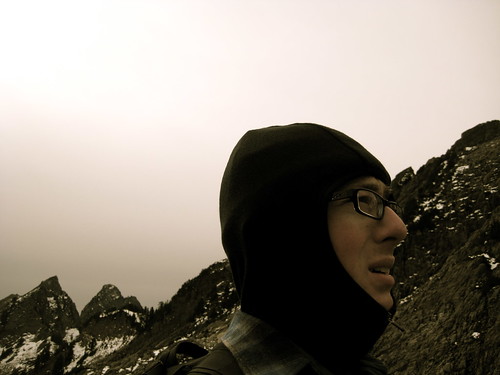
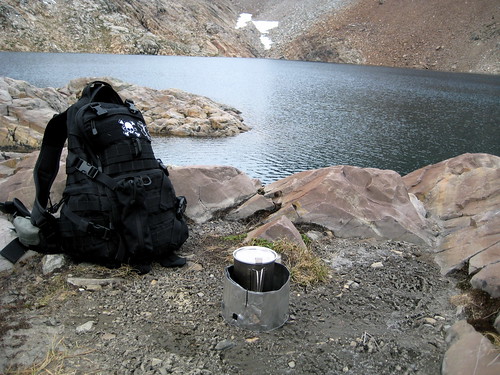
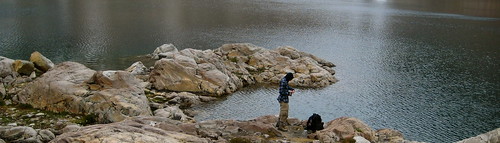
My awe was quickly overtaken by another sensation: cold. The wind was strong up here, cutting through my clothing with ease. With windchill, the temperature hovered around 20 degrees Fahrenheit – a stark contrast even to the trailhead only 3,000 feet below, which had felt more like 45-50F. I took off my pack and put on two more light layers of wool. It was still cold. The lowlands have maintained themselves around 60F thus far which has not yet given me the opportunity to acclimatize to these lower temperatures. I also found that I had neglected to bring any gloves. No matter. The small tarn was partially frozen over and I wanted to make my way another half mile further across the rock to Foggy Lake to see how it was faring.
Foggy Lake proved to be moving, though I can’t imagine that it will resist the ice much longer.
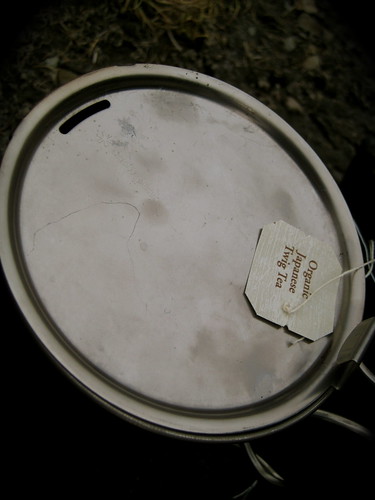
Standing by the cold water made me think of the packet of kukicha that I had in my pack. I had packed it, along with my old Vargo Triad XE stove, Trail Designs windscreen, and Snow Peak 700 mug. The package is not as efficient or versatile a stove as my Trail Designs Ti-Tri stove, but packs down much smaller. I often bring it on day hikes.
It was too cold for the denatured alcohol to light with a spark, so I used one of the matches from my EDC. Even with the screen around it, the wind blew the stove out once. I relit it and used my pack as a windbreak. As the tea brewed, I jumped around in place, trying to keep warm.
Soon I noticed blood on one of my finger tips: the skin had cracked from the dryness and was oozing a little bit. I tried to apply a bandage but it refused to stick. Must have something to do with the cold, I figured, and sliced off a piece of duct tape from the bit I have rolled around my Klean Kanteen. That held the bandage in place just fine.
After the tea had steeped, I was cold enough to decide to pack up the stove and start making my way back down, drinking the tea as I went. With mug in one hand and a trekking pole in the other, I made my way back to the tarn, facing the icy south wind. Having downed the warm tea in a remarkably quick fashion, I decided to stop so that I could put the mug away and thus have one free hand to stick in my pocket to warm. I set down the pack and mug, digging around inside the pack for the small garbage bag that I carry, so that I could pack out the teabag. It was a bit tricky, not being able to feel anything due to numb fingers. In a minute, I found the garbage bag and opened it, then reached for the tea bag that was still sitting inside the mug. It had already begun to freeze to the titanium. I broke it free, tossed it in the garbage bag, and put bag and mug in the pack. I decided that things were starting to get a bit serious when I found that I had a lot of trouble closing the zippers on my pack. After donning the pack, I could stick one hand in my pocket to warm, but the other had to stay exposed to hold the trekking pole (which I needed even more on the descent than the ascent). Using the spare Buff I had in one of my pockets, I fashioned a mitten-like covering for the exposed hand which suited to block the wind. It really wasn’t that cold out: as soon as the fingers on both hands were out of the wind, they began to rewarm.
With that addressed, I continued the descent, making my way over scoured rock and through whispering trees back to the trailhead. (I slipped once on one of those ice covered rocks near the top, coming a little too close to the side of the mountain, but arrested myself and recovered.) The ascent took 3 hours and the descent 2.5.
Gothic Basin certainly warrants further explorations. Visually, it is one of the most stunning areas of the Cascades. I could easily spending a week just within the small area.
I have often thought about what I would do out here if I were stricken with a serious illness, if I broke a leg, cut myself badly or had an attack of appendicitis. Almost as quickly as the thought came, I dismissed it. Why worry about something that isn't? Worrying about something that might happen is not a healthy pastime. A man's a fool to live his life under a shadow like that. Maybe that's how an ulcer begins.
- Richard Proenneke, One Man's Wilderness
How does one hate a country, or love one? ...I lack the trick of it. I know people, I know towns, farms, hills and rivers and rocks, I know how the sun at sunset in autumn falls on the side of a certain plowland in the hills, but what is the sense of giving a boundary to all that, of giving it a name and ceasing to love where the name ceases to apply? What is love of one's country; is it hate of one's uncountry? Then it's not a good thing. Is it simply self-love? That's a good thing, but one mustn't make a virtue of it, or a profession... Insofar as I love life, I love the hills of the Domain of Estre but that sort of love does not have a boundary-line of hate. And beyond that, I am ignorant, I hope.
Ursula K. Le Guin, The Left Hand of Darkness
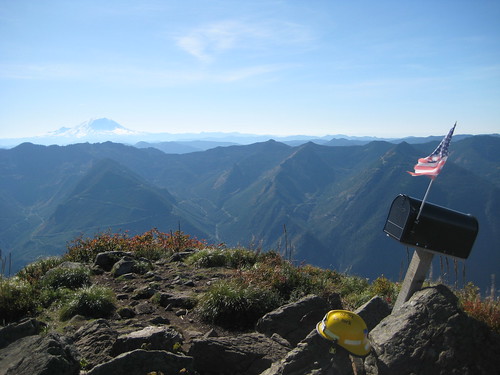
I hiked to the top of Mailbox Peak today, near Snoqualmie Pass. The trail has a reputation of being one of the toughest short day hikes in the Cascades: it’s only about 3 miles one way, but you gain 4,100 feet. That makes it a bit steep. The Mountaineers and the Washington Trail Association has this to say:
Wimpy hikers, turn the page. This trail offers nothing for you but pain and heartbreak. If you think you've got the goods to scramble up more than 1000 feet per mile, read on. Mailbox Peak brings a serious burn to the thighs of even the best-conditioned athletes, but the rewards make it all worthwhile.
Mailbox Peak Trail is a very steep, wet, unmaintained, difficult, challenging trail.
It is 2.5 miles one way to the top and gains 4,00 feet in elevation.
Search and rescue teams are frequently called to this trail to assist distressed hikers.
Please respect your own ability.
I figured it was all just a bunch of hype. It didn’t look that bad, standing at the bottom.
The trail starts out on an agreeably shallow grade for the first 100 meters or so. Then it gets steep. Then steeper. Then a bit steeper yet. Still, it’s not the challenge it’s made out to be. It may separate the obese, McDonald’s eating, TV watching, weekend warrior (1 in 4 people in the state, last I heard) from anyone who’s ever climbed a mountain before, but it certainly isn’t going to “bring a serious burn to the thighs of even the best-conditioned athletes”.
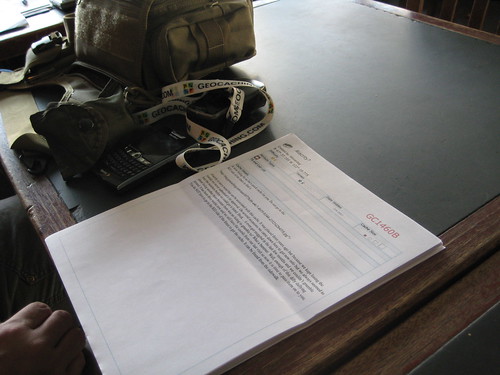
The view from the top, in contrast to the hike up, was not over-hyped. Today was a crisp, clear Autumn day and one could see for miles in all directions. Mount Si, Glacier Peak, and Mt. Rainier were all visible. And at the top, there is not one but two mailboxes. (I vote we change the name to Mailboxes Peak.) One contained something called a TerraCache, which is some sort of alternative to geocaching. The other held the log book and a number of odds-and-ends that people had left behind. At the base of one of the mailboxes was a firefighting helmet. The state’s Fire Training Academy sits just at the base of the peak and they often use the trail as part of their physical training. (I’m told that they once hauled a fire hydrant up the peak. That is quite a feat.)
I’d like to return to the trail with a fully loaded rucksack on my back. That would be some thigh burning!
This mash-up feed still exists, but you probably don't want to use it. As of May 2010, Twitter feeds are now integrated into the blog and thus are included in the normal feed. The mash-up feed now only mashes the blog feed and Flickr photos
When I first decided to add twitter posts to my site, I debated whether I would rather have them integrated into the actual blog posts or separated. Visually, I like to have the separation, but I always thought it would be neat to pull the twitter posts directly into Wordpress’ database, and so have them integrated into my RSS feed. Otherwise, for those who wish to follow my twitter posts, but are not on twitter, they have to subscribe to two different feeds – both my blog feed and twitter feed.
Today, I had the idea of keeping the actual separation of twitter and the blog, but simply creating a new RSS feed using some sort of RSS-mash-up-aggregator thingy. I thought Feedburner could do something like that, but apparently not. After searching around for other options and not finding anything that really excited me, I decided to just use Yahoo Pipes. After all, this is pretty much what it was made for.
Combining feeds in Pipes is pretty simple, but after mashing them together, I discovered that twitter’s RSS feed is kinda ugly. Luckily, editing feeds using regular expressions in Pipes is pretty simple, too. After polishing up the twitter feed a bit, I thought Why not toss my Flickr feed into this puppy? But occasionally I’ll upload a large group of photos to Flickr at a single time, and I didn’t want to totally bomb my new RSS feed. Plus, most of the time when I put photos on Flickr, I create an accompanying blog post, so I wasn’t sure that adding the Flickr feed to the mash-up was even necessary. I figured that I’d toss in the Flickr feed for now, but compromise by having Pipes truncate it to the 6 most recent items.
Then came the problem of what to do with it. I didn’t want to just toss up a link somewhere. I preferred the idea of replacing my normal blog feed with this new super-feed. But I also didn’t want to just edit the Wordpress template header. I new Feedburner had a plugin to integrate with Wordpress, so I thought about burning the new feed and then using the Feedburner plugin to pull it in, but that seemed a little excessive, particular since I don’t care about any of the click-tracking or monetizing features of Feedburner. Then I found the Feed Locations plugin, which does exactly what I wanted: allow me to specify the location of my feed in the Wordpress admin panel.
Now, if you ask Wordpress for this site’s RSS feed, you get the new feed. If you’re opposed to all this new fanciness and just want the plain old blog feed, it’s still up at the same location, just not linked to from anywhere.
Let me know what you think about having the Flickr photos in the feed. If it’s redundant, I’ll take them out.
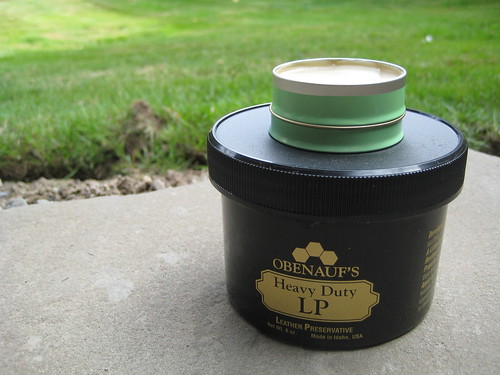
I’ve been using Obenauf’s products on my boots and other leather products since last spring and have been constantly pleased with the results. Though I’ve replaced their White Jaguar Leather Cleaner with my standard Dr. Bronner’s soap that I use to clean everything else, their oil and leather preservative are great products.
A couple days ago, I read an article which mentions that some people use Obenauf’s leather preservative as a skin care product. I was a bit shocked at first, but it makes perfect sense. All the LP consists of are “three different natural oils… suspended in Beeswax and Propolis.” And what makes a standard skin care balm? Beeswax, olive oil, and your minced up dried herbs and/or essential oils of choice. LP is pretty much a balm without the herbs. That may make it inferior to products that include the healing power of herbs, but LP is designed to protect skin – dead skin that you wear on your feet, but skin none-the-less.
(Arguably, this lack of herbal material in the LP could be a benefit: it means that the product has no strongly identifiable scent (a useful trait in the woods). If one did not care about the scent and wanted to add something extra to the LP, it would be a simple matter to melt it and put a few drops of essential oil in. Though that’s fine for skin care, I’m not sure I want my boots smelling like tea tree or lavender oil.)
I decided to experiment. This morning I cleaned out a small tin from a commercial balm and filled it with LP (by heating the LP until it liquefied, then pouring it into the smaller container). Now I have a convenient way of carrying the LP around with me, which should encourage me to try it on a regular basis.
I always carry some sort of skin balm with me, both in my urban EDC and in my wilderness gear. Usually, I opt for Badger Healing Balm or Burt’s Bees Res-Q Ointment. I’ve made my own herbal balms in the past, but, as with home-made soap, I have never felt that what I made was in any way superior to store-bought products nor that there was a significant financial savings by making my own stuff. If I decide that I like the LP product, I’ll probably end up carrying it in my larger rucksack in lieu of a normal balm. That would give me the ability to treat not only my own skin, but also take care of my boots in the wilderness. More functionality than what I have now, and it seems a good plan.
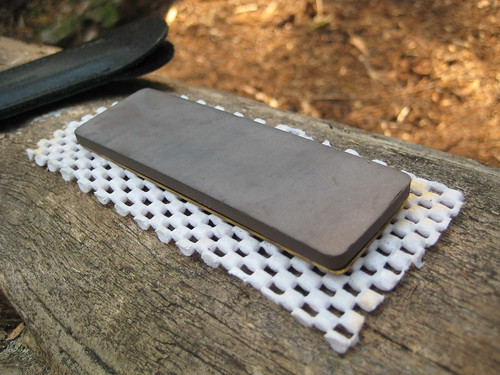
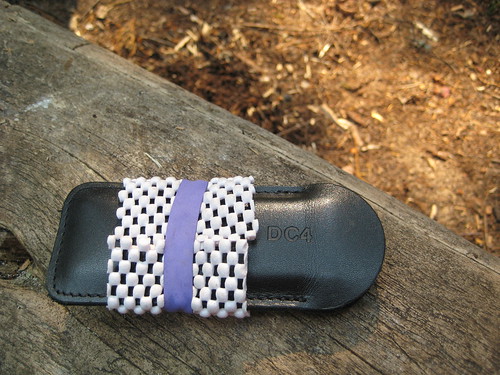
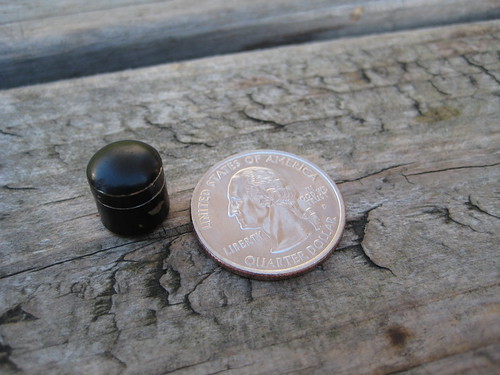
The Fallkniven DC4 is one of the more popular pocket-sized knife sharpeners, particulary among bushcrafters, due in no small part to patronage by Ray Mears.
The technique that Ray Mears uses to keep his stone from moving around is to create a frame by hammering 4 small nails around the stone into a log. This works, but, over on the Equipped to Survive Forums, I picked up a better idea: simply cut up a bit of non-stick rubber padding.
This padding is sold in rolls and meant to be placed between carpets and hard-wood floors to prevent the carpet from moving around. The stuff that I use is actually meant to line shelves and drawers. The only different between it and the carpet padding is that the shelf and drawer stuff has smaller squares and a tighter mesh.
I find the padding to be much more convenient that the nails. It’s easier to deploy – you don’t have to take the (albeit small amount) of time to hammer in and then remove the nails; the pad works just as well on a rock as it does on a log; and the pad does not get in the way when sharpening, as the nails will sometime do.
For storage and transportation, I simply wrap the pad around the DC4’s sheath and secure it with a rubber band.
I still carry the small nails in the bottom of the sheath just in case, but I think the pad is a better way to go.
The Wild Sky Wilderness of the Baker-Snoqualmie National Forest is the newest wilderness area in these parts. It received a lot of hullabaloo last year when it was officially designated. There aren’t many trails, but the area offers much to explore.
Towards the end of this spring, I took my first trip into the Wild Sky, choosing to visit Eagle Lake. The lake is only at about 4,000 feet, but winter seemed to cling to it despite the season and conditions not a thousand feet below. On this first visit, the edges of the lake were still frozen over and the surrounding meadow covered by four feet of snow. I had not learned much about the area before venturing into it and so was surprised to find an old cabin on the eastern side of the lake. It was apparently built sometime around the 1950s for the Forest Service. They’ve since abandoned it, leaving the cabin to be maintained by locals who visit the area frequently. It houses a couple beds, wood stove, cooking implements, wood working tools, warm clothing, a bit of food, and other odds and ends that people have supplied. I spent one comfortable night in the cabin on my first visit and decided that I would like to visit the area again sometime after snow melt.
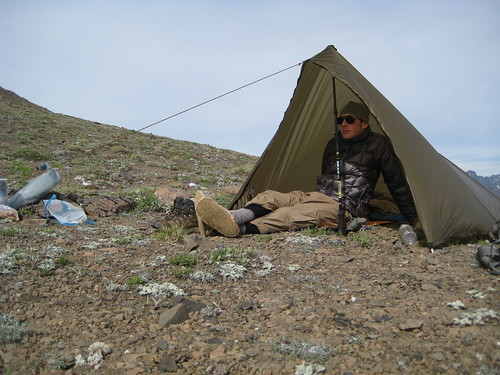
Earlier this week I made a short trip to accomplish that, spending two nights in the area to celebrate the Autumnal Equinox and the equality of day and night. I had no particular goals in mind for the trip and did not intend to log much distance over the few days.
It was pleasantly uneventful.
The hike in started on a short, 2-mile trail to Barclay Lake. I was surprised at how dry the lake had become since my previous visit. The lake looked to hold only half as much water as before, exposing logs and boulders on one end and a grassy meadow on the other. Baring Mountain still towered above the area, sunning its harsh, 3,000 foot northern face.
From Barclay, I left the trail and made my way north up a ridge to the small – and seemingly always extraordinarily cold – Stone Lake. After Stone Lake, I headed northwest a short distance through Paradise Meadow to my destination of Eagle Lake, all told only another 2 miles from Barclay.
The way from Stone Lake to Eagle Lake through Paradise Meadow was a much easier and more pleasant jaunt with a good covering of snow on the ground. Now, the meadow was a muddy bog that warranted careful attention be paid to each footstep, lest I find my boots submerged in mud. I was glad that I had not decided to come back to the area in July or August, as the meadow looked a perfect place for bugs. (Indeed, I thought to myself that Paradise Meadow was probably named by mosquitoes.) As it was, the year had aged enough that there were no biting insects about. But for that fact and the shortness of the day, it could easily have been midsummer. The skies were clear, the country green, and temperatures somewhere around 80 degrees Fahrenheit.
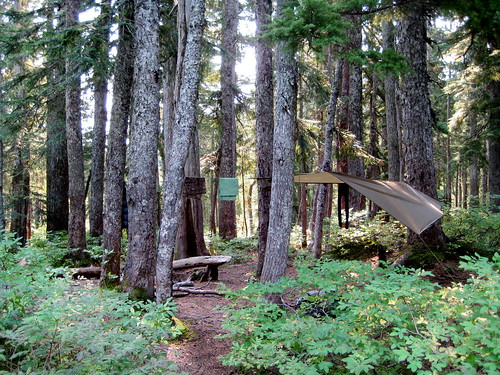
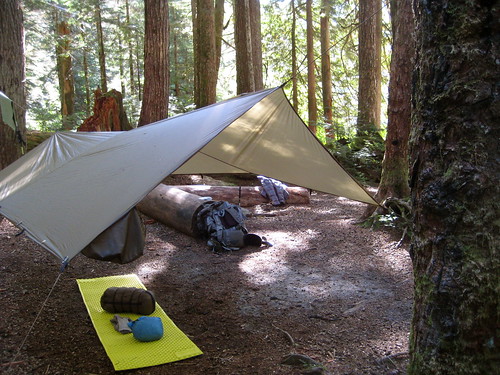
Arriving at the lake at mid-afternoon, I reported to the cabin and found it all in good order. But the day was warm and the night promised to be clear. I could find no reason to spend it in a box. So I left the cabin and found a well suited site for my tarp on the shore of the lake, a ways down from the cabin. The remainder of the afternoon and evening was spent with hatchet, knife, and saw, preparing the first fire of the season and kindling the blaze against the coming darker months.
That night, I cooked a small dinner on the fire, enjoyed the flame, and went to bed.
I slept in late the next morning, not crawling out of my sleeping bag till 9:30 AM. It looked to be another fine day. It was supposed to be the first day of Fall, but this country didn’t know it yet.
After breakfast, I lounged around the lake, explored the neighboring ridges and some more of the meadow. Near 1 PM, I thought about where I would like to spend the night. Initially I had thought that I would spend it at Eagle Lake once more, either in the cabin or in another spot near the lake, but this trip marked the second time I had walked past Barclay Lake without much of a pause there. It had always seemed a nice spot to me, despite its close proximity to the trailhead. There would be little chance of encountering many people at Barclay, it being the middle of the week and summer now over. I decided I would try a night down there.
Working my way back down to Barclay was a sweaty affair. I encouraged myself along the way by thinking that I could jump in the lake to wash and cool off at the end of it. When I finally made my way back down and arrived at Barclay it was still plenty light, but I was disappointed to find that the sun had already gone behind Baring Mountain. No matter, I thought, and, stripping down to my underwear, jumped in. It was cold. Cold enough to make me think it a surprise that there wasn’t any ice on the surface. My time in the lake was shorter than I had previously expected.
I had already laid out my nice, warm, merino wool baselayers before jumping in, and eagerly put them on after drying off. The lake had left me feeling refreshed, and I went off to find a suitable spot to hang my tarp for the night. I cooked and ate dinner as the land darkened. Just before dusk I heard a strange sound and looked up in time to see a chute open. Two people had jumped off the top of Baring and para-glided down to the meadow on the eastern side of the lake. Soon after, I retreated to bed and went off to another satisfying sleep.
Next morning I woke up early, but stayed in my sleeping bag reading till around 9. It was another slow morning, with not much of anything occurring besides breakfast. Laying on the beach of the lake just before noon I spotted a small wisp of cloud in the west. It was creeping in on an otherwise spotless sky. No more than 15 minutes later, the valley was filled with fog. Fall had finally arrived, I thought, and took that as my cue to break camp and head off back to the trailhead.
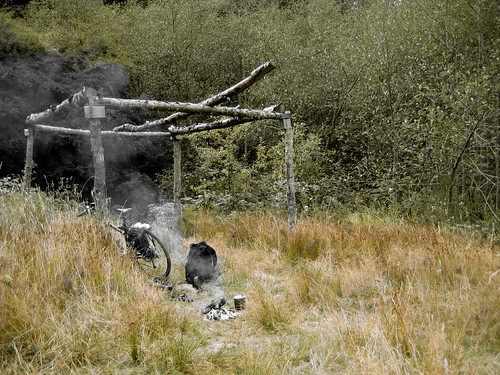
I went for a bike ride today, following a set of train tracks through the woods. Off to one side a small path led to a grassy clearing and this square structure. I stopped for a bit, processed a down log to start a small fire, and enjoyed a cup of kukicha tea while reading a book.
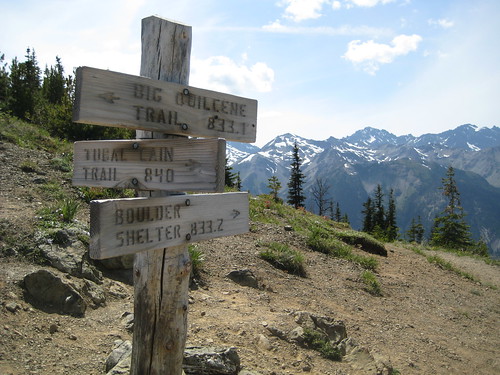
Last week I planned a loop through (and around) the Buckhorn Wilderness of Olympic National Forest. My previous visit had only provided a glimpse of the many mountains and valleys, all of which demanded further exploration. The loop was about 30 miles, which I thought I’d split into 3 or 4 leisurely days, allowing time for side trips and naps.
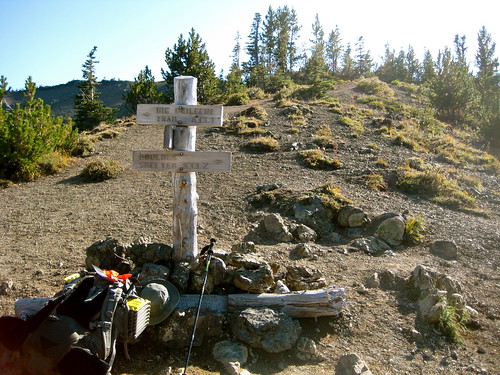
I entered the forest at the same trail head as before and climbed the same trail up to Marmot Pass.
I had arrived at the trail head later than intended, so it was already late-afternoon by the time I had made the climb to the top. My intended camp for the night, Home Lake, was another 5 miles (and 1,000 feet down, then 1,000 feet up) away, which I thought I could still easily make before dusk.
A couple miles down from the pass, I arrived at an area marked on the map as Boulder Camp: an open field with a stream running through it. I thought it would make a fine camp, but I had heard that Home Lake was a popular backcountry destination, and I wanted to see why.
As I continued down the trail, I thought about which of my meals I would fix up for dinner that night, and enjoyed the scenery of the forest. I was startled out of my serenity by a sign on the side of the trail informing me that I was entering Olympic National Park. Oops. Apparently I had not studied my map closely enough while planning the trip. I had no intention of leaving the National Forest, and certainly had not meant to cross the Park boundary. Without a permit from the National Park Service, it would be illegal for me to spend the night at Home Lake. Oh well, I thought. On the off chance that I met anyone official along the trail, I’ll just pull out the “I-used-to-do-backcountry-trail-patrol-for-the-NPS-too!” trick out of my hat and play on their sense of camaraderie.
As it turned out, I encountered no person along the trail that day and arrived at the Lake just as the sun set behind the westerly peaks. With the sky lit up red, I put on my long underwear and jacket and enjoyed a meal to end the fine day. The sky looked clear, with small chance of rain, so I left my tarp in my pack. A sleeping pad and bag in a clearing above the lake would be my home for the night. After hanging my food in a stand of trees beyond the camp, I settled into the bag and fell asleep watching the stars slowly pass by overhead. I was awoken once that night to the sound of rocks falling down the flank of neighboring Mount Constance. Satisfied to have been witness to the changing of the Earth, I slept once more.
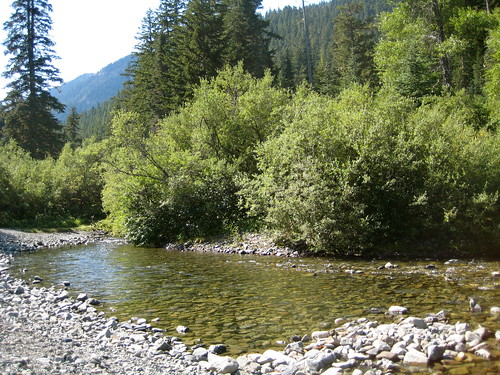
Waking with the sun, I quickly broke my small camp and started on the trail back to Boulder Camp, from where I would take another trail that would continue my loop. Halfway back, I stopped at a waterfall for water and a small breakfast. Mid-morning found me back at Boulder Camp.
The rest of the morning was consumed by walking along the trail down into the valley carved by the upper reaches of the Dungeness River. Shortly after noon I arrived at a fine spot along the river with a rocky beach and an open field beyond. With no other demands on my time, I cooled my feet in river, fixed a lunch, and napped under the bright sun.
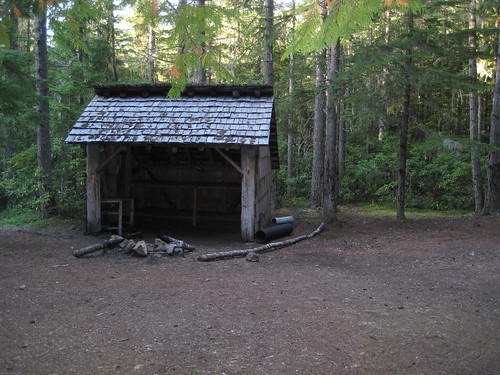
I had no planned campsite that night, intending instead to simply stop wherever I happened to be when the sun set. The rest of the day’s walk was easy going, not gaining or losing much elevation, along a trail and, at the end, a bit of an old Forest Service road. At the end of the dirt road I picked up the trail that would complete the loop. Soon thereafter I came upon a clearing and a shelter on the side of the trail.
The day was close to its end. I decided to camp near the shelter for the night. As the sun set, the sky slowly filled up with clouds, hinting at the possibility of rain that night. I decided I would place my pad and bag in front of the shelter, so as to enjoy once again what stars shone through the breaks in the clouds, but have a retreat close by in case rain did fall.
Sleep found me quickly once again that night, and I snoozed comfortably until the pleasant pitter-patter of water entered my dreams. Some conscious part of my brain recognized the sound as rain and waged a difficult battle to wake up the rest of my body enough to quickly move my bedroll under the shelter’s roof. Afterward, I slept soundly again until morning. Fog had filled up the valley overnight, blocking the sun’s wakeful rays and encouraging me to sleep well into the morning. Eventually I woke and completed the morning rituals of gathering water, retrieving my food bag, and cooking a breakfast.
On the trail again, I walked through the mist shrouded valley, wondering if the previous day had been the year’s last day of summer weather.
The day’s walk along the last part of the loop should have been a simple affair. It was on a trail, requiring no effort of navigation of my part, and close enough to the area around Buckhorn Mountain that I had scouted last time that I thought I could probably find my way without trail or much use of map or compass if I had to.
Around noon on that third day, I arrived at a fork in the trail. From looking at the map, I had expected a fork, but not for another mile or two. No matter, I thought, I have probably just been walking a bit faster than I thought. I took the right fork, which should have continued along the main trail back to Marmot Pass. The fork went slightly uphill for about a hundred feet and immediately entered a clearing in the trees. Trails, being rather fickle by nature, are often hard to mark when going from dense woods into a wide clearing. This right fork disappeared immediately on the boundary. I walked the perimeter of the clearing, thinking that I would pick up the trail again on the other side. To my surprise, I did not find what looked to be the main trail, but half a dozen smaller trails going off every which way instead. I explored them all and discovered that they had a disturbing habit of petering out into nothing very shortly after leaving the clearing. Deciding then that this right fork of the trail must not be the fork marked on my map, I backtracked to the junction and took the left fork. This trail also disappeared shortly after the junction, compounding my confusion.
I saw the sun poking through the fog and clouds a bit and decided to head back to the clearing down the right fork so as to enjoy the warmth and see if I could discover where I was. Setting my pack down beside a rock, I dug out my GPS, turned it on, and set it aside to acquire a satellite signal. Then I took the map out of my pocket and, judging from my gut feeling of my pace and length of time on the move, reckoned roughly where I thought I should be. Pulling out my compass, I attempted to get a bearing and corroborate the opinion of my location. The compass agreed with me, but, even though I was in a clearing, I was still down in the middle of a deep valley stuffed full of old growth forest and so had a difficult time getting an accurate bearing on any landmark with my compass. Still, at the very least I was comfortable of knowing that I was somewhere in a 100 meter box on the map. The GPS had acquired its signal by this time and was displaying my coordinates. I never put much faith in the device and generally refrain from using it for navigation as it has proved at times to be wildly inaccurate, but the coordinates it displayed agreed with my previous findings. Everything pointed to myself being where I was supposed to be. I was found, but the trail was most definitely lost.
Neither the right nor left fork of the trail had any evidence of continuing after the junction. The right fork had a small creek running along its western side, which matched the map, but the left fork also had a small creek, this one along its eastern edge, that was not supposed to exist. The creek along the right fork looked slightly larger. I reasoned that the left fork’s creek might be a new comer in the area and so not represented on my map. I knew that the trail that I was supposed to be following should follow a creek up to a lake. It seemed likely that this creek along the right fork of the trail was most likely the one that drained the lake. I thought I would try to follow it to the lake, from where the main trail should once again become obvious.
This planned proved well for the first hundred feet or so, but I was soon defeated by the valley. Increasingly dense plant life crowded around the stream, with frequent boulders and massive downed trees blocked my way. Without the large pack on my back, I might have attempted to continue, but, as it was, I did not think that attempting to climb, crawl, and push my way along the creek was a realistic or overly wise notion.
Accepting defeat, I sat down, pulled out the map once more, and considered my options. I knew that I could backtrack the entire loop, retracing my footsteps of the whole trip and come out that way. Another two days to do that, I figured. I had enough food to complete that with no lack of comfort, but the option did not appeal to me.
I also knew that I could make my way back down to the Forest Service road that I had used to make up part of the loop, and make my way out to the highway. But I had no guarantee that there would be anyone at all on this road to give me a lift and I judged that the road took about 45 miles to wind its way out of the forest. A worse option than the previous, this did not appeal to me either.
I was still not entirely convinced that this fork in the trail that was troubling me was not the same fork marked on the map. Looking at the map, I saw that after the split, the right fork made a couple rather wide switchbacks up to the top of the western ridge. Judging from where I thought I was, I reasoned that I could simply walk straight west up the slope and intersect the main trail. It was a steep climb, and proved my plan easier said than done.
A third of the way up, I decided to drop my pack and continue up less encumbered. The thick forest had ended up here, giving way to tall grasses and rocks, which made the going easier, but also completely hid my pack from view after I set it on the ground. I walked up a little higher, turned around, and did my best to make a mental picture of the area, hoping that I could find my way back to my pack on the way down.
Continuing up the slope (much faster than before) I resumed my search, but was discouraged when I failed to find the main trail. I thought I had gone far enough, but decided to travel up just a little bit further to make sure that I did not miss it. Slightly higher, I found a narrow channel cut through the grass. It looked like something made by the local goats. I was sure that it could not be the trail that I was looking for, but it ran in roughly the direction that I wished to go and was surely the path of least resistance. Deciding that I would see where it led, I went back down the slope to get my pack (which I found with little trouble). Then, back up again to the goat trail.
The small path continued to travel in the correct direction and was much easier than walking through the thick valley below. My spirits began to improve, but I was dismayed once more when the path split. Another fork! One path continued on, roughly in the same direction, while the other went up steeply and shortly disappeared from view. I had no idea which to take, but chose to climb the higher one. I would see where that one went, I thought, and, from up there, ought to be able to see where the lower path went as well. The decision proved well. After climbing the higher fork only a short distance, I saw above me what could only be the main trail. Wide, well maintained, and even defined on the edges by an old log here and there. I hurried onto the trail and continued on my way. In all, I had only been misplaced for about 2 hours.
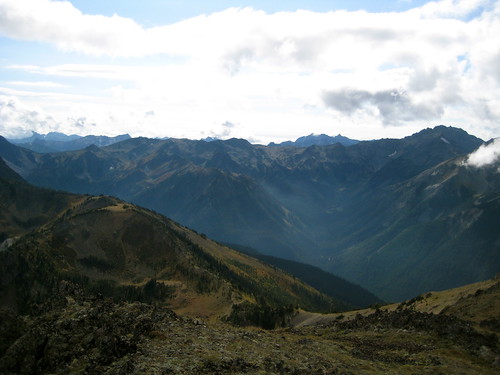
The main trail climbed high to the top of ridges, well above tree line, where the ground was covered only by rocks and the occasional hardy moss and lichens. In this sort of terrain, it’s difficult to mark out a trail, and I ended up losing it now and again. This didn’t worry me. Unlike when I lost the trail down in the valley, up here I was able to see where I was going and easily make my way along my own path.
Giving up on the trail, which became only more and more faint as I went on, I marked what looked to be Marmot Pass and made my way towards it. The distance was not great, but it was steep. For some nonsensical reason, whenever I make my way cross country, I always choose a line as straight as possible, avoiding any switchbacks. It makes for a shorter overall distance, but a much more difficult climb. I did not much mind, as the views of the alpine environment made up for the difficulty of the hike.
Climbing ever higher, I finally reached what I had thought would be the pass and my way out. I looked around and muttered to myself that this looked suspiciously like Buckhorn Mountain. In fact, I decided, it was Buckhorn Moutain. I had no intention of coming up here this trip and so had climbed a good thousand feet higher than I needed to. Oops. I looked down to the pass, and, with a sigh, began my descent.
Below me, I could see that the way down to the trail head, along with most the rest of the region, was covered by cloud. I marched on and, despite the day’s misadventures, found the end of the trail just before the sun began to set on the third day.
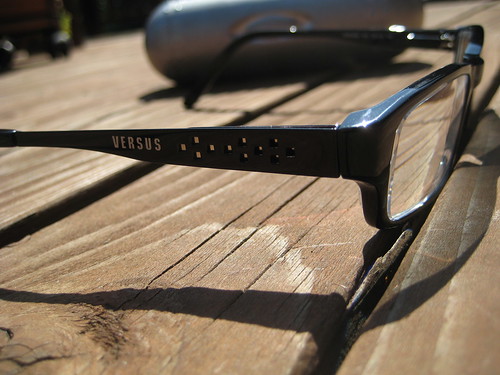
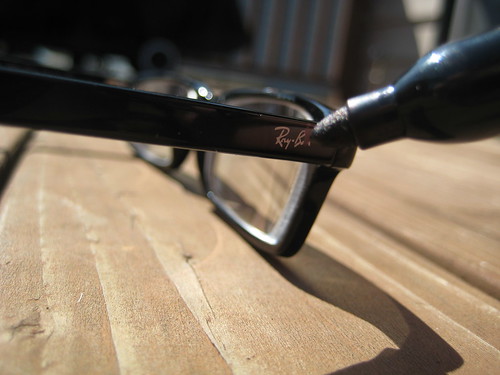
Last week, my Oakley glasses broke, cracking right down the center of the nose piece. I had had them for only a year and a half, which is not very long for a pair of frames. I would have expected to have had the same set for twice that amount of time. Such an event does not bode well for Oakley or my opinion of the quality of their product.
An attempt at repairing the glasses by taping them back together failed. I needed to buy a new pair of frames. Luckily, I was able to take advantage of a sale and acquired two pairs of frames for the price of one, which makes the otherwise obscenely high price of glasses more reasonable. This also gives me a backup pair in case I bust my primary set again.
(This time around, during the period between breaking the Oakleys and receiving the new pairs, I was able to use an older pair of frames with a weaker prescription that I had saved. I should have also been able to use my Revision Sawflys with clear lenses installed, but I have not kept the prescription in the insert up to date. This will be addressed for the future.)
Both the new pairs of frames that I chose had advertisements on either side of the arm. Clearly, that would not do. I grabbed the handy-dandy Sharpie sanitizing tool out of my EDC and, in a few moments, had the problem addressed to my satisfaction.
The sanitation job with the Sharpie is evident when inspecting the frames up close, but, at a distance, from where most people are standing, it is not to be noticed. I’ve also found that the ink will wear off over time. It will have to be reapplied every few months. The small effort is worth it, though, as it helps to clean the environment for all those around me.
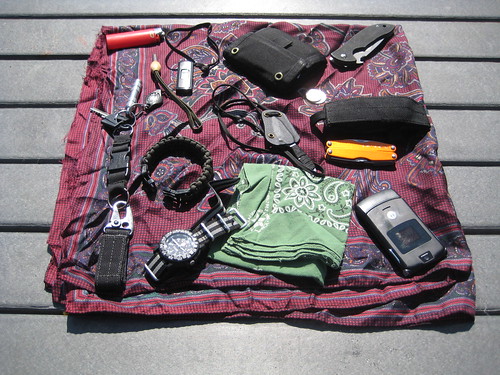
Today I went on a longer bike ride than the previous day. I didn’t want to carry the size or the weight of my FAST Pack EDC, so I grabbed the Kifaru E&E. I use the E&E as my alternate EDC bag when I need something smaller.
The items in the E&E are simply transferred over from the EDC items in the FAST Pack, but not every item makes the cut. This is a more minimalist setup. All level 1 and level 3 EDC items remain the same.
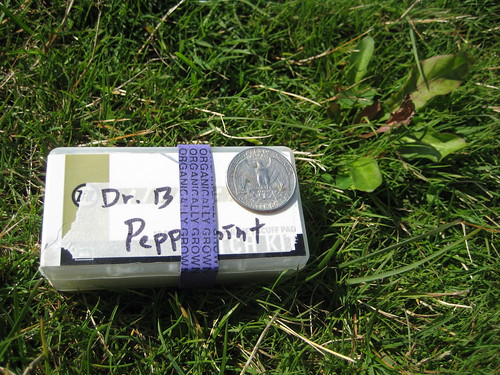
Here’s another great idea that I gleaned from scanning the BackpackingLight Forums: using the plastic container from an old bike tube patch kit as a soap bar container.
Whole soap bars tend to be far too large and heavy for any but the longest of travels. Cutting up a bar of soap to make it smaller is easier enough, but prior to this I had never come across a correctly sized container to package it in.
This container is perfect. It measures in at 3.25” x 1.75” x 0.9”, weighs 2.5 oz when full, and holds about 1/3rd of a bar of Dr. Bronner’s Bar Soap. I wrap a rubber band around it for added security.
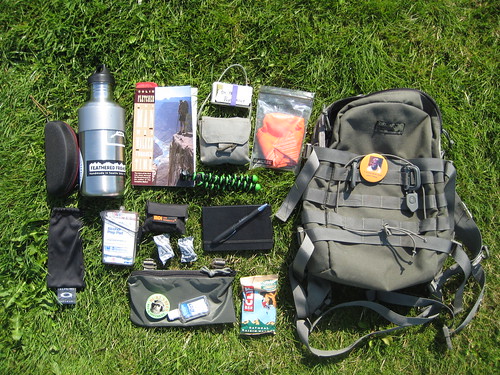
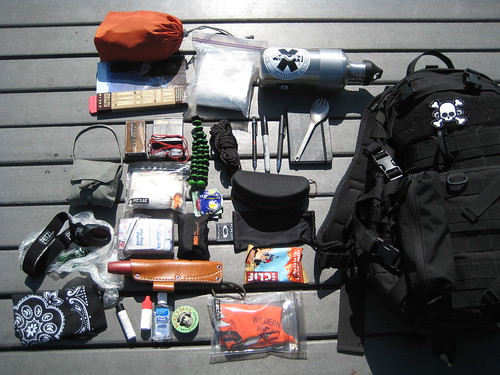
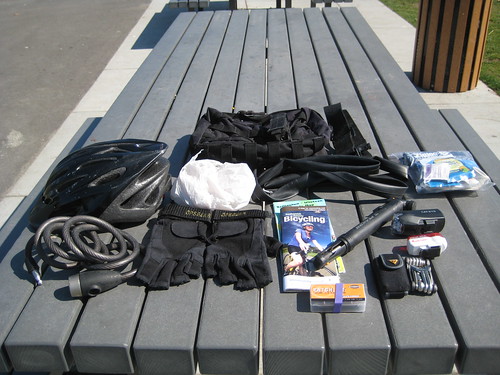
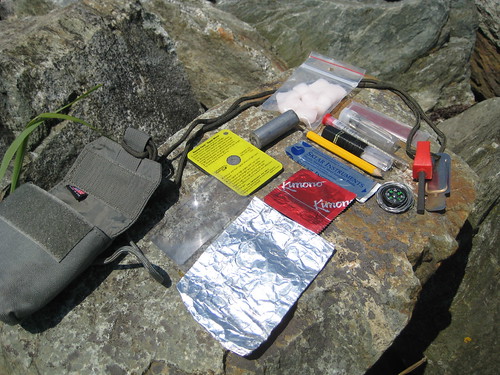
I took a break during today’s bike ride to dump out all the gear I had on me and snap a few photos. For the most part, this is representative of what I have on me every single day. There were a couple items in my pack that aren’t normally in there, but I noted those on the Flickr photo page.
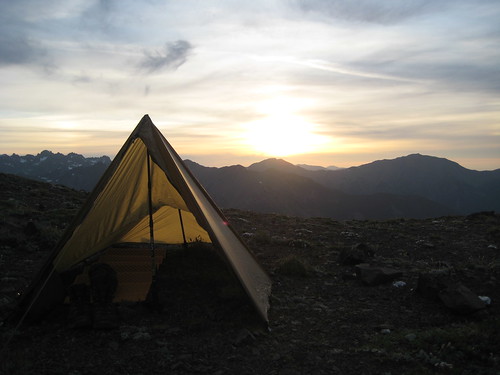
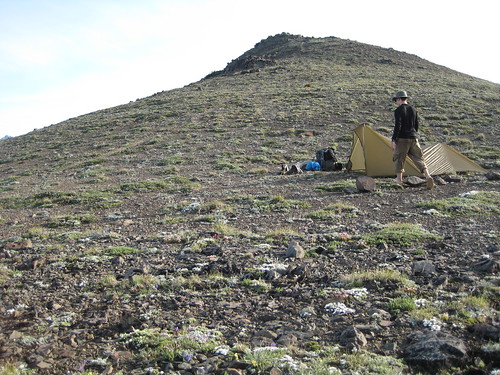
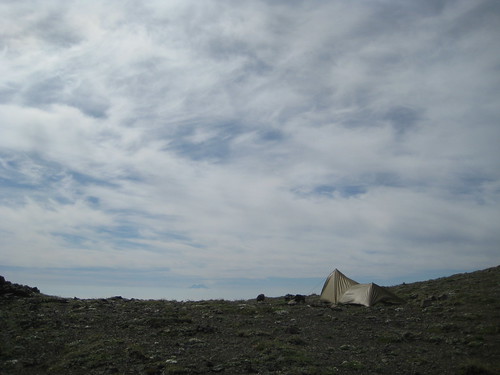
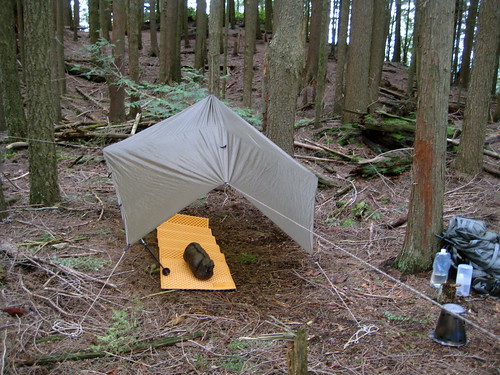
I do not understand why so many outdoor-gear manufacturers insist on making gear in bright, unnatural colors. To me, it is a form of visual pollution. To be enjoying oneself in the wild and suddenly come upon a hiker in a bright red shirt, or a noisy yellow tent, is a rude shock. It seems to me an attempt to visually isolate humans from the non-human environment – something that we are exceedingly fond of, based on some flawed Abrahamic notion of everything non-human having been created for the entertainment of humans.
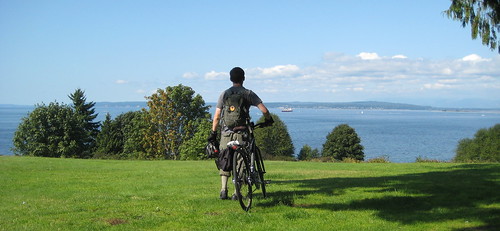
Earth-tones should be the order of the day. Here is a photo of my camp, taken from only a couple hundred feet away. It is exposed, out in the open. No attempt was made to camouflage it. Can you spot it? (Large version)
With such a simple setup – a brown tarp and a green pack – I can blend with the environment, not disturbing the other occupants of the area, human or otherwise.
You and I are part of that world – the world – and should not seek to create barriers or erect boundaries between us and it. Do not noisily advertise your presence, disturbing those who may be around you. Embrace the world, sink into it and wrap it around you. It’s not such a bad place.
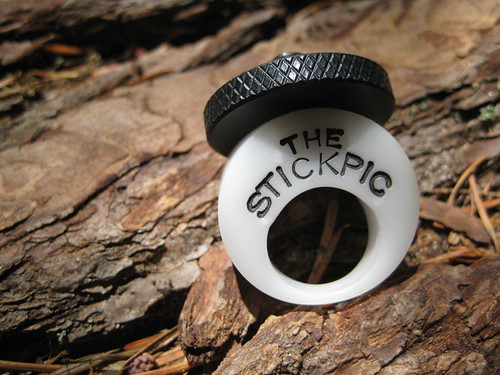
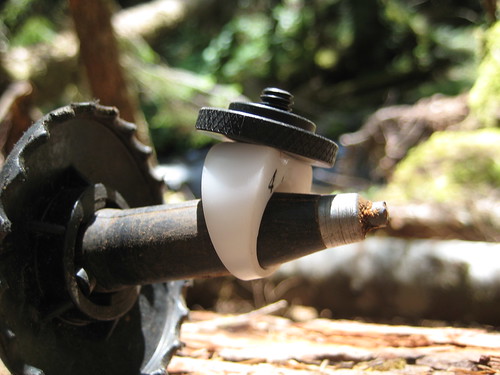
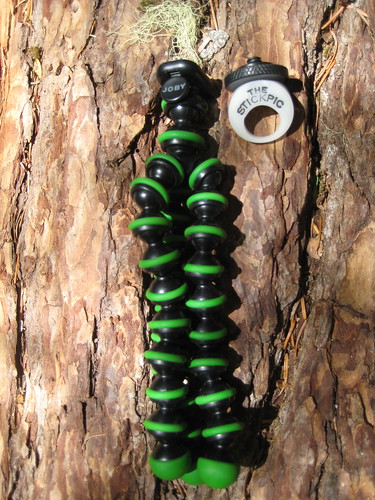
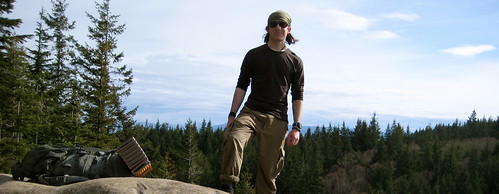
It’s a very simple device. The top screws into a camera’s standard tripod socket and the bottom slides onto the tapered end of a trekking pole. You can then set the camera’s self timer, hold out the pole, and take a self portrait. Or pretend that you’re Les Stroud and shoot a little video. Overall, an ingenious little device.
My initial worry about the StickPic was that it would fall off the tip of the pole, taking my camera for a tumble down the side of a mountain. So far, that has not been a problem. You can jam the StickPic on the tip of the poles pretty tightly, and also loop your camera’s wrist strap around the pole above the basket for added security.
I usually carry a Joby Gorillapod with me and keep the attachment doohickey for that screwed into my camera’s tripod socket. Switching that out for the StickPic takes only a few seconds.
The Gorillapod is overall a more versatile device, but fails to address the problem that StickPic primarily concerns itself with: when you are alone, in an alpine environment, with no conveniently situated tree branches to wrap the Gorillapod around or perfectly sized boulders to set it on top of.
In terms of size and weight, the StickPic wins out. It weight 0.3 oz, compared to the Gorillapod’s 1.5 oz.
So far this summer, I’ve been carrying both. They each address different needs and only weigh a combine total of 1.8 oz. Not much weight for the extra versatility added to your photography arsenal.
I first heard of the hike to Marmot Pass through a report at the Washington Trails Association, which claimed that it was possible to see Seattle’s Fourth of July fireworks from the pass. I had been back from a week in the Wenaha-Tucannon Wilderness of the Umatilla National Forest for only a few days, but having had a shower, a shave, and done some laundry, I was ready to head back out again. I planned to go there on Saturday, when the rest of the country would be eating hot dogs and preparing to blow stuff up in celebration of the violent overthrow of a government (being too fat, no doubt, for a more fitting remembrance, such as staring a local militia movement.)
Assuming that the traffic would be poor and the ferry to the peninsula jammed because of the holiday, I awoke early and hit the road as the sun came up. As it turned out, there was almost no traffic and I only had a 5 or 10 minute wait for the ferry.
The ferry ride from Edmonds to Kingston on the Puyallup is a short, 25 minute cruise. I entertained myself by taking pictures from the bow as the mountains appeared.
From Kingston, it was another short journey to Quilcene, where I left the highway for the forest.
The hike to the pass is short and fairly leisurely, being only 5 miles and gaining 3,600 feet. It is an easy day hike and, it being a holiday, I was worried about the area being too crowded for my taste. Things were looking up on the way in, as the only people I saw were day hikers walking out.
The trail follows the Quilcene River for the first few miles, wandering through a dense forest of Doug Fir, Cedar, and Hemlock. Halfway in, the trail passes through a cleared area that must be Shelter Rock Camp. It is empty, which is a good sign, but not surprising. I cannot think why anyone would want to camp so close to the trailhead.
Beyond Shelter Rock, the trail begins to climb. The forest clears for a spell, exposing the first views of the peaks of the Olympics. I pass a couple of day hikers going in, picking their way along slowly despite not having any weight on their backs. After them, I come upon a group of 4 backpackers plodding along the trail. Judging by the size of their packs, they must have a month’s worth of provisions. As I pass them, the trail turns a corner. I am greeted by the second and last established camp on the trail, Camp Mystery. My heart sinks. It is the most depressing sight I could think of: a veritable village here in the wilderness.
Over a dozen tents and more people crammed together, crowding both sides of the trail. I look to the trees and a cringe of embarrassment for these people runs through me. Everywhere, branches are laden with stuff sacks. Bear bags, they must be, but not one is hung more than six feet from the ground. Most are closer to 5 feet, hung near the trunks, where strong branches meet the tree. I cannot spot one that is further than a few feet from a tent. Either this is some weird cult, seeking to sacrifice themselves to the bears of the wilderness, or these people have no business being out in such an area. Either way, I was clearly dealing with mad men. I want to get as far upwind and upstream from these people as I can. I continue the climb to the pass, only another mile away.
My bewilderment grows. I toy with the thought of going back down to the camp and screaming at the campers below; perhaps letting lose a well aimed rock or two. Anything to knock them out of their bout of insanity. What is it that inspires such emotion?
The trees thinned. Meadows of grass and wild flowers replaced them. The Quilcene, which even a half mile back at the camp was a torrent, disperses into numerous little streams, here and there disappearing into the ground. Behind me, to the east, the view betrays the distant peaks of the Cascades, still topped with snow. I could not, can not, and never will understand how anyone could stand to spend the night in such a crowded cluster of tents, closed in among the trees, with the river running noisily beside them, when not half a mile from them lies an Eden such as this.
I continue the last leg of the climb to the pass, reasoning that if the forest, the mountains, the Earth itself can not talk any sense into the lunatics, I stand no chance of it myself.
Reaching the pass, which sits at 6,000 feet, I find myself in a panorama. The view of the far off Cascades in the east is magnified. Looking West, I find myself level with the peaks of the Olympics. North and south: a trail along ridges, mountains without end.
Northeast of me sits Buckhorn Mountain, whose summit is at 6,988 feet. A trail runs up from the western side. This is what E&Es and XTLs are made for, but the thought only briefly crosses my mind. It is only 3:30 PM and the trail up does not look too steep. I decide to climb to the top with my full pack on.
Halfway up, I turn and look east again. Where before I had only seen a few small peaks of the Cascades, far off in the distance, Mt. Rainier now stands, dominating the landscape with its huge body and sky-scraping summit.
A short distance further and the trail levels out. I find myself walking along the spine of the mountain, covered here with rocks and there with more meadows of flowers and grass. There is one tent with two people right off the trail. I congratulate them on their choice of bedroom. I go further, to the top of the summit, glad to have left the insanity a thousand feet below me. From up here, I can see the Hood Canal, the Puget Sound, San Juan Islands, Seattle, Everett, Rainier and Glacier Peak. I am in a world of mountains. Miles and miles I can see in everywhere direction, yet, wherever I look, the horizon is dominated by rocky peaks. Yes, I think to myself, this will be my home for the night.
Sitting here, I am reminded of other journeys. This place and this view brings into strict contrast, particularly, California. Down there they have seen fit to trade all good clean air for smog and pollution. Looking west from the peaks of the Sierra Nevada it is not possible to see even into the foothills, much less the neighboring coast range. It is a lamentable development, to have had to sacrifice Oregon as a buffer state between us and them, but I hope it will give us the time needed to protect and preserve our own realm.
Back here, on top of the mountain, I feel dehydration setting in – a tingling in my fingers. The day has been hot, the climb long. It is cooler up here, but also that much closer to the Sun. I had drunk the last of my 2 liters of water near Camp Mystery. I need something to drink now and more still if I plan to spend the night up here. But there is no water on the back of the mountain. So, I begin the climb down again. In an hour, I reach the meadows just above Camp Mystery and find a spot where a low but fast moving spring gurgles out of the Earth. There is probably no need to filter it, but I do. I sit for a while, slowly sipping a liter of water. Then I top off my bladder and bottle, giving me about 3 liters for the night. Tossing on the (now much heavier) pack, I turn around, and climb back up to the pass, then back up the mountain, reaching the summit again in another hour and a half.
Now, at the top, I survey the area for a spot to pitch my tarp. I spot a small saddle back along the spine of the mountain, just below the main summit and out of sight from the other camp. The ground looks rocky, but that’s why I brought a sleeping pad.
I clear away a few of the larger rocks and pitched the tarp there, opening facing east, as I always do, to catch the first warming rays of dawn.
That done, I wander around a bit, exploring the area.
I am particularly interested to find an outcropping of boulders with many loose rocks. Originally, I had intended to spend the night at or just below the pass, which is situated at just about the tree line. As such, I had brought my bear bag hanging system to store food. Up here it is alpine. There are no trees available. In this outcrop of rocks, I can at least bury my bag. Of course, any rock that I can move, a bear can move with much more ease, but it is the best that I can do. All my food is individually packaged in ziploc bags, all of which are in an odor proof Opsak, which is itself in a stuff sack. It seems pretty scent-proof. As long as I cook and eat all my food in another spot away from camp, I see no reason why any bear would venture up this high to disturb me – particularly not with the buffet awaiting him down at Camp Mystery. As well, I am on National Forest land, not National Park. One of the benefits of National Forests is that dogs are allowed. The other camp further back along the spine of the mountain has a dog with them. Coming up the mountain from that direction is the most likely route for anyone, bear or human. The dog would be an excellent sentry, warning me of any intruders.
I cook my dinner and stash my food. It was about 9:00 PM now and I was just thinking that this place would be worthy of an annual pilgrimage, whether fireworks were visible or not, when I caught sight of some motion to my left. I turn, looking towards the steep southern slope of the mountain and saw something white. I am stunned for a moment. I am used to the browns of deer, elk, and cougars and the black of bears (no Grizzly out here), but white? Recovering, I realize what it is. A Mountain Goat. For myself, the very spirit of the mountains. But so rare to see. I rush back to my tarp, bend down, with my back to where he had appeared, and grab the camera out of my pack. Turning around, I half expect him to have vanished. But he had not. He was only a few feet from my tarp, and approaching.
Out of myth, out of time, the great god Pan walks towards me. In shock of his lack of fear, I can only stand, pointing my lens towards him. For a moment or for an eternity, I am set loose from the fetters of the profanity below. The human world is shattered by his presence. He looks at me, and I find myself at once in another place. Older, wider, and deeper. There is no other sound here, above all things, and he is close enough for me to hear his breath.
He leads on, and I follow. I try not to make much noise, but he, casting an eye at me over his shoulder now and again, is aware of my presence. We walk in the light of the setting sun for a time. At the top of a small rise beyond my camp, I stop, and allow him to continue alone. The sun has set now, leaving the western sky a blood red. But rising in the east is a full moon. It will not be dark tonight.
Reaching my tarp once again, I can see the lights of the cities far away – isolated attempts to drive back the night and the cycles of the world. It is near 10:00 PM now. The fireworks begin. Tiny explosion of red and white along the coast in an endless stream from Everett to Seattle. Soundless flashes of light. I wonder what a war would look like from up here.
It is night now. I crawl under the tarp, into my sleeping bag. Lying on my stomach, looking out from under my shelter, I can still see all the explosions. They are not as impressive as the rest of this world. I quickly lose interest and turn onto my back to go to sleep.
Perhaps half an hour later, I hear movement out to the south. Pan walks by, three or four feet in front of my bed. His gait is quicker now, eager to return to his own bed after completing his business.
In the morning, I am awakened by the sun. Clouds are in the sky. There is a wind blowing across the mountain.
I go to where I buried my food and, finding it unmolested, return with it to camp. Having nothing particular to do this day, I walk around the mountain some. I do some sitting, then return to my tarp to continue sitting out of the wind.
For a while, I lay, listening to the bees dance with the few flowers outside. Eventually, it is time for breakfast. I finish eating at 11:30 AM and decide to break camp. At noon I am packed and head back down the mountain, through the pass, and into the valley. Back at the trailhead at a bit past 3:00 PM.
(A new version of this tutorial has appeared on ITS Tactical, detailing my updated construction method. The following is outdated, but left for posterity.)
Tyvek is a synthetic material made by DuPont, most regularly used at construction sites for wrapping house frames. It is a rather strong material and fairly waterproof. It is so ubiqitous in industrial usage as to be freely available to the intrepid individual. Partly because of this, Tyvek is popular among many lightweight travelers for use as a cheap, lightweight, and effective groundcloth for a tarp shelter.
The United States Postal Service’s Priority Mail envelopes are also made out of the material. A few months ago I saw a picture of one of these envelopes in use as a stuff sack. I thought it was a great idea and decided to make my own. I’ve since made two of them. It’s a very simple process.
You need only a few items for the project: a USPS Priority Mail envelope, a needle and thread (from the repair kit in your trusty possibles pouch, no doubt), a bit of cord, a cordlock, and a sharp object. You could make the needed cuts with a knife, but scissors are a bit easier. I use the pair on my Leatherman Juice S2, which has replaced the Charge ALX as my daily carry.
The envelope can be new or used. Any post office will have new envelopes available in the lobby, free for the taking. Still, I would feel a little guilty about taking a brand new envelope just for this purpose. There’s plenty enough used envelopes floating around, and it seems a waste to steal a brand new one. I lucked out in that recently someone sent me a package in a box, but, within the box, used the pictured envelope to organize the goods. So the envelope is used, but brand new.
This project also warrants a disclaimer: Priority Mail envelopes, whether new or used, are property of the United States Postal Service. They are intended solely for the use of the postal system and, contrary to logic, just because somebody paid to mail you a package in one doesn’t make it yours (or theirs). So repurposing the envelope in this way is probably a federal offense. Law abiding citizens should immediately navigate away from this page and return to their cells. The rest of us can move on.
The first step in the process is to cut a little square in one corner of the open end of the envelope. No need to measure. Just eyeball whatever looks good. The height of the square will determine the size of the channel which we will sew and then pass the cord through (this one happened to be about 1.5mm).
If you are using a brand new envelope, you’ll want to cut the top bit with the sticky stuff off, so that both sides of the envelope are the same height. On a used envelope, you might have to do some trimming to achieve the same thing, depending on how you opened the envelope.
After the square is cut, fold down the rim of the envelope all the way around, using the height of the square to determine how much is folded. If you want, you can cut a slit in the other corner of the envelope to help fold it down. I did this on the first stuff sack. For this one, I chose not to. There’s a slight bit of bunching in that corner as a result, but it’s fine.
Now that you have the top flap folded down all along the top of the envelope, sew it shut. This creates a channel which we may then thread a bit of cord through, using it to cinch the sack shut.
I start my stitching on the inside of the envelope, poke the needle through, and pull all the thread through except for a tag of about 3”. Then I poke the needle back through in another hole, pull all the thread through back to the inside, and use the tag end of the thread to tie a square knot, thus securing my first stitch.
With the sewing done, now would be a good time for the camera battery to die. Curse a little, perhaps shed a tear, then decide that your audience is intelligent enough to struggle through the next steps without pictures.
For this stuff sack, I used ALSE survival vest cord, also known as accessory cord or Type I paracord. This stuff has a breaking strength of 100 lbs, is 1/16 of an inch in diameter, and tips the scale at 1oz per 50 feet. Pick it up at Supply Captain. You could use any cord you happen to have, including the standard (Type III) 550 paracord, but I don’t think the cord on this little stuff sack needs to have a breaking strength of 550lbs and Type III paracord is much, much heaver than Type I. We’re trying to go lightweight here.
Threading the cord through the channel can require a little perseverance. I usually tie a knot in one end, stick it in, and then use the knot to push the cord along with my fingers from the outside. If need be, you can shove a skinny stick or something in there to help it along.
When the cord comes out the other side, all that’s left is to cut it to length, slide the cordlock over both ends, tie some sort of knot so that the cordlock can’t be inadvertently slide off the cord, and you’re done!
The resulting stuff sack is durable, lightweight, and free (or close to it, depending on what materials you have in your craft box). Though you’re obviously not going to get a water-tight seal by cinching the sack closed, the Tyvek material itself is waterproof and will suffice to keep your gear organized and dry in any pack. If water crossings and momentary submersion is a concern, use a trash bag as a liner in your pack and you will be very well off for almost no cost in weight or money.
Lighter, stronger, more waterproof, and better constructed stuff sacks can of course be purchased, but for an exponentially higher price. I have nice stuff sacks for my sleeping bag and spare clothes, so, for the time being, this Tyvek stuff sack is used for my food.
Last weekend I decided to finally invest in a digital postal scale for the accurate weighing of gear. Prior to that, all I’ve had is a small kitchen scale that I use for weighing herbs. It was inaccurate (and not digital, so reading its inaccurate measure was always a trick that invariably introduced further inaccuracies) and weighed only up to 16 oz.
The scale I’ve replaced it with is an Ultraship #35 shipping scale. In addition to having a digital display, it’s also able to weigh in ounces, grams, pounds, and kilograms. It’s accurate to 0.1 oz, which is good enough to me. The #35 in the product name signifies that it can weigh up to 35 lbs (they also have #55 and #75 models). The display bit can actually separate from the scale bit, which is a nifty feature when weighing over-sized items. The scale only cost $25 (including shipping). I bought it on eBay from OldWillKnottScales.
I received the scale this morning. I’ve started a database of weights of individual pieces of gear using Google Docs, which I’ve published for anyone to view. I’ll add to the document as I weigh more gear.
A lazy day of doing not much of anything sometimes makes me feel guilty. It requires that some evening activity take place – something which gives one the satisfactory feeling of accomplishing something of use during the block of waking hours. Today I chose to spend the evening in the woods. I thought I might practice some knife skills, or just sit and read a book. Arriving at my spot I was unpleasantly greeted by a thick swarm of mosquitoes, greatly annoying me and foiling my plans for peace. I decided to start a small fire with a bit more green wood than usual. The smoke from a fire usually drives mosquitoes away and the green wood would put out more smoke than dead wood. When I was out collecting wood, I noticed a large patch of Stinging Nettles in the gully below where I was. The two thoughts of Nettles and fire brought to my mind an episode of Wild Food where Ray Mears picked a few fresh Nettles and wilted them over the fire to neutralize their sting and improve the flavor. I eat a lot of Nettle raw, crushing the leaves to break the needles and get rid of the sting, but I thought I might try this new method.
After the fire was going (and the mosquitoes buzzing off elsewhere), I put a small measure of dead wood on a corner of the fire to get a bit more flame than the smokey green wood was providing. This accomplished, I went back to the gully to collect a few stalks of nettle and return them to the fire. It took only about 15 seconds of holding one plant over the flame for it to become limp and drooping. I tested it a bit with my fingers to see if the sting had been neutralized. It had. Tearing off a bit and munching it around a bit in my mouth, I was greeted by quite a surprise: these wilted Nettles were, without doubt, the best Nettles I had ever tasted, perhaps even being the best wild weed I had ever enjoyed! I ate about a dozen tall plants, until I was quite satisfied with my evening snack. Occasionally I would leave a stalk hovering over the flame a bit longer than needed, but that would impart to the leaves a slightly toasted flavor, which I also found to be agreeable.
I’ll certainly be enjoying wilted Nettles again. It’s a bit more trouble than just eating them raw, but, even on the move, it takes very little time to start a small fire and prepare a few picked plants in this way. The improved flavor greatly pays back the small investment in time.
My possibles pouch began as being simply a Doug Ritter Pocket Survival Pak. The Survival Pak comes in a waterproof envelope that is meant to be carried in a pocket. I prefer a belt-mounted solution, so I ditched the waterproof envelope and moved the contents to a TAD Gear SERE SP pouch. The SERE pouch has velcro webbing on the back, which allows it to be mounted to be mounted to any sort of belt or PALS webbing.
When using the possibles pouch, I’m often traveling with my Kifaru ZXR. The ZXR is built upon Kifaru’s WrapTech Plus Suspension system, one of the primary components of which is the belt. The belt is a very thick, wide belt that is designed to work with the anatomy of the body and allow the user to comfortable carry obscenely heavy loads. The design of the ZXR’s belt makes it unpractical to have many pouches mounted to your own pants belt. Because of this, I didn’t want to actually mount the SERE pouch to my belt itself, but instead mount it so that it dropped down a bit below my waist, thus not interfering with the ZXR belt. To accomplish this, I simply tied a short loop of paracord through the pouch’s webbing. To mount the pouch, I pull the loop through the backside of my belt and run the pouch through the loop. This allows me to both don and doff the pouch without removing my belt.
The contents of the pouch have changed since I first removed them from the waterproof envelope. The Doug Ritter Pocket Survival Pak still forms the base of the pouch, but I’ve added and removed other items to cut down on redundancy and better compliment the other gear that I carry. I also don’t intend the possibles pouch to be strictly a “survival” item. All of the pouch’s contents have utility in a survival situation, but some of them are not intended explicitly for that.
The contents are as follows:
Ferrocerium rod, striker and paracord
Duct tape (26" x 2")
Pencil
Aluminum Foil (3 sq. ft.)
Condom
2 match strikers
8 Coghlan's Emergency Tinder
Sterile stainless steel surgical blade
20mm compass
Stainless steel utility wire (6' of .020")
Signal mirror
Magnifying lens
4 large safety pins
Repair kit
Fishing kit
The components that remain from the Doug Ritter Pocket Survival Pak are the duct tape, pencil, safety pins, 20mm compass, stainless steel utility wire, sterile stainless steel surgical blade, magnifying lens, signal mirror, and aluminum foil. The other items I’ll cover here.
Ferrocerium rod, striker and paracord
This is a standard Light My Fire Scout firesteel and striker. It is not my primary firesteel, but a backup that I can be sure of always having securely attached. You might have noticed that the paracord that I use to secure the rod and striker to the pouch is rather long (about 3.5’). Paracord, of course, has hundreds of uses, so carrying a bit more of it than is strictly necessary isn’t always a bad idea. But the primary reason for the length of this particular piece of cord is that I can use it as a bow string on a fire-bow set.
Condom
This is just one standard latex condom. It can be used as a water carrier, a makeshift glove for a few fingers while taking care of a wound, a barrier to help stop the creation of a new species of half humans half wood nymphs, or utilized in the creation of emergency balloon animals.
Match Strikers
REI Storm Proof Matches always come with 2 spare strikers sealed within a piece of plastic. I find that so-called “strike anywhere” matches can be hit and miss, so by carrying this, I assure myself of always having a dry, reliable surface to strike any kind of match on.
Coghlan's Emergency Tinder
This stuff is not my favorite fire starting tinder, but it does work, and I have a bit of it kicking around, so I tossed it in. They’re stored within a small waterproof bag.
Repair Kit
My repair kit, I think, is somewhat ingenious. I like it, at least. I previously carried a small leather pouch with an assortment of different needles, types of thread, and safety pins. The whole thing was far larger and heavier than I could ever justify it being, so I ditched it and started from scratch. I got the idea for this new kit from the BackpackingLight Forums.
The container is an old Pentel mechanical pencil led refill case. This is the perfect size to secure the two needles I’ve chosen to carry and the case itself is light enough to make me happy. (And it’s free.)
Around the outside of the case, I’ve wrapped a length of black Kevlar thread. When I built this kit, I just wrapped till I got bored, so I have no idea how much thread there is. Enough, I think, for any repairs that I am likely to encounter. I chose Kevlar thread as the best complement of weight and strength. Previously, I carried a bit of standard, thin sewing thread. The thinness of that thread is suitable for sewing things like clothing, but it is decidedly weak. Kevlar thread is the same thickness, not noticeably heavier, but much stronger. I also previously carried a bit of thick waxed nylon string that is appropriate for sewing things like thick leather, heavy cotton canvas, or thick nylon. This is very heavy by my standards and overkill for most repair jobs. Out of all the gear I carry, it would probably be appropriate for repairing only my Kifaru rucksack. And Kifaru rucksacks don’t fail. If by some strange happenstance it did fail, the Kevlar thread would probably be strong enough to get be back home or to some place where a more permanent repair could be made.
Inside the case I carry two needles. One that is thicker and stronger than most thin needles used for the hand-repair of clothing, but still small enough to qualify as small in my eye (just under 5mm in length and thin enough to not punch overly large holes in a thin cotton material). I believe this is the needle that comes with the Doug Ritter Survival Pak, but I could be wrong. The other needle is slightly longer (about 6mm) and has a slightly thicker head, making it more appropriate for heavier material. (I believe this one is technically a sail maker’s needle, but I could be wrong. I have a variety of different needles I’ve picked up over the years and lack the expertise to be able to identify their intended purpose.)
Also inside the case is a small safety pin. The purpose of this is actually just to take up more area inside the case so that the two needles don’t bounce around and make noise.
This repair kit, along with the 4 large safety pins also carried in the possibles pouch, makes for a very small and lightweight repair kit that is able to tackle any of the problems that I may encounter. In addition to this, I also carry a half dozen safety pins of a varying sizes and a couple spare buttons within the rucksack itself. The guts of paracord and the floss in my toiletry kit can also be appropriated as thread.
Fishing Kit
My fishing kit is actually a combination fishing kit and glasses repair kit. An odd combination, you say? I agree.
I am dependent on my glasses, so I have always carried a glasses repair kit. Such kits are available in any drug store in the country and usually consist of a small tube that contains a few of the small screws that most glasses use, a small screwdriver to match, and a couple spare rubber nose pieces.
A year and a half ago I purchased a new pair of glasses that happen to have plastic nose pieces integrated into the frames. Recently, I was going through the possibles pouch, rethinking each item, and came upon the glasses repair kit. I opened it up and was shocked – shocked, I tell you – to discover that it contained two of those small rubber nose piece replacements. With my new glasses, these were completely useless to me. I had been carrying around an extra 2 grams (or so) all this time! I disposed of the offending pieces and felt better immediately.
But then I looked at the tube and its contents and decided that it really was a waste of space. The tube was far too large for the spare screws and screwdriver that it now contained. I shrugged, moved on to looking at the rest of the contents of the possibles pouch, and then had a stroke of brilliance. I would turn the glasses repair kit into a fishing kit!
It follows on the same principle as the repair kit.
Around the outside of the tube, I wrapped a length of 4 lb monofilament fishing line (“ultragreen” in color). Again, I did not measure the length, but it is plenty for such an emergency kit.
Inside the tube, I placed 4 small hooks, 2 split shot, and 2 snap swivels. This is clearly a very minimalist fishing kit, meant for emergencies only, not for when one intends to actually catch fish for a main form of sustenance, but I have used it. It does work.
This particular glasses repair tube is well-suited for such a kit because the lid for the tube is the screwdriver itself. The top of the screwdriver can then be removed, exposing the inside of the hollow handle. It is in here that the spare screws are stored. This allows the glasses repair bit to be separate from the fishing bit.
It should also be noted that the fishing line wrapped around the outside can also be used as repair thread.
I’ve moved this domain back to Dreamhost. It’s been a good run with Slicehost. I still think that they are the superior host (I’ve already noticed a slowness with Dreamhost compared to Slicehost) and I greatly prefer the freedom and control of a VPS over shared hosting, but Dreamhost is cheaper and I need to cut down expenses. In the future I may move back to Slicehost again.
If anybody finds anything broken due to the move, let me know.
Last year, Backpacking Light published a review of the MSR Hyperflow filter. It was one of their subscription-only articles, so I never read it. Apparently, the reviewer attempting to filter only slightly-less-than-clear water and experienced a very quick build-up of material in the filter element that could not be removed by back-flushing and vastly deteriorated the flow-rate of the filter. Since the review, MSR has acknowledged the problem and released a new filter cartridge to address the problem.
I have had a MSR Hyperflow for a little under a year and have never experienced the clogging problem or the lack of effectiveness of back-flushing. I do tend to be judicial about selecting my water sources and filter the clearest water I can find, which may be why I have not experienced the reviewer’s problem. (In fact, I could probably get away without using any filtering on many of the water sources I choose, but I, like most, have been indoctrinated with the need to fear all wild water sources.)
What caught my eye in the second review was that MSR was offering free replacement filter cartridges to those who had filters manufactured prior to November, 2008. The cartridge is the most substantial component of the filter, and getting a new one is a bit like getting a whole new filter for free. This afternoon I called Cascade Designs (MSR’s parent company) at 1-800-531-9531, read them the serial number on my filter, and there is now a new filter cartridge in the mail for me! MSR customer service gets two thumbs up, even if there may be issues with the product.
I’ve changed my jabber account to pigmonkey@jabber.org. The old account is no longer active.
The jabber.org server doesn’t support transports, so I am no longer reachable through the old ICQ or AIM accounts. All the contacts I actually speak with seem to be on XMPP, so that shouldn’t matter.
This past weekend I took a walk out to the Chuckanuts, visiting the same spot Avagdu, HatterOfMaddnesz, and I visited a couple months prior. The ice had disappeared from the lake by now. I opted to pitch my tarp up at the viewpoint above the lake, which had caught my fancy last time around. The sun was out and not a drop of rain fell from the sky for both days, making for a pleasant contrast with the last few trips I’ve taken. In the evening I could watch the sun set over the San Juan islands in the west, and the following morning watch the sun rise over Mt. Baker to the east.
I set my Kifaru Paratarp up in an elevated manner, opting to rig it to trees with paracord rather than using my trekking poles underneath. This makes for a huge amount of living space underneath.
On the way out, I made a detour to Raptor Ridge, another nearby viewpoint that I had been unable to visit on the outing with Avagdu and Hatterz.
After fixing a small breakfast and soaking in the view, I finished the 12-ish mile hike home, munching on the odd Stinging Nettle leaf plucked from the side of the trail and pondering butterflies.
High carbon steels have a tendency to rust without proper care. This is especially true of knives made from O1 tool steel, such as my BCNW-O1.
A patina is a thin film that develops on some metals due to oxidation. It is a type of rust, but a good one, that protects the blade rather than corroding and eating away at the metal. Over time, most knives will develop a patina, regardless of the material that they’re made from. Many people are attracted to the distinctive and aged look that a patina imparts onto a knife, and will make an effort to force a patina onto their blades. The easiest way to do so is to use the knife to prepare acidic foods: potatoes, onions, tomatoes, pickles, and the like all work well. Some people will soak a rag in vinegar and wrap it around the blade, or coat the blade with mustard and leave it overnight.
I wanted to force a patina onto my BCNW-O1, for both the aged look and the extra protection that it gives. The first step I took was to take a slightly-moldy potato out of my fridge and stab the blade into it, up to the handle. I left this in overnight. In the morning, I took the blade out, rinsed it, and stabbed it into another spot on the potato. I repeated this through-out the day, leaving the blade in one spot for a few hours at a time. This sort of approach adds a multi-layered texture to the patina.
After the blade had been in and out of the potato for about 24 hours, I tossed the potato, cleaned the knife, and used it to slice an orange. After the orange was sliced, I left the knife on the plate with the orange as I ate, so that the juices could soak into the blade a bit. After this, I rinsed and dried the blade again, then sliced another orange the next day.
I figured all of this would probably be good enough, so, after slicing the final orange, I rinsed the blade once more, then gave it a good scrubbing with a soapy sponge to clean off any bacteria that might be growing on it after all the exposure to food. This removed a lot of the rust – more than I thought it would – but, after I dried the knife off, I had a beautiful patina on the blade.
Since the patina is a type of rust, it does eat away the sharp edge of the knife a bit. So, after it was all clean, I gave the knife a session on my 6000 grit japanese water stone, which sharpened it back up again.
Usually after the sharpening the knife, I coat it in camellia oil, which was used in Japan by samurais to protect their blades. It is a non-toxic oil that is often used for skin care, and can even be cooked with, so I have no problem using it on a knife that I will prepare food with and eat with. The main purpose of the oil is to protect the blade from rust so, with the patina applied, it is not strictly as necessary as before. Still, I apply it so that both it and the patina can ward away any bad rust.
Using a fine-grit Japanese water stone with a nagura stone to sharpen the blade creates a slightly abrasive cleaner that can be purposefully rubbed into the blade to clean off the beginnings of a patina, if one so desires. I do not do this on purpose, but I have sharpened my knife multiple times since applying the patina and, as a result, the bevel of the blade is much shinier and less-rusted than the upper part.
You can tell this patina is forced, because it terminates at the handle (I couldn’t stab it into the potato any deeper!) of the BCNW-O1. The exposed part of the tang is shiny clean, like new.
I was given the sandals a few years ago and always toss them in my pack when traveling in warmer climates. They’re light enough to not weight down the pack, and function as excellent camp shoes at the end of the day. I’ve never done any serious hiking with them though, and I wanted to see how capable they (and I) were.
I ended up doing a 15 mile hike. Towards the end, the balls of both my feet felt a little sore. They feel as if they’re developing a new callus (good thing) rather than a blister (bad thing).
I think it’s a healthy habit to do a hike every now and again with minimal-to-no foot support (such as barefoot, or with sandals similar to these). We all know that shoes are supposed to be bad things. If you’re the type who wears 6” or taller boots everyday, it’s especially important. Combat boots provide so much support for the foot and ankle that the muscles and tendons don’t have to do any work. They waste away. Walking with less supportive footwear will allow your feet to develop to a more healthful level.
For myself, I was surprised to find that the muscles in my lower back seemed to get the greatest workout. I usually have very bad posture, but walking with the sandals, for some reason, forced me to stand straighter than usual.
I decided to bring the Kifaru E&E instead of my normal EDC pack to cut down on weight. Here’s what I carried in it:
Joby Gorillapod
TAD Gear BC-8 pouch
Canon Powershot SD1000
Klean Kanteen (40 oz)
Possibles pouch
Challah (1/2 loaf)
Grimloc Carabiner (2x)
Bushcraft Northwest BCNW-O1 knife
Filson Tin Cloth Packer Hat
Minimalist Self-Aid kit
Buff
The Wilderness Tactical Halfway-Decent Glasses Case
...most of my townsmen would fain walk sometimes, as I do, but they cannot. No wealth can buy the requisite leisure, freedom, and independence, which are the capital in this profession. It comes only by the grace of God. It requires a direct dispensation from heaven to become a walker. You must be born into the family of the Walkers. Ambulator nascitur, non fit. Some of my townsmen, it is true, can remember, and have described to me some walks which they took ten years ago, in which they were so blessed as to lose themselves for half an hour in the woods, but I know very well that they have confined themselves to the highway ever since, whatever pretensions they may make to belong to this select class. No doubt, they were elevated for a moment as by the reminiscence of a previous state of existence, when even they were foresters and outlaws.
Henry David Thoreau
I have refrained from posting gear lists from my travels here mostly out of laziness, but partly because of a fear that they will be taken as absolute. The gear that I pack varies greatly from trip to trip. The type of travel, duration, terrain, and anticipated weather all factor into what I pack. On top of this, I always experiment with different gear and different configurations, seeking the best of both. Thus, my gear will differ even on nearly identical trips.
I should also note that I pack with an eye towards preparedness. That is to say that, for me, the only difference between 3 days and 30 days is the amount of food, and I’m not going to be carrying 30 days worth of food, anyway.
Still, people have expressed interest in what I pack, and I know that I do appreciate it when others whom I respect post their pack lists. So, here is the list from my last trip. The trip was 7 days long, and included about 85 miles of travel on dirt trails, paved roads, and bushwhacking. The route was never what I would call true wilderness or backcountry, meaning that I was always within one days walk of an urban area – and by urban I mean what is probably rural by most standards. The route also took me directly through small towns, which allowed me to restock on food.
I performed the trip over the last week of March. Days got up to around 45 degrees Fahrenheit, with nights around 35. Days were unusually dry (which meant it misted constantly, but didn’t actually rain). During the night, it did rain, but not terribly hard. On the first night, which was at about 1700 feet, it snowed. (The rest of the hike was through valleys and along the coast, so the elevation was well below 1000 feet.) In all, this pack list is a good representation of what I will choose to carry in Winter, not Spring. In the deep, dark of Winter, I will probably carry a few more layers of clothing and switch out some of the lighter garments for heavier ones, but, other than that, this list represents a more-or-less standard pack list for a one week journey in a Cascadian Winter, below elevation.
I do not have a reliable scale, so I cannot weigh my gear. All in all, I’d estimate the pack to be at about 45 lbs.
I’m compiling this list a few days after returning from the trip. I have already unpacked about half the items, so I may have missed something, but the bulk of the gear is certainly here. If you have any questions, or notice any stark absences, feel free to comment. Ideally, I would create a pack list as I’m packing, before the trip. Maybe next time…
The list is subdivided into two sections: what I wore on my body and what I carried in my pack. In the pack section, I decided to separate out what was carried in the lid (called an XTL), which detaches to become a man-purse and so also functions as a sort of escape and evasion bag (or a bail-out bag for the bail-out bag) and the body of the ZXR itself. Otherwise, I have not distinguished between what is carried in the main compartment, the slot pockets, or mounted on the belt. The clothing consists of three main insulating layers: a light wool shirt, a fleece vest, and a lightweight fleece jacket. These three would, of course, alternate between my body and my pack depending on where I was and what I was doing. During most of the hiking, I wore the wool shirt and packed the other two.
Worn On Body
Smartwool Hiking socks
Smartwool Microweight Boxer Briefs
Ibex Woolies long underwear bottoms
Patagonia Capilene Level 2 long sleeve tshirt
Nemesis Hellion neck knife
Atwood Tactical Whistle (worn on paracord around neck)
Railriders Versatac Light pants
Small bandana
Ultimate Survival Technologies Strike Force
K & M Industries Matchcase
Hair tie
Bic lighter
The Wilderness Tactical Frequent Flyer belt
Bushcraft Northwest BCNW-O1 knife
Leatherman Charge ALX
Pendleton Western lightweight wool shirt
Buff
Filson Tin Cloth Packer Hat
Lowa Renegade Gore-Tex boots
Sole Ed Viesturs Ultra Cushion footbeds
Kifaru ZXR
Kifaru XTL
Kifaru Standard Chamber Pocket
Rite-in-the-Rain notepad (model 393-M)
Lens cloth
Hair tie
Glasses strap
Badger Healing Balm
Purell Hand Sanitizer
Jetstream ballpoint pen
Fisher space pen
REI titanium spork
2x spare camera batteries
REI keychain thermometer
Large ziploc
Maps (5x)
Inova 24/7 with head band
Light My Fire Scout Swedish Firesteel and striker
Cell phone
Possibles pouch (Note: I'm not going to discuss the contents of this here, as I'm rethinking it with an eye toward redesign. In it's current incarnation, the items are housed within a TAD Gear SERE SP pouch, which measures 1" deep x 4" tall x 4" wide. It began as a modified Doug Ritter Pocket Survival Pak that I wanted to mount to my belt, instead of carrying it in a pocket. Many of the items remain the same.)
Joby Gorillapod
TAD Gear BC-8 pouch
Canon Powershot SD1000
Fallkniven DC4 sharpening stone
Kleenex pocket pack
REI Storm Proof matches
Maxpedition Rollypolly mini dump pouch
Self Aid Kit (Note: I'm also not going to discuss the contents of this here. Suffice for now, it is a small, pocket-sized kit composed of items in two different small aloksaks)
Small ziploc bag
Ultimate Survival Technologies Wetfire cubes (6x)
Garbage bag (8 gallon)
Small bandana
Platypus collapsible bottle (32 oz)
Outdoor Research Celestial Jacket hardshell
Integral Designs Sil Poncho/Tarp
REI Peak UL Compact carbon fiber trekking poles
Blackhawk Hellstorm SOLAG gloves
Kershaw folding saw
Cambelback 100oz Omega Resevoir
MSR Hyperflow water filter
Kifaru Paratarp
Big Agnes Seedhouse SL1 Fast Fly Floor
Assorted stakes (12x)
Nite-Ize Figure 9 small (4x)
25ft paracord (6x)
Kifaru Stuff Sack (small)
Kifaru 20 degree Slick bag
Outdoor Research Hydrolite Pack Sack #1
Thermarest Prolite 4
Sea-to-Summit Ultra-Sil Dry Sack (8 liters)
Smartwool Hiking socks (2x)
Generic cotton boxer briefs
Ex-Officio Boxer Briefs
Ibex Outback long sleeve shirt
TAD Gear Merino long underwear bottoms
REI synthetic towel, 25" x 15.5" (Note: I bought this a number of years ago and I do not know the specific model name. It does not appear to be the "MultiTowel" currently listed on REI's website.)
TAD Gear Pathfinder fleece hoodie
REI fleece vest (Note: I do not remember the model name and REI no longer sells it. It is made of a light-weight microfleece, with stretchy, spandex-like sides that provide a larger range of movement than a vest of all fleece.)
Trail Designs Ti-Tri Titanium Stove System (900ml pot)
AntiGravity Gear custom pot cozy
Large bandana
Food (Note: this was an assortment of trail mix, couscous, a few energy bars, 2 dry miso packets, 2 bullion cubes, a couple freeze dry meals, 2 tea bags of kukicha, 2 bags of green tea, and one chocolate bar. My journey took me through towns every couple days where I could purchase a meal and supplement my stores with fresh food such as bread, cheese, and fruit. All told, I carried roughly 3 days worth of food at a time.)
REI Nylon Mesh Storage Sack (10" x 6")
Small comb
Hair tie
Nail brush (Note: used not for nails, but for laundry.)
Floss
Toothbrush
Small tube of toothpaste
Ziploc bag
Dr. Bronner's Magic Soap (Almond castile, 2 fl oz.)
Kifaru Standard Chamber Pocket
Coghlan's Emergency Tinder (6x)
Sharpie
Highlighter
Pencil
Small repair kit
Keys
Small plastic bag (Note: used for trash)
Large contractor garbage bag (Note: this bag is large enough to fit over the whole pack. When traveling internationally, I use these to protect all the straps and webbing on the rucksack from the airport conveyor belts. In the wilderness, it can be used internally as a pack liner, externally as a pack cover, or as an emergency bivy.)
Small paperback book (The Golden Spruce by John Vaillant)
Despite investing a lot of money into my footwear, thrashing them heavily, and depending on them to carry me further, I’ve never spent any effort on cleaning or caring for my boots. A month or so ago, I was in REI and took a gander at the footwear section. They happened to have a pair of Lowa Renegades on the rack. The Renegades remain my primary boots that I wear on a daily basis and for the vast majority of my travel. I was shocked by the contrast of the boots on my feet and those on the rack. The boots are made of nubuk leather with some cordura around the ankle band. New, the leather is of a smooth, dark blue color. The leather on my feet was dry, wrinkly, and of a brownish-green color. This made me think that maybe there was something to that whole boot care thing, after all.
I didn’t know much about leather care, nor what I should look for in a product. My first stop for research like this is the Kifaru Forums. The forums are peopled predominantly by those whom I think of as the modern day longhunters and mountain men. I take their gear advice very seriously in considering all of my purchases. The overwhelming opinion on the forums was for a product called Obenauf’s. Obenauf’s makes three relevant products: White Jaguar Leather Cleaner, Leather Oil, and Heavy Duty Leather Preservative (LP). The LP, in particular, was developed for and by wildland fire firefighters. What with the hiking, the heat, and the smoke, I can’t think of any other profession that demands more out of leather boots. I promptly placed an order for $50 worth of product.
After a week-long trek, my boots were soaked through and caked with mud. I was looking forward to trying out my new Obenauf’s products. The first thing I did was remove the Sole insoles (which I clean separately) and attack the boots with a hose, blasting the mud off the outsides and flooding the inside. After about half a day on a boot dryer, the boots were dry, both inside and out, and had returned to the familiar dry, wrinkly, brownish-green color.
White Jaguar Leather Cleaner
The first product I used was the White Jaguar Leather Cleaner. They claim the cleaner is a water based solution of natural plant ingredients. As such, it is non-toxic and biodegradable. Obenauf’s recommendation is to spray some of the cleaner onto an applicator, such as cloth, sponge, or soft-bristles brush. Then work it into the boot with a soft, circular motion, which lifts the dirt, and finally wipe the dirt off with a clean cloth. They warn against soaking the applicator. I found that this did not work very good at all on the nubuk leather. Instead, I sprayed the cleaner directly onto the boots, soaking them thoroughly but stopping just before the point where the cleaner would begin to run. Having soaked the boots, I worked the leather with a nail brush, making circular motions to lift the dirt off. I then wiped off the dirt with a clean cloth. This worked much better than the recommended method. I repeated the process 4 times on each boot, till the dirt stopped coming off.
I’m not sure if the White Jaguar cleaner is in any way superior to, say, a sudsy bath of Dr. Bronner’s, which is the soap I use on everything else. This would clean the cordura as well, and I can’t imagine it would do much harm to the leather. I will probably try this method next time for comparison.
Leather Oil
Regardless of which cleaner is used, the leather will now be very dry and free of all oils, which must be addressed. Obenauf’s says of leather that “it’s a skin, with fibers and pores that requires proper natural lubrication and needs to breathe. Because it no longer has a body to provide proper natural oils, we must.” They claim that other products “soften by weakening or decomposing the fibers and they waterproof by sealing the pores.” Their own product, by contrast, is a combination of natural oils that maintains and preserves the leather’s natural properties.
They recommend applying the oil at a temperature of 75 degrees Fahrenheit or higher. The ambient temperature when I was doing this was around 45 degrees. I decided to hit the boots with a hair-dryer to warm up the leather a bit before the application. Then I applied the oil to the boots, lobbing it on in obscene amounts. One coating per boot, then I went over both of them with the hair-dryer again to encourage the oil to soak in. Obenauf’s recommends two coatings approximately one hour apart. Because my boots took so long to dry after the encounter with the hose, it was rather late after the first oiling, so I left the boots to soak overnight and went to bed. In the morning, I did a second application the same as before, treating the leather to the hair-dryer both before and after. After this, I let the boots set another hour, then lightly wiped off any excess with a cloth.
If you’re a masochist and appreciate ugly, attention-grabbing footwear, you could also use this oil to buff the leather to a shine.
The transformation of the leather was amazing. Save for a few scuff marks here and there, the boots look identical to the brand new pair that caught my eye on the store shelf. They’ve returned to the dark, rich blue color and no longer look so dry and chapped.
Heavy Duty Leather Preservative
The third step, for long term preservation, was the application of the leather preservative. The LP is made of three different natural oils that are suspended in beeswax and propolis. This wax allows the oils to gradually seep into and lubricate the oil over time. Being exposed to flexing or extreme heat, rather than drying the leather out, encourages the wax to release the oils faster, thus preserving the leather.
To apply the LP, I once again heated the leather with the hair-dryer. Then, I turned the hair dryer onto the LP itself. Holding it over the jar for about a minute melted the wax a bit, making it easier the apply. Obenauf’s recommends applying the LP by hand, as your natural body heat will also help to warm the wax and encourage the leather to accept it. So, I dipped in a couple fingers and started spreading the wax all over the leather. After coating the first boot, I went over it with the hair-dryer again to help it penetrate a bit more. Obenauf’s recommends two coatings of the LP, which is what I did. The LP darkened the color of the leather more so than the oil, and also gave them a slightly waxy gloss. The boots actually look a bit too new and fancy for my taste now. I’ll have to rough them up a bit on the next hike.
I’m very happy with all three of the products from Obenauf’s, particularly the oil and the LP, which seemed to have worked magic on my boots. I’d recommend them to anybody who demands heavily on their boots. I plan to work them into a regular care schedule for my own boots, extending the life of my investments.
If anybody with more experience has suggestions for other products or a critique of my method, let me know.
To the multitude, whether city or country bred, the bare idea of faring alone in the wilds for days or weeks at a time is eerie and fantastic: it makes their flesh creep. He who does so is certainly an eccentric, probably a misanthrope, possible a fugitive from justice, or, likely enough, some moonstruck fellow whom the authorities would do well to follow up and watch.
But many a seasoned woodsman can avow that some of the most satisfying, if not the happiest, periods of his life have been spent far out of sight and suggestion of his fellow men.
... By yourself you can sit motionless and mutely watchful, but where two are side by side it is neither polite nor endurable to pass an hour without saying a word. Lonesome? Nay indeed. Whoever has an eye for Nature is never less alone than when he is by himself.
...Solitude has its finer side. The saints of old, when seeking to cleanse themselves from taint of worldliness get closer to the source of prophecy, went singly into the desert and bided there alone. So now our lone adventurer, unsaintly as he may have been among men, experiences an exaltation, finds healing and encouragement in wilderness life.
When twilight falls, and shadows merge in the darkness, the single-handed camper muses before the fire that comforts his bivouac and listens to the low, sweet voices of the night, which never are heard in full harmony save by those who sit silent and alone.
- Horace Kephart, Camping and Woodcraft
Last weekend Avagdu, HatterOfMaddnesz, and I loaded up our packs and went for a jaunt in the Chuckanuts. The hike in was about 6 miles, with an elevation gain of something on the order of 1,600 feet. (In the planning stage, I had told them to expect 7 miles and 500 feet. I suppose next time I should look at the map, rather than relying on memory.)
Avagdu and HatterOfMaddnesz claimed that this was the longest hike that they had done in a while, but they both pulled through. Avagdu used the opportunity to field-test his INCH Bag, which was quite heavy. It gave him a hard time. I think he’ll be shedding some of the redundancy the next time around. Certainly, we all learned something.
When you have worn out your shoes, the strength of the shoe leather has passed into the fiber of your body. I measure your health by the number of shoes and hats and clothes you have worn out.
- Ralph Waldo Emerson
Last February I began a training ritual in preparation for my anticipated journey to Spain. Every weekend that I could, up to the very time of my departure, I would load up my Kifaru ZXR with the heaviest books I owned till it reached something in the range of 70-80 lbs, then head out the door and hike 15-20 miles. In reality, this is far more weight than I usually carry while traveling and I tend not to walk much more than 15 miles a day. But by pushing my body and mind further than where I actually require it to go, the pleasure, serenity, and ease of travel is heightened.
I find that no amount of running, biking, or light-weight day hiking adequately prepares the body for the weight of the ruck and life on The Road. So, this year, I’m continuing the training. Yesterday was day one. I hadn’t walked under my heavy rucksack for a couple of months, so I started out with something probably closer to 50 lbs and did a 15 mile trip that lacked much elevation change.
It felt good to dust off the rucksack and move around some. At the end of the day, I could feel the strain in my gluteal muscles. Today I’m only a little bit sore. The exercise works and I’m glad of my starting weight and mileage.
In the coming weeks, I’ll increase the weight and mileage until I reach stability. At that point, I’ll keep things interesting by using my GPS to clock my speed and see what I can do about cutting down on time.
I think that I cannot preserve my health and spirits, unless I spend four hours a day at least -- and it is commonly more than that -- sauntering through the woods and over the hills and fields, absolutely free from all worldly engagements. You may safely say, A penny for your thoughts, or a thousand pounds. When sometimes I am reminded that the mechanics and shopkeepers stay in their shops not only all the forenoon, but all the afternoon too, sitting with crossed legs, so many of them -- as if the legs were made to sit upon, and not to stand or walk upon -- I think that they deserve some credit for not having all committed suicide long ago.
Henry David Thoreau
Last Saturday, I took a train into Seattle to meet up with some of the members of RantMedia’s Washington cell. In attendance were OneeyedElf1, SideSlide, HatterOfMaddnesz, Avagdu, myself, and another who I will dub PlantGirl.
OneeyedElf1 was the first to arrive at Bauhaus Books & Coffee. I got in a bit past noon, after walking the few blocks from the train station. Neither of us had seen or met SideSlide yet, but, soon thereafter, a fellow walked in with a Maxpedition Versipack and we figured that must be him. OneeyedElf1 and I were both sporting our Rant 10th Anniversary shirts, which attracted SideSlide to our place at the bar. He introduced us to PlantGirl, who was not familiar with RantMedia but had consented to joining us on our exploits, and we moved to a table upstairs.
We talked about the various things that people like us talk about and SideSlide prepared for the day’s main activity: geocaching. SideSlide was the most experienced geocacher in our group – and the most prepared – so he took the lead.
After a while of sitting around, OneeyedElf1 managed to contact Avagdu, who informed us that he would be late (some nonsense about not realizing about what day it was). None of us had contact information for HatterOfMaddnesz, but we thought that there was a good chance that he would be carpooling with Avagdu, so we decided to start the adventures without them. SideSlide selected the first target.
We knew this first cache was near REI, so we headed in that direction. As we got close, SideSlide consulted his GPS.
The GPS indicated that the cache was probably somewhere in the bushes, so we all dived in. PlantGirl was the one who found it. This first cache was a micro, which is very small. Inside, was a list of those who had previously located the cache.
We all signed our names and returned the cache, after which we ventured into REI to inspect the gear. They didn’t have what I was looking for, so I left empty-handed. SideSlide bought an MSR Dromlite bag and PlantGirl picked up one of those CamelBak water bottles.
While inside REI, OneeyedElf1 and I discovered that we both have Atwood Tactical Whistles on our keychains (though his is titanium, while I have one of the older stainless steel models).
At the checkout stand, we had another obligatory wog moment when I noticed what SideSlide was paying out of. “Hey, is that a Spec-Ops wallet,” I asked, while brandishing my own for him to see. (If this doesn’t happen, you’re not at a RantMeet.)
Before heading to the next cache, SideSlide used the public restroom. When he returned, he digged into his bag, revealing that all important piece of kit: baby wipes.
After this, we heading back across i-5 in search of the third cache. It was more difficult to find, as it was a nano cache, which is very, very small.
The fourth cache was just down the hill from the previous one, but was the most difficult yet to locate. The GPS first insisted that it was almost right on i-5, so we looked there first.
But it soon became apparent that the cache was actually located on the other side of the street in some rocks. We searched for a while but remained unsuccessful, so SideSlide decoded the hint.
During all of this, Avagdu had called OneeyedElf1 to inform him that he was in town. We didn’t know how to direct him to where we were, so we decided to walk back to Bauhaus and meet him there. When we arrived, we found both Avagdu and HatterOfMaddnesz sipping coffee.
We talked a bit and in a few minutes, the table was cluttered with multiple GPS systems, compasses, knifes, and lighters.
After HatterOfMaddnesz finished his drink, we decided to go in search of food. Our first attempt proved futile, as the place was not serving food for another hour, so we ventured on in search of another restaurant.
Eventually we found a bar that served pizza, which was good enough for our tastes. We ordered two larges and spent about an hour discussing various subjects and sharing more gear. Most of the excitement occurred on Avagdu’s part. He passed his fire making kit to SideSlide for inspection, which SideSlide promptly dropped directly into his beer. Luckily, Avagdu’s kit was waterproof. A while later, Avagdu reached for a slice of pizza. When he lifted the piece, all the toppings fell off onto the plate. This was dubbed Pizza Fail.
As we left the bar, Avagdu borrowed PlantGirl’s purse for a glamour shot and to demonstrate the latest fashion in tactical EDC bags.
After a quick trip into a drugstore in search of batteries for the GPS, we started to walk down the hill, in the direction of Avagdu’s car and the next cache.
After plugging the meter, we went off in search of the next cache. This one proved to be the most difficult to find, but it was eventually found by PlantGirl. After finally locating it, the sun was almost set and we began to head downtown in an attempt to locate the final cache. We did not have coordinates for this final cache, but instead had been provided with a series of puzzles to crack. I had to start the trek back to the train station before we could solve all the puzzles and locate the cache, so I don’t know if that search was successful.
All my photos from the meet are on flickr. Feel free to remix.
I’ve had a few requests to do a review of the new stove system I’ve been using for the past couple weeks. I don’t feel like I have enough experience with it yet to do a proper review, but I snapped some photos today to let people know what it’s all about.
If you already have a pot you’d like to use, you can contact Trail Designs and have them build a cone for you. Elsewise, the Ti-Tri is available with a pot from Titanium Goat. I’ve previously mentioned my love affair with my Snow Peak Trek 700 mug/cup/pot/thing, but I had been thinking of acquiring a larger, 900ml pot for somewhat more extravagant cooking. Because of this, I decided to get the 900ml Ti-Tri from Titanium Goat, rather than have a Ti-Tri built for my Snow Peak mug.
Titanium Goat’s 900ml pot is a basic affair: handles on the body, a decent lid with a thingy on top that allows it to be easily lifted, as well as three holes for venting or draining water. Titanium Goat claims that the pot and mug weigh in at 4.4oz, which seems correct to me.
The Ti-Tri system itself comes inside of the same caddy system as does the normal Caldera. It’s basically two pieces of plastic that screw together. The diameter of the caddy is the same as a 32oz Nalgene, so it will nest in the same cups (such as the aforementioned Snow Peak 700). This is a somewhat bulky way of carrying the system, I find, but the caddy is constructed out of food grade plastic, so both pieces can double as a bowl or mug. It also does a great job of protecting all the components. So far, I’ve been packing everything in the caddy. I haven’t decided if I’ll keep doing it that way or not.
The alcohol stove that comes with the Ti-Tri is a Trail Designs 12-10 which, they claim, has been designed to “perform optimally with the restricted air flow and higher heat retained by the cone during operation.” My expertise in the design of alcohol stoves are lacking and, as I said before, I don’t feel I yet have enough experience with this system to draw a comparison between it and my Vargo Triad XE (which I also haven’t had for all that long), but the 12-10 has seemed extremely efficient so far (and much easier to light).
The pot’s lip holds it up. Even with the thinness of the cone’s material, it is a surprisingly sturdy setup. You do have to be somewhat watchful when sliding the pot into the cone, as the pot handle’s mountings will sometimes get caught on the edge of the cone’s opening. I say sometimes, but this actually happens to me the majority of the time. It’s greatly annoying.
If you’re sure to center the handles over the opening in the side of the cone, the handle mountings will not get caught.
The base is an optional addition to the Ti-Tri system to be used for wood burning. It’s simply another piece of titanium foil, slightly larger in diameter than the cone. When burning wood, you set the cone on the base, put the included titanium stakes through the holes in one end of the cone and out the other. These then support the pot higher up, allowing you to shove your fuel in the cone’s side opening.
The Ti-Tri’s third fuel option are esbit tabs, which uses Trail Design’s GramCracker. The GramCracker consists of three pieces of titanium: two sides and a stand. The sides pieces are slid into either side of the stand, which then holds the esbit tab.
This setup directs the heat for a much more efficient burn than that offered by a standard esbit stove. (The GramCracker also comes with a small piece of foil to be used as a base, but since I already carry the larger base for wood burning, I leave this smaller piece at home.) With the GramCracker assembled, the cone is placed on top, and the pot is nested just as with the alcohol stove.
Today, I was planning on using the Ti-Tri as an alcohol stove. Trail Designs claims that the Ti-Tri can bring 2 cups of water to a boil with 15ml of alcohol. I’ve found that 15ml brings 2 cups to more of a simmer. For a boil, you’d want 25ml. I didn’t measure exactly how much water I poured into the pot, so I decided to use a bit over 20ml of fuel.
Tea, today, would be Doug Fir and Cedar. After pouring the the fuel from the measuring cup into the stove, I lit the 12-10 with a match, tossed on the cone, settled in the pot (after getting the handle mountings caught on the edge of the cone), and shifted my attentions elsewhere. I didn’t time it this time around, but I think it burned for a bit over 10 minutes. My water was brought to a full, rolling boil – much more than I really needed just for tea, but I was just out for a day-hike, so I wasn’t terribly concerned with fuel conservation. After the burn, I tossed the Doug Fir and Cedar into the pot to steep and settled in for some tea and poetry.
Overall, the Ti-Tri comes in at just under 10oz. It’s not the lightest or most compact alcohol stove setup, but seems to me to be extremely efficient. It’s a bit like the JetBoil of the alcohol stove world. Of course, the Ti-Tri’s primary advantage over other alcohol stoves is that it is not an alcohol stove: it’s an alcohol stove, esbit stove, and wood stove. Having three different fuel options in your pack (and at such a light weight) is quite an invaluable thing. I’m greatly looking forward to further use and testing of what has become my primary cooking system.
The Ti-Tri is a somewhat new product, but has already garnered some positive press, such as a 2008 Backpacking Light Staff Pick. I’m quite curious as to how the system’s wood burning compares to that of the Bush Buddy.
Check out Trail Design’s gallery for photos further photos of the Ti-Tri in use, including at -20 degrees Fahrenheit in the Yukon.
Today’s post brought to you by: that feeling you get when you dangle your legs over a precipice that could probably kill you. And blue skies.
Bed in the bush with stars to see,
Bread I dip in the river --
There's the life for a man like me,
There's the life for ever.
from The Vagabond, Robert Louis Stevenson
I always run on Saturday morning. When my schedule allows it, I try to get in at least one additional run at some point during the week. The past few months, this didn’t happen very often. Since the new year, my schedule now allows me to run on both Tuesday and Thursday mornings, in addition to the usual Saturdays.
This morning was the first run I had taken in close to a month where it wasn’t raining (or snowing). It was so enjoyable that I decided to add something extra: at the park that marks my half-way point, I stopped and did 45 elevated push-ups off one of the benches before continuing on home. When I first started running again, it actually felt a little easier, since my legs and lungs had gotten about a minute break from the running, but soon after I discovered that my abdominal muscles weren’t too happy with me.
After running on weekdays, I only have about a 20 minute break to take a shower and break-fast before jumping on my bike and pedaling off to work. My morning commute is all up a hill that gets progressively steeper as one gets higher. Over the winter holidays, my office was moved about another half mile up the hill. Rather than riding my bike all the way up, I’ve taken to going up only about halfway, then walking up 55 stairs with the bike on my shoulder.
I finally got around to uploading my photos and video from the RantMedia 10th Anniversary in Vancouver over the first weekend of the new year.
We had a tendency to hang out in dark places – mostly alternating between Subeez, Vancity Theatre, and Sanctuary – so none of the pictures turned out to be any kind of decent, but there you have it.
The live Afternow (which kicks off a brand new season) was certainly pant-wetting material, but, for me, the highlight must be dinner the night before. The group included Avagdu, Hatterofmaddnesz, Kevin, Yugosaki, Halloween, IceHawk, Ephoy, ButcherShopVegan, and myself. It started off innocently enough, sharing flashlights and knives, but the night quickly degenerated to other debauchery: boots on the table, belts coming off, Kevin trying to teach Avagdu to braid paracord after Avagdu had had too much to drink.
Thanks to Avagdu and Hatterofmaddnesz for driving me up.