You are currently viewing all posts tagged with survival.

A Bug Out Stuff Sack

I have a pretty thorough setup with my every day carry. Between the level 1 items on my body and the level 2 items in my pack, I have all the tools that I think I may need. This limits the need for a bug out bag in my environment. Were I packing a bag to support running away from a disaster, it would largely duplicate what I carry every day. The difference is in shelter. Specifically, clothing.

Bug Out Stuff Sack

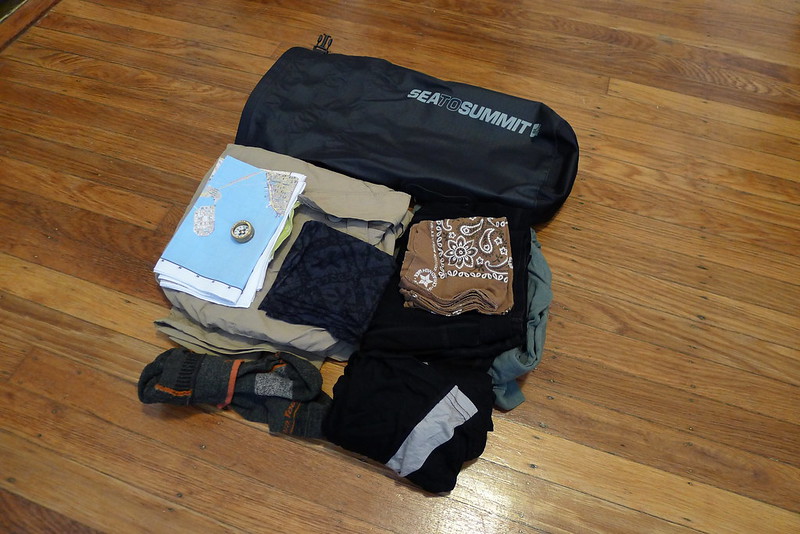
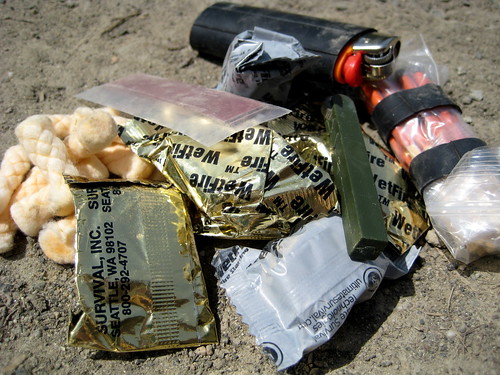
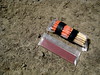
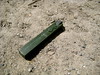
For the past few years, I’ve kept a bug out stuff sack instead of a bug out bag. The stuff sack contains clothes, which gives me what I need to leave in a hurry regardless of what I’m currently wearing. I keep a pair of merino wool boxer briefs, merino wool long underwear, a lightweight merino wool long sleeve shirt, quick-drying nylon pants, a Buff, merino wool and nylon blend socks, and a cotton bandana. The two non-clothing items in the stuff sack are a Tru-Nord compass and a silk escape map.

The map is from SplashMaps in the UK. It is a print of the OpenStreetMap for the San Francisco bay area at 1:40000 scale.

Conspicuously absent from the contents of the stuff sack is any sort of foul-weather gear. I don’t venture outside without a hardshell jacket in my pack, even here in drought-stricken California. I also generally will have some sort of insulating layer already in my pack, making that an uncessary addition to the stuff sack.

The stuff sack I went with is a Sea To Summit 8L Big River. This is a much heavier stuff sack than any of those I use backpacking. When I was deciding on the stuff sack for this project, I knew I wanted something that I would be comfortable running outside of a pack. The 420 denier nylon on the Big River is more abrasion resistant than any of my cuben or sil-nylon stuff sacks, and the Big River also includes Hypalon lash points on either side of the bag to assist when securing it. When I’m carrying a larger pack, like the FAST Pack EDC, these points are moot since I can just toss the stuff sack into the pack on the way out the door. However, if I’m using something smaller, like the FAST Pack Litespeed, the pack may already be close to full. With the Big River I’m able to quickly and easily lash the stuff sack to the bottom of the pack, without taking time rearranging the inside of the pack in an attempt to make more room.

Bug Out Stuff Sack

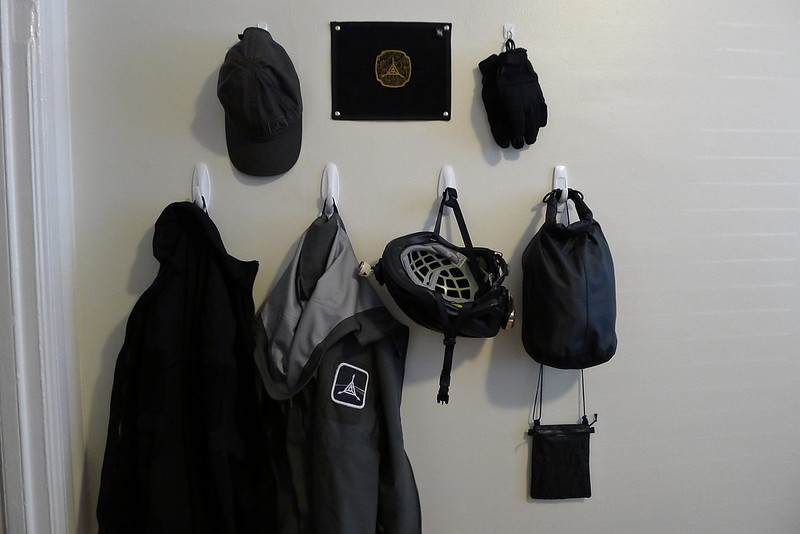
The stuff sack hangs on a hook on my wall, immediately next to the door. My pack and footwear stay underneath on the floor when I’m home. Keeping these items in the same spot means that I can grab them and be out the door in a short count of seconds. Also hanging in this area are my gloves and helmet, which are necessary when leaving on a bike (certainly the best bug out vehicle for a city). I also leave a hat, insulating jacket, and rain jacket hanging in this area. These items should already be in my pack, but leaving duplicates here allows me to easily grab them on my way out if needed. The last item in this area, hanging on the same hook as the stuff sack, is a small bag with documents that I may want when leaving in a hurry.

I keep a stuff sack at my desk at work with all the same things in it. Since I only have one of the silk maps from SplashMaps, the stuff sack at work instead has a few USGS quads of the area printed on glow in the dark onion skin paper. I buy these from zdw on eBay.

Fire Starting with the Trail Designs Ti-Tri Inferno

On our last morning in the Red Buttes Wilderness, Avagdu and I woke up to a very wet camp. We wanted fire, but neither of us had brought any dry wood into our shelters the night before. Everything was soaked.

We gathered what we could – branches from dead fall that were up off the ground, as well as dead lower branches from standing trees – but the trees were so sparse in the area that, even after splitting, much of this wood was still wet. (I should mention that we wanted a fire, but did not need one. I, at least, was not hugely motivated to put a large amount of energy into batoning. So a small amount of our failure ought to be attributed to laziness.)

After failing to get a blaze going with the wet wood, even after using a bit of inner tube to extend the flame, I hit on the idea of using the Inferno.

I’ve had my Trail Designs Ti-Tri for two and a half years now. It’s been my primary stove system for all of that time. Last Fall, I contacted Trail Designs and had them send me an Inferno insert for the system. The Inferno consists of a second, inverted cone and a grate. The grate raises the base of the fire up off of the ground, allowing for an improved air flow, and the second cone creates a double-walled stove. This turns the Ti-Tri into a wood gassifier, similar to the Four Dogs Bushcooker or the ever-popular Bushbuddy.

So, back at camp, I thought the Inferno might help. I had never used it before solely to start a camp fire, but I knew from previous experience using it to cook my dinner that it was efficient enough to burn damp wood. It would give us a raised platform, allowing us to build the fire up off of the saturated ground, and the cone would provide a wall to keep the heat in and help dry the wood.

It was a success.

Inferno Fire

We split a bit more wood, and did a bit more feathering. It was all still as damp as before, but shortly we achieved a small blaze inside the Inferno. From there, it was simply a matter of building the fire up and around the Inferno. With the heat put out by the cone, even the wet, unprocessed wood would dry and burn. As the fire built up, the Inferno could be pulled out with a multi-tool or a couple sticks, and packed away with the rest of the Ti-Tri, ready to cook the next meal.

The weight of the Inferno insert varies. It is dependent on the size of the outer Caldera cone, which in turns varies based on the size of the pot. For my system, which is built around a 900mL pot from Titanium Goat, the pieces that comprise the Inferno weigh in at a collective 38 grams (1.34 ounces). Given that it not only increases the Ti-Tri’s efficiency as a wood burning stove, but also functions as an emergency fire starter, I’m happy to haul the extra weight.

Gear List

I’ve had a few requests to do a gear list for some of my recent trips. Since it’s been over a year since the last one, I thought I would acquiesce. What follows is the list from my recent journey to the Goat Rocks. Though that was a short trip, my gear has varied very little on any trip this year. I’ll take warmer clothing earlier (and later) in the year, and of course the amount of food varies based on the length of the trip, but most everything else remains static. This is quite the change from even just a year ago, where it seems like my gear would change drastically from trip to trip! Perhaps I know what I’m doing a little better now.

Some of the gear is light, some of it isn’t. Regular readers know that I always struggle to find a balance between lightweight, functionality, and durability. Certain items that I carry – like, say, the saw – are not likely to be found in the pack of an average backpacker, but are suited to my method of travel. In all, my base weight for this trip was right at 20lbs. I’m not too ashamed of that. In fact, considering that my pack alone weighs 6lbs when empty, that base weight is pretty darn good.

If you have any questions or comments about the items, feel free to get in touch.

Packed

  • Kifaru ZXR
  • Kifaru Longhunter Lid
    • Shoulder strap
    • 1 quart ziploc
      • Toilet paper
      • 1 oz Hand sanitizer
    • Emergency fire kit
    • First aid kit
    • Kifaru Ultralight Pullout (small)
      • REI Keychain Thermometer
      • K & M Industries Match Case
      • Croakies Glasses Retention Lanyard
      • Jetstream ballpoint pen
      • Sharpie
      • Highlighter
      • #2 Pencil
      • All-Terrain Lip Armor (SPF 25)
      • 4x safety pins
      • Duct tape (length unknown, .75" diameter roll)
      • StickPic #3
      • Badger Healing Balm
    • Sea to Summit Headnet
    • Petzl Tactikka headlamp
    • Tyvek Stuff Sack
    • Rite in the Rain No. 393-M
    • Large garbage bag
    • 1 quart ziploc
      • 3x Green Trails maps
    • Plastic vial-type container (found on street)
      • 16x cotton balls w/ petroleum jelly
    • Hard glasses case (unknown brand/model)
      • Oakley soft lens cloth bag
      • Julbo Micropores (Rx)
    • Sea to Summit Ultra-Sil Dry Sack (2 liter)

On Body

(I do hope that I haven’t forgotten anything. If you notice anything conspicuously absent, please let me know!)

Romani Fire Starting

This past week I read Dominic Reeve’s Smoke in the Lanes. The book is a first-hand account of the lives of Romani in England during the mid-1950s, which marked the end of the era of horse-drawn wagons. It’s an interesting read if you’re at all interested in itinerant lifestyles.

Toward the end of the book the author describes lighting his daily fire in very wet conditions:

Nobody had collected any wood for the morning's fire, so I scrambled into the middle of a tangle of thorn-bushes, the limbs of which were heavy with rain that showered down on me; and within a matter of minutes I was completely soaked. I did not possess a raincoat and my old jacket and cord trousers were inadequate to withstand the water. Nevertheless, I managed to gather quite an imposing amount of dead wood, all sodden, and I returned with it to the site of the previous night's fire. I took a stump of candle from my pocket and broke it in half, then I lit one half and set it upright in the watery ashes, piling some twigs and small wood round and above it. When I had placed sufficient twigs above the tiny flame I laid the other half of the candle stump in the wood directly above the flame so that the heat from below gradually rose upwards, melting the wax which then caught fire and ignited the soggy twigs. It is an old Romani trick, and a very successful one.

Le Loup often talks about carrying a beeswax candle in his 18th century fire kit. I always assumed that this would be used to keep a flame below damp tinder to dry it out, similar to how today we might take advantage of the long burn time of cotton balls soaked in petroleum jelly to light slightly damp materials. It never occurred to me to break the candle in two and melt the second half above for even more heat. Neat trick!

None but the Romanies, or perhaps the few remaining tramps, can know how great a comfort is afforded by a fire. Once its warming tongues lick upwards into the pile of sticks and one's tingling, numbed fingers are eased in its glow, one experiences great pleasure and satisfaction. It is a creative, aesthetic, pleasure. On countless grey winter mornings, often in company with other travellers, I have sat huddled close to an immense [fire], my front glowing and steaming with heat and my back running with rain or heaped with snow. The fire is everything to us. With it we can cook, eat, survive and live: without it we should perish.

Emergency Fire Starting Kit

Emergency Fire Starting Kit

This kit is kept in the lid of my rucksack, which also functions as a man-purse for short trips away from camp. It is intended for emergencies only, and so is secondary (or even tertiary) to my normal fire starting equipment: ferro rod(s), rubberized BIC lighter, matches, and a fair amount of cotton balls covered in petroleum jelly. The kit here is to be used only when these other methods of starting fire have for some reason failed.

It is quite simple and is probably nothing unique. Everything is kept together and dry inside of a small aLOKSAK (measuring 5”x4”). It weighs 2.8 oz. The contents are as follows:

  • 9 Tinder Quik tabs
  • 6 Ultimate Survival Technologies WetFire cubes
  • 16 REI Storm Proof Matches (sealed in a ziploc bag with two inner-tube ranger bands around the outside)
  • 2 REI Storm Proof Matches striking surfaces (sealed)
  • Spark-Lite fire starter
  • Rubberized BIC lighter

Emergency Fire Starting Kit Contents

That’s a whole lot of fires that I can start with just this small kit, and I don’t even have to start messing around with natural tinder or making char-cloth yet!

Previously the envelope held a small ferrocerium rod and striker in lieu of the Spark-Lite. I’ve never been too impressed with the Spark-Lites: the sparks produced are relatively small and weak. They are fine for starting a fire with prepared tinder such as cotton balls or those commercial products included in this kit, but trying to get a natural tinder to take with them can be a bit of a pain. As for the whole one-handed fire starting thing – well, I have never broken my arm or hand. I have been cold enough to not have the fine motor control needed to reliably operate a Bic lighter or Spark-Lite. So for me, given the choice between a normal ferro rod and a one-handed Spark-Lite, I’d go for the normal rod. It requires a gross movement that I know I can always achieve, even when cold.

I decided to remove the ferro rod and add the Spark-Lite to this kit because I figure that I have enough ferro rods stashed here-and-there (including at least one tethered to my body) that the chances of me losing all of them are very slim. (I would be more likely to lose this kit, which is kept in my pack, not on my body.) I should never have to depend on whatever spark-making tool I keep in the envelope, but by opting to make that tool a Spark-Lite, I do give myself the possibility of one-handed fire making (without depending on lighters or trying to light a match held in my teeth). Doug Ritter would be proud.

  • Emergency Fire Starting Kit Contents: Tinder Quik
  • Emergency Fire Starting Kit Contents: WetFire Cubes
  • Emergency Fire Starting Kit Contents: Matches and Striker
  • Emergency Fire Starting Kit Contents: Spark-Lite
  • Emergency Fire Starting Kit Contents: Rubberized Bic Lighter

Simple Ferrocerium Rods

I don’t like paying for brand-name ferrocerium rods with handles when blanks can be got for much cheaper – usually $5 less than their handled counterparts. But I do like to have a handle on the rod, and I require some sort of lanyard. When it comes to something as important as a ferro rod, I find comfort in knowing that it is secured to this-or-that.

Simple Ferro Rods

The simplest solution is to tape a loop of paracord to one end of the rod. I use gutted paracord. The tape can be wrapped a few extra times to make a handle however thick I like.

The other rod in the above photo has a similar lanyard attached in a different manner. The paracord is first taped to the rod with a small piece of electrical tape. Then, on top of that, I slid a small piece of heat-shrink tubing (the kind used for electrical wiring). That was blasted with a hair dryer, causing it to shrink.

Drilled Ferro Rod

A small hole could also be drilled in one end of the rod. This is something of a fire hazard: the drill and rod will be throwing a whole lot of sparks as the drill works its way through. And it requires access to power tools, which isn’t always practical.

My favorite method is the tape. The lanyard is secure and the tape provides a thick, padded handle.

I like to buy my blanks from Ben’s Backwoods. If you like misch metal blanks, Going Gear is the place to be.

Mora Sheath Modifications

The greatest disappointment about any Mora knife is the sheath: a flimsy, plastic thing that won’t easily fit on a decent sized belt and does not even hold the knife very securely. As they come, I consider them unusable. But a few simple modifications and additions make them quite acceptable.

Mora Sheath Modifications

The Mora knife sheaths are designed to be mounted either on a button on a pair of coveralls or through a belt. Apparently people wear very small, skinny belts in Sweden. Over here in the United States of Gun Belts, that doesn’t fly. The belt slot on the sheath can be forcefully enlarged by shoving in a piece of wood, such as a ruler, and applying heat to cause the plastic to expand, but I don’t trust that such an act will not over weaken the plastic. I’m not a big fan of carrying a Mora directly on my belt, anyway. Usually, I’ll carry the knife either on a lanyard around my neck or as a dangler off my belt. But both of these setups allow the possibility of the knife and sheath to swing freely, accentuating the problem of an insecure fit.

Both the problem of how to carry the sheath and the problem of the insecure fit can be addressed with a single piece of paracord.

Paracord Loop

With the knife in the sheath, I take a piece of paracord and run both ends around the handle and through the slot for the belt. Then, tight against the back of the sheath, I tie an overhand knot in either end of the cord. This creates a loop of paracord on the front of the sheath that can be made smaller, but cannot become any wider than the bottom third of the handle. Because the handles on Mora knifes are somewhat tapered – fatter in the middle than on either end – this loop prevents the knife from being removed from the sheath. Even if the knife is only lightly dropped into the sheath rather than securely pressed, it cannot be removed without first sliding off the loop of paracord.

Paracord Loop

After tying the two knots against the back of the sheath in either end of the paracord, I take both ends and tie them together, forming a loop on the back of the sheath. This provides my carry options.

If I want to wear the knife around my neck, I take a pre-tied loop of paracord that I carry and loop it through itself around the loop on the sheath.

To carry the knife in a dangler system, I prefer to use a Maxpedition Keyper rather than a carabiner. The Keyper is mounted on my belt and clipped into the loop of paracord on the sheath. (To reduce movement in this setup, I’ll stick the knife and sheath in my pocket.)

Mora Sheath Modifications

The last thing that I do to this part of the sheath is add a small wrap of electrical tape around the very top, covering the upper bit of the belt loop and the button hole. This prevents the paracord from sliding to the top of the sheath and forces the securing loop to be about .75” from the very end of the handle. I’ve found that if this is not done, the securing loop is like to slip off the handle.

Taped Sheath

That’s all that is needed to make the sheath usable, but a few other additions can be made to increase its utility.

Around the top of the sheath, I wrap tape. In the sheaths pictured here, one has 2” olive drab duct tape, the other has 1” black Gorilla Tape (which is like duct tape, but thicker and stickier). One can never carry enough tape. I imagine, also, that the tape likely increases the structural integrity of the sheath.

Repair Needle

On the back of both sheaths, I have a #17 sailmaking needle, pre-threaded with black kevlar thread, taped down with some electrical tape. As I mentioned in my review of the RAT Izula, this is an idea I first picked up from one Dave Canterbury’s videos. The extra needle and thread adds no noticeable weight and could be a welcome addition to the sheath if you ever find yourself separated from your pack, with the knife and sheath as your only piece of gear.

The next modification on the body of the sheath was also inspired by Dave Cantebury. In another of his videos, he showed how he had layered different width pieces of inner-tube on a machete sheath to create pockets that could store small items, such as a sharpening stone and magnesium fire starter. With that in mind, I add a wide piece of inner-tube onto the middle of the Mora sheath (which also serves to cover and further secure the taped down needle). Then, on top of that, I put a skinnier piece of inner-tube. Slid between both pieces is a backup ferro rod. Because the rod has rubber below it and rubber atop, there is an incredible amount of friction. The ferro rod becomes difficult to remove. I have carried blank rods in these “pockets” and they have never fallen out. Still, I prefer to carry rods with a lanyard of some sort on them. I loop the rod through its lanyard around the paracord loop on the top of the sheath, guaranteeing that the rod is secured.

Mora Sheath Modifications

The sheath for my KJ #1 knife has only a ferro rod. That knife is carbon steel and can generate sparks off the spine. On the sheath for the larger SL-2, however, I have added a small striker slid between the two pieces of inner-tube on the back. The SL-2 is made of laminated steel, which is too soft to reliably produce sparks.

Firesteel and Striker

These modifications made to the Mora sheath help to secure the knife, allow for different carry options, guarantee a source of fire, and provide a needle, thread and tape for repairs. They turn what is otherwise a near useless sheath into a functional item worthy of being matched with the Mora blade.

Mora Blades

(I also own a high-quality leather sheath made by JRE Industries for the KJ #1 knife. I tie a loop of paracord through the top loop of leather on the sheath so that the knife may be carried around the neck or on a dangler, similar to the modified plastic sheath. The leather sheath does not require a loop of paracord on the front to secure the handle. Nor does it need pieces of inner-tube to create a pocket for a ferro rod. The only thing that it lacks is a repair needle, but I have found that most tape does not adhere very well to leather, so I cannot stick one on the back.)

  • JRE Industries Mora Sheath
  • Neck Lanyard on JRE Industries Mora Sheath

Vargo Triad XE in the Ti-Tri Cone

Yesterday, Avagdu asked me if the Vargo Triad XE stove could be burned inside the cone of my Trail Designs Ti-Tri Stove System. I’ve used it in the cone a couple of different times, but never performed any direct comparisons between it and the 12-10 alcohol stove that comes with the Ti-Tri system. Today, I spent some time with both stoves to do just that. Temperatures were around 42 degrees Fahrenheit.

I burned both stoves with the same amount of fuel. One of the downsides of the Triad XE stove is that because the main fuel source is enclosed within the inner container, it cannot be directly lit. Instead, some fuel must be placed within the outer section of the stove. This is then lit to prime the main fuel source. On an alcohol stove where the main fuel is directly accessible, such as the 12-10, the outer priming ring is not always required. It will usually be used when operating in colder temperatures. To be fair for these tests, I primed both stoves with the same amount of alcohol.

The Triad XE stove had to be tested in two different modes: with support legs extended and with support legs collapsed. With the legs collapsed, the stove sits a little lower than the 12-10. With legs extended, it’s a bit higher. The tests were done on a hard, solid surface so that when the legs were extended they were not pushed into the ground (as they might be when using the stove on dirt). The Triad XE took longer to bring the 2 cups of water to a boil with the legs collapsed, which is to be expected, since the flames are further from the pot.

Interestingly, when the Triad XE’s legs were extended, it took a significantly shorter period of time than the 12-10 stove to bring the same amount of water to a boil. One would think that the 12-10 stove, being designed by Trail Designs specifically to work within the Ti-Tri cone, would be superior to a general-purpose stove like the Triad XE burning inside the same cone. The Triad XE also had a longer burn time than the 12-10, suggesting that it makes more efficient use of the same amount of fuel (although, in practice, it may require more fuel than the 12-10 since the Triad XE must always be primed and the 12-10 must not).

All in all, it seems that leaving the 12-10 at home and bringing the Triad XE with the rest of the Ti-Tri system would be a smart move. But then, there are the weights. The Triad XE weighs three times as much as the 12-10 – certainly a significant amount. Though it must be remembered that the Triad XE is not just an alcohol stove: it is designed to burn solid fuel tabs (Esbit) as well. So, to be fair, if I switched out the 12-10 with the Triad XE, I would also leave Trail Design’s GramCracker burner at home. But the GramCracker tips my scale at 0.1 oz, so it does not really factor in to the decision much. (I also think that the GramCracker most likely burns fuel tabs slightly more efficiently than the Triad XE, but I haven’t done this comparison yet.)

The other factor in comparing the two stoves is durability. The Triad XE, being made out of titanium is a tough little guy, not phased by the occasional drop or riding around loose in my pack. In contrast, the 12-10 stove is made out of two thin aluminum cans, making it very delicate. Even though it lives within the protective plastic caddy of the Ti-Tri, it has numerous scratches and dents to show for its year in use.

I’m not sure what conclusion to draw. If the Triad XE weighed closer to 1.0 oz, it would be without doubt superior.

Vargo Triad XE (1.6 oz)

Main Fuel:
25 cc
Primer Pan Fuel:
5 cc
Water:
2 cups
Total Burn:
10:30
Boil (legs extended)
6:30
Boil (legs collapsed)
7:12

Trail Designs 12-10 (0.5 oz)

Main Fuel:
25 cc
Primer Pan Fuel:
5 cc
Water:
2 cups
Total Burn:
10:14
Boil
7:15