DIY Tyvek Stuff Sack
(A new version of this tutorial has appeared on ITS Tactical, detailing my updated construction method. The following is outdated, but left for posterity.)
Tyvek is a synthetic material made by DuPont, most regularly used at construction sites for wrapping house frames. It is a rather strong material and fairly waterproof. It is so ubiqitous in industrial usage as to be freely available to the intrepid individual. Partly because of this, Tyvek is popular among many lightweight travelers for use as a cheap, lightweight, and effective groundcloth for a tarp shelter.
The United States Postal Service’s Priority Mail envelopes are also made out of the material. A few months ago I saw a picture of one of these envelopes in use as a stuff sack. I thought it was a great idea and decided to make my own. I’ve since made two of them. It’s a very simple process.
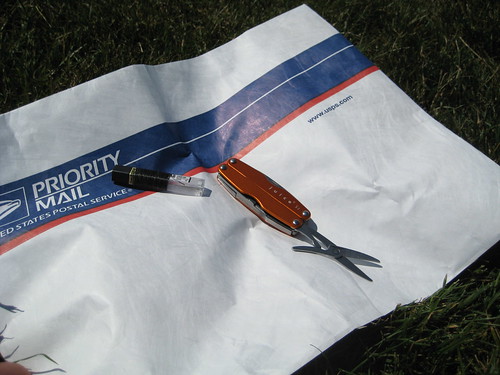
You need only a few items for the project: a USPS Priority Mail envelope, a needle and thread (from the repair kit in your trusty possibles pouch, no doubt), a bit of cord, a cordlock, and a sharp object. You could make the needed cuts with a knife, but scissors are a bit easier. I use the pair on my Leatherman Juice S2, which has replaced the Charge ALX as my daily carry.
The envelope can be new or used. Any post office will have new envelopes available in the lobby, free for the taking. Still, I would feel a little guilty about taking a brand new envelope just for this purpose. There’s plenty enough used envelopes floating around, and it seems a waste to steal a brand new one. I lucked out in that recently someone sent me a package in a box, but, within the box, used the pictured envelope to organize the goods. So the envelope is used, but brand new.
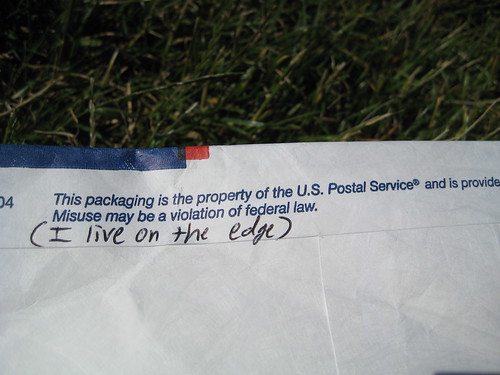
This project also warrants a disclaimer: Priority Mail envelopes, whether new or used, are property of the United States Postal Service. They are intended solely for the use of the postal system and, contrary to logic, just because somebody paid to mail you a package in one doesn’t make it yours (or theirs). So repurposing the envelope in this way is probably a federal offense. Law abiding citizens should immediately navigate away from this page and return to their cells. The rest of us can move on.
The first step in the process is to cut a little square in one corner of the open end of the envelope. No need to measure. Just eyeball whatever looks good. The height of the square will determine the size of the channel which we will sew and then pass the cord through (this one happened to be about 1.5mm).
If you are using a brand new envelope, you’ll want to cut the top bit with the sticky stuff off, so that both sides of the envelope are the same height. On a used envelope, you might have to do some trimming to achieve the same thing, depending on how you opened the envelope.
After the square is cut, fold down the rim of the envelope all the way around, using the height of the square to determine how much is folded. If you want, you can cut a slit in the other corner of the envelope to help fold it down. I did this on the first stuff sack. For this one, I chose not to. There’s a slight bit of bunching in that corner as a result, but it’s fine.
Now that you have the top flap folded down all along the top of the envelope, sew it shut. This creates a channel which we may then thread a bit of cord through, using it to cinch the sack shut.
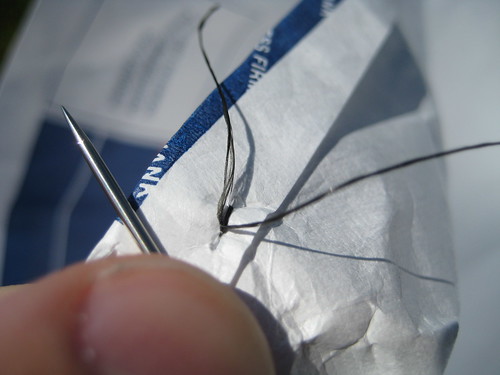
I start my stitching on the inside of the envelope, poke the needle through, and pull all the thread through except for a tag of about 3”. Then I poke the needle back through in another hole, pull all the thread through back to the inside, and use the tag end of the thread to tie a square knot, thus securing my first stitch.
After that, stitch your way around till the channel is sewn shut and tie off the end of the thread in whatever way you see fit. I’m a pretty poor sewer and am physically and mentally challenged when it comes to knots, which always makes for an interesting end to my stitches.

With the sewing done, now would be a good time for the camera battery to die. Curse a little, perhaps shed a tear, then decide that your audience is intelligent enough to struggle through the next steps without pictures.
For this stuff sack, I used ALSE survival vest cord, also known as accessory cord or Type I paracord. This stuff has a breaking strength of 100 lbs, is 1/16 of an inch in diameter, and tips the scale at 1oz per 50 feet. Pick it up at Supply Captain. You could use any cord you happen to have, including the standard (Type III) 550 paracord, but I don’t think the cord on this little stuff sack needs to have a breaking strength of 550lbs and Type III paracord is much, much heaver than Type I. We’re trying to go lightweight here.
If you don’t have any cordlocks lying around, these can also be got from the Captain.
Threading the cord through the channel can require a little perseverance. I usually tie a knot in one end, stick it in, and then use the knot to push the cord along with my fingers from the outside. If need be, you can shove a skinny stick or something in there to help it along.
When the cord comes out the other side, all that’s left is to cut it to length, slide the cordlock over both ends, tie some sort of knot so that the cordlock can’t be inadvertently slide off the cord, and you’re done!
The resulting stuff sack is durable, lightweight, and free (or close to it, depending on what materials you have in your craft box). Though you’re obviously not going to get a water-tight seal by cinching the sack closed, the Tyvek material itself is waterproof and will suffice to keep your gear organized and dry in any pack. If water crossings and momentary submersion is a concern, use a trash bag as a liner in your pack and you will be very well off for almost no cost in weight or money.
Lighter, stronger, more waterproof, and better constructed stuff sacks can of course be purchased, but for an exponentially higher price. I have nice stuff sacks for my sleeping bag and spare clothes, so, for the time being, this Tyvek stuff sack is used for my food.
March 2010 Update:
Check out the new version of this tutorial on ITS Tactical.