I purchased a pair of Outdoor Research Flex-Tex Gaiters last spring. I had owned the full-length Rocky Mountain High Gaiters from Outdoor Research for a year, and was a big fan of them. They are not completely waterproof, but are highly water-resistant, and still maintain a level of breathability that makes them appropriate for year-round use. I find them adequate for protecting my legs when bushwhacking and for keeping me warm and dry when traveling in rain and snow – but I’m always looking to loose weight. My eye had been on the Flex-Tex gaiters for a while. I thought that they would be a good alternative to full-length gaiters during the warmer months: something lighter and cooler which could provide protection from debris but would also handle the wet and snow that is often found in the alpine summer.
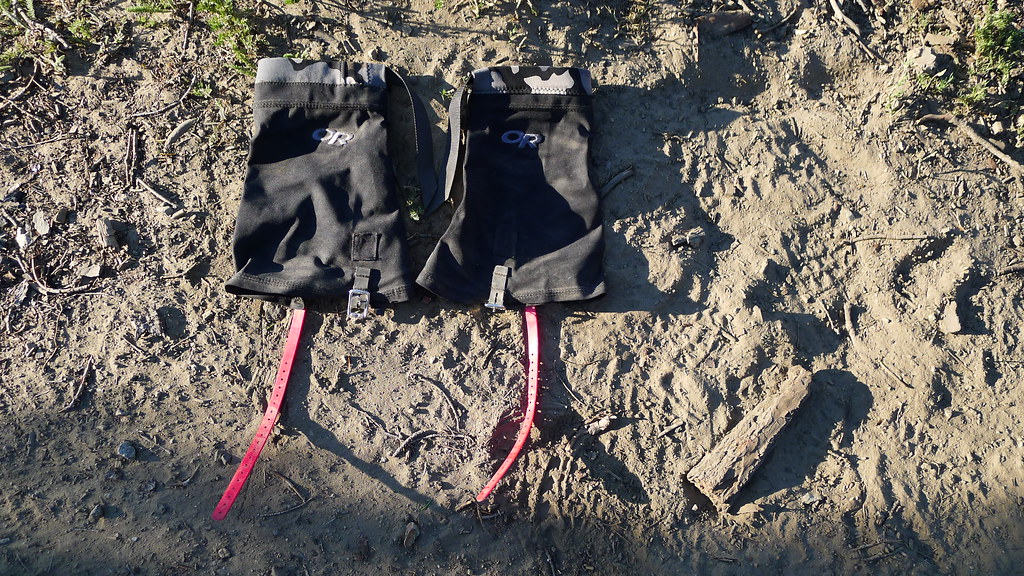
When I went to purchase the gaiters, I found that sizing was an issue. Unlike Outdoor Research’s other gaiters, the Flex-Tex do not come in normal sizes. They are offered only in the combination sizes of Small/Medium and Large/Extra Large. In the Rocky Mountain High gaiters I wear a medium. The Small/Medium Flex-Tex gaiters were far too small for me to even get on. The Large/Extra Large gaiters fit well around my footwear, but were loose at the top around my calf. Unlike other gaiters from Outdoor Research, the Flex-Tex had no adjustment to tighten the fit.
I purchased them anyway, thinking to give them a shot. After using them on an early season trip in the snow, it was evident that they would not work. The loose top allowed too much snow to enter the gaiter.
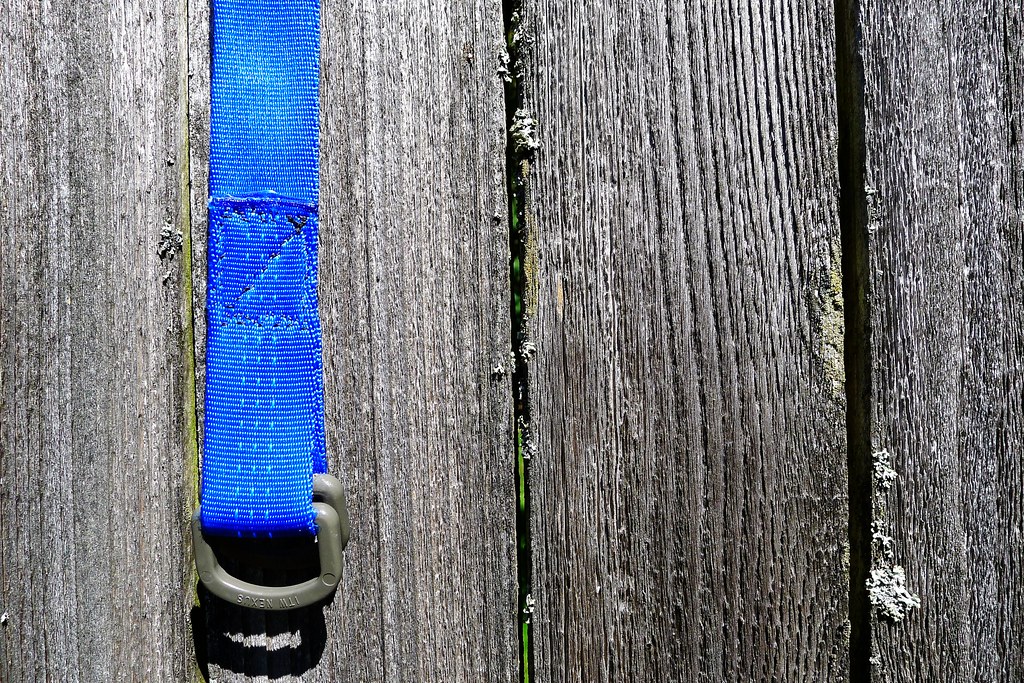
Rather than giving up on the gaiters and immediately returning them, I held on to them for a while. I thought that it would be simple enough to modify the gaiters by adding a new cuff on top of the gaiter, creating a channel of material through which could run a thin piece of webbing. The webbing could be cinched down around the leg and secured with a camlock. This would provide the same adjustment mechanism as that found on my full-length gaiters. It would not be a perfect seal, but short gaiters will never keep out as much debris as tall ones.
The gaiters lay neglected for a while. A few months later I found myself in Seattle Fabrics and wound up purchasing the needed webbing, as well as some stretchy Lycra material which I thought would serve as the added cuff. Then I forgot about the project again.
Eventually, I remembered the gaiters, and wanted to get them done. At that time I had some material left over from hemming a new pair of Kuiu Attack Pants. The Kuiu pants are made out of Toray Primeflex, an impressive soft-shell which I discussed in my review of the Kuiu Guide Gloves. While heavier than the Lycra, I thought that Primeflex would provide more durability and be a better match to the soft-shell of the Flex-Tex gaiters.
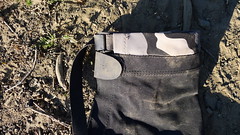
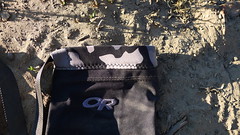
The project was a success. With the Primeflex cuff sewn atop the gaiters’ normal cuff and a piece of webbing put through it, I can cinch down the top of the gaiter around my calf and secure it with the camlock buckle. Because the top of the gaiter has not been modified to be permanently smaller, I can still wear the gaiters over pants – although I almost always wear them next to skin. I have not done much post-holing in snow this summer, but the new cuff has provided a tight enough seal to keep out flying snow that comes from glissading down snowy slopes and kicking steps on the way up. Neither rocks, dirt, nor twigs have yet to find their way in.
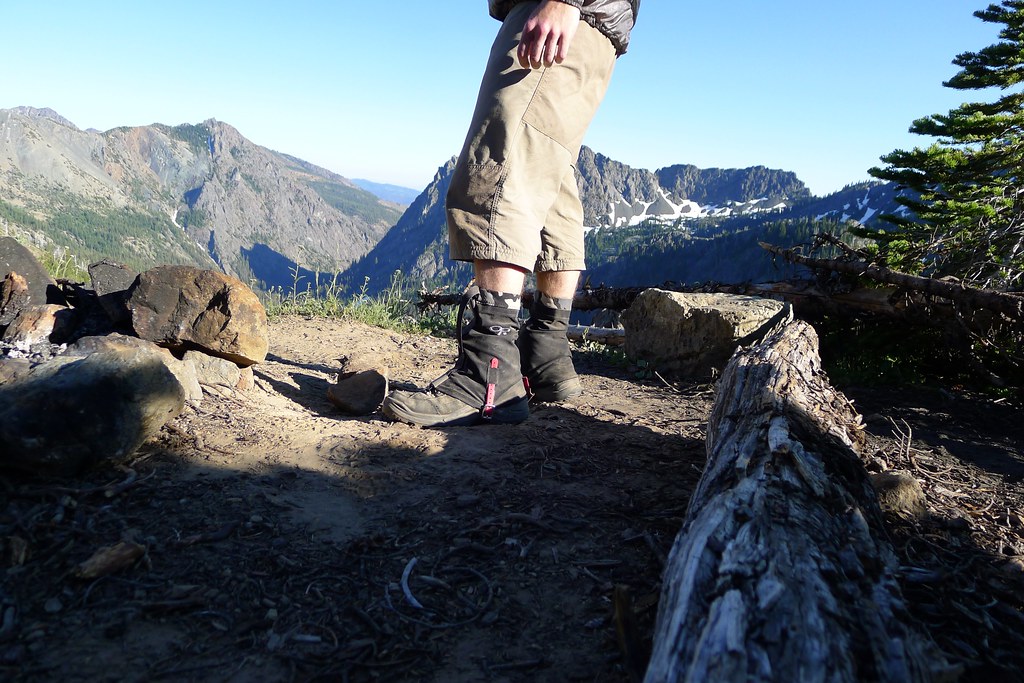
Now that I have a proper fit, the Flex-Tex gaiters have become my preferred wear. They are breathable, water-resistant, and tough. At 5.29 ounces, the modified gaiters are only slightly lighter than the 6.98 ounces Rocky Mountain High gaiters. It is not a huge difference, but I find that I still prefer the Flex-Tex gaiters. The Rocky Mountain gaiters I never wore specifically for debris. They stayed in my pack until I encountered wet or snow. The Flex-Tex gaiters are comfortable and breathable enough to wear all the time – even when gaiters are not necessarily needed – which makes them more efficient at keeping out debris. For my type of travel, I find the Flex-Tex gaiters more functional than short gaiters that I’ve tried from other companies, such as Integral Designs and Dirty Girl.
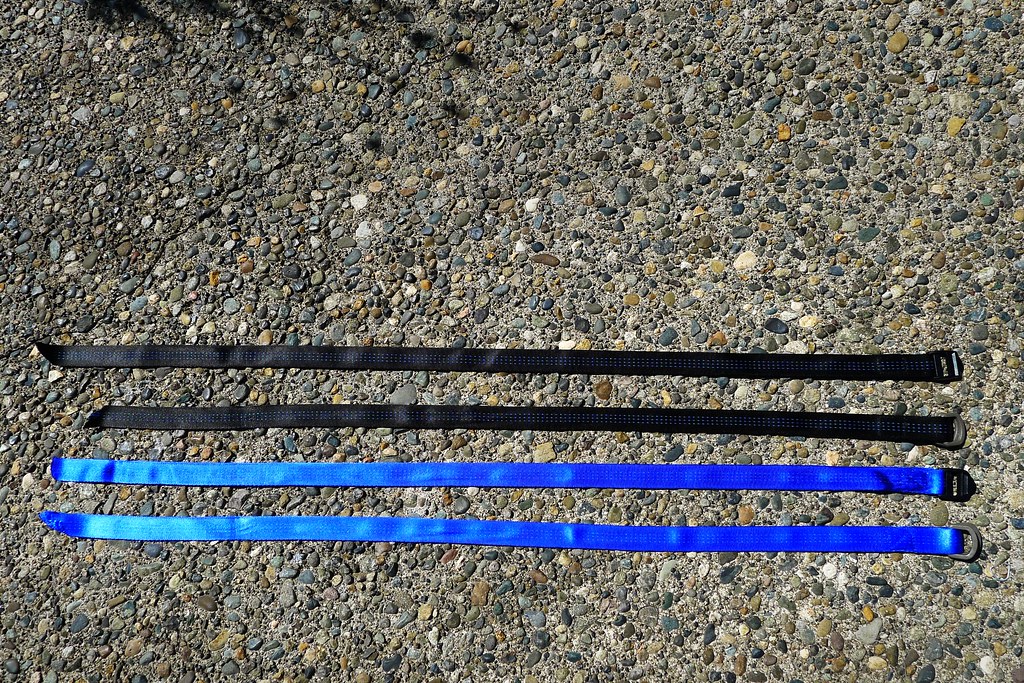
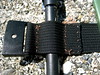
Many outdoor gear brands sell thin webbing belts. These belts aren’t meant to hold much gear. They simply hold your pants up. The thin, pliable webbing makes for a svelte belt that can be comfortably worn under a pack hip belt or a climbing harness. The webbing also tends to be of a low quality, and the belts are often priced ridiculously high. Why pay $15 for something that you can make yourself at little cost, if not for free?
I had worn a Frequent Flyer Belt from The Wilderness Tactical on a daily basis for a number of years. It is an excellent belt, but I occasionally found the wide and thick webbing, which is appropriate for some uses, to be uncomfortable and cause chafing under the heavy hip belt of my pack. As an experiment, I purchased a Patagonia Friction Belt when it was heavily discounted during a sale. That worked well for a while – it was more comfortable under my pack – but the webbing used was very low quality. It was also still a bit stiff. I thought, why should there be any stiffness at all to the belt? It serves no purpose in the backcountry.
I made my first belt in early March. Initially I intended for it be used only when backpacking, but it proved functional enough that I soon made three more and wear them on a daily basis. The webbing is stiff enough to hold a multi-tool and a knife, which is the most that I carry on my belt these days, both in wilderness environments and urban.
The webbing I used is simple tubular webbing. It is strong, and yet softer and more pliable than most flat webbing, making for a comfortable belt. Any climber most likely has yards of the stuff laying around. I happen to use BlueWater 1” webbing, which exceeds the strength of military-spec webbing, but, in a belt, this is irrelevant. My stitching will certainly blow long before the webbing.
After sewing, I cut the webbing so that the total length of the belt is about 39”. That provides plenty of length to use the belt as improvised lashing, if I ever need it.
I first began using ladderlocs as the buckles. This worked, but I later experimented with using two D-rings. I now prefer the smoother operation of the D-ring buckle. I have experienced no slippage with either type of buckle. Both the ladderlocs and the D-rings I had laying around from previous projects, or from old gear (I always salvage the hardware from old, ratty gear before throwing the rest away).
The total cost to me for all of these belts was zero. If you had to buy the webbing and hardware, you may be looking at around $2. A far cry cheaper than any similar belt you’d find in a store! The total weight of a single belt is 50 grams (1.76 oz).
Three years ago I wrote a guide to building a VPS web server for serving sites in a PHP environment. That setup served me well for some time, but most of the sites I run now – including this one – are now written in Python. Earlier this year I built another web server to reflect this. It’s similar to before; I still use Ubuntu and I still like to serve pages with nginx. But PHP has been replaced with Python, and many of the packages used to build the environment have changed as a result. As with the last time, I decided to compile my notes into a guide, both for my own reference and in case anyone else would like to duplicate it. So far, the server has proven to be fast and efficient. It serves Python using uWSGI, uses a PostgreSQL database, and includes a simple mail server provided by Postfix. I think it’s a good setup for serving simple Django-based websites.
Basic Setup
As with last time, I recommend following Slicehost’s basic server setup article. It discusses user administration, SSH security, and firewalls. I no longer use Slicehost as my VPS provider, but I find that Slicehost’s articles provide an excellent base regardless of the host.
Packages
Packages should upgraded immediately to address any known security vulnerabilities.
12
$sudoapt-getupdate
$sudoapt-getupgrade
After the repositories have been updated, I install some essential packages.
1
$sudoapt-getinstallbuild-essentialscreendnsutils
Build-essential includes necessary tools to compile programs. I am incapable of using a computer that does not have screen on it, so that gets installed too. The third package, dnsutils, is optional, but includes dig which is useful for troubleshooting DNS issues.
DenyHosts
Slicehost’s setup article recommends turning off password authentication in SSH, forcing users to login with keys only. I use keys whenever I can, but I appreciate the option of being able to login to my server from any computer, when I may or may not have my SSH key with me. So I leave password authentication enabled. This presents the possibility of brute-force attacks. Enter DenyHosts. DenyHosts, which I have discussed previously attempts to protect against SSH attacks by banning hosts after a certain number of failed login attempts. When password authentication is enabled, running DenyHosts is a smart move.
Later on I’ll be installing some Python development packages. One of them creates a directory called /usr/lib/pymodules/python2.6/.path, which sets off a warning in chkrootkit. Part of chkrootkit’s desgin philosophy is to not include any whitelists: if chkrootkit finds something that it doesn’t like, you’re going to hear about it. I have cron run chkrootkit nightly and I want to receive any warnings, but I don’t want to receive the same false positive every morning in my inbox.
The solution is to create a file that contains chkrootkit’s warning. I call that file whitelist and store it in the same directory as chkrootkit. When chkrootkit is run, any output is redirected to a file. That file is compared to the whitelist using diff and the output of that – if any – is then read. At the end, the file containing chkrootkit’s output is deleted so that the working directory is ready for the next run. The effect is that I only hear warnings from chkrootkit that I have not explicit whitelisted. All of this can be accomplished in a single crontab entry.
The script that my cronjob runs is slightly different from the one demonstrated in the Slicehost article. Their script executes a few commands, groups the output together, and sends it to mail to email the system administrator. This results in daily emails, regardless of whether rkhunter finds any warnings or not. My script is simpler and does not result in so many messages.
The version check and update commands both have the -q switch, which disables any output – I don’t care to know whether rkhunter updated itself or not. The final line actually executes the scan. Notice that there’s no reference to mail. This script does not send any messages. The reason for that is that rkhunter itself provides the mail functionality. Inside of /etc/rkhunter.conf there is a MAIL-ON-WARNING variable. As long as the machine has an smtp server on it (which I’ll get to later in this guide), simply filling in this variable will result in any warnings being emailed to the system administrator.
Web Server
With the basics complete, it’s time to start serving something! In my previous article I covered serving a PHP-based Wordpress site via FastCGI and nginx. This time around the stack will be different: nginx, uWSGI, Python, and Django.
A few basic packages will help flesh out the server’s Python development environment:
The nginx package in Ubuntu’s official repositories is always notoriously outdated. It used to be you had to compile the server from source, but there is now an Ubuntu PPA for the latest stable versions. As described by the nginx wiki, all that is needed is to add the PPA to your sources.list and apt-get away!
If you do Python development and haven’t heard of virtualenv, it is well worth reading up on. It allows the user to create an isolated, virtual Python environment for each project. This helps immensely when developing (or serving) multiple projects on a single machine. Needless to say, I consider it to be a required package.
Install
I’ll be installing virtualenv and virtualenvwrapper (a set of scripts to facilitate working with virtual environments). I also prefer pip over easy_install for managing Python packages.
Virtual environments can be stored wherever you fancy. For now, I keep them in a hidden folder in my home directory. For these examples, I’ll setup an environment called myproject.
Notice the --no-site-packages switch. That tells virtualenv to create this environment without any of the Python packages already installed, creating a completely fresh, clean environment. The --distribute switch causes the new virtual environment to be setup with distribute, a replacement for the old and rather broken setuptools.
All that’s needed to get virtualenvwrapper up and running is to add two lines to your .bashrc and re-source the file.
We can now use commands like workon to ease the process of activating a certain environment.
I’ll go ahead and install yolk in the environment to help manage packages.
123
$workonmyproject
$pipinstallyolk
$yolk-l
The last command will cause yolk to list all packages installed in the environment. Try deactivating the environment and then running yolk again.
123
$deactivate
$yolk-l
yolk:commandnotfound
‘yolk’ wasn’t found, because it was only installed within the virtual environment. Neat!
Install Django
Finally, it’s time to install Django! The process is simple enough.
12
$workonmyproject
$pipinstalldjango
And that’s it!
The Python Imaging Library is likely to be needed for any Django project. I installed it in the beginning of this section, but because I used the --no-site-packages when creating my virtual environment, it is not available for use within the project. To fix that, I’ll just link the package in. I also previously installed psyopg2, which Python will need to communicate with my PostgreSQL database, so I’ll link that in as well. psyopg2 depends on mx, which was also previously installed but still must be made available in the environment.
While I’m still in the virtual environment, I’ll go ahead and create a new Django project. The project will have the same name as the environment: myproject. For this tutorial, I’ll stick with the precedence set by the Slicehost tutorials and use demo as the name of both my user and group on the server.
I like to keep my sites in the /srv/ directory. I structure them so that the code that runs the site, any public files, logs, and backups are all stored in separate sub-directories.
Notice that the logs and public directories were chowned to the www-data group. That is the name of the user and group that nginx will run as. The web server will need permissions to write to those locations.
Save Requirements
With the environment setup and all the necessary packages installed, now is a good time to tell pip to freeze all the packages and their versions. I keep this file in a deploy folder in my project.
Now that I have something to serve, I’ll configure uWSGI to serve it. The first step is to create a configuration file for the project. I call mine wsgi.py and store it in /srv/myproject.com/code/myproject/. It appends the current directory to the Python path, specifies the Django settings file for the project, and registers the WSGI handler.
With that done, the next step is to decide how uWSGI should be run. I’m going to use Ubuntu’s upstart to supervise the service. I keep the upstart script in my project’s deploy/ directory.
1 2 3 4 5 6 7 8 9101112131415161718
$vim/srv/myproject.com/code/deploy/uwsgi.conf
description"uWSGI server for My Project"
startonrunlevel[2345]
stoponrunlevel[!2345]
respawn
exec/usr/local/sbin/uwsgi\
--home/home/demo/.virtualenvs/myproject/\
--socket/var/run/myproject.com.sock\
--chmod-socket\
--pythonpath/srv/myproject.com/code/\
--modulemyproject.wsgi\
--process2\
--harakiri30\
--master\
--logto/srv/myproject.com/logs/uwsgi.log
Sadly, upstart doesn’t seem to recognize links. Rather than linking the config file into /etc/init/, I have to copy it.
Nginx’s configuration is pretty straight-forward. If you’ve never configured the server before, Slicehost’s articles can set you down the right path. My own nginx config looks something like this:
I keep the virtual host config for my project inside the project’s code/deploy/ directory. A basic virtual host for a Django project would looks like this:
To install and enable the virtual host, I’ll link the configuration file first to the nginx sites-available directory, and then link that link to the sites-enabled directory.
Django has a very good built-in cache framework. I like to take advantage of it with a memory-based backend: namely, memcached. It’s fast, efficient, and easy to setup.
All that’s needed is to install memcached on the server, followed by the Python API python-memcached.
The default configuration file in Ubuntu lives at /etc/memcached.conf. I usually stick with the defaults, but sometimes end up changing the port that memchached runs on or the amount of memory it is allowed to use.
I maintain a configuration file for each of the domains being served by the machine. The file for a domain lives in – you guessed it – the associated project’s deploy/ folder. Each contains two entries: one for the nginx virtual host and one for the uWSGI instance. The reason for this is that each config block needs a postrotate section to restart the associated server after the logs have been rotated. I don’t want nginx to be restarted everytime a uWSGI log is rotated, and I don’t want uWSGI restarted everytime an nginx log is rotated.
A web server isn’t much use without a database these days. I use PostgreSQL.
Install
1
$sudoapt-getinstallpostgresql
Configure
PostgreSQL has some unique terminology and ways of doing things. When I first set it up for the first time, having coming from a MySQL background, not everything was completely straightforward. As usual, Slicehost has a number of articles that will provide a foundation.
In the /etc/postgresql/8.4/main/postgresql.conf file, I uncomment the following two lines:
track_counts = on
autovacuum = on
Then restart the database server.
1
$sudo/etc/init.d/postgresql-8.4restart
After that I’ll change the password for the postgres user and the postgres database role.
If I’m restoring a previous database from a backup, now would be the time to import the backup.
1
$psql-Umyproject<myproject.postgresql
And now Django should be able to connect!
The basic server is setup and secure. Django, uWSGI, nginx and PostgreSQL are all running and getting along swimmingly. At this point, many people would be done, but I also like to have a minimal mail server.
Mail Server
Most of my domains use Google Apps, so I don’t need a full-blown mail server. I do want programs and scripts to be able to send mail, and I prefer not to do so through an external SMTP server – I’d rather just deal with having sendmail running on my own box. And I do have a few domains that do not use Google Apps. They have one or two aliases associated with them, so the server needs to receive messages for those domains and forward them off to an external address. If any of this sounds vaguely familiar, it’s because it’s the same thing I detailed last time. My setup now is the same as then, so I won’t repeat any of it here.
I use Git to keep track of the code for all my projects. (If you’re new to Git, you ought to skim the Git Reference or Everyday GIT With 20 Commands Or So). To manage websites, I create a repository of the directory with the code that runs the site (in this case, /srv/myproject.com/code/) and another empty, bare repository to work as a hub. With a post-update and post-commit, the end result is an excellent web workflow:
A copy of the hub can be checked out on a local machine for development. Whenever a change is committed, a simple git push will push the code to the web server and automatically make it live.
Changes can be made on the server in the actual live website directory. (This is not a best practice, but I do it more often than I should probably admit.) Whenever a change is committed, it is automatically pushed to the hub, so that a simple git pull is all that’s needed on the development machine to update its repository.
A more detailed explanation of this workflow is at Joe Maller’s blog.
To start, I need to create a repository for the new project I created in this tutorial. And, since this is a new server, I need to give Git my name and email address to record with every commit.
Now the hub needs a post-update script so that every time something is pushed to it, that change is automagically pulled into the live website directory.
1 2 3 4 5 6 7 8 91011121314
$vim/srv/myproject.com/hub.git/hooks/post-update
#!/bin/shechoecho"**** Pulling changes into live"echocd/srv/myproject.com/code||exitunsetGIT_DIR
gitpullhubmaster
execgit-update-server-info
$chmod+x/srv/myproject.com/hub.git/hooks/post-update
And the live website directory requires a post-commit script so that every time something is committed inside of it, that change is automagically pushed to the hub.
1 2 3 4 5 6 7 8 910
$vim/srv/myproject.com/code/.git/hooks/post-commit
#!/bin/shechoecho"**** pushing changes to Hub"echo
gitpushhub
$chmod+x/srv/myproject.com/code/.git/hooks/post-commit
All that’s left is to check out the hub onto the development machine – my laptop, in this case!
Now go back to the server, and the file should be there! To test things the other way around, I’ll delete the file from the live repository.
12345
$cd/srv/myproject.com/code/
$ls
myprojecttest
$gitrmtest
$gitcommit-m"Removing the test file"
And once again to the development machine:
123
$gitpull
$ls
deploymyproject
No more test! It’s pretty dandy.
Restoring
If I was building a new server and restoring a project from an old server, I would simply mirror the old hub and then clone that in the live directory.
Prior to building this server, I was new to a lot of this – particularly, uWSGI and virtualenv. The following tutorials helped me a good deal in putting together the perfect setup for my needs.
Although I have misgivings about their durability, Platypus‘ 2L+ bottles remains the primary water reservoirs in my pack. It’s been a bit over a year now since I started using them. At the same time I switched over to Platypus, I also started treating my water with chemicals rather than filtering it. Both methods of treatment have their advantages and disadvantages, but lately I have been using chemicals almost exclusively.
A water filter, of course, filters out not only the invisible nasties that upset the stomach, but also the visible things things that don’t cause much harm but aren’t altogether pleasant: dirt, dead bugs, small rocks, and the like. When I moved to using chemicals I was just dumping the water into my drinking vessel direct from the source. Without any sort of filter, the water could sometimes be a bit gritty. Too textured for my taste.
As a first attempt to solve this I started to place a bandanna over the opening of the Platypus, and then poured the source water over that. That worked great for getting out the sediment, but then I had the problem of having a wet rag. If the sun is out, it dries, but the other 307 days of the year, the bandanna – even a synthetic Buff – became a bit of a hassle to dry. I wanted some sort of pre-filter that I could get wet without worrying about it.
The solution (like more than a few before it) came while browsing the BackpackingLight forums.
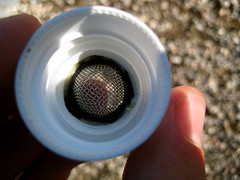
A filter washer is a rubber washer with a mesh screen in the middle. Apparently they’re used in garden hoses and washing machines to remove sediment. I was able to find them easily in the plumbing section of a local hardware store.
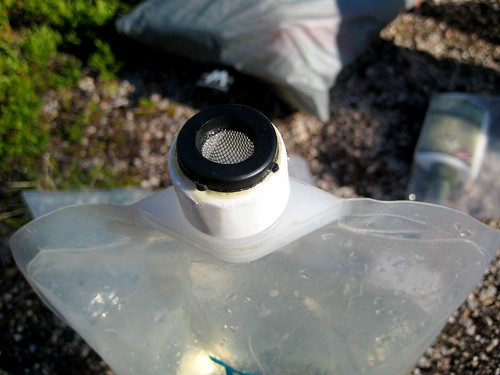
I took an old Platypus cap and drilled out the center of it. Then, with a little Gorilla Glue, glued the filter washer onto the cap. That’s all there is to it! The new pre-filter cap weighs 2 grams (0.07 oz) and shouldn’t cost much more than $1 to make.
The downside to the pre-filter cap is that it does noticeably decrease the flow rate of the water. To fill the Platypus, I use a scoop made out of an older Platypus bottle with the top cut off. Without the pre-filter cap, it takes all of 30 seconds to fill the Platypus bottle. With the pre-filter cap, it takes something more like 2 minutes to fill up the bottle. I have to pour the water out of the scoop much more slowly. Because of this I’ll sometimes forgo using the pre-filter cap if the water looks very clean, but the majority of the time I do use the cap. It’s become a permanent addition to my pack.
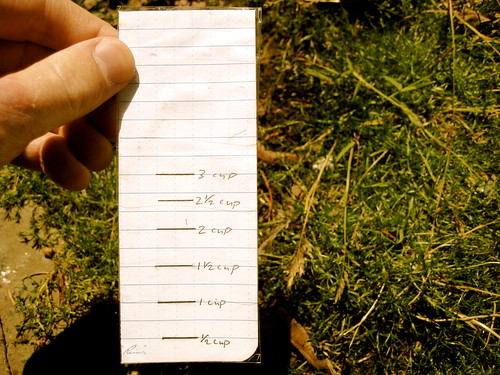
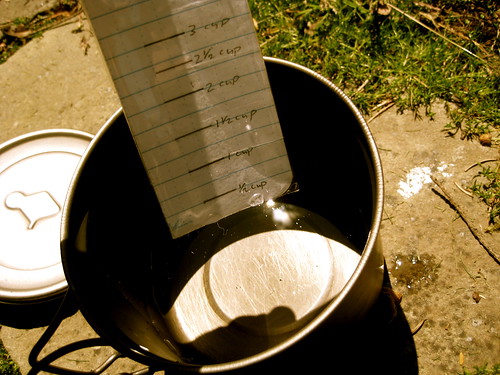
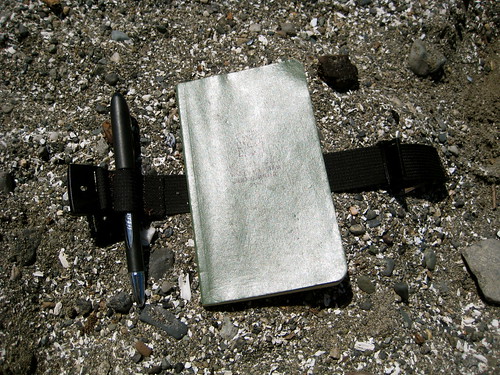
When I purchased my Trail Designs Ti-Tri Titanium Stove System, I bought it with a 900mL pot from Titanium Goat. I like the pot, but it has one shortcoming: there are no measuring marks on it. I’m not comfortable just pouring a little water into a pot and saying “Well, that looks like 2 cups.” I prefer a slightly higher level of accuracy.
Originally I addressed this by scoring the handle of my spork to mark 1, 2, and 3 cups measured in the pot – an idea which I think originally came to me from somewhere on the BackpackingLight Forums. This method works ok – though making the marks deep enough to be visible on the titanium was a bit tough with my knife – but I’ve never felt that it is very accurate. It will tell me if I have roughly 1 cup of water in the pot, but I could really be anywhere between 3/4 of a cup to 1 1/4 cups. That’s the difference between nice, fluffy couscous and overly soggy (or dry and undercooked) couscous, you know.
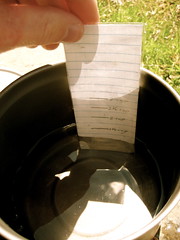
As a more accurate replacement, I came up with the idea for the Water Measuring Doohicky: a piece of paper with marks on it. Ingenious, isn’t it?
For the paper, I chose a cut a piece out of a page in one of my Rite in the Rain notebooks. Then I put 1/2 cup of water into the pot, set in the paper, noted the water line, took out the paper and marked the water line. This was repeated at 1/2 cup increments up to 3 cups. (The pot holds 4 cups when filled to the rim, so 3 cups is the most I would ever want to cook with.) After I had all the marks determined, I cut an identical piece of paper and put marks at the same levels. Then I tossed the soggy paper and was left with a fresh, dry piece of waterproof paper with the appropriate marks.
As a poor-man’s lamination, I wrapped it with clear packing tape. Even though the Rite in the Rain paper is waterproof, it gets a little soggy when submerged and takes a while to dry out. Water doesn’t cling to the tape at all. I can give it a shake or two after taking it out of the pot and it is immediately dry. The tape also adds a little stiffness, which helps achieve more accurate measurements.
I made two of these doohickeys at the same time, but have been using only one since last Fall. It works great. I am somewhat embarrassed it took me almost a year to come up with the idea. Even though I only made marks at 1/2 cup increments, the grid on the paper allows me to easily measure with 1/4 cup accuracy. As opposed to the marks on the spork, this paper is one extra thing to carry, but when placed on my scale it doesn’t register. I don’t think it weighs me down any.
I had done the lamination before I thought of this, but next time around I think I will write common cooking ratios on the back: water to couscous, water to dehydrated brown rice, etc. Usually I write those ratios on the ziploc freezer bags that hold my food, but the bags get replaced and rotated fairly frequently. The Water Measuring Doohickey has proved that it will last for a longer period of time.
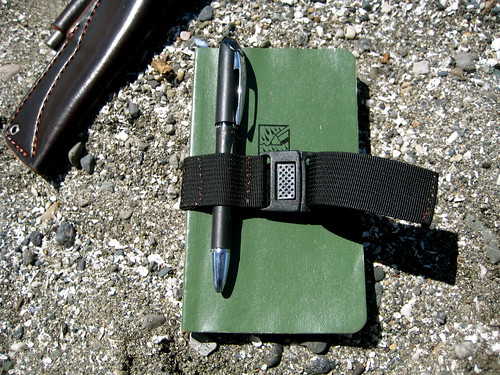
Here’s an idea I stole from the excellent BFE Labs: hacking a Rite in the Rain notebook to include a retention strap. The original idea at BFE was just a strap to keep the notebook closed and contain loose leafs that were shoved inside, but while making the strap he accidentally cut the webbing too short. To solve this he sewed on another piece of webbing as an extension and found that the overlap between the two pieces made a good pen holder.
I thought this was a neat idea, but the tri-glide fastener used in BFE’s version seemed a little cumbersome. I knew I would want some sort of quick release buckle. A traditional side release buckle would be too bulky for my tastes, particularly when the notebook is shoved in a pocket. The other thought I had was that using elastic webbing for the pen loop might increase the versatility of the strap, since it could expand to fit different sized tools.
I didn’t have any 1” elastic webbing hanging about, but I did have some spare webbing and an old buckle from a previous project. With those two things along with a knife and my repair kit, I set out to see what I could do about whipping up some kind of strap.
My initial intention was to create the pen loop the same way as the BFE strap: cut one strap short and sew on an extension piece with a bit of an overlap. But before I got to that part, I had to sew one end of the buckle onto the webbing. In preparing to do this, I realized that I would already be sewing a loop right there. I could just pull a bit more webbing through the buckle to create my overlap, throw in a stitch to hold down the end of the webbing, another stitch closer to the buckle, and between the two I would have the perfect loop for my pen. Simple.
On the back of the notebook I created two slits for the webbing to pass in and out of, just like in the BFE hack (except I used my knife rather than a Dremel tool).
I’m happy with how this hack came out and will probably perform it on my other Rite in the Rain notebooks. The whole process takes only a few minutes and does not strain my juvenile sewing skills. My one complaint is with the buckle that I happened to choose. I appreciate the low profile, center-release design, but the male end of it doesn’t grip the webbing very well. This means that while it is adjustable, it doesn’t hold much tension, and so the buckle doesn’t snap open as much as it should when I release it. I’m thinking of sewing the webbing down on the male end of the buckle just like I did on the female end. The strap would no longer be adjustable, but I could be guaranteed the proper tension and that the buckle would open with the speed and ease which I desire. This would also present the opportunity for me to create another loop to hold a second tool. Perhaps a pencil or a highlighter to go along with the pen.
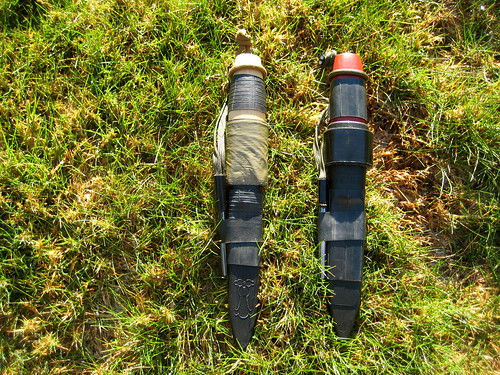
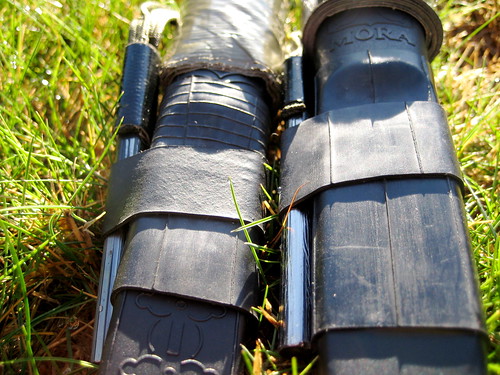
The greatest disappointment about any Mora knife is the sheath: a flimsy, plastic thing that won’t easily fit on a decent sized belt and does not even hold the knife very securely. As they come, I consider them unusable. But a few simple modifications and additions make them quite acceptable.
The Mora knife sheaths are designed to be mounted either on a button on a pair of coveralls or through a belt. Apparently people wear very small, skinny belts in Sweden. Over here in the United States of Gun Belts, that doesn’t fly. The belt slot on the sheath can be forcefully enlarged by shoving in a piece of wood, such as a ruler, and applying heat to cause the plastic to expand, but I don’t trust that such an act will not over weaken the plastic. I’m not a big fan of carrying a Mora directly on my belt, anyway. Usually, I’ll carry the knife either on a lanyard around my neck or as a dangler off my belt. But both of these setups allow the possibility of the knife and sheath to swing freely, accentuating the problem of an insecure fit.
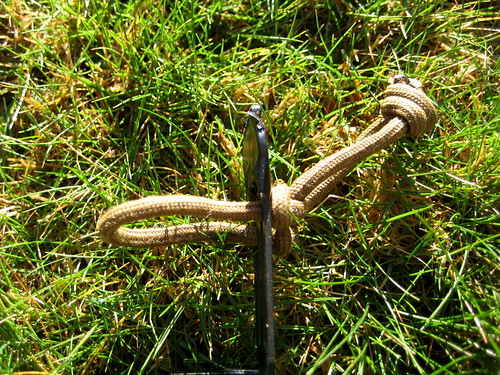
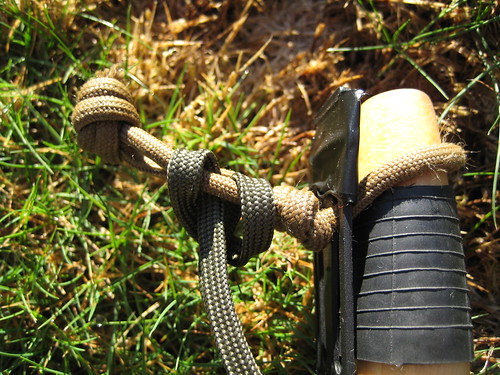
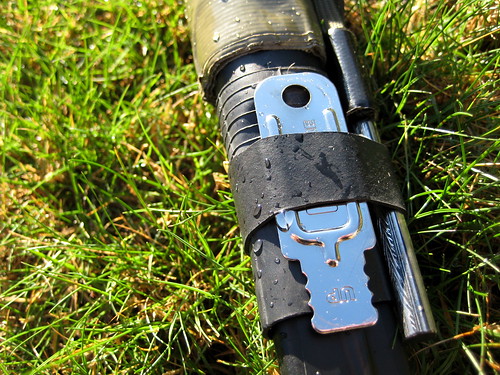
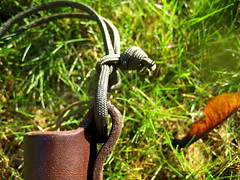
Both the problem of how to carry the sheath and the problem of the insecure fit can be addressed with a single piece of paracord.
With the knife in the sheath, I take a piece of paracord and run both ends around the handle and through the slot for the belt. Then, tight against the back of the sheath, I tie an overhand knot in either end of the cord. This creates a loop of paracord on the front of the sheath that can be made smaller, but cannot become any wider than the bottom third of the handle. Because the handles on Mora knifes are somewhat tapered – fatter in the middle than on either end – this loop prevents the knife from being removed from the sheath. Even if the knife is only lightly dropped into the sheath rather than securely pressed, it cannot be removed without first sliding off the loop of paracord.
After tying the two knots against the back of the sheath in either end of the paracord, I take both ends and tie them together, forming a loop on the back of the sheath. This provides my carry options.
To carry the knife in a dangler system, I prefer to use a Maxpedition Keyper rather than a carabiner. The Keyper is mounted on my belt and clipped into the loop of paracord on the sheath. (To reduce movement in this setup, I’ll stick the knife and sheath in my pocket.)
The last thing that I do to this part of the sheath is add a small wrap of electrical tape around the very top, covering the upper bit of the belt loop and the button hole. This prevents the paracord from sliding to the top of the sheath and forces the securing loop to be about .75” from the very end of the handle. I’ve found that if this is not done, the securing loop is like to slip off the handle.
That’s all that is needed to make the sheath usable, but a few other additions can be made to increase its utility.
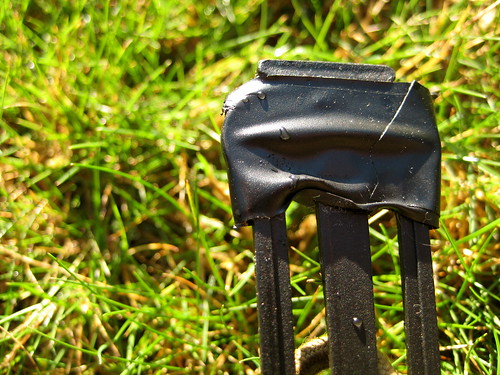
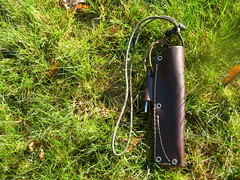
Around the top of the sheath, I wrap tape. In the sheaths pictured here, one has 2” olive drab duct tape, the other has 1” black Gorilla Tape (which is like duct tape, but thicker and stickier). One can never carry enough tape. I imagine, also, that the tape likely increases the structural integrity of the sheath.
On the back of both sheaths, I have a #17 sailmaking needle, pre-threaded with black kevlar thread, taped down with some electrical tape. As I mentioned in my review of the RAT Izula, this is an idea I first picked up from one Dave Canterbury’s videos. The extra needle and thread adds no noticeable weight and could be a welcome addition to the sheath if you ever find yourself separated from your pack, with the knife and sheath as your only piece of gear.
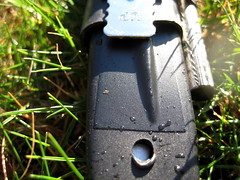
The next modification on the body of the sheath was also inspired by Dave Cantebury. In another of his videos, he showed how he had layered different width pieces of inner-tube on a machete sheath to create pockets that could store small items, such as a sharpening stone and magnesium fire starter. With that in mind, I add a wide piece of inner-tube onto the middle of the Mora sheath (which also serves to cover and further secure the taped down needle). Then, on top of that, I put a skinnier piece of inner-tube. Slid between both pieces is a backup ferro rod. Because the rod has rubber below it and rubber atop, there is an incredible amount of friction. The ferro rod becomes difficult to remove. I have carried blank rods in these “pockets” and they have never fallen out. Still, I prefer to carry rods with a lanyard of some sort on them. I loop the rod through its lanyard around the paracord loop on the top of the sheath, guaranteeing that the rod is secured.
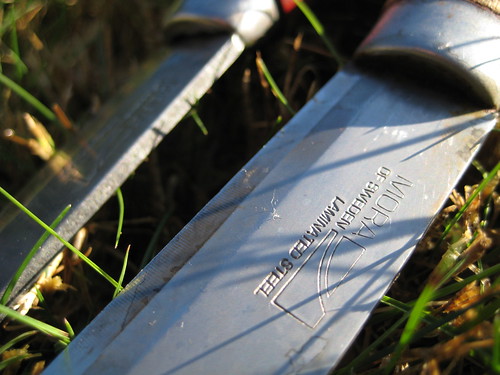
The sheath for my KJ #1 knife has only a ferro rod. That knife is carbon steel and can generate sparks off the spine. On the sheath for the larger SL-2, however, I have added a small striker slid between the two pieces of inner-tube on the back. The SL-2 is made of laminated steel, which is too soft to reliably produce sparks.
These modifications made to the Mora sheath help to secure the knife, allow for different carry options, guarantee a source of fire, and provide a needle, thread and tape for repairs. They turn what is otherwise a near useless sheath into a functional item worthy of being matched with the Mora blade.
(I also own a high-quality leather sheath made by JRE Industries for the KJ #1 knife. I tie a loop of paracord through the top loop of leather on the sheath so that the knife may be carried around the neck or on a dangler, similar to the modified plastic sheath. The leather sheath does not require a loop of paracord on the front to secure the handle. Nor does it need pieces of inner-tube to create a pocket for a ferro rod. The only thing that it lacks is a repair needle, but I have found that most tape does not adhere very well to leather, so I cannot stick one on the back.)
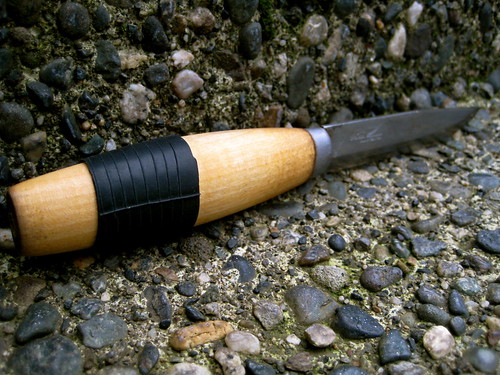
One of the pesky traits of the wooden handled Mora knives is their lack of grip when wet. One could acquire a Mora with a rubber handle, but, let’s face it: those are ugly. Instead, I cut a piece of 700x35 bicycle inner-tube about an inch wide and slide this just less than halfway on to the handle. The grip is immediately improved. If you were so inclined, you cut a piece the length of the handle and cover the whole thing, but so far it seems that this small piece is enough.
As with the rubberized BIC, this also provides another way to carry tinder that will work even when wet (though it will require a lighter or candle to start).