Brian Krebs’ recent experience highlights PayPal’s insecurity. The convenience and ease of use of PayPal give them a wide customer base, but their inherent untrustworthiness has long been reason for concern. For as long as I’ve used the service, I’ve been concerned about external attacks, like what Krebs experienced, as well as the internal threat – PayPal themselves have a history of freezing and diverting their users’ funds. Both of these concerns can be addressed via a proxy bank.
In 2008 I opened an online checking account with a new bank, completely separate from the financial institutions I normally use. The account has no “overdraft protection” or any line of credit. As with my PayPal account, I keep no money in the checking account. This checking account is the only account I associate with PayPal. When I want to make a purchase via PayPal, I transfer the needed funds from my primary financial institution to the checking account at the proxy bank. Since banks still subscribe to the archaic notion of “business days”, this transfer can sometime take up to week, but more frequently completes within 2-3 days.
The brief wait period is acceptable to me (it certainly reduces the ability to impulse buy) and gives me a level of security that otherwise cannot be achieved with PayPal. If someone breaks into my PayPal account, there’s nothing for them to steal. Even PayPal themselves have limited ability to steal funds. If an attacker is lucky, they may gain access to the account when I’m transferring funds in preparation for a purchase. My PayPal transactions are typically low-value, so at most this lucky attacker will acquire $100 or so. That’s an acceptable risk for the convenience of PayPal.
In the past I used this multilayer approach for all online purchases. A debit card from a proxy checking account at a different bank with no access to my primary accounts was the only thing I would use to make online purchases. When the account was compromised, the wait period for a new card wasn’t the inconvenience it normally is, since it had no impact on my day-to-day spending with my primary accounts. I think this type of security is required for shopping online, but responsible use of a credit card can offer acceptable protection for non-PayPal transactions without the hassle of a proxy account.
Arch has been my Linux distribution of choice for the past 5 years or so. It’s a fairly simple and versatile distribution that leaves most choices up the user, and then gets out of your way. Although I think it makes for a better end experience, the Arch Way does mean that it takes a bit more time to get a working desktop environment up and running.
At work I use Ansible to automate the provisioning of FreeBSD servers. It makes life easier by not only automating the provisioning of machines, but also by serving as reference documentation for The One True Way™. After a short time using Ansible to build servers, the idea of creating an Ansible playbook to provision my Arch desktop became attractive: I could pop a new drive into a machine, perform a basic Arch install, run the Ansible playbook and, in a very short period of time, have a fresh working environment – all without needing to worry about recalling arcane system configuration or which obscure packages I want installed. I found a few projects out there that had this same goal, but none that did things in the way I wanted them done. So I built my own.
Spark is an Ansible playbook meant to provision a personal machine running Arch Linux. It is intended to run locally on a fresh Arch install (ie, taking the place of any post-installation), but due to Ansible’s idempotent nature it may also be run on top of an already configured machine.
My machine is a Thinkpad, so Spark includes some tasks which are specific to laptops in general and others which only apply to Thinkpads. These tasks are tagged and isolated into their own roles, making it easy to use Spark to build desktops on other hardware. A community-contributed Macbook role exists to support Apple hardware. In fact, everything is tagged, and most of the user-specific stuff is accomplished with variables. The idea being that if you agree with my basic assumptions about what a desktop environment should be, you can use Spark to build your machine without editing much outside of the variables and perhaps the playbook.
The roles gather tasks into logical groups, and the tasks themselves are fairly simple. A quick skim through the repository will provide an understanding of everything Spark will do a matter of minutes. Basically: a simple i3 desktop environment, with GUI programs limited to web browsers and a few media and office applications (like GIMP and LibreOffice), everything else in the terminal, most network applications jailed with Firejail, and all the annoying laptop tasks like lid closure events and battery management automated away. If you’re familiar with my dotfiles, there won’t be any surprises.
Included in Spark is a file which describes how I install Arch. It is extremely brief, but provides everything needed to perform a basic installation – including full disk encryption with encrypted /boot – which can then be filled out with Ansible. I literally copy/paste from the doc when installing Arch. It takes about 15 minutes to complete the installation. Running Ansible after that takes about an hour, but requires no interaction after entering a passphrase for the SSH key used to clone the dotfiles. Combined with backups of the data in my home dir, this allows me to go from zero to hero in less than a couple hours without needing to really think about it.
If you use Arch, fork the repository and try it out.
Shirley’s cyberpunk magnum opus tells the story of a private security company attempting to use the distraction of a third world war to impose fascism across the United States and Europe, and the guerrillas who resist them. Although first published in the 1980s, the omnibus edition was refreshed by the author for publication in 2012, which gives it the feel of taking place 20 minutes into the future.
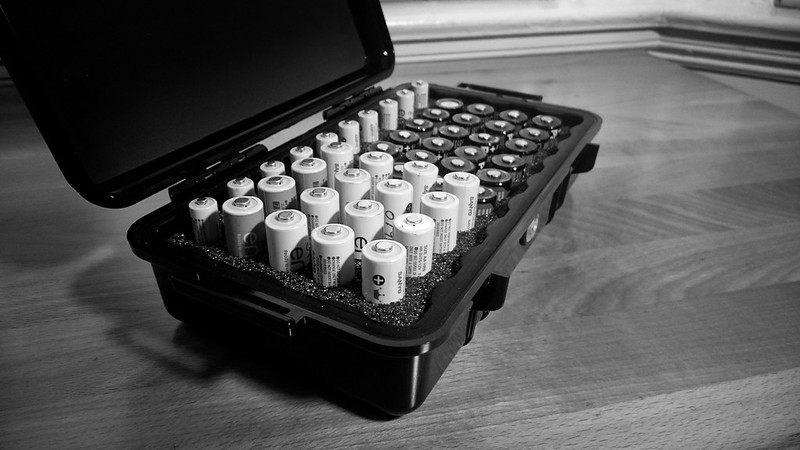
The Pelican 1060 plus pre-cut foam from eBay makes for compact and environmentally secure battery storage. The foam I bought has 10 holes for AAA batteries and 40 holes for CR123 and AA batteries.
This holds the CR123 batteries I keep on hand to feed devices and all of my spare AA/AAA Eneloops.
A diameter of 1.65 mm puts it in the same neighborhood as Type I Paracord, but with a little over twice the tensile strength. It fits through more eyelets than the typical Type III Paracord, making it appropriate for a wider range of footwear. It holds knots well, will pop through zip-ties in a jiffy, and the inner Kevlar can be broken down into three strands. I buy it from TwinLine.
The web browser is one of our computers’ primary means of interaction with the unwashed mashes. Combined with the unfortunately large attack surface of modern browsers, this makes a sandbox which does not depend on the browser itself an attractive idea.
Firejail is a simple, lightweight sandbox that uses linux namespaces to prevent programs from accessing things they do not need.
Firejail ships with default profiles for Firefox and Chromium. These profiles drop capabilities, filter syscalls, and prevent access to common directories like /sbin, ~/.gnupg and ~/.ssh. This is a good start, but I see little reason to give the browser access to much of anything in my home directory.
The --private flag instructs Firejail to mount a new user home directory in a temporary filesystem. The directory is empty and all changes are discarded when the sandbox is closed – think of it as a more effective private browsing or incognito mode that also resets your browser to factory defaults.
$firejail--privatefirefox
A more useful option for normal browsing is to specify a directory that Firejail should use as the user home. This allows you to keep a consistent browser profile and downloads directory, but still prevents the browser from accessing anything else in the normal user home.
This is the method I default to for my browsing. I’ve created my own Firejail profile for Firefox at ~/.config/firejail/firefix.profile which implements this.
The only inconvenience I’ve discovered with this is that linking my Vimperator configuration files into the directory from my dotfiles repository creates a dangling link from the perspective of anything running within the jail. Since it cannot access my real home directory, it cannot see the link target in the ~/.dotfiles directory. I have to copy the configuration files into ~/firefox and then manually keep them in sync. I modify these files infrequently enough that for me this is worth the trade-off.
The temporary filesystem provided by --private is still useful when accessing websites that are especially sensitive (such as a financial institution) or especially shady. In my normal browser profiles, I have a number of extensions installed that block ads, disable scripts, etc. If these extensions completely break a website, and I don’t want to take the time to figure out which of the dozens of things I’m blocking are required for the website to function, I’ll just spin up a sandboxed browser with the --private flag, comfortable in the knowledge that whatever dirty scripts the site is running are limited in their ability to harm me.
I perform something like 90% of my web browsing in Firefox, but use Chromium for various tasks throughout the day. Both run in Firejail sandboxes, helping to keep me safe when surfing the information superhighway. Other programs, like torrent applications and PDF readers, also make good candidates for running within Firejail.
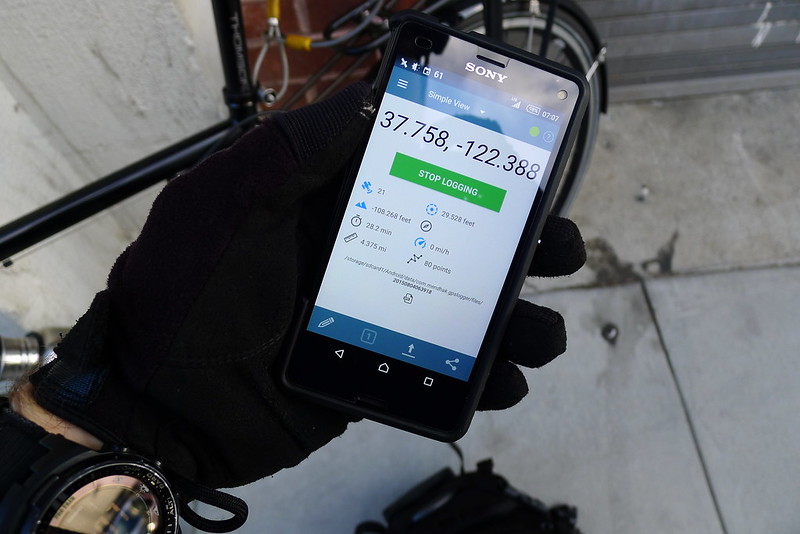
A GPS track provides useful a useful log of physical activities. Beyond simply recording a route, the series of coordinate and time mappings allow statistics like distance, speed, elevation, and time to be calculated. I recently decided that I wanted to start recording this information, but I was not interested in any of the plethora of social, cloud-based services that are hip these days. A simple GPX track gives me all the information I care about, and I don’t have a strong desire to share them with a third party provider or a social network.
Recording Tracks
The discovery of GPSLogger is what made me excited to start this project. A simple but powerful Android application, GPSLogger will log to a number of different formats and, when a track is complete, automatically distribute it. This can be done by uploading the file to a storage provider, emailing it, or posting it to a custom URL. It always logs in metric units but optionally displays in Imperial.
What makes GPSLogger really stand out are its performance features. It allows very fine-grained control over GPS use, which allows tracks to be recorded for extended periods of times (such as days) with a negligible impact on battery usage.
For activities like running, shorter hikes and bicycle rides I tend to err on the side of accuracy. I set GPSLogger to log a coordinate every 10 seconds, with a minimum distance of 5 meters between points and a minimum accuracy of 10 meters. It will try to get a fix for 120 seconds before timing out, and attempt to meet the accuracy requirement for 60 seconds before giving up.
For a longer day-hike, the time between points could be increased to something in the neighborhood of 60 seconds. For a multi-day backpacking trip, a setting of 10 minutes or more would still provide great enough accuracy to make for a useful record of the route. I’ve found that being able to control these settings really opens up a lot of tracking possibilities that I would otherwise not consider for fear of battery drain.
Storing Tracks
After a track has been recorded, I transfer it to my computer and store it with git-annex.
Everything in my home directory that is not a temporary file is stored either in git or git-annex. By keeping my tracks in an annex rather than directly in git, I can take advantage of git-annex’s powerful metadata support. GPSLogger automatically names tracks with a time stamp, but the annex for my tracks is also configured to automatically set the year and month when adding files.
$cd~/tracks
$gitconfigannex.genmetadatatrue
After moving a track into the annex, I’ll tag it with a custom activity field, with values like run, hike, or bike.
I also find it useful to tag tracks with a gross location value so that I can get an idea of where they were recorded without loading them on a map. Counties tend to work well for this.
One could also use fields to store location values such as National Park, National Forest or Wilderness Area.
Metadata Views
The reason for storing metadata is the ability to use metadata driven views. This allows me to alter the directory structure of the annex based on the metadata. For instance, I can tell git-annex to show me all tracks grouped by year followed by activity.
Or, I could ask to see all the runs I went on this July.
$gitannexviewyear=2015month=07activity=run
I’ve found this to be a super powerful tool. It gives me the simplicity and flexibility of storing the tracks as plain-text on the filesystem, with some of the querying possibilities of a database. Its usefulness is only limited by the metadata stored.
Viewing Tracks
For simple statistics, I’ll use the gpxinfo command provided by gpxpy. This gives me the basics of time, distance and speed, which is generally all I care about for something like a weekly run.
For a more detailed inspection of the tracks, I opt for Viking. This allows me to load the tracks and view the route on a OpenStreetMap map (or any number of other map layers, such as USGS quads or Bing aerial photography). It includes all the detailed statistics you could care about extracting from a GPX track, including pretty charts of elevation, distance, time and speed.
If I want to view the track on my phone before I’ve transferred it to my computer, I’ll load it in either BackCountry Navigator or OsmAnd, depending on what kind of map layers I am interested in seeing. For simply viewing the statistics of a track on the phone, I go with GPS Visualizer (by the same author as GPSLogger).
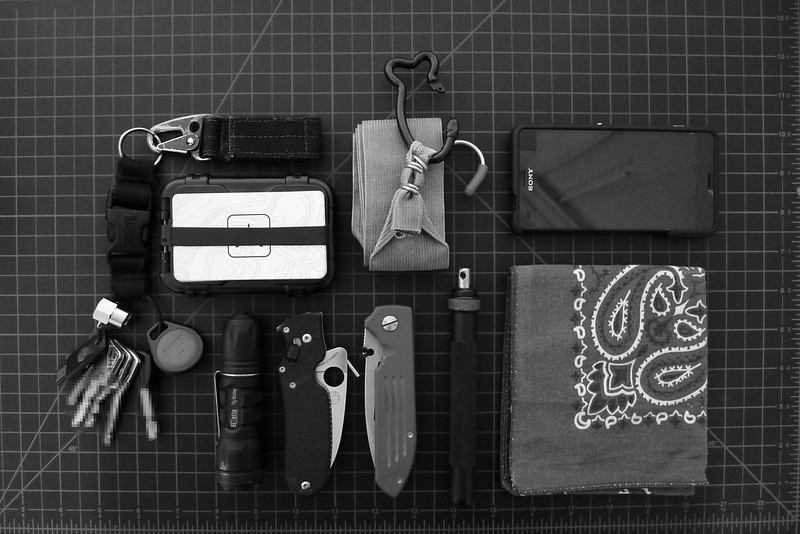
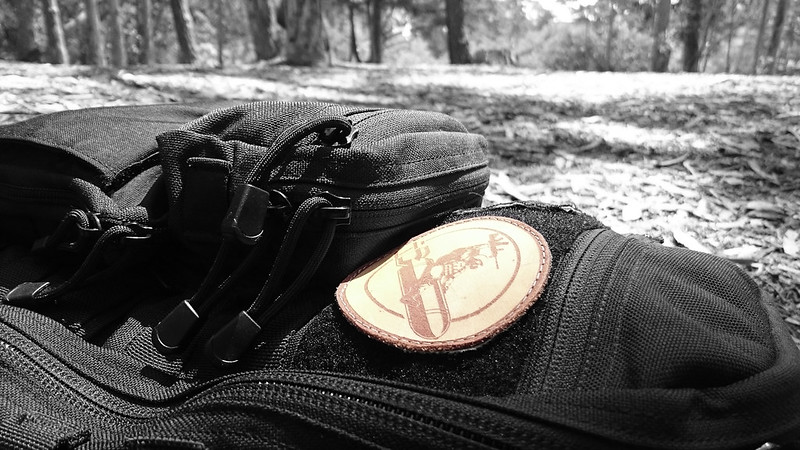
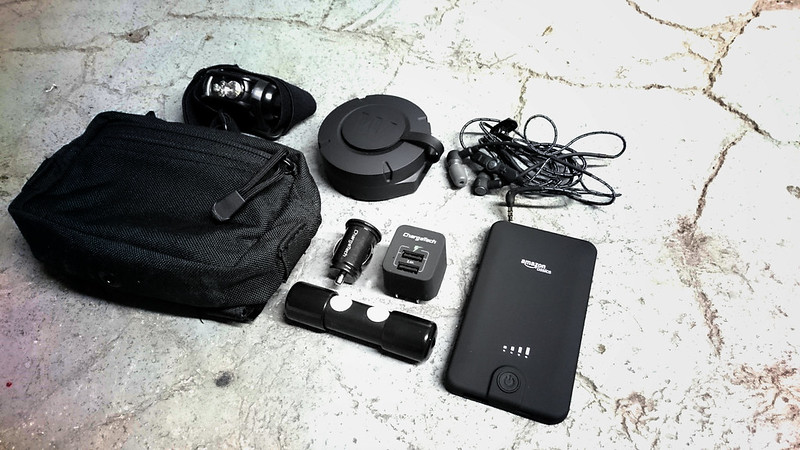
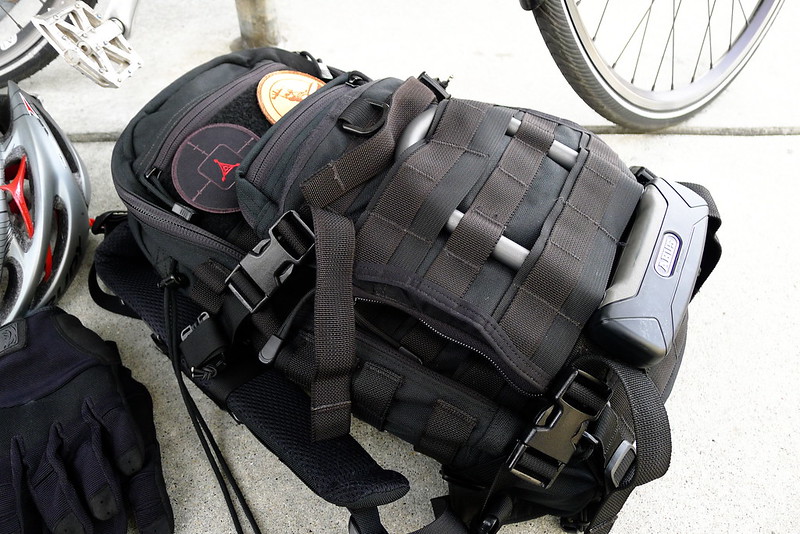
I carry a selection of tools to support the electronic devices that I utilize throughout the day. This electronic support package is part of my level 2 EDC, which means it is carried in my bag. Specifically, the items are stored in a GPP1 pouch attached to my Litespeed. The pouch is a little larger than it needs to be for what I carry, and if size and weight constraints were more of a concern, the package could be further paired down without too great a loss in capability by removing some of the less frequently used items, but I find this selection works pretty well for my daily life.
The electronic devices that this package supports are primarily my phone, helmet light, and the flashlight on my belt1. While these items serve multiple purposes, they tend to fall into the category of critical safety devices. As such, it is important to have the accessories needed to support their regular use.
I do carry a laptop between home and work, and to a lesser extent some of the items in this package support that, but for the most part the things needed to support the laptop (power adapter, peripherals, etc) live at both home and work. They’re not items that I carry.
Battery Pack
The outer pocket of the pouch holds an AmazonBasics Portable Power Bank. This USB battery pack offers 5,600 mAh. I very rarely use this, but when I do need it, I’m extremely glad to have it. The ability to power devices away from other infrastructure is a valuable capability.
The profile of this particular battery makes it easy to carry and to use – it can easily slide into a small pocket on a pair of pants or a jacket when in use with a phone. In the pouch, it takes up no noticeable space.
Earphones
Immediately inside the main compartment of the pouch are a pair of Westone Adventure Series Beta earphones. I do not frequently listen to music when away from home or work (and I find the sound from these Westones to be less than desirable for music anyway), but I do value a hands-free interface to my phone. I use earphones for talking on the phone and (more frequently) navigation. One earphone placed in an ear combined with an OpenStreetMap application and offline routing makes for an improved bike trip in strange lands.
These particular earphones have an IPX-3 rating, which is about the weakest water resistant rating you can get, but makes me feel a bit better about sweating all over them and exposing them to rain.
Headlamp
While critical in the backcountry, a headlamp is less useful in normal daily life. I carry a flashlight on my belt. Between that and my helmet light, this headlmap rarely gets used. I keep it the package mostly just because I have space and don’t mind the additional weight.
I went with the Princeton Tech Remix Pro. It’s compact, lightweight, and offers both red and white LEDs. That set of criteria is critical to me, and fairly easy to satisfy. The reason I chose the Remix Pro over other offerings is that it uses a single CR123. I have mixed feelings about CR123 batteries, but the flashlight I carry uses one. This headlamp allows me to standardize on replaceable batteries for my every day carry.
Batteries
I carry 2 spare CR123 batteries in a Deep Carry Tube from OscarDelta.
Chargers
I backed the ChargeTech Wall and Car Charger on IndieGoGo a while back. The car charger is nothing special – I’ve had other car chargers the same size – but the wall charger is unusually small. I’ve carried a wall charger in my pack ever since getting my first smart phone, but this is the first one that didn’t suck to carry. It’s no bigger than it needs to be.
Chew Can
The Westone earphones came in a small hard-sided container that screws shut, providing some measure of protection from weather and crushing. I don’t care enough about the earphones to store them in the container, but it happens to be the right size to fit most of the smaller items in this package that I do care about.
It also looks like a tactical chew can, which amuses me2.
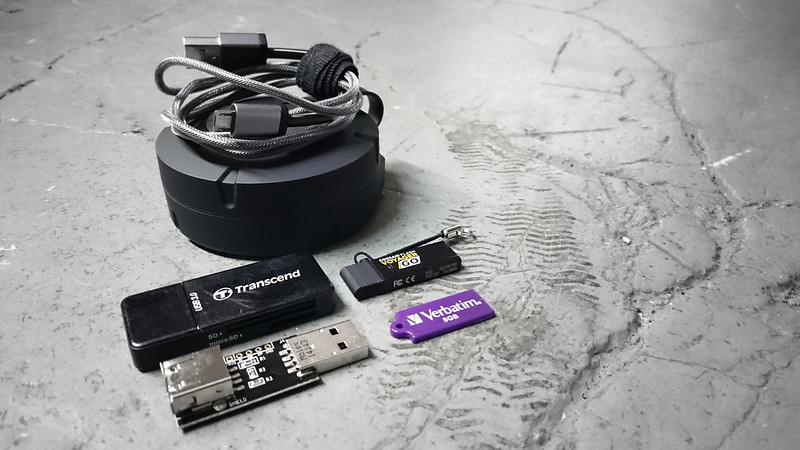
Micro USB Cable
These days enough devices have micro USB ports that carrying a cable is pretty much required3. I carry a 6 ft MOS Spring Micro USB Cable, which is probably not worth the money, but has some cool features like a woven jacket and spring strain relief near the connector.
USB Condom
The USB Condom is the least used device in the whole package. Between the micro USB cable, battery pack and wall and car chargers, I can power my phone without much worry about data leakage. For those rare times when I do need to draw juice from an unknown USB port, the condom offers peace of mind. As with the headlamp, I have the space and don’t mind the weight, so I leave it in.
Card Reader
The Transcend USB 3.0 Card Reader is another device that I don’t use too frequently. Most of the time when I need to read a card, it is an SD card from a camera. My laptop has a built-in SD card reader. But occasionally it is useful to be able to read microSD cards, and occasionally it is useful to be able to do so on other machines. I choose to carry this rather than a microSD-SD adapter so that I may read any card on any machine.
USB Sticks
I carry 2 USB sticks. One is an old 8GB Verbatim stick that runs Tails.
The second is a 64GB Corsair Flash Voyager GO, which has a normal USB 3.0 male connector one end and micro USB on the other. I only recently learned that these type of sticks were a thing, but it certainly makes sense. This gives me an additional method to transfer data between my phone and laptop (in addition to a wireless network, the micro USB cable, and the card reader).
I have not performed any quantitative testing of the Corsair, but it seems to be slow compared to other USB 3.0 sticks. Still, it is large in capacity, small in size, well-built, and I bought it for a good price.
Notes
↵ Although not part of my EDC, I will throw a Kindle in my pack if I'm planning to be gone for more than a day. Fortunately, this creates no new support requirements in addition to those already set by the phone.
↵ I also have a set of S&S Precision Tactical Chew Cans, which are much nicer than the Westone container, but too small for this application.
In the novel plagues, sea level rise and the depletion of carbon fuel sources have altered the face of the planet. Biotech megacorps seek to hack together genetic information from what few crops remain in order build foods resistant to the new diseases and monopolize the calorie market. It’s a sort of agricultural cyberpunk. Like all good cyberpunk, it takes place in a familiar feeling future that may not be too far distant.
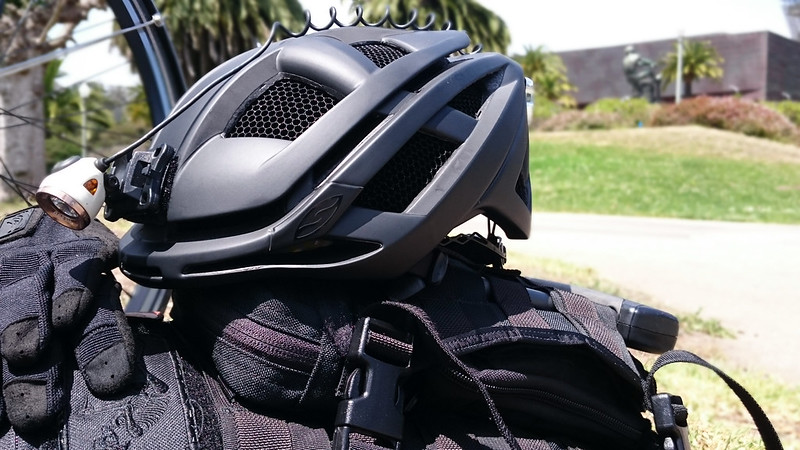
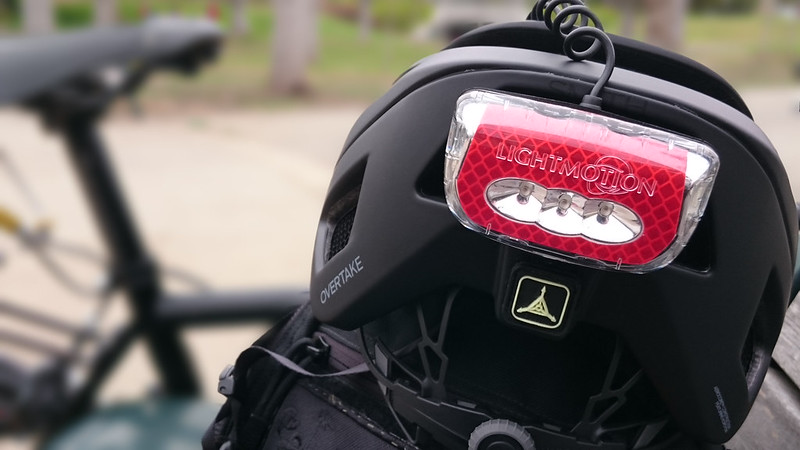
I recently purchased a Smith Overtake helmet. While most bicycle helmets on the market are made from styrofoam, the Overtake includes Koroyd, a new material that is supposed to revolutionize helmet safety. It also features MIPS, which reduces rotational forces on the brain by allowing the helmet to slide relative to the head during an angled impact.
So the Overtake offers exceptional protection, is comfortable and notable lighter than previous helmets, and it looks pretty good1. Unfortunately, it was not immediately compatible with my light system.
I’ve been using a Light & Motion Vis 360+ for a couple years. Its a great light, offering 360 degree visibility and a nice beam wherever I happen to be looking. And its always with me, so I don’t have to worry about removing it from my bike whenever I lock up.
The rear light easily zip-ties to the back of the Overtake. The front light, however, mounts by running a rubber strap through the vents present on normal bicycle helmets. The overtake lacks these pass-through vents due to the Koroyd. I didn’t want to glue the light to the helmet, so I thought I’d try Velcro. I picked up some industrial strength 2” wide tape and stuck the loop to the helmet and the hook to the back of the light. I wasn’t sure if it would hold, but so far it seems to have worked out great. It hasn’t fallen off and I have not noticed the light being wobbly while in use.
While I was it, I put a piece of loop on the back of the helmet and stuck a ranger eye on it.
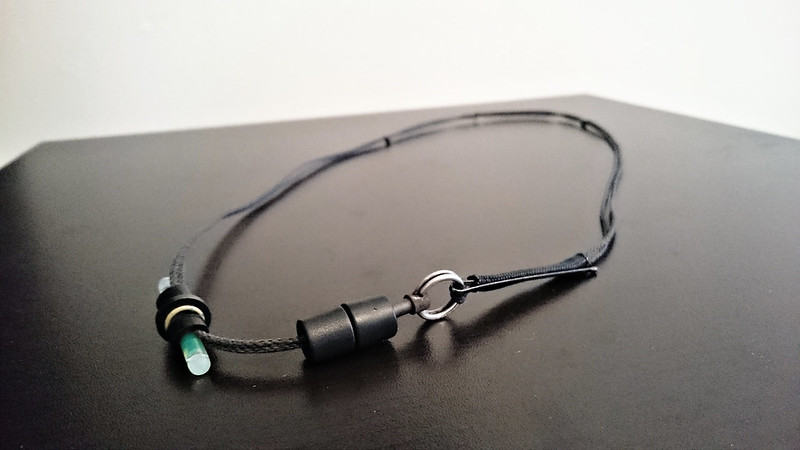
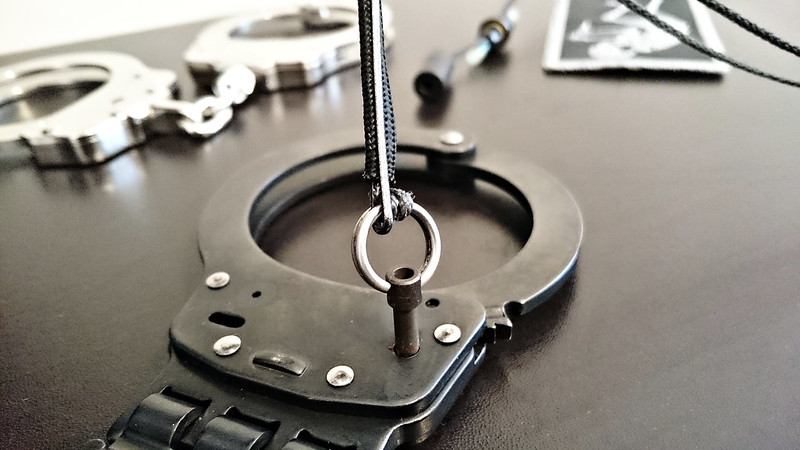
I purchased one of SnakeDr‘s Advanced Personal Escape Kits (APEK) from OscarDelta on a whim about a year ago. At the time I wasn’t sure if the APEK would be anything more than a novelty, but it quickly proved its utility and has been a part of my EDC ever since.
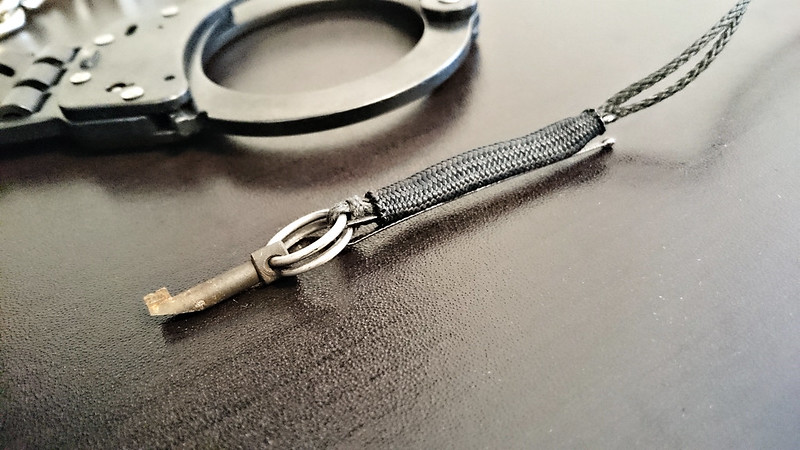
The APEK I purchased was version 2.1. It included a split paw shim, a micro disc striker and a handcuff key key, all on a length of Technora 410 with a breakaway connector.
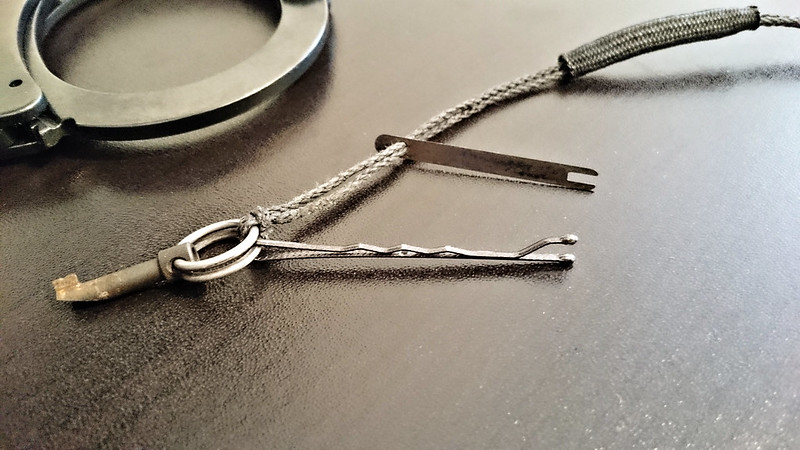
The handcuff key is metal and works on a wide variety of cuffs. I’ve successfully used it on models from Peerless, Chicago, Smith & Wesson, ASP, and no-name Chinese knockoffs. It is connected to a small split ring, which provides a handle to more conveniently manipulate the key. The key is stored in one end of the breakaway connector, which makes it the real breakaway point of the necklace.
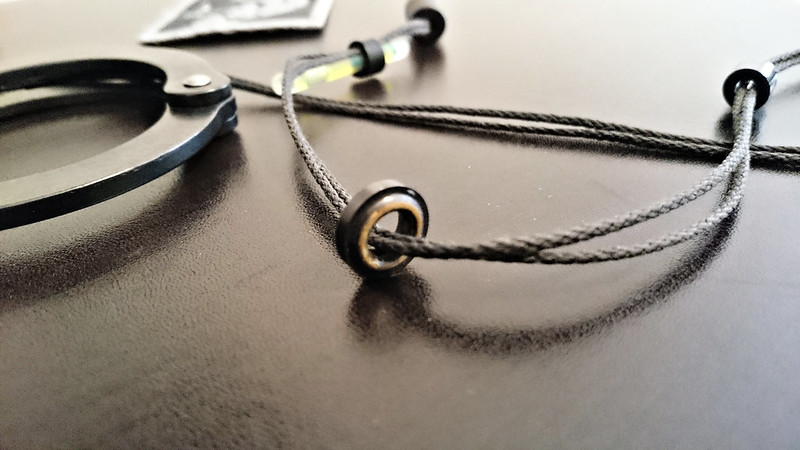
The split paw shim is your standard shim, and works everywhere you would expect a shim to work. It is stored underneath a piece of gutted paracord that the Technora has been threaded through.
The Technora itself has knots in it which make for pre-tied foot loops to be used when friction-sawing through restraints like zip-ties or flexicuffs. That simple trick is something I hadn’t thought of before, but I’ve come to greatly appreciate. The act of sawing through restraints tends to be very fast – particularly with a good, strong cord like Technora. What takes time is feeding the cord through the restraints, and then tying the loops for your feet. This does away with one of those time sinks.
The most unique component of the APEK is the micro disc striker. This is a ceramic disc made from zirconium dioxide. The hardness of the material means that it can be used to scrape a ferro rod, or to break tempered glass. This works on the same principle as broken spark plugs.
In later versions of the APEK, SnakeDr included a small glow stick. When I first saw this I thought it was a silly addition, but, at a Black Box course, Ed convinced me of the utility of a small light source. I now include a glow stick on my APEK. It is held on by 2 silicone retainers, which also keep the micro disc striker in place between them.
A photo of the most recent iteration of the APEK included a bobby pin. The way the bobby pin was shown stored on the APEK did not appeal to me, but I liked the addition. A bobby pin can be used to pick most handcuffs. More importantly, it can also be used to extend the reach of other tools. Hinged and rigid cuffs are a pain to escape from simply because they make it difficult to reach the keyhole. By putting the bobby pin through the split ring on the handcuff key, I gain another 2 inches of reach. This makes it easy to unlock rigid and hinged cuffs when handcuffed in front, both with the keyhole up (put the end of the bobby pin in your mouth) and with the keyhole down. It also works behind the back with the keyhole facing down, but with the keyhole facing up you’re still out of luck. Shimming or passing the cuffs to the front is the more likely strategy there. (Of course, this all assumes you’ve been cuffed with palms facing inward.)
I store the bobby pin attached to the split ring, with one leg through the same paracord sheath that holds the shim.
This all makes for a comfortable, compact escape package that can easily be carried everyday. It is carried in a way that is not terribly difficult to find – all of the escape tools included should have duplicates carried elsewhere on your body – but when it does get past an initial search, it is super convenient to use. The application of the APEK may be a bit of a niche, but we regularly do somewhat unconventional training at work, so that I actually find myself using the APEK with some regularity.
I’ve migrated to using a Yubikey Neo as a smart card and decided to replace the old key as part of the process. The new key can be found in the usual location or on your keyserver of choice.
Ostensibly about the the making of the atomic bomb, Rhodes‘ book is a detailed history of physics from the late nineteenth century to the bombing of Hiroshima and Nagasaki.
Kilcullen draws on his decades of experience in asymmetric warfare to develop his theory of fighting small wars in the midst of a big one and the failure of both classical counter-terrorism and counter-insurgency on the modern battlefield.
The local fighter is therefore often an accidental guerrilla – fighting us because we are in his space, not because he wishes to invade ours… he is engaged in “resistance” rather than “insurgency” and fights principally to be left alone.
…The dynamic interaction between the modern international system of nation-states (especially its self-appointed defender, the United States) and these two discrete but often interconnected and loosely cooperating classes of nonstate opponent – terrorist and guerrilla, postmodern and premodern, nihilist and traditionalist, deliberate and accidental – may be part of what gives todays’ “hybrid wars” much of their savagery and complexity.
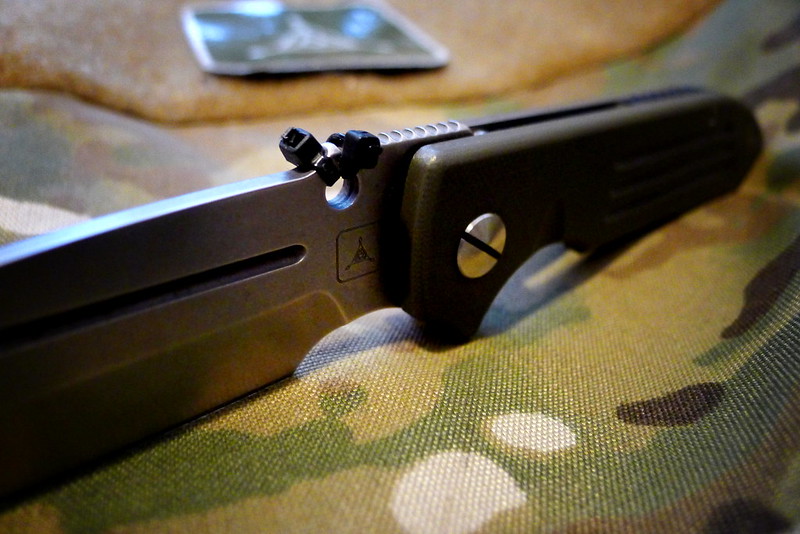
I replaced the thumbstuds on my Dauntless MK3 with two small zip ties. One zip tie acts as a thumbstud for conventional opening. The other catches on the pocket, functioning as a ghetto wave. I was skeptical of how well this would work, but surprisingly the zip tie seems to function just as well as the wave on my Emerson Mini Commander. I find that a folder with some sort of automatic opening is a more practical tool.
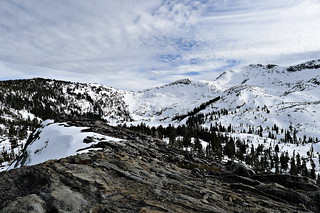
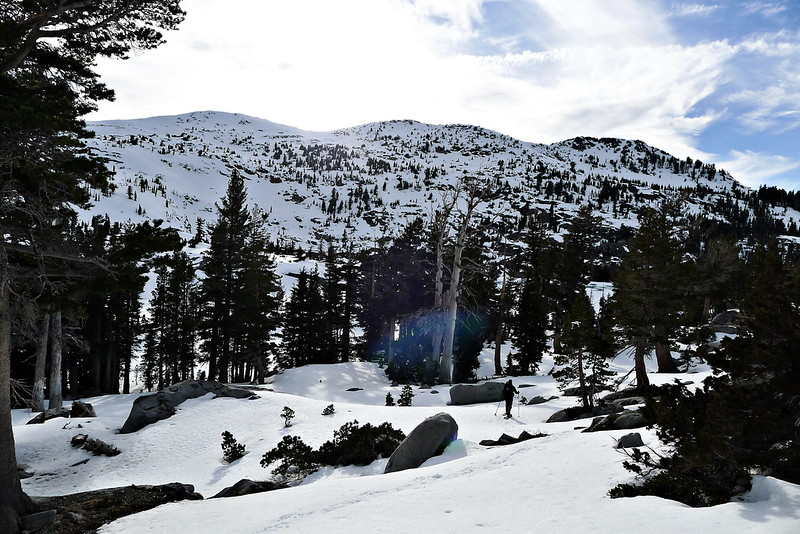
Last month, two of us from work went out looking for snow. There’s not much in the Sierras this year, but we found some at around 8,000 feet in the Desolation Wilderness. Enough to justify hauling our ‘shoes up there, and to provide a good testing ground for some newly purchased gear, as well as our own prototypes.
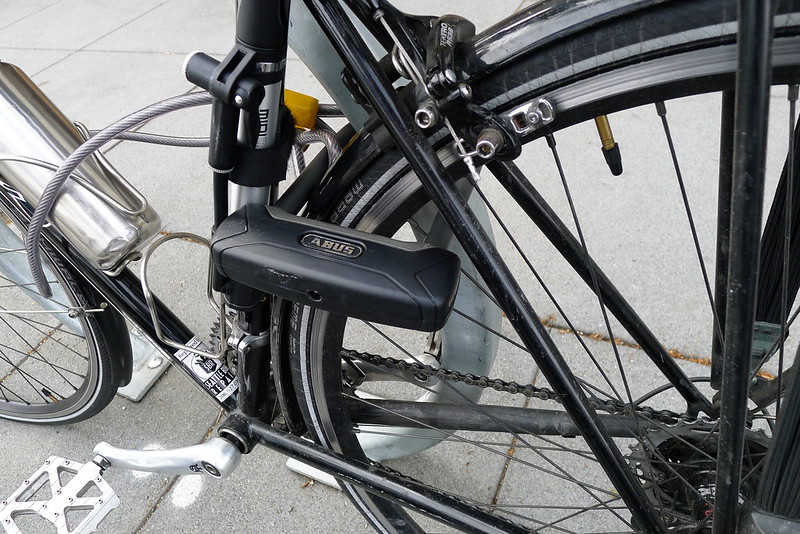
I’ve been carrying around an old OnGuard Bulldog Mini U-lock for at least five years. It has served well, but I recently replaced it with an ABUS GRANIT Plus 640. What appealed to me most about the 640 was the weight. Although my scale claims that the 6” ABUS at only 2 ounces lighter than the OnGuard (27 oz vs 29 oz), it feels significantly lighter. I can notice the difference between the two locks when attached to my pack, which is noteworthy for an item that I carry every day.
Other than weight it is hard to judge the relevant merits of the locks. Both are roughly the same dimensions, with about the same shackle diameter. OnGuard rates the Bulldog Mini at 63/100 on their security scale. ABUS puts the GRANIT Plus 640 at 12/15 on their scale. About the only other significant difference between the two that is immediately evident is that the 640 shackle double bolts two the body of the lock. (This, of course, is no help against someone with a hacksaw or blowtorch, which is probably a much more realistic threat than any attack related to the lock mechanism itself.)
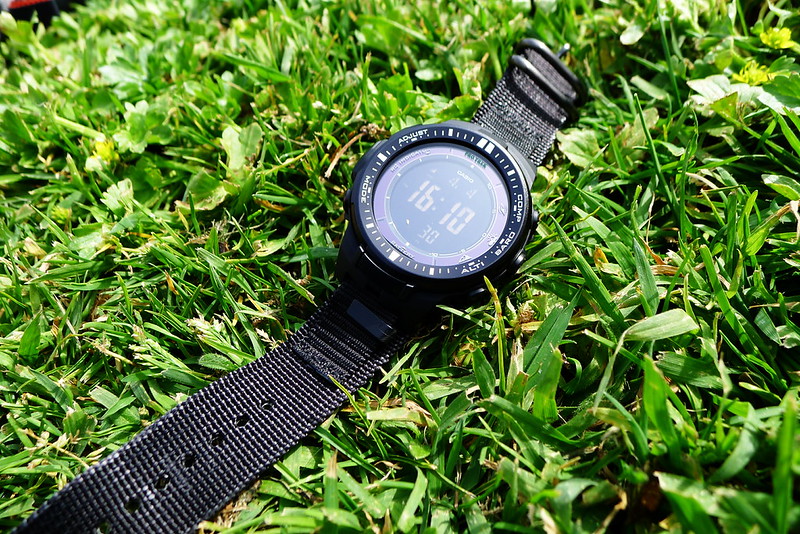
Last week I purchased a Casio PRW3000-1A. The watch is part of Casio’s Pro Trek line, which replaced the old Pathfinder series. The watch combines solar power and atomic timekeeping with the features of an ABC (altitude, barometer, compass) watch – and does it in a fairly compact package.
The Pro Treks come with a resin band, like the G-Shock series. I prefer nylon bands for both style and function. Fortunately the band attaches to the watch via a hollow tube and two screws, making it easy to replace. Unlike the G-Shock watches, it does not require an adapter. Unfortunately, the lug width on the PRW3000 is only 16mm. I bought a 16mm Marathon band to try out and, while functionally it satisfies, I don’t think that such a skinny band compliments the look of the watch.
The solution was simple: cut off a piece of the 16mm Marathon band and sew it onto the 24mm Maratac Zulu band that I ran on my G-Shock. It was a quick hack, and gives me the best of both worlds: a good watch and a good band.
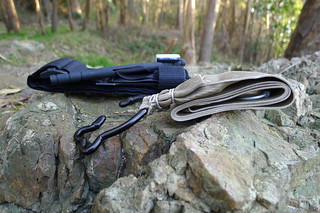
The tourniquet market is dominated by the SOFTT-W and CAT tourniquets, and for good reason. I prefer the SOFTT-W. There is always one in my bag. Some people can make the SOFTT-W or CAT work for everyday on-body carry, whether through ankle holsters or always wearing cargo pants. Neither tourniquet, however, is something that I can fit into my on-body EDC. To solve that problem, I have to look at what Jonathan Willis refers to as secondary tourniquets.
The SWAT-T is likely the most popular offering in the secondary tourniquet market. It tries to function as both a tourniquet and an emergency bandage, and ends up being mediocre in both roles. In its role as a tourniquet its largest failure is its difficultly to apply one-handed. If I can’t self-apply a tourniquet with one hand during training, the tourniquet is pretty much useless to me. I’ve heard some people claim the ability to apply the SWAT-T with a single hand (with the assistance of a wall to hold it in place), but I’ve never figured it out.
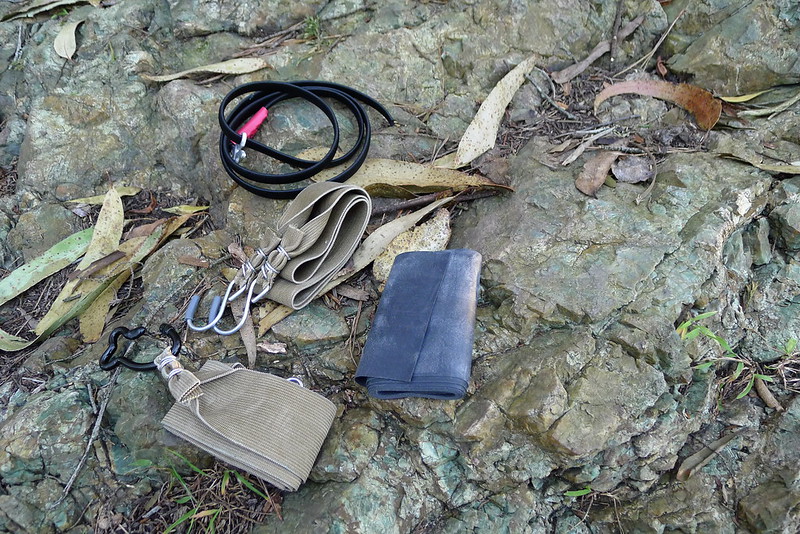
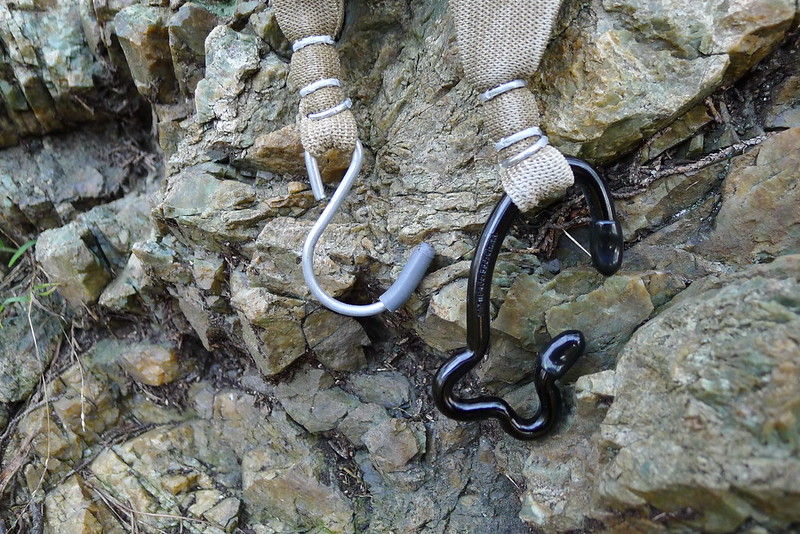
At first glance, the TK4 appears like it could be a promising solution. It is an elastic strap, roughly 36” long by 2” wide, with 2” metal hooks on either end. It folds to a compact size and easily fits in a pocket. Unfortunately the hooks are only 1” wide, which doesn’t work so well with the 2” wide strap. In my trials the strap would often pop out of the hook when attempting to start the wraps. I find it much more effective if used as an improvised tourniquet, with two overhand knots and a pen as a windlass, which is a terrible thing to say about any product that bills itself as a tourniquet.
The TK4-L is identical to the TK4, except one of the hooks is replaced by something akin to a gateless carabiner. This carabiner is shaped such that the elastic strap will actually fit inside of it and not pop out. The result is a product that is compact, not too difficult to apply, and effective.
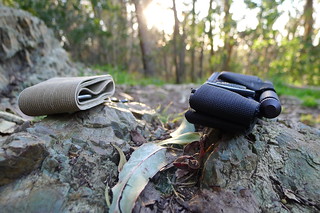
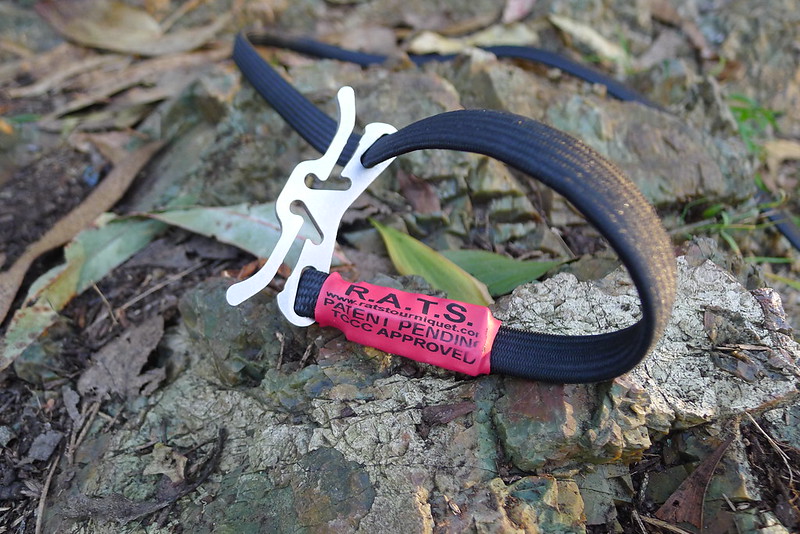
The RATS is made from a heavy duty, bungee-type strap and a unique buckle which locks the strap in place. The strap is around 45” in length but only 0.5” wide. With any tourniquet, you want a wide strap to avoid causing tissue and nerve damage. The idea with the RATS is that you get the desired width by performing parallel wraps, distributing the pressure over an area closer to 2” in width. This requires some care to be taken when applying the tourniquet, and it makes it less useful on larger limbs. On my leg I only get 3 wraps with the RATS.
Of these 4 secondary tourniquets that I’ve experimented with, the RATS is the most durable and, with the exception of the issue of parallel wrapping, the easiest to self-apply. However, the TK4-L folds up better for pocket carry, and its 2” wide strap inspires more confidence. I feel better carrying it and have been doing so for the past month and a half. It sits in my left rear pocket, with the carabiner hooked over the top of the pocket so that it can be easily grabbed without any fishing around.
Choosing a secondary tourniquet is an exercise in trade-offs. Without a windlass, pressure is achieved through tight wraps only. They certainly cannot replace a primary tourniquet, but may supplement it in areas where size or weight present limiting constraints. Given the choice between carrying no tourniquet on my body or carrying one that works but is less than ideal, I’ll choose the latter. Coupled with an H&H Mini Compression Bandage and a package of z-folded QuickClot Combat Gauze, you can build a compact blow-out kit that is easy to distribute across your body.


