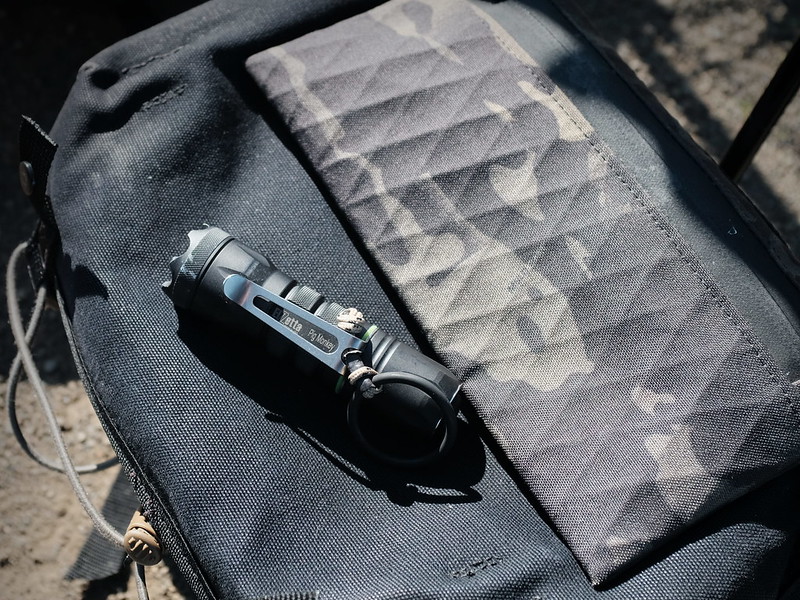
As I have previously mentioned, I started out using a Prometheus Lights Titanium Pocket Clip on the Elzetta Alpha before switching to the now-discontinued Raven Pocket Clip in 2016. The O-ring provided by the Raven Pocket Clip is key to how I use the light. It allows me to release the light and use my hand for something else, without dropping the light. The clip itself is perfectly adequate, though not as tight and springy as the titanium clip.
Last summer, I decided to move back to the titanium clip, but to add my own O-ring. I basically knocked off what Retention Ring sells, just using spare bits I already had around. It consists of a little bit of Lawson Ironwire, an O-ring with 1” internal diameter, a tiny piece of heat shrink tubing, and a knot. It isn’t pretty, but it has been working great as part of my EDC for the past 8 months.
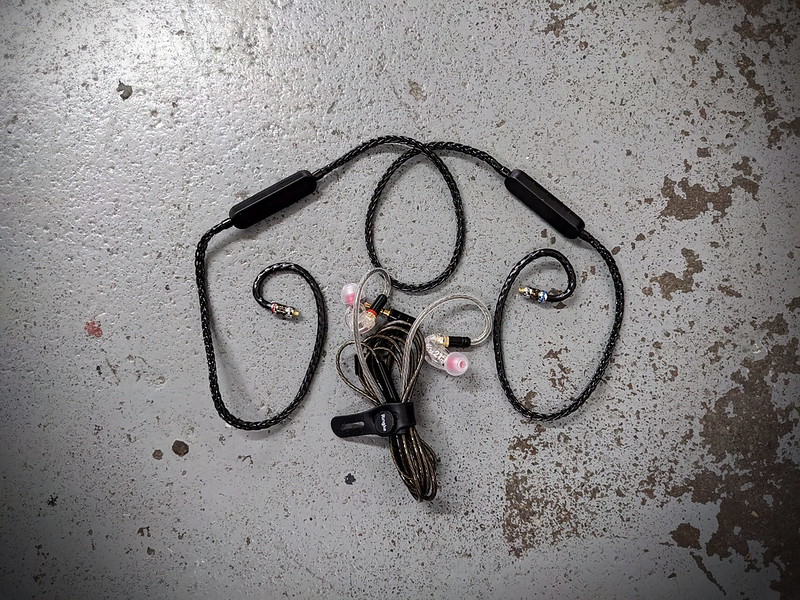
I do not regularly listen to audio of any sort outside of home or the office. But I value the ability to do so, so I always carry earbuds in my bag. As with headphones, the cable is the usual failure point. The solution, once again, is modularity.
Specifically, I recommend skipping the entire consumer earbud category and going straight to “professional” in-ear monitors.
I carry Shure SE215 IEMs. These are near the bottom-end of the IEM market. I’ve heard people claim that paying hundreds, or thousands, of dollars for custom-molded IEMs is worth it. I’ve heard other people claim that the Chi-Fi market now offers IEMs that are cheaper than the SE215s and yet provide better audio quality. To my non-discerning ears, the SE215s sound great, and they satisfy my listening and comfort requirements. But more important than the specific make or model is that most products in this market segment will offer replaceable cables. The SE215s use an MMCX connector.
For portable use, I want a cable with an inline mic (and 3-button remote) so that I have the option of using it to go hands free with my pocket telephone. Shure sells IEMs with such a cable. This cable failed for me after a couple years. Fortunately, the Chinese Communist Party has realized Marx’s dream of a practically infinite supply of generic MMCX cables with inline mics for dirt cheap. I’m now using a cable I bought off AliExpress for about $10, and if I have to spend another $10 in another couple years I shan’t shed a tear. (If this was for more than occasional and incidental use, I would likely purchase something like the Antlion Kumura Cable or Kinera Gramr, but I’m not going to carry that sort of thing around in my bag just in case.)
I prefer silicone eartips when out and about in the world. They are long lasting and easy to clean. They don’t provide as much isolation as foam tips, but I consider that a feature rather than a bug; I don’t want to be cut off from the surrounding environment. (In special circumstances where I do actually want to block or diminish environmental sound, I use actual ear protection). My favorite tips are the Spinfit CP100+. The medium size feels good upon initial insertion, but I find the small size is more comfortable after a couple hours of continuous penetration.
As a general rule, I subscribe to the Kamala Harris School of Audio Peripherals, as documented in my favorite example of modern hard-hitting investigative journalism. Wireless is a trap. But I admit that there are times when a wireless connection is convenient and worth the additional hassle, however few and far between those times may be. With a modular system, this can easily be addressed by the addition of an adapter.
Originally I thought I might purchase something like the FiiO UTWS5 or Shure RMCE-TW2. But both of these utilize telephone software, which I’m allergic to, and I realized I didn’t actually understand what the sales pitch was for this new-fangled category of “true wireless” earbuds.
Instead, I ended up going back to AliExpress and purchasing a much cheaper necklace style adapter. This isn’t something I carry everyday, but it’s nice to have the option to grab it when plans warrant.
Bluetooth is the one component of the modern audio stack where the technology is still improving – or, at least, getting less bad – so using an interchangeable module here makes sense. The adapter I purchased is built on the Qualcomm QCC5181 chip, providing Bluetooth 5.4, which appears to still be the latest and greatest thing. Portable Bluetooth devices have a limited service life due to their integrated batteries, so again, modularity makes sense here. When these batteries fail, or when I determine it is worth updating to the latest chip, I just buy a new adapter rather than purchasing a whole new system. (It’d be great if we could buy adapters with replaceable batteries, but that seems to be a dream too far.)
If someday in the future I decide it is worth it to buy custom molded IEMs, I’ll just order them with an MMCX connector and they’ll be able to play nicely with my existing ecosystem of cables and adapters. This is the antithesis of the market trend and may result in the revocation of one’s listener license.
At my desk, I use open-back, circumaural, wired headphones. This technology peaked decades ago. Despite what marketers may claim, there is no reason to keep up with the flavor of the month. At home, I use the Sennheiser HD 600. At work, I use the Massdrop Sennheiser HD 6XX. These two models have some aesthetic differences, but in my experience they are identical in use. I can’t tell a difference between them when they are on my head, either in feel or in sound.
The key with both of these headphones is that they are modular. Every pair of headphones I’ve ever had fail has failed either at the cable or due to the disintegration of the padding. Both are replaceable on the Sennheiser cans. The cables and ear pads on the 600 and 6XX are interchangeable, so I only have to stock one set of spare parts. (The headband pads are different, but I wear the headphones with this pad just lightly resting on the top of my head, so those pads last indefinitely.)
I had to replace the cable on both headphones after five years of use. In both instances, I went with a generic 3-meter Chi-Fi cable from NewFantasia. It is cheaper than the official Sennheiser replacement cable, and it works great. The braided sleeve may provide some extra durability.
I replaced the ear pads in one pair after four years, and in the other pair after six years. Since ear pads can actually effect the sound, unlike the cable, I went with the official Sennheiser replacement pads.
Both my Sennheiser cans have Antlion ModMic microphones attached (one has the Uni, the other has an older discontinued model). This allows for audio calls without needing to switch to some sort of inferior, integrated solution. Boom mic or bust. Importantly, the ModMic has an integrated mute switch. This allows the microphone to be kept muted, and only made hot when actively speaking. (When not on a call, I unplug the ModMic cable.) Because it is a simple two position switch, it provides haptic feedback and thus can be toggled blindly. With this system, you don’t look like a noob trying to find the software mute button in whatever video chat software the kids are using this week, nor will you start talking without realizing that you’re still on mute. Just touch the switch with your finger and you’ll know what position it is in.
The ModMic cable and headphone cable are wrapped together in a length of Techflex Flexo F6N0.25 braided cable sleeve. This keeps the cables together, and also provides some extra protection when they inevitably get stepped on or rolled over by a chair.
Both cables are plugged into a Schiit Fulla DAC. This is the only piece of audio equipment I have that is approaching the “audiophile” market (but is incredibly cheap by the standards of that market). More important than the purported improvement in audio quality that this provides is the volume control knob. I’m a sucker for sexy knobs.
I recently got the newer USB-C model of the Fulla at home, and moved my older Fulla from home to work. Previously I used the UGREEN USB Audio Adapter at work. This was adequate for solving the problem of needing to plug dual TRS connectors into my laptop, but it did not provide the hot knob fondling action I desire.
I also keep Kingtop Headphone Mic Splitter cables in a desk drawer at home and work, so that I may use this rig with my cellular telephone. I use this rarely, as most voice communications these days are VoIP based, and thus performed on my laptop, rather than PSTN.
When not in use, the headphones are stored under my desk on the Elevation Lab Anchor.
The theme with my entire desktop audio setup is modularity. The headphones allow for pads and cables to be replaced. The mic is a separate unit. The DAC is a standalone device. All these components can be easily swapped if one fails. All of them are based on long established technologies that have already reached a practical level of perfection, providing me with a level of immunity to advertising in these spaces.
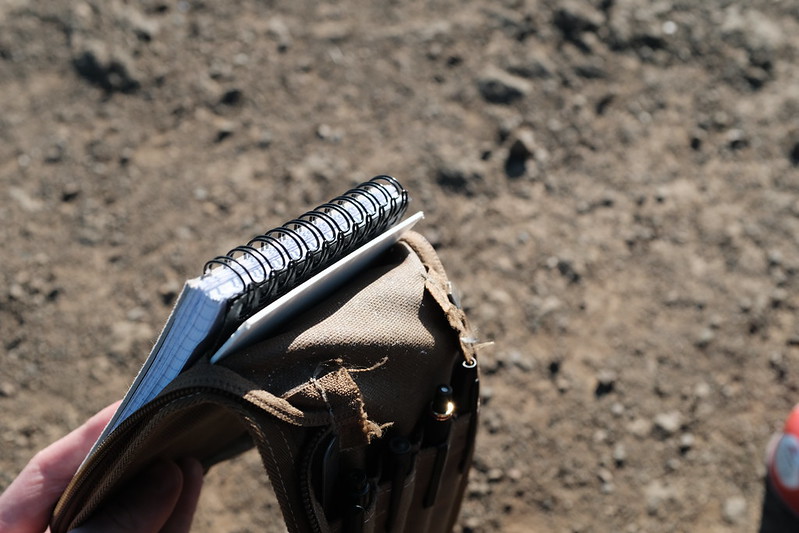
I previously mentioned that I install Rhodia pads in my Field Message Pad backwards, such that the thick cardboard backing is on top. This way when I open the pad, the cardboard provides a surface for writing on the back of the pages, where otherwise I would be writing on top of the FMP cover’s tool slots and the stuff carried within them. This means the other side of the pad has a less firm backing. On a fresh pad this is not an issue, but can become one as pages are consumed and the thickness of the stack of remaining pages is reduced.
My latest innovation in Field Message Pad technology is the addition of a cutting board.
I keep a number of thin HDPE cutting boards on hand at home. I don’t use these in the kitchen, where I care about my knives, but as project mats. If I’m gluing something, or cutting material with a utility knife, I’ll throw one of these mats down to protect the work surface.
I traced a 4x6” square out on one of these, cut it out with a utility knife, and gave the 4 corners a few passes with a file. The resulting piece slides down the back slot of the FMP cover, behind the notebook. With this underneath, and the Rhodia’s cardboard backing on top, I have a firm writing surface from the first page of the notebook to the last, on both sides of the page.
Being able to take notes on a stable surface while standing up, with the FMP in one hand and a pen in the other, feels like a super power.
Also, I always have an A6-sized cutting board with me now. Perhaps for impromptu charcuterie.
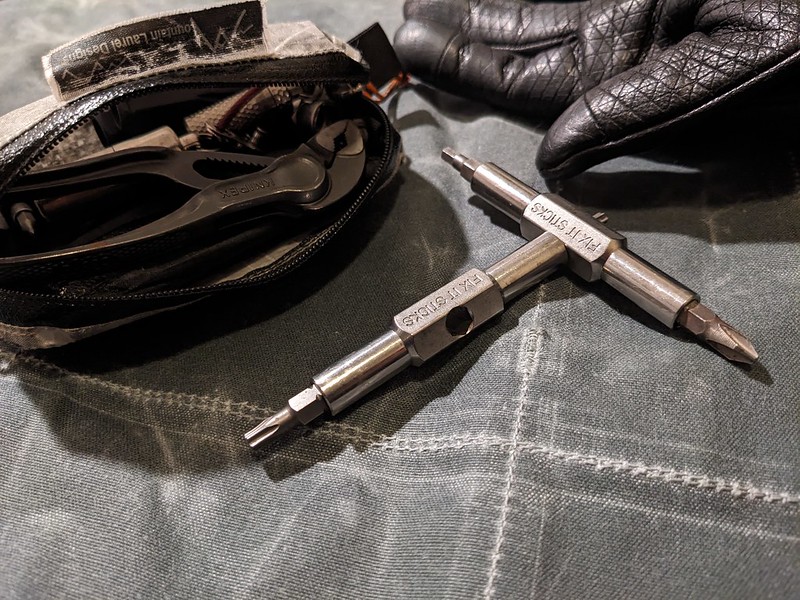
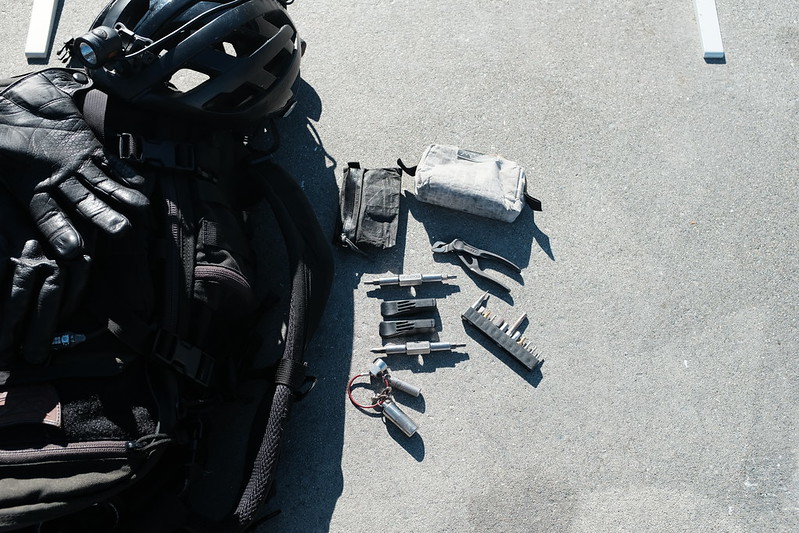
Since I outlined it in 2018, my EDC tool kit has not changed much. It is still based around the same titanium Fix It Sticks, and intended primarily as a vehicular repair kit.
It is still carried in the same cuben fiber packing cube from Mountain Laurel Designs (since discontinued and replaced by the otherwise equivalent Ultra X 100 Packing Cubes), though said cube is much worse for wear. Some of the smaller bits have poked a couple holes in the bottom of the pouch. I’ve patched this with Tenacious Tape on both the inside and the outside.
The bit selection has been augmented slightly. Installed in the Fix It Sticks are my most frequently used 1/4” drive bits.
Torx T20s
Torx T25s
Phillips #2
Hex 4mm
In the bit holder, I carry additional 1/4” drive bits.
Hex 1.5mm
Hex 2mm
Hex 2.5mm
Hex 3mm
Hex 5mm
Hex 5mm x 50mm
Hex 6mm
Hex 8mm
Torx T8s
Phillips #0
Slotted 0.6mm x 4.5mm
4mm MicroBit Adapter, holding a slotted 0.25mm x 1.5mm
Keen eyed readers will notice two 5mm hex bits. The longer, 50mm bit is needed to reach into my Gevenalle CX Shifters to adjust the mounting bolt. This longer bit can also be used to provide a turning tool to be used with my Pitlock key. (In 2018 I discussed using the longer Torx T25 bit for this. I now carry a standard length T25s, since I need the longer 5mm hex for the shifters.) My rear Phil Wood Touring Hub takes two 5mm wrenches to remove the end caps. Doing this allows the cassette to be removed from the wheel, providing easy access to repair a broken drive-side spoke without messing around with cassette removal tools.
Mini Knipex Cobra Pliers are only used infrequently, but are so useful when I do need them that I put up with their extra weight in the kit.
The Fix It Sticks tire levels and chain breaker still live in the kit, though I have been debating removing the chain breaker. It is compact but heavy, and it has been about 15 years since I last had an incident that required a chain breaker on the road. It would definitely be in the kit for any multi-day trips.
A small cuben fiber zip pouch holds my patch kit and one FiberFix, including that little spoke wrench that comes with the FiberFix (annoying to use, yes, but agreeably small and light).
I get my zafus from Carolina Morning Designs. Originally I bought one of their crescent models. This is what I took on the 10-day meditation retreat I went on in 2006. Some years after that I bought one of their standard models, and gave away the crescent zafu. I regret this slightly. Between the two, I think the standard round shape is the one to have. But I have been thinking about buying a crescent model again so that I can have one of each.
As with head pillows, buckwheat hulls are my preferred filling for a zafu.
There are a few ways to sit on a zafu, but all of them involve floor contact with the knees, lower legs, and feet. On some floors this can be less than comfortable. The solution here is a zabuton, which is a larger rectangular pillow that goes underneath the zafu. I have a 25” x 31” zabuton from Carolina Morning Designs and a 23” x 25” linen zabuton from Etsy.
The Carolina Morning Designs zabuton is filled with kapok fibre. This is a soft and fluffy material, sort of like a blend between cotton and down. The linen zabuton is filled with buckwheat hulls. While I like buckwheat hulls for structural pillows, the zabuton is used purely for padding. Buckwheat has less of an advantage here. I like both, but I use my kapok zabuton more often.
For all my Carolina Morning Designs pillows, I purchase their removablecovers. Cleaning furniture is much easier when you don’t have to go through the hassle of dumping the stuffing. I do not have a removable cover for the linen zabuton, and filling all its individual baffles with buckwheat hulls was an annoying process that I do not want to go through again, so it only gets spot-cleaned.
Sitting on a zafu utilizes core and back muscles. For times when you want to be especially lazy, a chair with a back is preferred. The best option I have found is the HIHIP Floor Chair. This is extremely comfortable. Unlike many floor chairs, it folds, and thus stores (somewhat) compactly. This is actually the only chair I use at home. All other sitting tools or either pillows or stools.
After trying a number of floor tables over the years, I’ve whittled my collection down to two. The Nnewvante Floor Table and the Cooper Desk Pro.
The Cooper Desk Pro is what I use most often. It provides a 23.5” x 17.7” surface, covered with a faux leather that feels pleasant and is easy to wipe clean. It is height adjustable, from 10” to 15”. When deployed, the legs angle out slightly, which allows my own legs to fit under the desk if I am sitting in the chair with my legs straight out. The table also tilts at a few preset angles, but I almost never use this feature.
The Nnewvante Floor Table is only slightly larger at 29.5” x 17.7”, but in use it feels much larger than the Cooper Desk. I rarely need the extra surface area, so I don’t pull this table out as often. It also is height adjustable, from 10” to 15”. Where the Cooper Desk has five preset height positions, this one allows you to stop the legs anywhere within the adjustable range. That sounds nice, but in practice means that you sometimes have to do a little back-and-forth to get both legs at the same height. Because of this I just leave the adjustment at whatever height I have found most useful and then never touch it again.
The Nnewvante Floor Table has their brand name engraved in the surface. I find this to be distasteful. Noticeable advertising does not belong on furniture. The Cooper Desk Pro does have their logo on the surface, but it is subtle enough that I rarely notice it.
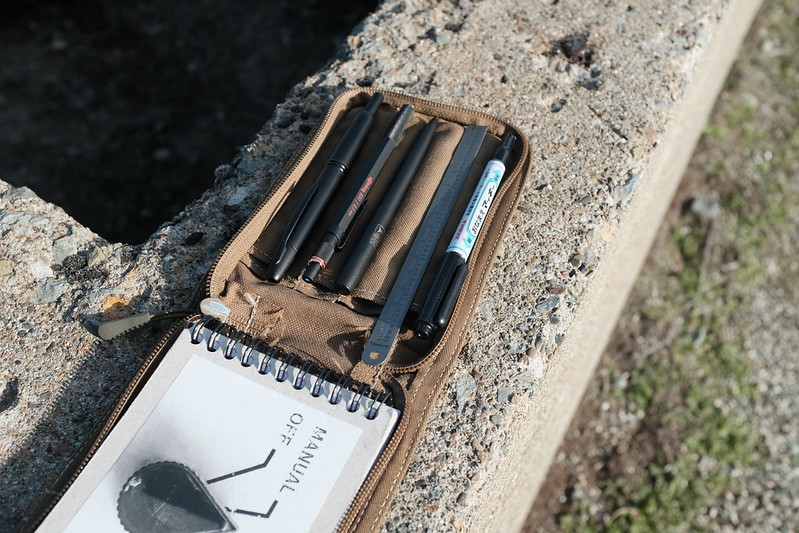
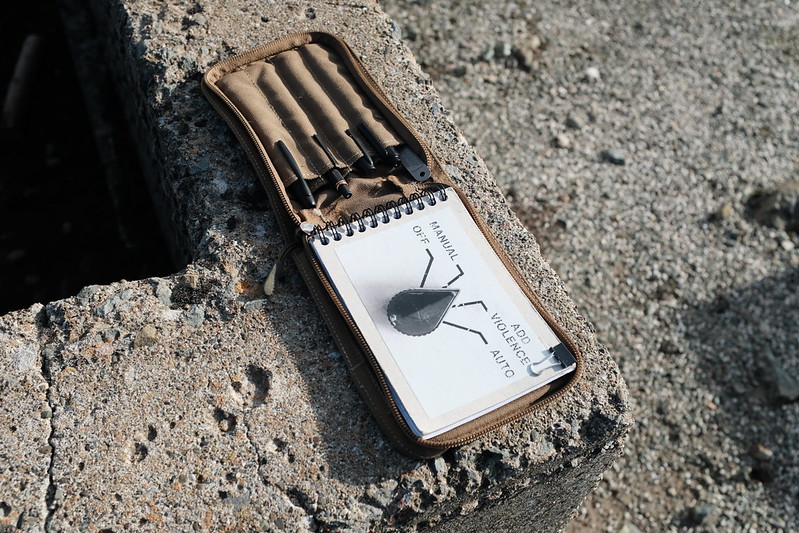
Pilot Vanishing Point, Fine Nib with a Pilot CON-40 piston converter loaded with Noodler’s Blue-Black. This is my new favorite human input device, but I got mine on eBay for a little less than half list price. I’ve been trying the blue-black ink for a few weeks now, but will probably go back to Noodler’s Black.
rOtring 800 loaded with Pentel Ain Stein 0.5 mm HB lead. This is another thing I only own because I found one for less than half the list price. I carried a rOtring 600 in the FMP for years, but I always get stressed about the thin metal tip. The 800 could conceivably be temporarily moved to a pocket if the situation warrants, unlike the pokey 600. And the twist mechanism is fun to play with. Both rOtring pencils are pieces of industrial art, in the same category as Curta calculators, but realistically they are no more functional than the much cheaper Staedtler 925. Quality lead made me reevaluate my previous dislike of mechanical pencils.
Zebra Onamae Mackee. I used to carry a Sharpie. Then I decided to check if the Japanese had invented a better Sharpie. It turns out the answer is yes, they have.
CountyComm Titanium 15CM Ruler. For many years I carried the General Tools 300/1, but mine became bowed. This is a titanium knock-off of the same. The matte finish makes it harder to read, but I use this more as a straight edge than a measuring device. The bowed-ness of the General Tools stainless version is annoying in that application. The titanium version has been in my kit for 3 years and so far it is still straight and flat.
A 14mm binder clip secures used pages, allowing the pad to quickly be flipped to a blank (or currently in progress) page.
I still primarily use the Rhodia A6 pads. I install them backwards, so that the cardboard backing is on top. This provides a writing surface to more easily utilize the back of the pages. Otherwise I’m writing on top of the FMP’s tool slots, which is annoying. (The thing the Canadians got right is to put heavy cardboard on both sides.)
When expecting inclement conditions, I drop the fountain pen and the Rhodia, and install a Rite in the Rain *46. But given my druthers, it’s all fountain pen all the time.
The Field Message Pad remains my primary writing setup. One of its strengths is the ability to switch between pads from Rite in the Rain and Rhodia.
The Field Memo Pad is a useful substitute for quick and short notes. I have multiple, which I keep stashed in different places and bags. But its weakness is that it is dependent upon the Rite in the Rain pad. When not outdoors, I like having the option of switching to normal (fountain pen friendly) paper.
I recently discovered the Maruman Mnemosyne N192A Twin Ring Memo Pad. They label this as B7, which ISO 216 defines as 3.5 x 4.9 inches. But in fact the N129A does not meet the standard. It is instead 3 x 5 inches. This is identical to the Rite in the Rain 135, making it a perfect substitute in this kit.
The paper in the N129A is lined, rather than graphed. This is unfortunate, but for my application I’m willing to overlook this imperfection.
In one of my kits I dropped a magnet down the back pocket. This pad now lives on my refrigerator, perfect for grocery lists and other kitchen related notes.