You are currently viewing all posts tagged with bushcraft.

Trail Designs Ti-Tri Titanium Stove System

I’ve had a few requests to do a review of the new stove system I’ve been using for the past couple weeks. I don’t feel like I have enough experience with it yet to do a proper review, but I snapped some photos today to let people know what it’s all about.

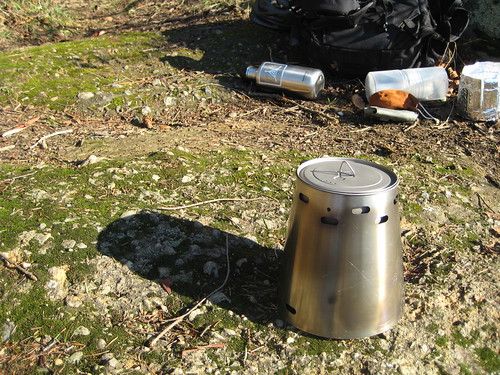
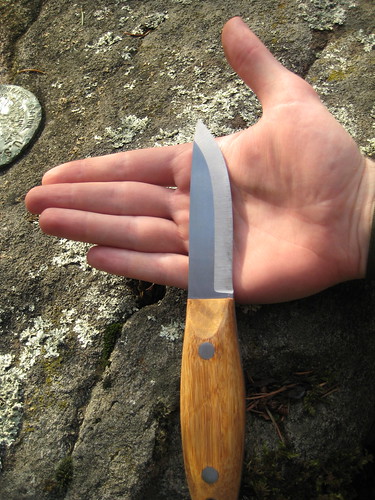
The system is a Trail Designs Caldera Ti-Tri Titanium Stove System. It takes the older (and very popular) Caldera Cone and combines some of the know-how of the folks at Titanium Goat to create a light-weight system that burns alcohol, Esbit tabs, and wood. And, of course, it’s made of titanium.

Ti-Tri Burning Alcohol

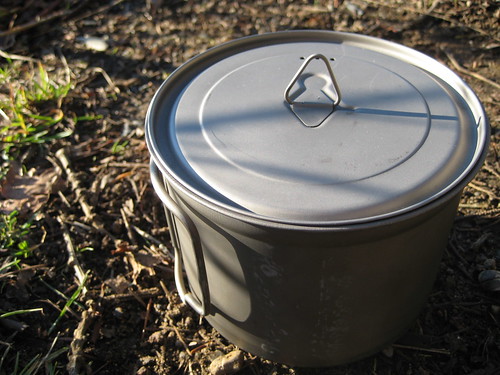
If you already have a pot you’d like to use, you can contact Trail Designs and have them build a cone for you. Elsewise, the Ti-Tri is available with a pot from Titanium Goat. I’ve previously mentioned my love affair with my Snow Peak Trek 700 mug/cup/pot/thing, but I had been thinking of acquiring a larger, 900ml pot for somewhat more extravagant cooking. Because of this, I decided to get the 900ml Ti-Tri from Titanium Goat, rather than have a Ti-Tri built for my Snow Peak mug.

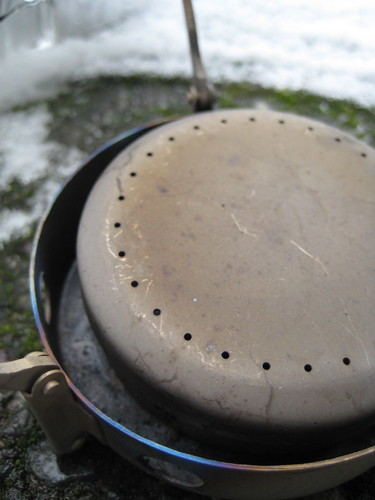
Titanium Goat’s 900ml pot is a basic affair: handles on the body, a decent lid with a thingy on top that allows it to be easily lifted, as well as three holes for venting or draining water. Titanium Goat claims that the pot and mug weigh in at 4.4oz, which seems correct to me.

Titanium Goat 900ml Pot

The Ti-Tri system itself comes inside of the same caddy system as does the normal Caldera. It’s basically two pieces of plastic that screw together. The diameter of the caddy is the same as a 32oz Nalgene, so it will nest in the same cups (such as the aforementioned Snow Peak 700). This is a somewhat bulky way of carrying the system, I find, but the caddy is constructed out of food grade plastic, so both pieces can double as a bowl or mug. It also does a great job of protecting all the components. So far, I’ve been packing everything in the caddy. I haven’t decided if I’ll keep doing it that way or not.

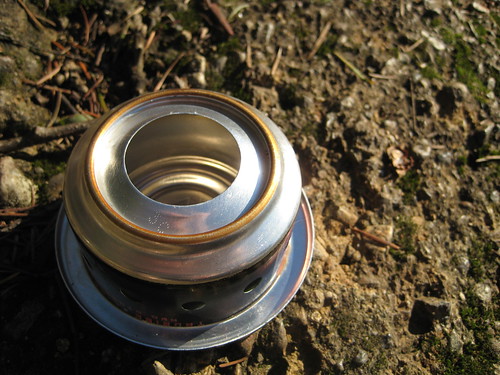
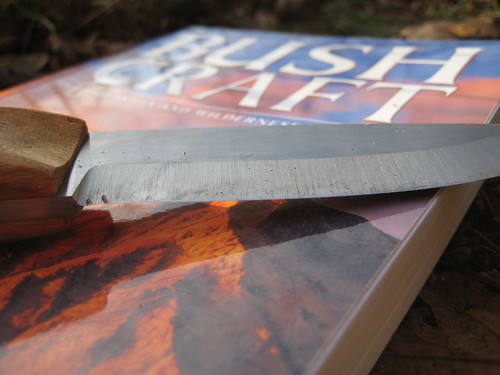
The alcohol stove that comes with the Ti-Tri is a Trail Designs 12-10 which, they claim, has been designed to “perform optimally with the restricted air flow and higher heat retained by the cone during operation.” My expertise in the design of alcohol stoves are lacking and, as I said before, I don’t feel I yet have enough experience with this system to draw a comparison between it and my Vargo Triad XE (which I also haven’t had for all that long), but the 12-10 has seemed extremely efficient so far (and much easier to light).

Trail Designs 12-10 Stove

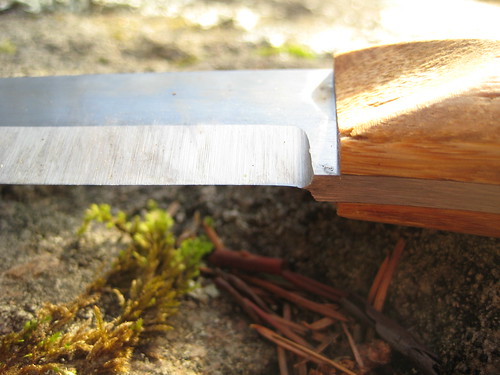
The Ti-Tri cone itself is made from a piece of very thin titanium foil. On either side of the cone is a rib – the smaller slides into the larger, and there’s your cone. It’s very easy to assemble. The cone has air vents on the top and the bottom. When assembled, the cone goes over the stove, and the pot nests into the top.

Ti-Tri Cone, Stove, and Pot

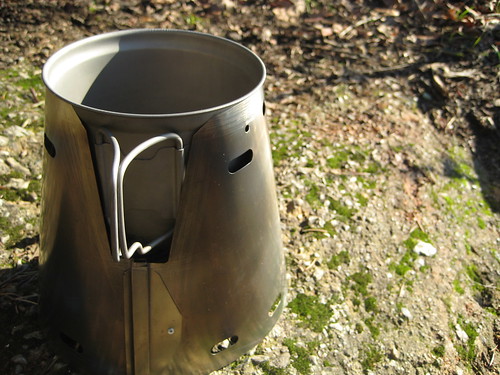
The pot’s lip holds it up. Even with the thinness of the cone’s material, it is a surprisingly sturdy setup. You do have to be somewhat watchful when sliding the pot into the cone, as the pot handle’s mountings will sometimes get caught on the edge of the cone’s opening. I say sometimes, but this actually happens to me the majority of the time. It’s greatly annoying.

Ti-Tri Cone and Pot: Stuck

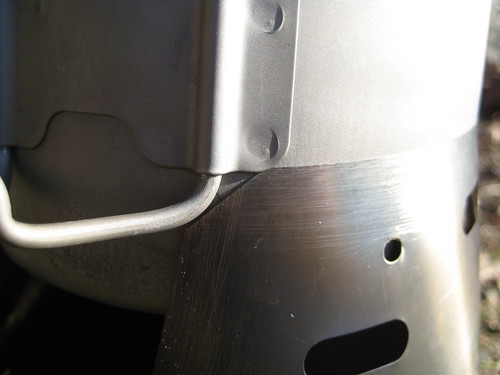
If you’re sure to center the handles over the opening in the side of the cone, the handle mountings will not get caught.

The base is an optional addition to the Ti-Tri system to be used for wood burning. It’s simply another piece of titanium foil, slightly larger in diameter than the cone. When burning wood, you set the cone on the base, put the included titanium stakes through the holes in one end of the cone and out the other. These then support the pot higher up, allowing you to shove your fuel in the cone’s side opening.

Ti-Tri: Assembled for Wood Burning

The Ti-Tri’s third fuel option are esbit tabs, which uses Trail Design’s GramCracker. The GramCracker consists of three pieces of titanium: two sides and a stand. The sides pieces are slid into either side of the stand, which then holds the esbit tab.

Trail Designs GramCracker and Esbit

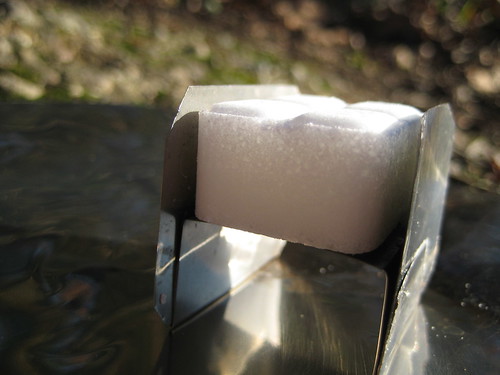
This setup directs the heat for a much more efficient burn than that offered by a standard esbit stove. (The GramCracker also comes with a small piece of foil to be used as a base, but since I already carry the larger base for wood burning, I leave this smaller piece at home.) With the GramCracker assembled, the cone is placed on top, and the pot is nested just as with the alcohol stove.

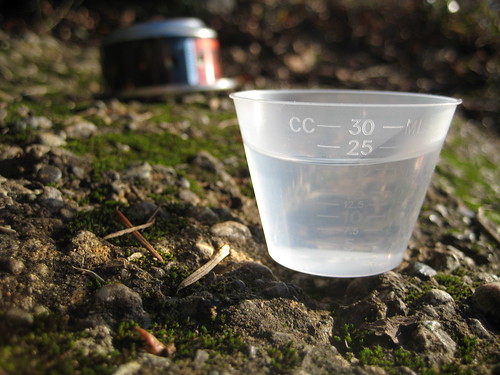
The Ti-Tri also comes with an 8 oz fuel bottle and measuring cup. The measuring cup holds 1 oz and has measurements marked in various units on all sides. The fuel bottle itself is the best I’ve found for alcohol. It has a tight screw lid that prevents any leaking (unlike those little Nalgene dispenser bottles), but also provides a plug with a small hole that allows one to fill the measuring cup (or the stove directly) much easier than it is to pour without such a plug.

Today, I was planning on using the Ti-Tri as an alcohol stove. Trail Designs claims that the Ti-Tri can bring 2 cups of water to a boil with 15ml of alcohol. I’ve found that 15ml brings 2 cups to more of a simmer. For a boil, you’d want 25ml. I didn’t measure exactly how much water I poured into the pot, so I decided to use a bit over 20ml of fuel.

Measuring Cup and Alcohol

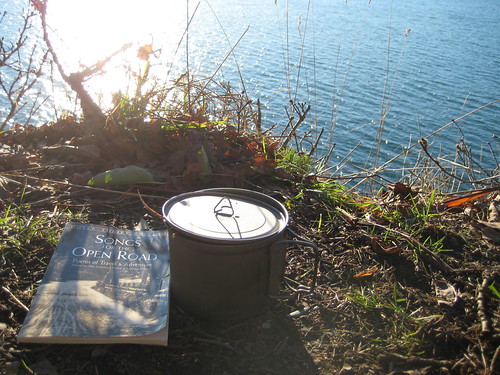
Tea, today, would be Doug Fir and Cedar. After pouring the the fuel from the measuring cup into the stove, I lit the 12-10 with a match, tossed on the cone, settled in the pot (after getting the handle mountings caught on the edge of the cone), and shifted my attentions elsewhere. I didn’t time it this time around, but I think it burned for a bit over 10 minutes. My water was brought to a full, rolling boil – much more than I really needed just for tea, but I was just out for a day-hike, so I wasn’t terribly concerned with fuel conservation. After the burn, I tossed the Doug Fir and Cedar into the pot to steep and settled in for some tea and poetry.

Tea and Poetry

Overall, the Ti-Tri comes in at just under 10oz. It’s not the lightest or most compact alcohol stove setup, but seems to me to be extremely efficient. It’s a bit like the JetBoil of the alcohol stove world. Of course, the Ti-Tri’s primary advantage over other alcohol stoves is that it is not an alcohol stove: it’s an alcohol stove, esbit stove, and wood stove. Having three different fuel options in your pack (and at such a light weight) is quite an invaluable thing. I’m greatly looking forward to further use and testing of what has become my primary cooking system.

The Ti-Tri is a somewhat new product, but has already garnered some positive press, such as a 2008 Backpacking Light Staff Pick. I’m quite curious as to how the system’s wood burning compares to that of the Bush Buddy.

Check out Trail Design’s gallery for photos further photos of the Ti-Tri in use, including at -20 degrees Fahrenheit in the Yukon.

Today’s post brought to you by: that feeling you get when you dangle your legs over a precipice that could probably kill you. And blue skies.

Blue Skies

Bed in the bush with stars to see, Bread I dip in the river -- There's the life for a man like me, There's the life for ever. from The Vagabond, Robert Louis Stevenson

Ravenlore

One of my favorite bushcraft sites is the oft-overlooked Ravenlore. The site is very simple, containing information on a number of projects that cover the basics of the craft, such as cooking and cutting. Interspersed throughout the site are stunning photographs that appear as if windows into Arda.

In addition to the site’s excellent and diverse set of information, what appeals to me so much is the manner in which it is presented and organized. It creates a feeling of myth, framing bushcraft as a story that we move through while on the trail. This is important, but undervalued. Joseph Campbell used to say that we were a people without myth. I disagree. I believe that we have an over-abundance of myth. Individuals must pick their own mythology to live within. Bushcraft, when taken as more as just wilderness survival skills, can be part of this.

Your life is a story. Pick up a pen and write it.

(Wayland is also a free-lance viking, pirate, and photographer.)

Titanium

I love titanium. It’s so light, yet strong, and discolors beautifully when burned.

Snow Peak Trek 700

The Snow Peak Trek 700 has been with me on every foray into the wilderness for the past four years, and it’s still going strong. It’s my primary pot/mug/bowl, whether I’m cooking with a fire, canister stove, or alcohol. If I were to create a list of my top ten most valued possessions, I think this would be on it.

Vargo Triad XE stove

I’ve only had the Vargo Triad XE for a few months, but it’s quickly become my favorite stove. It’s far lighter and more versatile than the Esbit stove. I haven’t even looked at my Jetboil since purchasing the Triad. The stove burns both denatured alcohol and fuel tabs, giving it a wider operating potential than most stoves that burn only either one or the other. My experience with alcohol stoves is limited, so I can’t compare the burn efficiency of the Triad to its competitors, but I, so far, have zero complaints.

Trail Designs Vari-Vent Wind Screen

If there’s the slightest breeze out, the Triad will require a windscreen when burning alcohol (fuel tabs aren’t quite as susceptible). Vargo provides instructions and a diagram for building a windscreen yourself. I ended up purchasing a Trail Designs Vari-Vent windscreen from Anti-Gravity Gear.

BCNW-O1 Bushcraft Knife

After a long wait, the end of last week brought with it the arrival of my new BCNW-O1 bushcraft knife.

BCNW-O1

In late August, I had put aside some money for a new bushcraft knife. For quite some time, I had had my eye on a Skookum Bush Tool. Yet, over the summer I discovered Mike Lummio’s Bushcraft Northwest through his YouTube channel. One of his videos features his knife, the BCNW-O1. It has a very similar design to the slightly larger Skookum, which make it difficult for me to decide which I preferred.

The knife was listed as back-ordered on Mike’s web page, so in the beginning of September I emailed him, asking when the knives would become available. My intention was that I would purchase whichever of the two knives became available first. Mike initially told me 2 weeks. That got delayed to 2 months, due to a batch of special order knives with a sharper grind coming in first and his moving the school to a new location. Still, it was available sooner than the Skookum, so I decided on the BCNW-O1.

It was well worth the wait. I couldn’t be happier with the knife.

(The plus side of the knife being back ordered is that the money had been sitting in a savings account, gaining interest since August.)

As the name implies, the BCNW-O1 is made of O1 tool steel. O1 is a relatively high maintenance material, somewhat soft when compared to other metals such as A2, and more prone to rust if not properly cared for. But the steel can be more easily sharpened to a razor edge than others, and can strike a spark off the backspine with a piece of flint (in addition to the more common ferrocerium rod). Because of this, O1 is quite popular in many bushcraft knives, including the famed Woodlore knife.

The knife is of the classic, Scandinavian design preferred by bushcrafters. The specs, taken from the product page, are as followed:

  • 5/32" (3.9 mm) thick O1 tool steel
  • RC 59
  • 3 5/8" (9.3cm) Scandi grind blade (grind done by Daniel Koster)
  • 8" (20.3cm) overall length
  • Full tang

BCNW-O1

Perhaps the most unique aspect of the knife is the handle. It’s made of bamboo “that has been processed much like micarta. The individual fibers are separated and then bound together under pressure with an industrial strength, formaldehyde-free adhesive. This material can withstand 3,000 psi and is very resistant to the elements while being made from a sustainable resource.” The handle is very smooth, lacking the unique texture of micarta. It feels more like a normal wooden handle, which I love. One of the things that I don’t think is demonstrated very well by the photos on the Bushcraft Northwest site is the size of the handle. It’s a bit bigger and chunkier than what it looks like, which provides for a very comfortable grip. It fits perfectly in my hand.

(While Bamboo can be grown and harvested sustainably, many of the processing methods that go into turning it into clothing are extremely toxic and environmentally destructive. I have no idea about the process that goes into making this handle, but I don’t figure it to be any more environmentally friendly than micarta. Maybe I’m wrong, but I think you should probably avoid any synthetic or processed handle material if you’re concerned about such things.)

In addition the the handle material, the thumb scallops that are carved into either side of the handle are rather unique. This is an excellent feature that assists in certain carving grips, as demonstrated in Mike’s video.

The knife comes with a leather Scandinavian style sheath (available either with or without a firesteel holder) made by JRE Industries. I’ve used one of these with my Mora knives for a couple years and greatly prefer them over any other style I’ve tried.

Most any bushcraft knife made today owes its design, in some part, to Mors Kochanski. Though not as well known as Ray Mears, Kochanski in generally considered to be the father of modern bushcraft. In the spirit of Schwert’s introduction to the Skookum Bush Tool in Outdoors Magazine, I’ll introduce the BCNW-O1 with excerpts from the Knifecraft chapter of Mors Kochanski’s Bushcraft.

BCNW-O1

The general-purpose bush knife should have a blade as long as the width of the palm, although blades half or twice this length are within acceptable limits. A blade five centimeters long would be an excellent survival knife except for being too small to fall and limb trees of wrist-thickness. A blade 10 to 15 centimeters long will do intricate work like carving a netting needle, yet be large enough to present a good target for a baton when cutting down small trees. A blade 20 centimeters long is a superior tool for heavy work, but awkward to use for fine work.

BCNW-O1

All general-use knives should have the blade tip close to the profile centerline of the handle. The back of the handle and the back of the blade should be on the same line. The back of the blade should not be thinned down or sharpened so that a baton can be used more effectively without being cut up. There is no advantage to a two-edged blade in bush living.

BCNW-O1

The blade should be of a good quality carbon steel, from two and a half to three millimeters thick and about two to two and a half centimeters wide. This size of blade is light in weight, yet difficult to break. The steel should be soft enough to be maintained at a shaving edge with common sharpening tools, without frequent sharpening. Such steel is found in Mora (Sweden), Solingen (Germany) or Sheffield (England) knives. Carbon, unlike stainless steel, can be used as the striker in the flint and steel method of fire-lighting. Inexpensive stainless steels have had a bad reputation with respect to producing a keen edge let alone holding it. The Mora stainless steels however, are every bit as good as their carbon steels.

BCNW-O1

The metal of the knife blade should extend for the full-length of the handle (a full tang) for strength.

BCNW-O1

The handle should be a durable, water-resistant material that can be shaped to the user's hand if necessary.

BCNW-O1

The knife should have a strong pommel that will protect the handle if the knife is driven tip first deep into wood.

BCNW-O1

The curvature of the cutting edge should extend for the full-length of the blade. This cuts well and is one of the best shapes that quickly sharpens to a razor's edge. The knife blade should have a sharp enough point to penetrate deep into wood with a minimum of effort.

BCNW-O1

The knife handle should be about as long as the width of your palm. A handle that is too thick or too thin fatigues the hand and causes blisters. The cross-section of the handle should be an oval instead of round or rectangular. An oval handle provides an adequate indication of the direction of the cutting edge and raises fewer blisters than handles with angular or rounded corners.

BCNW-O1

A guard on a bush knife is in the way and detracts from many operations. It prevents the use of a simple, secure deep sheath. Some people prefer a guard for fear of slipping forward onto the knife edge, but unless the knife is used for stabbing, the hand should never slip in this way. In all my years of instructing I do not recall an injury due to the lack of a guard.

The BCNW-O1 clearly meets all of Kochanski’s criteria for the perfect bush knife, as well as introducing new innovations of its own. Though I’ve not had it long enough to perform a full review, I am extremely pleased with the knife. It has exceeded my expectations. I can safely say that I wouldn’t trade it for any other knife.

BCNW-O1

Additional photos of the knife are on Flickr.

Outdoors Magazine Mirror

Outdoors Magazine went down a few weeks ago. The website used to be one of the best sources for bushcraft and survival techniques and tool reviews. In addition to the wayback machine and other caching websites, all the old content has been turned into PDFs and made available here. A 275 MB zip file of all the PDFs is also available, which I am mirroring here.

Update:

Here is another source for the individual articles in PDF format.

The whole of the site, with the articles in html, is mirrored here.

Deer Encounter

This morning before going to work I visited the neighboring woods, having taken it into mind that I would visit the sit spot I used during Kamana, but haven’t been to since last winter. Soon after breaking off the trail and climbing steeply uphill through the undergrowth toward the spot, I heard a bit of rustling of leaves and snapping of twigs. It surprised me, as I’d never seen another person near this spot – people rarely ever venture off the trails in this area at all. After stopping and listening for a short count, I continued on my way, thinking that I was probably making enough noise that the person would hear me, as I heard him, and thus wouldn’t surprise someone in awkward encounter.

A few steps later, as I came above the rock overhang that my spot sits on, I was greeted by a deer munching on the leaves of a young sapling. This surprised me more than the human I expected. Though the forest is home to deer and cougar, they usually stay in the deeper woods, not as close to the main trails as we were here.

I froze, partly out of surprise, and stood still, not staring at the deer, but keeping my peripheral vision trained on him. He looked in my direction, but continued munching and didn’t seem terribly concerned. I can’t imagine that he didn’t see or hear me, but the wind was favoring me by blowing downhill onto my face. Without my scent to alarm him, he must have decided that I was little more than an interesting stump.

When he turned his back to me, I slowly dropped my pack and went prone, thinking it would be fun to see how close I could get. Like most pine forests of the Pacific Northwest, the area was dense with undergrowth such as ferns and Oregon Grape. It all provides for great cover when you’re hugging the floor, but makes moving quietly in it a challenge.

I stalked the deer for 15 minutes, not getting much closer than I was when he first surprised me, but doing my best to maintain the distance as he moved. Within the first couple minutes he led me to 2 other deer slightly further up the hill which I had neglected to spot previously.

Stalking humans is much easier!

When compared with most people who tromp through the woods, I can walk with a measure of silence, but attempting to match pace with such an animal while not making noise gives one great respect for the deer’s ability. All the while I was crashing through the undergrowth, despite my best efforts at silence, while the deer would effortlessly bound ahead, snapping only the occasional twig.

Eventually they ditched me, but making my way back down hill to where I dropped my pack, there were plenty of tracks in the soft ground to gaze at.

Back on the trail, I encountered people dressed in their stylish reds, blues, and yellows, and was struck by how sad it was that they could never experience such an encounter while garbing themselves in such eye pollution.

Deer stalking

Drink In the Forest

In the damper months, I like to throw a small stove in my pack. A warm cup of tea encourages further exploration of the woods, which seem to come alive after a rain.

Cedar Tea

We do not go to the green woods and crystal waters to rough it, we go to smooth it. We get it rough enough at home; in towns and cities; in shops, offices, stores, banks anywhere that we may be placed -- with the necessity always present of being on time and up to our work; of providing for the dependent ones; of keeping up, catching up, or getting left.. "Alas for the life-long battle, whose bravest slogan is bread." -Nessmuk, Woodcraft and Camping

Cedar Tea

Navigation

One should always carry the knowledge and skill to navigate in your place. Always in my pack is a Silva Ranger CL compass – a light, compact compass, for which I can use to navigate either with the terrain or with a map. The compass is stored in a TAD Gear BC-8 pouch, which I picked up on my pilgrimage to TAD while passing through San Francisco earlier this summer. The pouch can be attached to my belt, pack, or any other piece of webbing, assuring the compass always has a place on my person, without taking up precious pocket space.

In the field, I also carry a Garmin Etrex Vista Cx GPS device. The GPS is unessential and shouldn’t be relied upon for primary navigation. Its error is larger than that of a compass; it depends upon a clear line of sight to the sky, making it more of a hassle than a help to use in forested areas; and, of course, it depends upon batteries. I’ve had one occasion this summer where the GPS insisted that North was South and South was North, implying either a sporadic pole shift or shaky satellite reception. My primary use of the GPS is the trip computer – the odometor, my moving time, my stopping time, my average speed, and elevation shift. I’ll also use it for a quick reading of my coordinates to get a rough idea where I am, and occasionally the Tracks program, which can be used to retrace my steps.

Always carry a map. USGS 7.5” topo maps are the best. On my backcountry trips here in the Park, I carry a minimum of 3 maps: a Tom Harrison Map of the entire Park, a Tom Harrison Map more specific to my location in the Park, and the USGS maps for each quadrangle I plan to walk through. The map I primary reference is the second Tom Harrison, which is clear and easy to read and has mileage printed directly on the trails. The USGS maps I carry for cross-country travel or in case I get lost. The large Tom Harrison map is carried more for a sense of place and planning other trips.

Learn to read a map. I’ve never had a class in the subject, nor read a book, but I’m confident in my ability to utilize a map. The best way to learn is practice. Here’s what to do: buy the USGS 7.5” quadrangle for the area you live in. If you live in an urban area, try to buy a quadrangle for a nearby park or forested area – someplace that isn’t flattened and paved. (But buy the maps for the urban areas too! I have the 7” quadrangles for the city I live in, covering my home and commute, taped on my wall, for exploration and post-Apocalypse survival.) Now take your new map and wander into the woods. Figure out where you are. Find a feature on the map, such as a hill or a ridge, and then find it in your place. How steep are the contours in real life? Here’s a hint: contours “V” upstream.

Even if you’re unable to triangulate your position or perform other minute calculations, you should have the confidence to read a map and have a rough idea of what that means in real life. A few weeks ago, a visitor came in to the Visitor Center in the Park while I was working. He was interested in a backcountry permit. After glancing at the map, he asked how much water he should bring. I hate giving someone like that a permit. If you’re unable to read the steepness of the trail and the locations of water sources, you have no business in the backcountry. And everybody should have business in the backcountry. So learn to read.

Pictures of my gear may be found here.