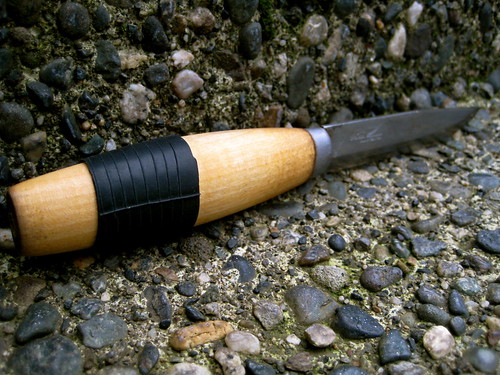
One of the pesky traits of the wooden handled Mora knives is their lack of grip when wet. One could acquire a Mora with a rubber handle, but, let’s face it: those are ugly. Instead, I cut a piece of 700x35 bicycle inner-tube about an inch wide and slide this just less than halfway on to the handle. The grip is immediately improved. If you were so inclined, you cut a piece the length of the handle and cover the whole thing, but so far it seems that this small piece is enough.
As with the rubberized BIC, this also provides another way to carry tinder that will work even when wet (though it will require a lighter or candle to start).
Linseed oil is a popular product used to coat and protect wooden handles on knives, axes, and other tools. I’ve tried it a couple times, but I’m not a big fan of the stuff. It takes multiple coatings over a long period of time to get a decent finish, it seems to rub off easily with use, and that whole spontaneous-ignition-of-linseed-oil-soaked-rags thing makes me a little nervous.
My preference is with Howard Citrus-Shield Premium Natural Paste Wax. I first stumbled upon this stuff in a hardware store while I was looking for linseed oil. The store didn’t seem to stock the oil, but the “Citrus Shield” can caught my eye. I remembered reading that Ragnar sometimes used some sort of orange-scented wax on certain wooden knife handles, so I brought the can home to try it out.
It turns out that the stuff works really well. All it consists of is a mixture of natural wax and oil. Initially, there is a very strong citrus scent, but this quickly wears off after application. I use it on all my wooden handled blades now, including the specially processed bamboo handle on the BCNW-O1 (which is supposed to be water resistant, but I found that it would swell some when damp before I treated it with the wax).
The application is very simple. The instructions on the can say to apply a thin coat with a clean rag, but I just use my fingers. After rubbing it into handle, I let it sit for 5 minutes before wiping it off with a clean rag. If this is the first time I’m treating the wood, I’ll apply and wipe off the wax about 3 times. After the final wipe down, I rub the handle with fine 0000 steel wool. I don’t put a whole lot of time or effort into this buffing, though. I’m not seeking a shiny finish, just practical protection.
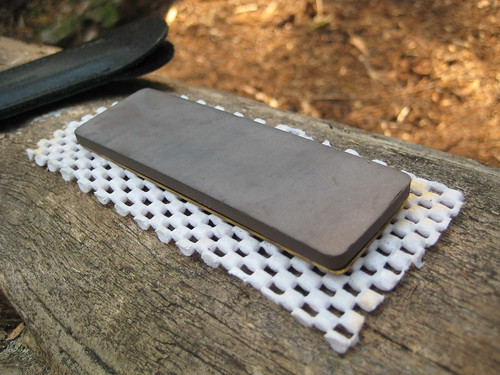
The Fallkniven DC4 is one of the more popular pocket-sized knife sharpeners, particulary among bushcrafters, due in no small part to patronage by Ray Mears.
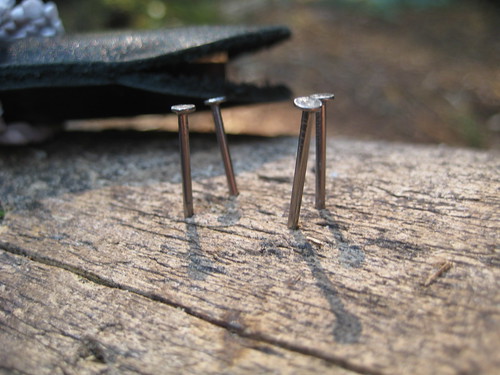
The technique that Ray Mears uses to keep his stone from moving around is to create a frame by hammering 4 small nails around the stone into a log. This works, but, over on the Equipped to Survive Forums, I picked up a better idea: simply cut up a bit of non-stick rubber padding.
This padding is sold in rolls and meant to be placed between carpets and hard-wood floors to prevent the carpet from moving around. The stuff that I use is actually meant to line shelves and drawers. The only different between it and the carpet padding is that the shelf and drawer stuff has smaller squares and a tighter mesh.
I find the padding to be much more convenient that the nails. It’s easier to deploy – you don’t have to take the (albeit small amount) of time to hammer in and then remove the nails; the pad works just as well on a rock as it does on a log; and the pad does not get in the way when sharpening, as the nails will sometime do.
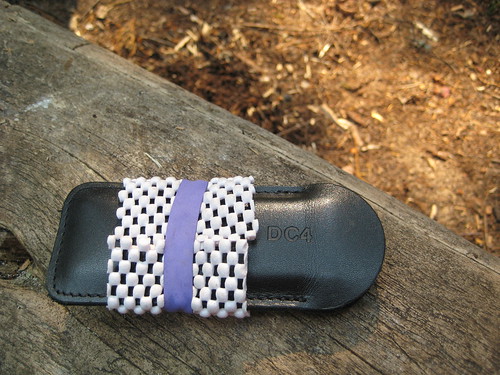
For storage and transportation, I simply wrap the pad around the DC4’s sheath and secure it with a rubber band.
I still carry the small nails in the bottom of the sheath just in case, but I think the pad is a better way to go.
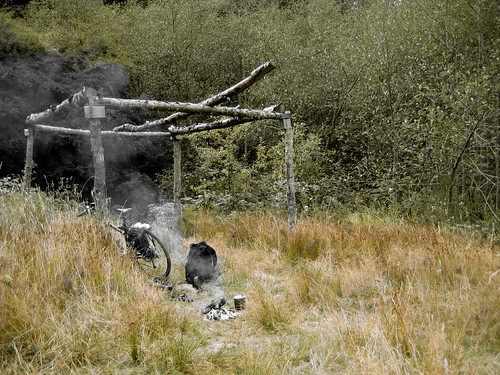
I went for a bike ride today, following a set of train tracks through the woods. Off to one side a small path led to a grassy clearing and this square structure. I stopped for a bit, processed a down log to start a small fire, and enjoyed a cup of kukicha tea while reading a book.
I do not understand why so many outdoor-gear manufacturers insist on making gear in bright, unnatural colors. To me, it is a form of visual pollution. To be enjoying oneself in the wild and suddenly come upon a hiker in a bright red shirt, or a noisy yellow tent, is a rude shock. It seems to me an attempt to visually isolate humans from the non-human environment – something that we are exceedingly fond of, based on some flawed Abrahamic notion of everything non-human having been created for the entertainment of humans.
Earth-tones should be the order of the day. Here is a photo of my camp, taken from only a couple hundred feet away. It is exposed, out in the open. No attempt was made to camouflage it. Can you spot it? (Large version)
With such a simple setup – a brown tarp and a green pack – I can blend with the environment, not disturbing the other occupants of the area, human or otherwise.
You and I are part of that world – the world – and should not seek to create barriers or erect boundaries between us and it. Do not noisily advertise your presence, disturbing those who may be around you. Embrace the world, sink into it and wrap it around you. It’s not such a bad place.
A lazy day of doing not much of anything sometimes makes me feel guilty. It requires that some evening activity take place – something which gives one the satisfactory feeling of accomplishing something of use during the block of waking hours. Today I chose to spend the evening in the woods. I thought I might practice some knife skills, or just sit and read a book. Arriving at my spot I was unpleasantly greeted by a thick swarm of mosquitoes, greatly annoying me and foiling my plans for peace. I decided to start a small fire with a bit more green wood than usual. The smoke from a fire usually drives mosquitoes away and the green wood would put out more smoke than dead wood. When I was out collecting wood, I noticed a large patch of Stinging Nettles in the gully below where I was. The two thoughts of Nettles and fire brought to my mind an episode of Wild Food where Ray Mears picked a few fresh Nettles and wilted them over the fire to neutralize their sting and improve the flavor. I eat a lot of Nettle raw, crushing the leaves to break the needles and get rid of the sting, but I thought I might try this new method.
After the fire was going (and the mosquitoes buzzing off elsewhere), I put a small measure of dead wood on a corner of the fire to get a bit more flame than the smokey green wood was providing. This accomplished, I went back to the gully to collect a few stalks of nettle and return them to the fire. It took only about 15 seconds of holding one plant over the flame for it to become limp and drooping. I tested it a bit with my fingers to see if the sting had been neutralized. It had. Tearing off a bit and munching it around a bit in my mouth, I was greeted by quite a surprise: these wilted Nettles were, without doubt, the best Nettles I had ever tasted, perhaps even being the best wild weed I had ever enjoyed! I ate about a dozen tall plants, until I was quite satisfied with my evening snack. Occasionally I would leave a stalk hovering over the flame a bit longer than needed, but that would impart to the leaves a slightly toasted flavor, which I also found to be agreeable.
I’ll certainly be enjoying wilted Nettles again. It’s a bit more trouble than just eating them raw, but, even on the move, it takes very little time to start a small fire and prepare a few picked plants in this way. The improved flavor greatly pays back the small investment in time.
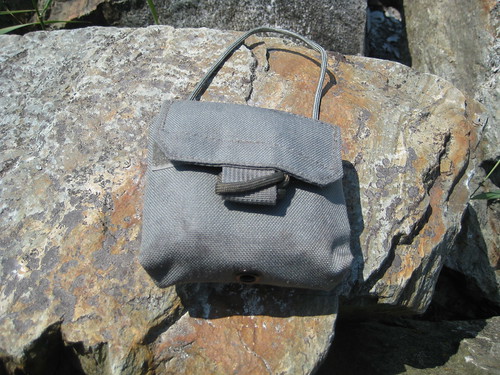
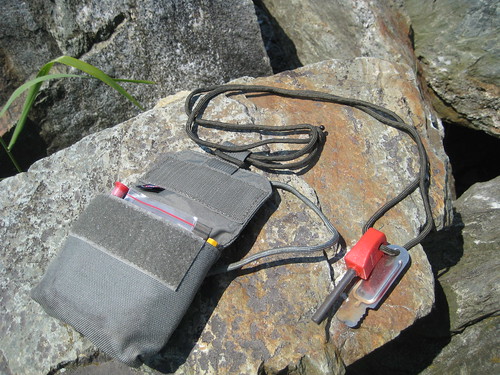
My possibles pouch began as being simply a Doug Ritter Pocket Survival Pak. The Survival Pak comes in a waterproof envelope that is meant to be carried in a pocket. I prefer a belt-mounted solution, so I ditched the waterproof envelope and moved the contents to a TAD Gear SERE SP pouch. The SERE pouch has velcro webbing on the back, which allows it to be mounted to be mounted to any sort of belt or PALS webbing.
When using the possibles pouch, I’m often traveling with my Kifaru ZXR. The ZXR is built upon Kifaru’s WrapTech Plus Suspension system, one of the primary components of which is the belt. The belt is a very thick, wide belt that is designed to work with the anatomy of the body and allow the user to comfortable carry obscenely heavy loads. The design of the ZXR’s belt makes it unpractical to have many pouches mounted to your own pants belt. Because of this, I didn’t want to actually mount the SERE pouch to my belt itself, but instead mount it so that it dropped down a bit below my waist, thus not interfering with the ZXR belt. To accomplish this, I simply tied a short loop of paracord through the pouch’s webbing. To mount the pouch, I pull the loop through the backside of my belt and run the pouch through the loop. This allows me to both don and doff the pouch without removing my belt.
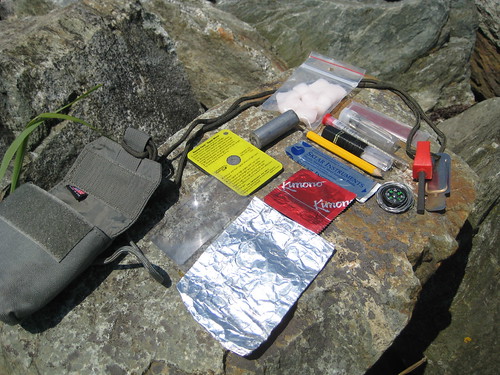
The contents of the pouch have changed since I first removed them from the waterproof envelope. The Doug Ritter Pocket Survival Pak still forms the base of the pouch, but I’ve added and removed other items to cut down on redundancy and better compliment the other gear that I carry. I also don’t intend the possibles pouch to be strictly a “survival” item. All of the pouch’s contents have utility in a survival situation, but some of them are not intended explicitly for that.
The contents are as follows:
Ferrocerium rod, striker and paracord
Duct tape (26" x 2")
Pencil
Aluminum Foil (3 sq. ft.)
Condom
2 match strikers
8 Coghlan's Emergency Tinder
Sterile stainless steel surgical blade
20mm compass
Stainless steel utility wire (6' of .020")
Signal mirror
Magnifying lens
4 large safety pins
Repair kit
Fishing kit
The components that remain from the Doug Ritter Pocket Survival Pak are the duct tape, pencil, safety pins, 20mm compass, stainless steel utility wire, sterile stainless steel surgical blade, magnifying lens, signal mirror, and aluminum foil. The other items I’ll cover here.
Ferrocerium rod, striker and paracord
This is a standard Light My Fire Scout firesteel and striker. It is not my primary firesteel, but a backup that I can be sure of always having securely attached. You might have noticed that the paracord that I use to secure the rod and striker to the pouch is rather long (about 3.5’). Paracord, of course, has hundreds of uses, so carrying a bit more of it than is strictly necessary isn’t always a bad idea. But the primary reason for the length of this particular piece of cord is that I can use it as a bow string on a fire-bow set.
Condom
This is just one standard latex condom. It can be used as a water carrier, a makeshift glove for a few fingers while taking care of a wound, a barrier to help stop the creation of a new species of half humans half wood nymphs, or utilized in the creation of emergency balloon animals.
Match Strikers
REI Storm Proof Matches always come with 2 spare strikers sealed within a piece of plastic. I find that so-called “strike anywhere” matches can be hit and miss, so by carrying this, I assure myself of always having a dry, reliable surface to strike any kind of match on.
Coghlan's Emergency Tinder
This stuff is not my favorite fire starting tinder, but it does work, and I have a bit of it kicking around, so I tossed it in. They’re stored within a small waterproof bag.
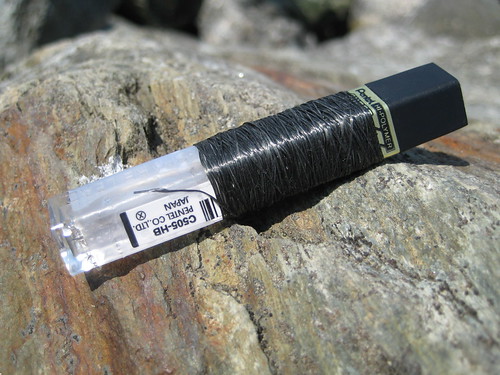
Repair Kit
My repair kit, I think, is somewhat ingenious. I like it, at least. I previously carried a small leather pouch with an assortment of different needles, types of thread, and safety pins. The whole thing was far larger and heavier than I could ever justify it being, so I ditched it and started from scratch. I got the idea for this new kit from the BackpackingLight Forums.
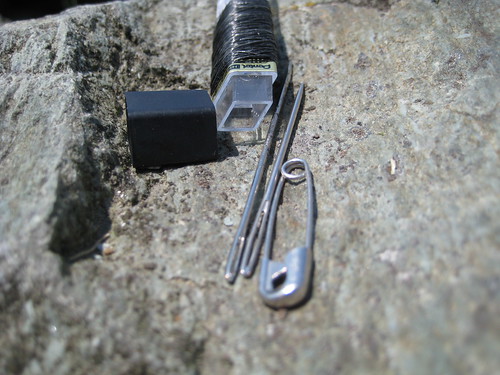
The container is an old Pentel mechanical pencil led refill case. This is the perfect size to secure the two needles I’ve chosen to carry and the case itself is light enough to make me happy. (And it’s free.)
Around the outside of the case, I’ve wrapped a length of black Kevlar thread. When I built this kit, I just wrapped till I got bored, so I have no idea how much thread there is. Enough, I think, for any repairs that I am likely to encounter. I chose Kevlar thread as the best complement of weight and strength. Previously, I carried a bit of standard, thin sewing thread. The thinness of that thread is suitable for sewing things like clothing, but it is decidedly weak. Kevlar thread is the same thickness, not noticeably heavier, but much stronger. I also previously carried a bit of thick waxed nylon string that is appropriate for sewing things like thick leather, heavy cotton canvas, or thick nylon. This is very heavy by my standards and overkill for most repair jobs. Out of all the gear I carry, it would probably be appropriate for repairing only my Kifaru rucksack. And Kifaru rucksacks don’t fail. If by some strange happenstance it did fail, the Kevlar thread would probably be strong enough to get be back home or to some place where a more permanent repair could be made.
Inside the case I carry two needles. One that is thicker and stronger than most thin needles used for the hand-repair of clothing, but still small enough to qualify as small in my eye (just under 5mm in length and thin enough to not punch overly large holes in a thin cotton material). I believe this is the needle that comes with the Doug Ritter Survival Pak, but I could be wrong. The other needle is slightly longer (about 6mm) and has a slightly thicker head, making it more appropriate for heavier material. (I believe this one is technically a sail maker’s needle, but I could be wrong. I have a variety of different needles I’ve picked up over the years and lack the expertise to be able to identify their intended purpose.)
Also inside the case is a small safety pin. The purpose of this is actually just to take up more area inside the case so that the two needles don’t bounce around and make noise.
This repair kit, along with the 4 large safety pins also carried in the possibles pouch, makes for a very small and lightweight repair kit that is able to tackle any of the problems that I may encounter. In addition to this, I also carry a half dozen safety pins of a varying sizes and a couple spare buttons within the rucksack itself. The guts of paracord and the floss in my toiletry kit can also be appropriated as thread.
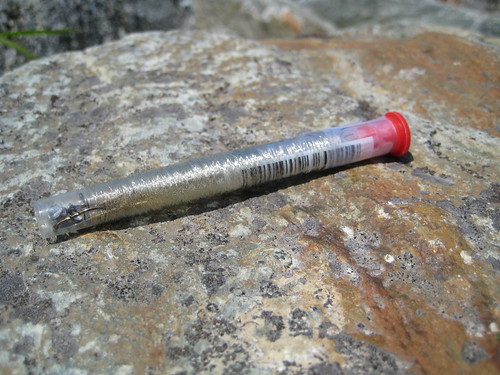
Fishing Kit
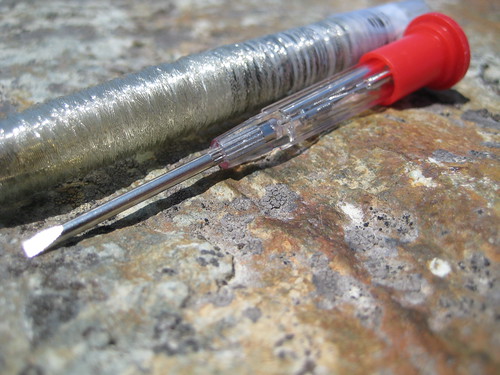
My fishing kit is actually a combination fishing kit and glasses repair kit. An odd combination, you say? I agree.
I am dependent on my glasses, so I have always carried a glasses repair kit. Such kits are available in any drug store in the country and usually consist of a small tube that contains a few of the small screws that most glasses use, a small screwdriver to match, and a couple spare rubber nose pieces.
A year and a half ago I purchased a new pair of glasses that happen to have plastic nose pieces integrated into the frames. Recently, I was going through the possibles pouch, rethinking each item, and came upon the glasses repair kit. I opened it up and was shocked – shocked, I tell you – to discover that it contained two of those small rubber nose piece replacements. With my new glasses, these were completely useless to me. I had been carrying around an extra 2 grams (or so) all this time! I disposed of the offending pieces and felt better immediately.
But then I looked at the tube and its contents and decided that it really was a waste of space. The tube was far too large for the spare screws and screwdriver that it now contained. I shrugged, moved on to looking at the rest of the contents of the possibles pouch, and then had a stroke of brilliance. I would turn the glasses repair kit into a fishing kit!
It follows on the same principle as the repair kit.
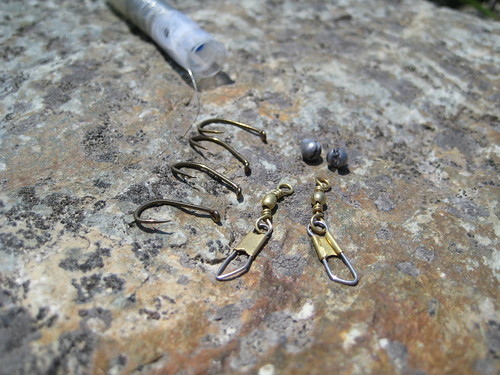
Around the outside of the tube, I wrapped a length of 4 lb monofilament fishing line (“ultragreen” in color). Again, I did not measure the length, but it is plenty for such an emergency kit.
Inside the tube, I placed 4 small hooks, 2 split shot, and 2 snap swivels. This is clearly a very minimalist fishing kit, meant for emergencies only, not for when one intends to actually catch fish for a main form of sustenance, but I have used it. It does work.
This particular glasses repair tube is well-suited for such a kit because the lid for the tube is the screwdriver itself. The top of the screwdriver can then be removed, exposing the inside of the hollow handle. It is in here that the spare screws are stored. This allows the glasses repair bit to be separate from the fishing bit.
It should also be noted that the fishing line wrapped around the outside can also be used as repair thread.
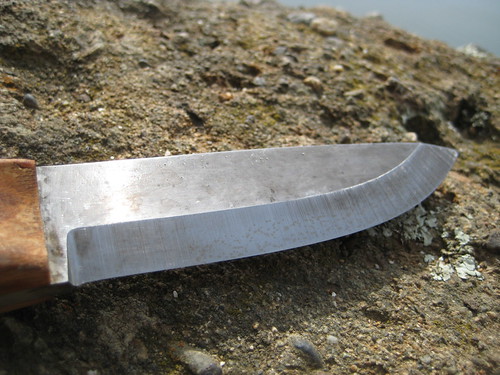
High carbon steels have a tendency to rust without proper care. This is especially true of knives made from O1 tool steel, such as my BCNW-O1.
A patina is a thin film that develops on some metals due to oxidation. It is a type of rust, but a good one, that protects the blade rather than corroding and eating away at the metal. Over time, most knives will develop a patina, regardless of the material that they’re made from. Many people are attracted to the distinctive and aged look that a patina imparts onto a knife, and will make an effort to force a patina onto their blades. The easiest way to do so is to use the knife to prepare acidic foods: potatoes, onions, tomatoes, pickles, and the like all work well. Some people will soak a rag in vinegar and wrap it around the blade, or coat the blade with mustard and leave it overnight.
I wanted to force a patina onto my BCNW-O1, for both the aged look and the extra protection that it gives. The first step I took was to take a slightly-moldy potato out of my fridge and stab the blade into it, up to the handle. I left this in overnight. In the morning, I took the blade out, rinsed it, and stabbed it into another spot on the potato. I repeated this through-out the day, leaving the blade in one spot for a few hours at a time. This sort of approach adds a multi-layered texture to the patina.
After the blade had been in and out of the potato for about 24 hours, I tossed the potato, cleaned the knife, and used it to slice an orange. After the orange was sliced, I left the knife on the plate with the orange as I ate, so that the juices could soak into the blade a bit. After this, I rinsed and dried the blade again, then sliced another orange the next day.
I figured all of this would probably be good enough, so, after slicing the final orange, I rinsed the blade once more, then gave it a good scrubbing with a soapy sponge to clean off any bacteria that might be growing on it after all the exposure to food. This removed a lot of the rust – more than I thought it would – but, after I dried the knife off, I had a beautiful patina on the blade.
Since the patina is a type of rust, it does eat away the sharp edge of the knife a bit. So, after it was all clean, I gave the knife a session on my 6000 grit japanese water stone, which sharpened it back up again.
Usually after the sharpening the knife, I coat it in camellia oil, which was used in Japan by samurais to protect their blades. It is a non-toxic oil that is often used for skin care, and can even be cooked with, so I have no problem using it on a knife that I will prepare food with and eat with. The main purpose of the oil is to protect the blade from rust so, with the patina applied, it is not strictly as necessary as before. Still, I apply it so that both it and the patina can ward away any bad rust.
Using a fine-grit Japanese water stone with a nagura stone to sharpen the blade creates a slightly abrasive cleaner that can be purposefully rubbed into the blade to clean off the beginnings of a patina, if one so desires. I do not do this on purpose, but I have sharpened my knife multiple times since applying the patina and, as a result, the bevel of the blade is much shinier and less-rusted than the upper part.
You can tell this patina is forced, because it terminates at the handle (I couldn’t stab it into the potato any deeper!) of the BCNW-O1. The exposed part of the tang is shiny clean, like new.