You are currently viewing all posts tagged with bicycle.

Gevenalle CX Shifters

Gevenalle CX Shifters are the best change I’ve ever made to my bike. I don’t understand how STI brifters have any market share in the world where Gevenalle exist.

When all is ready, I throw this switch

The left Gevenalle shifter is friction only. Shifting the front chain ring with friction is objectively superior to indexed. It allows me to make minute trim adjustments based on where I am in the rear cassette. This is especially useful with a triple crank (which I still run, because why wouldn’t I want more gears). With indexed shifting on a triple, you often end up with some gear combinations that cause rubbing front or rear if your cable tension is not perfectly dialed. Not so with friction. Just give it a slight nudge.

The right Gevenalle shifter can switch between indexed and friction shifting. I started out using it in indexed mode. After a few weeks of that I decided to give friction mode a whirl. I had never used friction shifting before. 9 months later, I’m still in friction mode. I do still think there is a place for indexed shifting in the rear, but I enjoy friction and have no current desire to switch back. (I haven’t even thought about cable tension all year!) I do, however, value the ability to switch between the two.

The real magic of the Gevenalle system is being able to jump the cassette between multiple gears with a single movement. An STI shifter may allow you to jump between 3 or 4 gears at once. With Gevenalle, you can dump the entire cassette in one smooth movement. That’s not something I do often, but I absolutely do dump or load about half the cassette at once. They market this as a feature for cyclocross racers, but it applies just as much to anyone who rides with other traffic.

This video is what helped sell me on the shifters when I was considering the purchase. It demonstrates the big cassette movements possible, as well as the ergonomics of using the system. Whether I push or pull the shift levers depends on where they are in relation to the brake lever. It takes a few minutes to get used to, but quickly becomes intuitive. As someone who spends most of the time on the hoods, I found that I didn’t need to change my hand position to actuate the shifters. Shifting from down in the drops is difficult or impossible, but if I’m down there it’s usually because I’m cruising down hill, already at mach 3, and not intending to shift anytime soon.

The Gevenalle shifters can be praised for their functionality. They are lightweight, simple, durable, and rebuildable. They don’t care if they’re caked in mud or bathed in the blood of your enemies or whatever. But they’re also just really fun. I shift a lot more frequently with these than I ever did with STI. They inspire a closer connection to the vehicle, perhaps similar to manually shifting an automobile. Having both visual and haptic feedback on where you are in your gears and how much move movement you have in either direction is fantastic. I refer to the front shifter as my hyperdrive switch. Anytime the rear shifter is moved all the way outboard and I flick the front all the way to the right I know shit is about to get real.

Many of the strengths of the Gevenalle shifters could also be claimed by bar-end or downtube setups, but Gevenalle allows you to keep all your in-flight controls in one place. I value being able to shift, brake, and flick my ding-ding all without moving my hands. I think this is especially important for city riding, when everything else on the road is actively trying to kill you. (And I still like using my bar-ends for mirrors, too.)

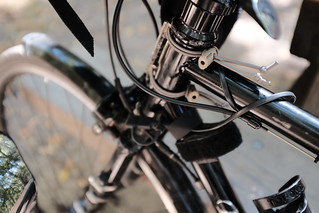
With Gevenalle, the brake cables run under the tape. Shift cables shoot out the side, like STI shifters of yore. When I installed them I made sure to cut my cables and housing long enough so that I had enough space to move the cables aside and shove my rando bag or bikepacking harness between them. It hasn’t been an issue. Back when STI shifters had this kind of cable routing, I used v-brake noodles to open up space for a bag. I haven’t found that necessary with Gevenalle shifters.

Rando Ready

I’m not sure that I’d ever want to use a non-Gevenalle shift setup on a drop bar bike again.

A Better Phone Mount

When I purchased my first smart phone in 2013, I was motivated primarily by the promise of using Open Street Map for bicycle navigation. This does not require, but is greatly assisted by, a mounting system of some sort. I’ve tried a few over the years. Since 2015 I’ve used the Aduro U-Grip Plus Universal Bike Mount, which I think is an excellent design. It uses a ball and socket to provide complete adjustability. It secures the phone with a spring-loaded cradle and silicon band. Between the two, there’s no way the phone is falling out, unless the mount breaks. Unfortunately the whole thing is cheaply made of plastic. Earlier this month, mine finally broke.

  • Aduro U-Grip Plus Universal Bike Mount: Failure
  • Aduro U-Grip Plus Universal Bike Mount

After seven years, I feel I got my money’s worth out of the Aduro U-Grip, but when a tool like this fails I want to replace it with something better. Purchasing another of the same just resets the countdown to the next failure. Unfortunately, the bicycle phone mount market seems to be flooded with shit. Either they provide limited adjustability, or they require a special phone case. I have no interest in either. I was disappointed, and about to just order another Aduro U-Grip, until I happened upon Tackform. Their Enduro Mount was advertised for motorcycles, but I figured it ought to work on a real bike.

Cockpit

Tackform’s offering is similar in concept to Aduro’s, with a ball and socket providing complete adjustability, and phone security provided by a spring-loaded cradle and silicon band. But it raises durability to the extreme. I’ve had mine for just a few days. I am impressed.

The only plastic component is the wingnut used to lock the position of the cradle. Everything else is metal. The spring that operates the cradle is no joke. It is capable of operating as an improvised finger guillotine. Yet it is quick and easy to operate one-handed. Tackform includes a silicon band for further security, but in the packaging material they say that you really don’t need it. I believe they are correct. When it is installed in the cradle, I can lift the bike with the phone. The phone doesn’t move at all. It is difficult to imagine a scenario where the phone would escape.

The top of the cradle has a lip to prevent the phone from being pulled out straight up. The sides and bottom of the cradle are lined with a thin rubber to provide some protection to the phone. The outer edges of the cradle are quite sharp, which makes me somewhat nervous about a crash. I have no doubt that the mount would come through, and that the phone would still be secured in it, but my face might not fare so well if it comes into contact with the cradle. But, hey, that’s what eye pro is for.

The primary disadvantage to the Tackform Enduro is that the arm which connects the cradle to the bar mount is tightened with a single wingnut. To rotate the cradle from portrait to landscape mode, you have to loosen this wingnut, which also loosens the connection to the bar mount. So while the ball and socket connection gives you complete freedom to position the phone as you like, it’s the sort of thing where you need to figure out what position you want and then tighten the wingnut to lock it in. You won’t leave the wingnut loose enough to allow for adjustments while riding. With the Aduro U-Grip, the socket is part of the cradle, the ball is part of the bar mount, and I was always able to leave the nut which secures the two just loose enough that I could make minor in-flight positioning adjustments without compromising the security of the system. In practice, I have yet to find this limitation with the Tackform to be something I really care about. But if you want to be able to rotate between portrait and landscape modes without stopping and using two hands, look elsewhere.

The other disadvantage that some riders will identify is weight. I didn’t weigh the components, but what you’re dealing with here is basically just a chunk of aluminum. I imagine the whole system is somewhere around 6 oz, which is significantly more than the plastic competitors. If you have much spandex in your wardrobe, you won’t be happy with Tackform. But my bike is carefully built for what I see as the ideal compromise between performance and durability, and the Tackform mount makes the cut.

Beyond the durability of the system, what endures me to Tackform is that their products really are systems. They are not just selling a few application-specific packages, but have whole series of components. It’s like a grown-up Lego set. I appreciate knowing that I could replace an individual component, or buy just the piece I need to expand the mount’s applicability to different vehicles or environments.

None of Tackform’s products are cheap, but they claim that their products are designed to last a lifetime. After the first 100 miles on this mount, I believe that statement will prove accurate. I suspect that the slab-format pocket terminal will be phased out and become irrelevant well before the Tackform Enduro will fail.

Tackform Enduro Mount

The mount is manufactured in the country of Taiwan, so get yours before China expands its beachfront property.

How I Flick My Ding-Ding

I use to run my bell on the center top of my handlebars, near the stem. This is a typical bell position, but it requires moving a hand off of the brifters to access it. Situations where one needs a bell are often situations where one also wants to be ready to brake or shift.

A couple years ago, I saw someone position their bell on the hook of the drops. I thought that was a great idea and promptly copied it. The positioning is ideal. It allows me to keep my hands on the hoods and actuate the trigger of the bell with my pinky, while the rest of my fingers interact with the brifters as needed. It is high enough in the hook that it does not interfere with my hand placement while riding in the drops, though it does require releasing the hold on the bar to actuate it from down there. But that is still a smaller movement than reaching from the drop to the center top of the bars. I spend about 90% of my time on the ramps and hoods, so that is the interface I optimize for.

Spurcycle Bell Positioning

I strongly recommend setting up your cockpit such that you can flick your ding-ding without sacrificing the drive controls.

A Better Kanteen Lid

My favorite lid for standard mouth Klean Kanteen bottles is the Topoko Straw Lid B. It’s a simple flip-top straw lid. The only thing that makes it special is that the mouthpiece is covered when closed. It seems like a common sense concept, but so many sport lids have no provision for some sort of mud guard.

Topoko Straw Lid

Other than that, there’s not much to say about the lid. It is completely leak-proof when closed. It is easy to operate one handed. It comes with two straws that can be cut to length. One is stiff and the other is bendy. I’ve found no functional difference between the two.

I have these lids installed on both the bottles I use on a daily basis – the 27 oz that I carry on my bike, and the 40 oz I use at home.

I did break one of the lids by accidentally dropping the bottle from about 4 feet onto concrete. It broke where the carry loop connects to the base. The lid still sealed and functioned properly. I only use the loop for pulling the bottle out of a cage or pouch, but I still purchased a replacement (and another spare) immediately.

The new lids I received were slightly different from the old ones. The bit that covers the mouthpiece is clear instead of black, and the edge of it is flush with the edge of the lid. On the old model, the black cover was a couple millimeters proud of the edge of the lid, which provided more purchase when grabbing the piece to flip it open. The older design seems superior, but I haven’t actually noticed a practical disadvantage with the new one. I can still easily and reliably flip the lid open, even with a gloved finger. (That is, however, with light gloves – the older design may have more of an advantage with heavy winter gloves.)

Topoko Straw Lid: Old and New

I’ve only used the lids on Klean Kanteen bottles. I use these bottles for water. I don’t know if there are any special considerations that would make the lids less than ideal for hot beverages.

I’ve used every iteration of Klean Kanteen’s Sport Cap since I bought my first bottle from them in 2005. They’ve all left something to be desired. The Topoko lid is a superior solution.

Rema Rotation

I previously outlined my patch kit, which is based around Rema patches and vulcanizing cement. Ensuring the health of the vulcanizing cement is key to the functionality of the kit. As with any liquid adhesive, it can dry out in an open tube. Or the tube may sprout a leak, causing the liquid to leak out and vanish. I have taskwarrior tell me to replace the cement in my patch kit every 3 months:

$ task add due:2020-01-01 wait:due-3weeks tag:bike recur:quarterly replace rema vulcanizing cement

The task is really just a queue for me to evaluate the condition of the kit. Because I do not get flats often, there’s a good chance that the cement tube in my kit will be unopened when I perform this evaluation. If the tube is sealed and appears in good condition, I’ll leave it in without replacing it. If it is open, I remove it from the kit and replace it with a new tube. The old cement goes into my toolbox at home. When I apply a patch at home, I’ll first try one these old, retired cement tubes.

Rema Vulcanizing Cement: Old vs New

Before marking the task as complete, I’ll also evaluate the patches in the kit, replenishing or replacing from my bulk supplies as necessary.

This process gives me extreme confidence that my patch kit will be functional when I need it.

Rainy Day True

Brought to you by Feedback Sports, P&K Lie, Carolina Morning, and Red Blossom Tea.

The pandemic has demonstrated the value in stocking a wide supply of spare bike parts.

The effect is evident when looking at the Amazon price history graphs provided by CamelCamelCamel. For example, take the six-month price history of my preferred chain:

Or the six-month price history of my favorite tires:

Fortunately, I have a long-held policy of stocking spares.

I've started mounting my bike lights via shock cord.

The previously mentioned Orfos Pro LED flares ship with Velcro One-Wrap for mounting. This works well enough, but lately I’ve decided I prefer using shock cord and cord locks. The cordlocks add a little weight to the system, but this setup mounts to all the things I want to mount the lights to, and makes it very easy to tighten. After tightening the lights don’t move around at all, where with the Velcro they would move a little on a bumpy road. This system is also quick to attach and detach, which I appreciate when parking, and can be more easily manipulated when wearing full-fingered gloves.

Orfos Pro Shock Cord Mount

  • Orfos Pro Shock Cord Mount
  • Orfos Pro Shock Cord Mount