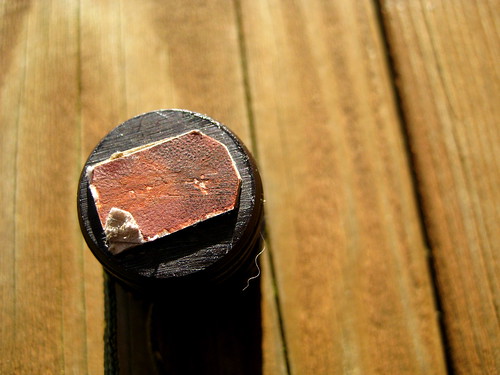
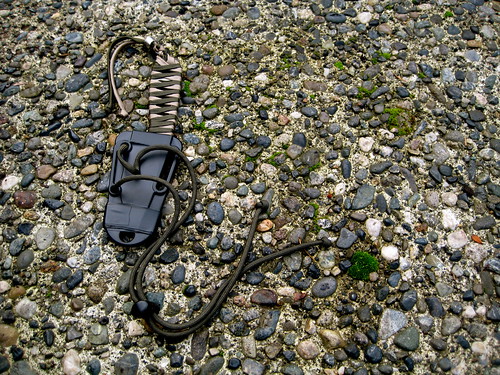
Yesterday, Avagdu asked me if the Vargo Triad XE stove could be burned inside the cone of my Trail Designs Ti-Tri Stove System. I’ve used it in the cone a couple of different times, but never performed any direct comparisons between it and the 12-10 alcohol stove that comes with the Ti-Tri system. Today, I spent some time with both stoves to do just that. Temperatures were around 42 degrees Fahrenheit.
I burned both stoves with the same amount of fuel. One of the downsides of the Triad XE stove is that because the main fuel source is enclosed within the inner container, it cannot be directly lit. Instead, some fuel must be placed within the outer section of the stove. This is then lit to prime the main fuel source. On an alcohol stove where the main fuel is directly accessible, such as the 12-10, the outer priming ring is not always required. It will usually be used when operating in colder temperatures. To be fair for these tests, I primed both stoves with the same amount of alcohol.
The Triad XE stove had to be tested in two different modes: with support legs extended and with support legs collapsed. With the legs collapsed, the stove sits a little lower than the 12-10. With legs extended, it’s a bit higher. The tests were done on a hard, solid surface so that when the legs were extended they were not pushed into the ground (as they might be when using the stove on dirt). The Triad XE took longer to bring the 2 cups of water to a boil with the legs collapsed, which is to be expected, since the flames are further from the pot.
Interestingly, when the Triad XE’s legs were extended, it took a significantly shorter period of time than the 12-10 stove to bring the same amount of water to a boil. One would think that the 12-10 stove, being designed by Trail Designs specifically to work within the Ti-Tri cone, would be superior to a general-purpose stove like the Triad XE burning inside the same cone. The Triad XE also had a longer burn time than the 12-10, suggesting that it makes more efficient use of the same amount of fuel (although, in practice, it may require more fuel than the 12-10 since the Triad XE must always be primed and the 12-10 must not).
All in all, it seems that leaving the 12-10 at home and bringing the Triad XE with the rest of the Ti-Tri system would be a smart move. But then, there are the weights. The Triad XE weighs three times as much as the 12-10 – certainly a significant amount. Though it must be remembered that the Triad XE is not just an alcohol stove: it is designed to burn solid fuel tabs (Esbit) as well. So, to be fair, if I switched out the 12-10 with the Triad XE, I would also leave Trail Design’s GramCracker burner at home. But the GramCracker tips my scale at 0.1 oz, so it does not really factor in to the decision much. (I also think that the GramCracker most likely burns fuel tabs slightly more efficiently than the Triad XE, but I haven’t done this comparison yet.)
The other factor in comparing the two stoves is durability. The Triad XE, being made out of titanium is a tough little guy, not phased by the occasional drop or riding around loose in my pack. In contrast, the 12-10 stove is made out of two thin aluminum cans, making it very delicate. Even though it lives within the protective plastic caddy of the Ti-Tri, it has numerous scratches and dents to show for its year in use.
I’m not sure what conclusion to draw. If the Triad XE weighed closer to 1.0 oz, it would be without doubt superior.
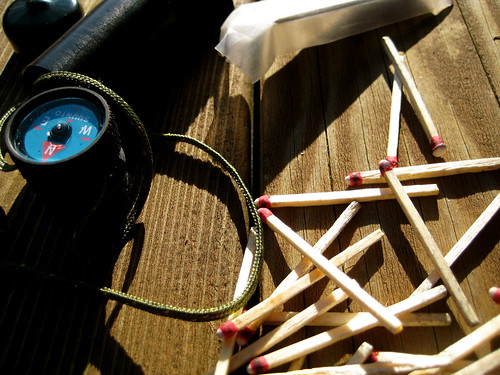
The K & M Industries Match Case has long been considered one of the top waterproof match cases available. Each case is hand made in the Elk River, Idaho garage of Keith and Marge Lunders.
The match cases are available in either brass or aluminum and come in two different sizes. The standard length cases are 3 7/8”, designed to fit 2 3/8” strike-anywhere matches. The long length cases, measuring in at 4 1/4”, are designed for REI Storm Proof Matches. Aluminum cases are available in black, silver, green, or red.
Last winter, I bought a standard length, black aluminum case. It has been part of my wilderness EDC for close to a year.
Though I don’t always use them, I always carry matches into the wilderness, in addition to at least one BIC lighter and a multitude of ferro rods. Ferro rods are my primary means of starting fire – usually with some synthetic tinder, such as Vaseline soaked cotton balls. It’s also my primary way of starting my alcohol stoves. If I’m not having luck with the rod, or all my tinder is wet, I can move to a lighter or a match to get the fire going. I’ve also found that when it gets to about 20 degrees Fahrenheit or below, denatured alcohol does not like to take a spark – instead requiring a match or lighter to start my stove.
A lighter is of course the easiest way of starting a fire, but because I carry a BIC lighter, it is not always dependable. If it was submerged, it will need some time to dry out before working. If there are high winds, the flame will no doubt get blown out. I have previously carried waterproof, windproof butane lighters, but those seem to eat through the fuel way too fast to be practical wilderness devices. It is difficult to justify the huge price increase in one compared to a BIC lighter. The other problem with BIC lighters is that it can be hard to determine how much fuel you have left. You can judge the weight, shake it around next to your ear and listen, but it’s a rough estimate at best. That’s what I like about matches: you can count how many you have. For this simple reason, I am sometimes likely to go to my matches rather than my lighter when I need ready-made flame.
Carrying the aforementioned REI Storm Proof Matches also addresses some of the other concerns of the BIC lighter: they will light when wet (if lit and then submerged, they will quickly relight themselves after you remove them from the water) and are nigh impossible to blow out. This makes them a great emergency fire source, but, like the fancy butane lighters, are relatively expensive compared to standard strike-anywhere matches. Because of this, I carry both: normal strike-anywhere matches for general use and REI Storm Proof Matches for when the elements are against me. The REI Storm Proof Matches, being pretty darn waterproof, aren’t in much need of a waterproof case (I imagine that they will get soggy and useless if they’re kept underwater for a long period of time, but if you accidentally take a bath during a river crossing and crawl out within a couple minutes, the matches should be fine). Strike-anywhere matches, on the other hand, do need extra protection. Hence why I decided to start with the standard size K & M case.
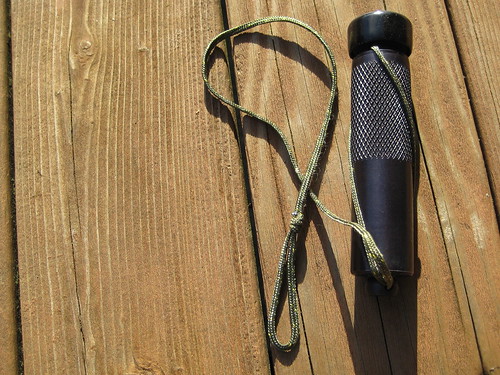
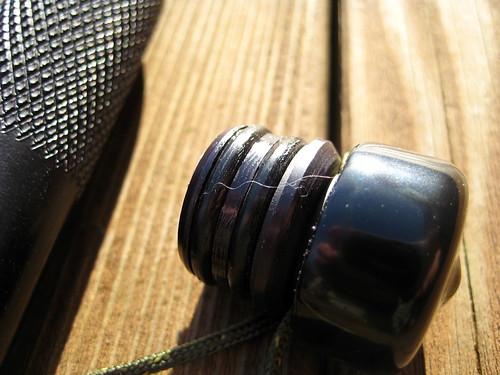
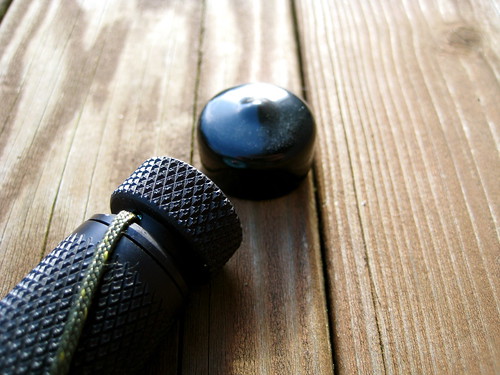
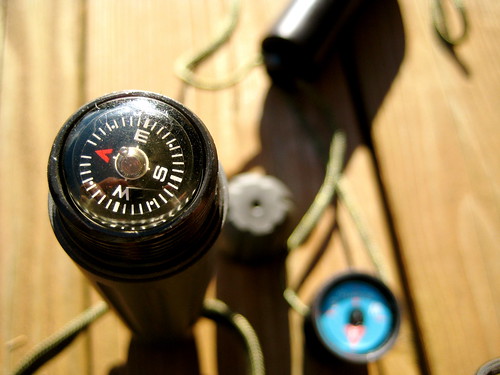
All K & M match cases feature a unique closure system. The lid itself has two o-rings on it to prevent any water leakage (guaranteed to 2000 psi of water pressure). It’s not a screw on lid, but simply pressed onto the case. After the lid is on, you then twist the cap, which in turn twists and tightens the thin nylon lanyard around the body of the case, ensuring that the fit remains tight. Ingenious, simple, and effective.
The body of the case itself is about 3” (not including the cap). The bottom half is smooth, while the top bit is etched with a pattern that ensures a good grip can be had on the case, even when you and it are soaked.
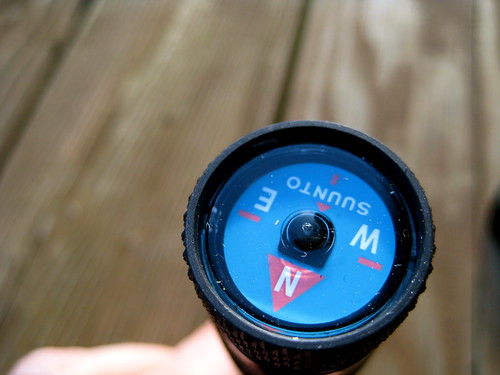
The top of the lid sports a small Suunto compass for general direction finding, greatly increasing the utility of the item. This isn’t some cheap, $1 knock-off button compass, either. Suunto compasses can be depended upon.
The outer rim of the lid has been etched in the same manner as the top half of the body for grip, but the case also comes with a small protective piece of plastic that slides snugly over the lid, protecting the face of the compass. With this installed, you loose the extra grip on the lid. This may be a problem in some conditions.
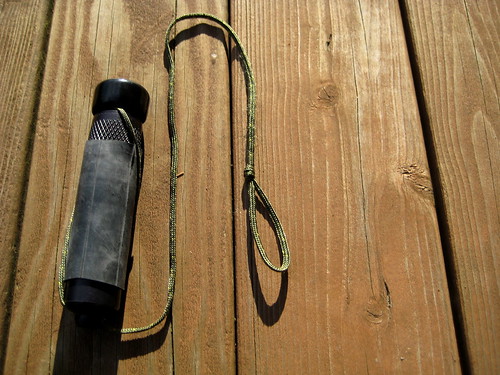
The lanyard, after it does its thing tightening the lid, extends down past the body of the case for about 12”, terminating in a loop, which allows the case to be securely fastened to your person.
The inside of the lid is roughened, which is supposed to provide a surface for striking the matches. Perhaps I don’t know how to strike a match, but it’s never worked for me. In fact, as a general rule, I find strike-anywhere matches to actually be strike-anywhere-there-is-a-commercial-match-striking-surface matches. I never have luck attempting to strike matches on any old rough surface. But that’s not a problem: all REI Storm Proof Matches come with extra striking surfaces inside the box. They’re pretty heavy duty, work with all types of matches, and come sealed in plastic. I tend to collect them and stash them everywhere. For the K & M match case, I cut off a small piece that would fit on the bottom of the lid and super-glued it on. This guarantees me a working surface to strike my matches.
The rest of the striker I put back in it’s plastic cover and store in the body of the case, for use as a backup. The plastic prevents it from striking and lighting any of the matches.
Because of the striking surface on the lid, I store all the matches tip down, so that they won’t accidentally light and turn the case into a bomb. With the the extra striker stored, I can jam in about 25 matches, give or take a few. You could fit in more if you removed the striker. The match case is also a nice place to carry a pre-threaded needle or two for emergency repairs.
Around the outside of the case, I keep a length of that same 700x35 bicycle inner-tube that I have around my BIC and a couple of my Moras. The inner-tube, along with matches that are guaranteed to be dry, gives me a sure-fire method of fire starting.
Both the brass and aluminum cases sell for $19 each. That may seem like a lot of money for a simple match case, particularly when you can pick up a cheap-o plastic one for $1.75, but I think it is well worth the money. The brass case looks a lot nicer and is more durable, but is a good deal heavier than the aluminum.
Some day I would like to acquire one of the long aluminum cases for my REI Storm Proof Matches, even though it is not strictly necessary.
I also own a TAD Gear Life Capsule O.K., which makes a good match case. The TAD Capsule is equally waterproof and also includes a compass in one end (albeit a cheaper one), but because of the significantly increased weight of the TAD capsule over the K & M case, I think the K & M is a superior product.
Another review of the case, along with some discussion of matches, can be found at British Blades. I thought I remembered Schwert doing a review of the case on the now defunct Outdoors Magazine, but I cannot find it in the archives.
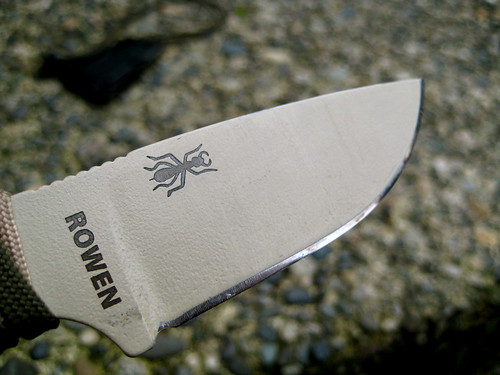
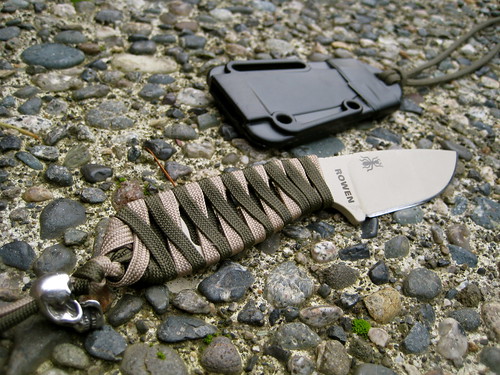
My primary EDC knife for the past few years has been a plain-edge Emerson Mini-Commander. It’s a great little knife: an ideal size for EDC and extraordinarily tough for a folder. I’ve used it as a pry-bar a few different times on objects that I would be afraid to pry with some fixed-blade knives. The Mini-Commander is no worse for the wear.
Still, I’ve often thought that I would like to EDC a fixed blade. After all, despite it’s toughness, the Mini-Commander is a folder and that gives it some limitations. I’ve also found that the grind and shape of the blade is not ideal for some wood-working and wilderness survival tasks. Making feather sticks with it isn’t easy.
I have carried a small Nemesis Hellion around my neck most every day for the past couple years. It’s a fixed blade, but quite small. As I’ve stated elsewhere, I think of the Hellion as a novelty item and a fun toy more than a tool. It’s extremely concealable due to its size, but could by no means replace the Mini-Commander.
Folding knives are fairly common and tend not to frighten many people. Fixed blades, on the other hand, are not so common out of the wilderness and rural areas. Now, I’ll admit that I have no idea concerning the legality of carrying a fixed blade in urban environments. I tried reading up on knife laws a number of years ago and quickly gave up – they are so convoluted and contradictory as to be meaningless. And so, for me, they are. I ignore them. So far that seems to work out pretty well. I don’t seem to recall granting any government the right to regulate a tool such as a knife, anyways. Still, I do concern myself with other people’s feelings and, as odd as it is, some people feel nervous around folks with fixed blade knives strapped to their hips. Even something like a nice 4-5” bushcraft blade on the belt doesn’t seem to fly in a city. I needed something more concealable, but still of a size large enough to be of some use.
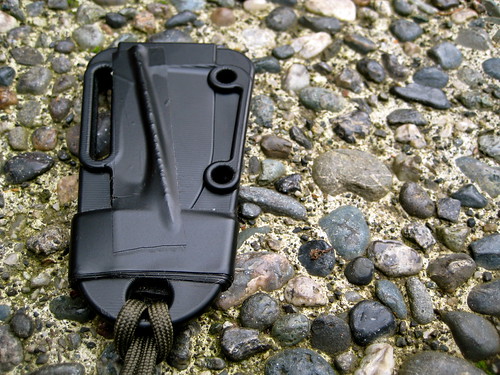
Two products immediately jump out as a perfect solution (well, three, but I can’t afford another Chris Reeve knife): the RAT Izula and the Becker Necker. Both knives are small and flat, which lends them to a number of different carry options, but large enough to function as utilitarian tools. The Izula is 6.25” over all, with a 2.88” blade and 3.37” handle. The Becker Necker comes in with a larger 3.25” blade and 3.5” handle for an overall length of 6.75”. For the slight difference in overall length, one would think that jumping on the Becker Necker for the larger blade would be the way to go. After all, that extra .37” of blade could equate to more utility. But in searching around the internet and reading a number of comparisons, it became evident that the RAT Izula was the favored knife. It seems to be the consensus that, comparatively, the Becker Necker has too little handle for its length of blade. I don’t consider my hands to be large, but they certainly aren’t small, and I know that having too small a handle could completely ruin a knife for me, regardless of the quality of the blade. So, I chose the Izula.
Izula Options
The Izula can be purchased in two different packages: either the standard knife and sheath, which RAT asks around $80 for (way overpriced) but can easily be got for closer to $50 (a reasonable price) or as part of a “survival kit”. The “survival kit” starts with the same knife and sheath, but also includes a MOLLE lock, paracord, cord lock, snap, split ring, ferro rod, and whistle. RAT asks $100 for this complete kit (crazy) though $60-$70 seems the going rate for most merchants. The “survival kit” did not appeal to me. I already have paracord, ferro rods, cord locks, and split rings. The only useful item in the kit seemed to be the MOLLE lock. I decided to save the money and get only the basic knife and sheath.
The Izula also comes in four different colors, which is a bit fun: black, desert tan, olive drab, and, best of all, pink. I was quite tempted to get the pink, especially given my concern over other people’s feelings of fixed blades. Who could be afraid of a man with a pink knife? But it turns out that I was able to find the desert tan knife for less money on eBay than I could get the pink knife for, so I went with tan.
Edge
The flat ground 1095 steel takes an edge very easily on my Japanese water stones. With the stones and a leather strop, I can get Izula as sharp as my high-carbon, scandi-grind, bushcraft blades. Scary sharp. In fact, the knife is very, very impressive in what it can do. Its only limitation is its short blade and, for longer sessions of use, the bare, skeletonized handle.
Handle
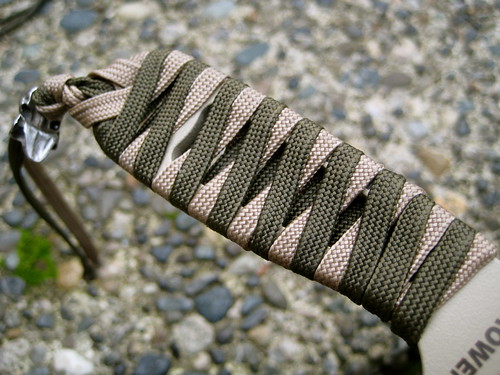
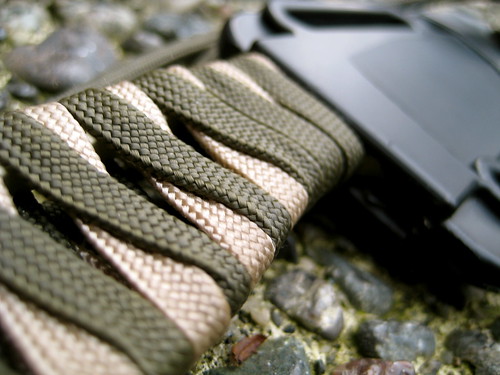
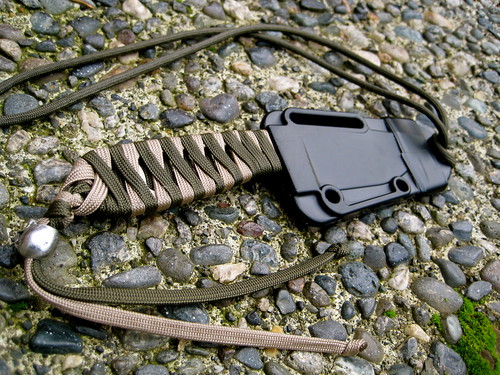
When I first got the knife, I took some olive drab paracord and wrapped it in the way instructed on the back of the Izula instruction sheet. The current paracord wrap that I have on the handle is a 180 degree katana wrap. I first did this with normal paracord, but found that it made the handle a little too thick, so I went back and did it again with gutted paracord. That worked out better, but, being gutted, the paracord does not add a whole lot of extra padding. At the end of the day, the katana wrap is more for looks. The wrap that RAT recommends is a more practical way to pad the handle and carry spare paracord, but it doesn’t look anywhere near as cool!
At the end of the handle, I finished the wrap with a simple overhand knot. I had a unused skull bead laying around, so I decided to leave the two tail ends of paracord a bit long and thread the skull bead through them. By sliding the skull bead to the end, I create a loop for my wrist. Rather than tying the ends of the cord together, I tied an overhand knot in each one separately, which prevents me from accidentally pulling the bead off, but also means that I can slide the bead to the top and just have two loose ends of cord, rather than a loop that will no doubt get caught on things. Honestly, I’m not a big fan of wrist lanyards on knives. I rarely ever use them. But I am a fan of skull beads. Like the rest of the wrap, this lanyard bit is on there just because it looks cool.
Sheath
The sheath itself was the surprise in this whole package. It is some sort of “injection molded thermoplastic” that is supposed to be more cold tolerant than Kydex. I’ve never had a problem with Kydex in the winter, but apparently extreme cold makes the Kydex brittle and prone to crack. The fit of the sheath was what most impressed me. It is, without doubt, the best fitting sheath I have ever had for a knife. The knife pops right in there and is completely locked – no wiggling or movement what-so-ever.
Mods
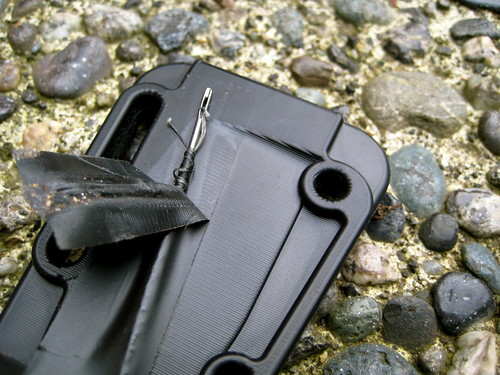
I’ve taken a size 14 sail-making needle pre-threaded with a length of black Kevlar thread and taped this to the back of the sheath with a piece of electrical tape. Dave Cantebury did this in a video on a Mora knife sheath a few months back. I thought it was a great idea.
It doesn’t add any noticeable weight. Even though I carry a sewing kit in my possibles pouch, I’ve since taped a prethreaded needle to the back of all my plastic knife sheaths. (Tape doesn’t stick too well to leather, so I haven’t figured out how to carry a needle on my leather sheaths). Around the bottom of the sheath, I wrapped a bit more electrical tape (I was out of 1” duct tape at the time). There probably isn’t more than 2 or 3 feet. It never hurts to carry extra tape!
Carry Options
Some people have complained about the sheath because it doesn’t come with a belt clip of any sort. This worried me as well. I wasn’t sure that I would want to carry it around the neck all the time and, since I didn’t go for the expensive kit that included the MOLLE clip, I did not know what other mounting options I would be able to come up with. It turns out that with only a cord lock (self supplied out of my repair box, since I didn’t get the “survival kit”) and a little over two feet of paracord, the sheath becomes remarkably configurable.
Neck Carry
To carry it around the neck, I simply slide the cord lock over both ends of the paracord, put the cord through the top hole in the sheath, and loop it through itself. The cord lock allows me to adjust how high or low it sits on my chest. As with the wrist lanyard, I put an overhand knot in each end of the paracord to prevent me from accidentally pulling the cord lock off, but refrain from tying the two ends of cord together. I don’t want to create a secondary, smaller loop on the back of my neck for things to get caught on when I adjust the cord lock up.
As I mentioned above, I initially thought that I might not want to carry the Izula around my neck. It’s a good deal bigger, heavier, and bulkier than the Nemesis Hellion neck knife that I’m used to. But I was pleasantly surprised. The profile of the knife is slim enough so that it can almost completely disappear under only a t-shirt. Unlike the Hellion, you are probably not going to forget that it’s there because of the weight, but it is by no means uncomfortable.
A lot of folks who carry a neck knife go on about the danger of using knotted paracord as a lanyard. Paracord is very strong. Someone sneaking up from behind could grab the cord and strangle the wearer rather easily. If this concerns you, you could use some weaker cord (or chain), tie a slip knot, or invest in some sort of break away device. Personally, I’m more concerned with the security of the knife around my neck (which sort of rules out slip knots) and I like the simplicity of this system. In the years that I have been carrying the Nemesis Hellion around my neck on gutted paracord, I have yet to be strangled. But it is something to be aware of – especially if you find yourself getting in a tussle fairly frequently. Do remember, though, that the paracord around you neck is attached to a knife, and knives cut things.
Front Pocket (TAD style)
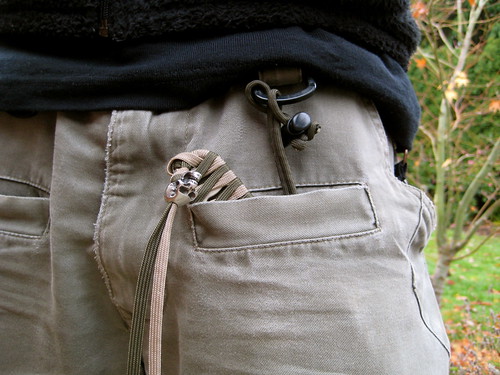
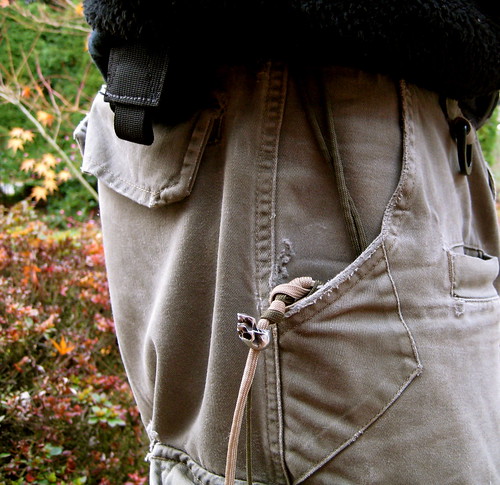
My favorite way to carry the Izula is in one of the two front pockets that Triple Aught Design places on their pants. In my Legionnaires, I carry the knife in the left front pocket. It sits in the pocket rather securely, with only the top half of the handle exposed, leaning to the right. This allows for a very fast, right-handed cross draw. I have the paracord and cord lock setup and attached to the sheath the same as in the above neck carry option, but in this setup I’ll put the cord through the plastic D-ring above the front pocket and loop it through itself so that the sheath and knife are securely attached me. Normally, when I draw from this setup, I’ll grab the handle and push against the sheath with my thumb, popping the knife free. But because the cord is attached to the D-ring, I can also just grab the handle and yank it to my right, extending the cord till it reaches its full length and pops the knife free. Personally, I feel that this is too obtuse a movement, so I prefer popping the knife free of the sheath with my thumb. If you prefer the latter option of yanking the knife, you could move the cord lock a few inches up the cord, thus shortening the distance you have to pull before fully extending the cord and popping the knife free. I will usually leave the cord lock all the way against the knots at the end of the cord and stuff the excess amount of cordage in the bottom of the same front pocket.
Side Pocket
As much as I prefer the above option, not all of us wear TAD pants every single day. When wearing another pair of pants, I will carry the Izula in the right side pocket, tip down. I found that most pockets are sized so that the tip of the sheath reaches the bottom of the pocket with only about the top 1/4” of the handle sticking out. Again, I keep the paracord and cord lock attached as before, with the cord lock slid all the way against the knots at the end, creating a big loop. This loop I run through my belt, guaranteeing the the sheath and knife are securely attached to me. To draw, I reach my hand in the pocket, grab the handle, and push against the sheath with my thumb, popping free the knife. I’m required to get my whole hand into the pocket to grasp the handle, which makes the knife slightly slower to draw than a folding pocket knife clipped into the same pocket (especially compared to an Emerson with the wave feature, such as the Mini-Commander).
Because the cord is attached to my belt I could just grab the handle and pull out or up, extending the cord till the knife pops free, but this is even more obtuse a movement than when drawing in the same manner from a front pocket. I’m not a fan.
Belt
The paracord and cord lock really become useful when you decide you want to carry the Izula on your belt. The first step is to unloop the cord from the sheath. Then remove the knot in either end of the cord so that the cord lock can be removed. Next, thread either end of the cord through the two holes in the side of the sheath and the reinstall the cord lock, retying the same knot in either end of the cord to prevent the cord lock from being removed.
Move the cord lock about halfway up the cord, grab a bit of the cord and pull it through the large slit opposite the two holes on the sheath. What you now have on the front of the sheath is a line of paracord crossing the top horizontally and, on the bottom, the cord coming together horizontally to the cord lock. On the back of the sheath you have two vertical loops that you can thread your belt through.
With the sheath attached to your belt, you can then move the cord lock tight against the sheath, pulling as much paracord through the lock as you can. The Izula will then be mounted on your belt.
When I first saw this carry option pictured in the manual that RAT provides with the Izula, I was skeptical of using the paracord this way. I didn’t think that you could could get the paracord tight enough to eliminate any wiggling or movement. I’ve now carried the knife a good deal like this and I am perfectly happy with it. The sheath is just as secure as a sheath with a belt clip or malice clip (albeit easier to cut off). If you keep it attached to your belt consistently for a few days, the cord lock will eventually slide down a bit, loosening up the cord and causing the sheath to move a little when the knife is drawn. This can be addressed by checking the tightness of the lock once a day every time you put on your pants, which I don’t think is too much to ask.
The downside to this method is that, because we’re using the same piece of paracord as we use when wearing the knife around our neck, the paracord is necessarily long. You will have 6” or so or cord dangling below the lowest point of the sheath. This would be a problem if the two ends of the cord had been tied together, forming a loop, but because they have not been tied thusly, the two ends are loose and will not get caught on anything. They don’t bother me.
Spine
The spine itself is .156” thick, with about 1/2” of a grooved thumb ramp at the start of the blade. I’ve never found these thumb ramps to be necessary on any knife, but they don’t get in the way, either.
Initially, I found that I could not generate any sparks by sparking the spine of the Izula against a ferro rod. I know 1095 is high-carbon, so I figured it must either be the tan-colored paint that was preventing me from getting any sparks, or the corner of the spine was slightly rounded. To address both potential problems I set the spine flat on top of a coarse silicon-carbide stone and slowly ground down the first 2” from the tip. This removes the paint and squares off the edge, giving a 90 degree angle that should be ideal for striking sparks. With that change made, the Izula will throw a decent shower of sparks.
Overall
I’ve been EDCing the RAT Izula for just over two months now. So far, I have been extremely impressed with the knife. Unless I am for some reason forced to carry a folder instead of a fixed blade, I doubt that I will go back to carrying the Emerson Mini-Commander. Direct comparison between a fixed blade and a folder is not exactly fair since they have both been designed with different intentions and are markedly different tools, but I find the Izula to be a superior knife. If I woke up in the zombie apocalypse, I’d much rather find the Izula in my pocket than the Mini-Commander.
If you think you can get away with EDCing a fixed blade, I’d strongly urge you to consider the Izula. As I mentioned in the beginning, the $80 that RAT asks for the knife is overpriced, but it’s not hard to pick up an Izula for closer to $50, which I think is a very good value. (It’s certainly cheaper than a quality folder like an Emerson!)
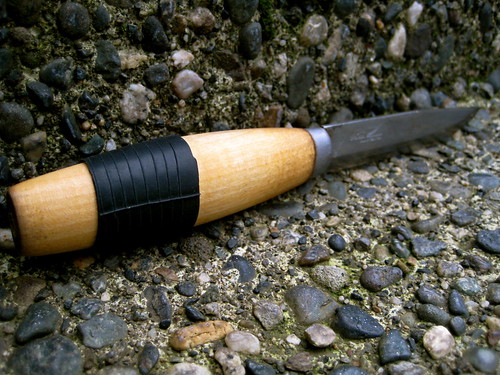
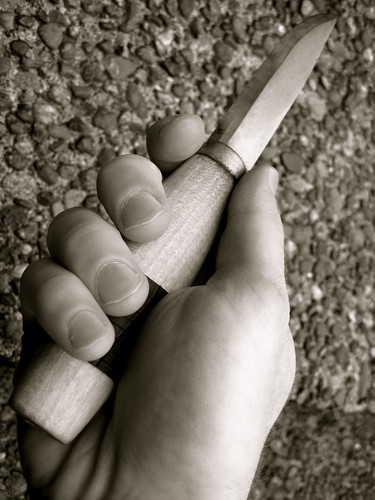
One of the pesky traits of the wooden handled Mora knives is their lack of grip when wet. One could acquire a Mora with a rubber handle, but, let’s face it: those are ugly. Instead, I cut a piece of 700x35 bicycle inner-tube about an inch wide and slide this just less than halfway on to the handle. The grip is immediately improved. If you were so inclined, you cut a piece the length of the handle and cover the whole thing, but so far it seems that this small piece is enough.
As with the rubberized BIC, this also provides another way to carry tinder that will work even when wet (though it will require a lighter or candle to start).
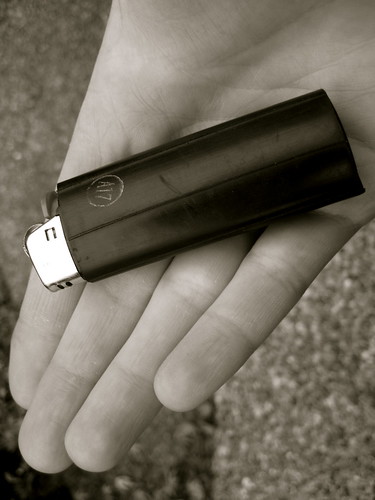
Here’s a neat trick I picked up from Dusty’s YouTube video. In the video, he shows how to use a couple of old bicycle inner-tubes to make a semi-waterproof pouch for a BIC lighter. That didn’t appeal to me too much: I always carry a BIC in my pocket and his idea added to much bulk for my liking. But, at the end of the video, he cut a smaller piece of inner-tube to make a sort of sheath for the lighter.
I thought that was a great idea. It gives you a nice, rubberized grip for the BIC and provides a simple way of always carrying waterproof tinder.
I’ve now cut off pieces from a 700x35 bicycle inner-tube and made this modification to all my lighters.
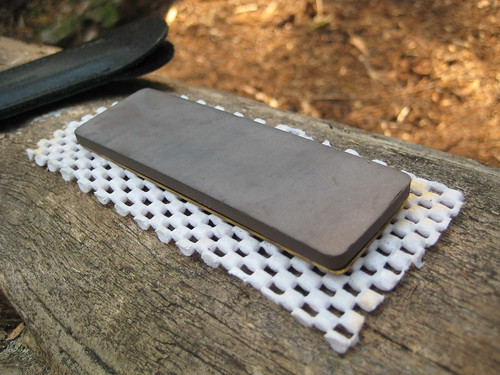
The Fallkniven DC4 is one of the more popular pocket-sized knife sharpeners, particulary among bushcrafters, due in no small part to patronage by Ray Mears.
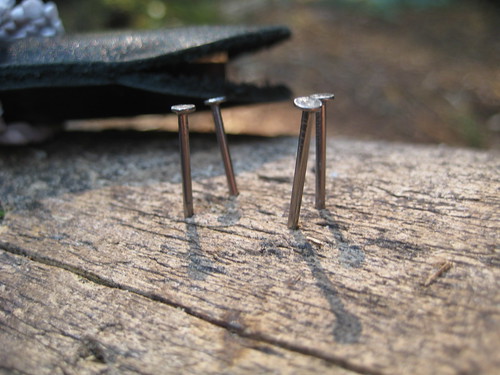
The technique that Ray Mears uses to keep his stone from moving around is to create a frame by hammering 4 small nails around the stone into a log. This works, but, over on the Equipped to Survive Forums, I picked up a better idea: simply cut up a bit of non-stick rubber padding.
This padding is sold in rolls and meant to be placed between carpets and hard-wood floors to prevent the carpet from moving around. The stuff that I use is actually meant to line shelves and drawers. The only different between it and the carpet padding is that the shelf and drawer stuff has smaller squares and a tighter mesh.
I find the padding to be much more convenient that the nails. It’s easier to deploy – you don’t have to take the (albeit small amount) of time to hammer in and then remove the nails; the pad works just as well on a rock as it does on a log; and the pad does not get in the way when sharpening, as the nails will sometime do.
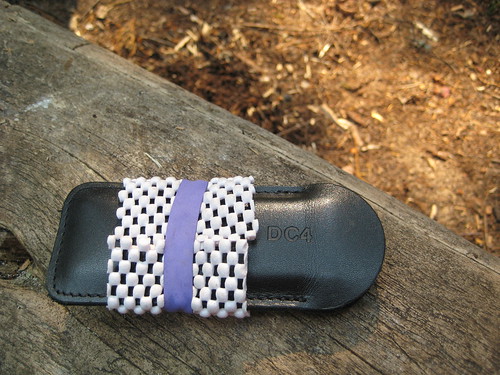
For storage and transportation, I simply wrap the pad around the DC4’s sheath and secure it with a rubber band.
I still carry the small nails in the bottom of the sheath just in case, but I think the pad is a better way to go.
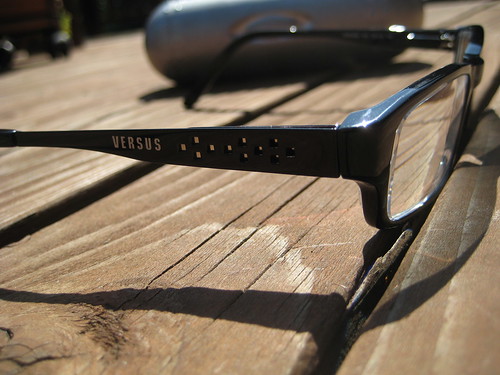
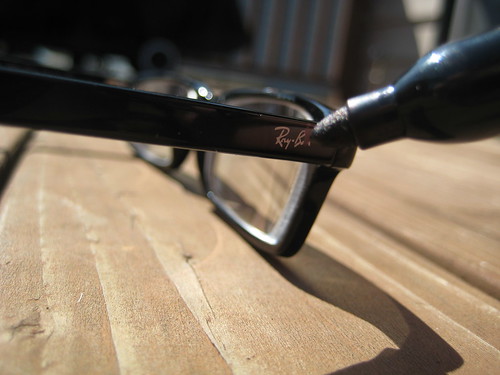
Last week, my Oakley glasses broke, cracking right down the center of the nose piece. I had had them for only a year and a half, which is not very long for a pair of frames. I would have expected to have had the same set for twice that amount of time. Such an event does not bode well for Oakley or my opinion of the quality of their product.
An attempt at repairing the glasses by taping them back together failed. I needed to buy a new pair of frames. Luckily, I was able to take advantage of a sale and acquired two pairs of frames for the price of one, which makes the otherwise obscenely high price of glasses more reasonable. This also gives me a backup pair in case I bust my primary set again.
(This time around, during the period between breaking the Oakleys and receiving the new pairs, I was able to use an older pair of frames with a weaker prescription that I had saved. I should have also been able to use my Revision Sawflys with clear lenses installed, but I have not kept the prescription in the insert up to date. This will be addressed for the future.)
Both the new pairs of frames that I chose had advertisements on either side of the arm. Clearly, that would not do. I grabbed the handy-dandy Sharpie sanitizing tool out of my EDC and, in a few moments, had the problem addressed to my satisfaction.
The sanitation job with the Sharpie is evident when inspecting the frames up close, but, at a distance, from where most people are standing, it is not to be noticed. I’ve also found that the ink will wear off over time. It will have to be reapplied every few months. The small effort is worth it, though, as it helps to clean the environment for all those around me.
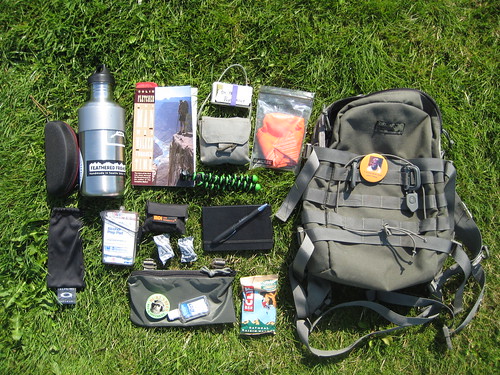
Today I went on a longer bike ride than the previous day. I didn’t want to carry the size or the weight of my FAST Pack EDC, so I grabbed the Kifaru E&E. I use the E&E as my alternate EDC bag when I need something smaller.
The items in the E&E are simply transferred over from the EDC items in the FAST Pack, but not every item makes the cut. This is a more minimalist setup. All level 1 and level 3 EDC items remain the same.