You are currently viewing all posts tagged with gear.

Rudy Project Rydon

I’ve used a pair of Rudy Project Rydon Stealth glasses as sun and safety glasses for about five years now. They’re a great eye protection system for active wear, and I think are especially attractive for those who require prescription eyewear. The Rydon offers an adaptable system with interchangeable lenses and full coverage, in a lower profile compared to popular tactical eyewear systems like the Revision Sawfly, Oakley M Frame or ESS ICE.

Rudy Project Rydon System

The temples and nosepads of the Rydon are made from an pliable rubber material that lets the user adjust them however they want. You can have straight temples or hook them down behind your ears. You can move the nosepads to get the right height and clearance on your face. I find that both adjustments largely stay in place after being set. If they do move, it is simple to reset them.

Safety & Durability

The only difference between Rudy’s “Stealth” and non-“Stealth” line is the ANSI Z87.1 rating applied to the frame. Z87.1 is the standard for eyewear protection that will be familiar to anyone who has worn safety glasses or so-called “tactical” eyewear. It describes, among other things, impact resistance. The Rydon lenses are interchangeable between Stealth and non-Stealth variants, and certain lens selections have their own Z87.1 ratings. The Stealth frames are made from a different material than non-Stealth. The non-Stealth Rydons fail to meet Z87.1 standards due to how they shatter1.

Unfortunately, Rudy has not certified the Rydon for MIL-PRF-32432, the military specification for ballistic eyewear.

As you might expect, the Rydon have proven to be very durable. I’ve used them regularly over the past five years. I shoot in them, I crash bikes in them, and I’ve been punched in the face more times than I can count in them. They’re none the worse for wear. Certain lenses have minor scratches, but none that I notice when I’m actually wearing them. The frames themselves are like new. The rubber material does not absorb sweat and odors, which is a complaint I’ve heard of Oakley’s “unobtainium” rubber temples.

ImpactX

Rudy is well known for their ImpactX lenses. They describe it as being a “bullet-proof, transparent, and light-weight material capable of providing superior protection, reliability and longer lasting performance than polycarbonate”. It is what Apache windshield panels are made out of, which makes me feel good about myself2.

ImpactX is actually just Rudy-branded NXT. NXT is a variant of Trivex. I’m not sure what the difference is between NXT and Trivex. It may be that NXT is just a specific branding of Trivex. I do know that the Z87.1 impact protection that NXT/ImpactX claims is a property of the Trivex. Trivex gives equal protection.

Trivex is a polymer that was introduced as an alternative to polycarbonate. Traditionally, most safety glasses are made out of polycarbonate. When you get a prescription insert from Revision or ESS and have them fill the prescription, the lenses they’re putting in are polycarbonate. “Plutonite” is Oakley’s proprietary brand of polycarbonate. Trivex offers equal impact protection, but has a lower Abbe number than polycarbonate, which translates to superior optical quality.

Trivex is slightly more expensive (polycarbonate costs ~$40, Trivex ~$50). Trivex also has a slightly lower refractive index, which translates to Trivex prescription lenses being slightly thicker than polycarbonate. But Trivex has a lower specific gravity, so the Trivex lenses will be slightly lighter than the equivalent polycarbonate, despite the added thickness.

There’s nothing rare or special about Trivex. Everyone does it. You can bring any set of frames into any optometry office and tell them you want to put Trivex lenses in it. As long as your prescription fits the frame, they can do it. The resulting lenses will meet or exceed Z87.1, even though your optometrist likely isn’t going to get them certified for the Z87.1 stamp.

Photochromic

The ImpactX lenses, in addition to offering impact protection, are also photochromic. Photochromic lenses darken when exposed to ultraviolet radiation. Having a clear lens in a pair of safety glasses is critical for indoor work, and being able to use the same lenses as sunglasses outdoors keeps the overall price down. It is also helpful for transitions. If you start out in the sun and then go inside, or the clouds roll in or the sun sets, your optics quickly respond without you needing to take time to remove the glasses or swap lenses.

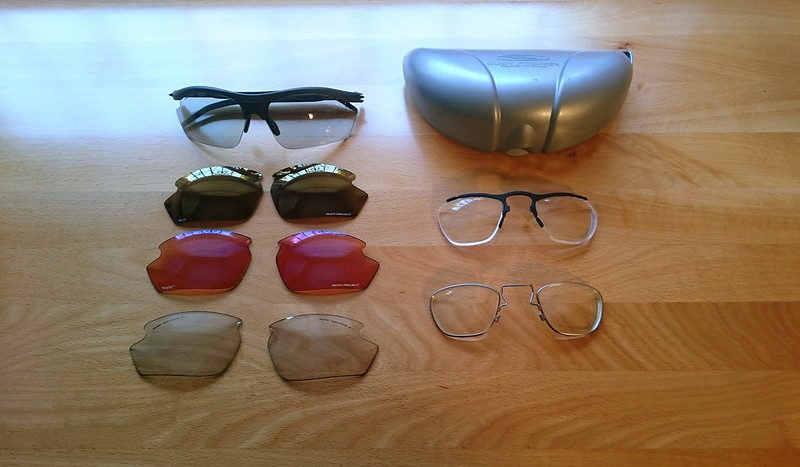
When I first purchased the Rydon system, one of the lenses I included was the ImpactX photochromic clear-to-black. This is a neutral lens that offered 18-78% light transmission. A few months ago, I purchased Rudy’s ImpactX-2 photochromic clear-to-black lenses. These offer 9-74% light transmission. In addition to the change in light transmission, ImpactX-2 also reacts faster and is supposed to respond slightly better to non-UV light3.

Other Lenses

While the ImpactX lenses are the only offerings from Rudy with the Z87.1 stamp, the company does offer some other lens options.

Rudy’s Polar 3FX is their polarized lens solution. Polarized lenses reduce glare, which is useful on water and snow. I have a pair of Polar 3FX brown lenses. At 15% light transmission, these offer about the same protection as my old Julbo Micropore glacier glasses. They’re a great supplement to the ImpactX photochromic lenses, and are light enough that I am happy to carry them as a secondary option on backpacking trips for use above the tree line.

The third lens I went with is what Rudy calls Racing Red. These are a high contrast red lens with 28% light transmission. A contrast lens in something like red or yellow is a great option for hazy days when it isn’t bright out and you don’t want much light reduction, but you find yourself squinting from the glare4.

Of the three lenses (or four, since I now have two of the photochromic clear-to-black lenses), I use the Racing Red least of all. They’re great in certain conditions, but the ImpactX(-2) lenses work well in all conditions, so I find that I can just leave them in the frame all the time and never think about it. Plus, Z87.1.

Prescription

Rudy has a few options for people who need prescription lenses. The option that I’ve gone for is the Optical Insert. I used a similar setup back in the day with Revision Sawfly eyewear and their insert, but I think Rudy does it better. While this kind of dual lens system does result in a slight degradation of optical quality, it means that you only pay for the prescription once. Being able to purchase multiple non-prescription lenses that sit in front of the prescription lens is the only thing that makes this kind of multi-lens system tenable.

Rudy offers two different carrier styles: a full metal frame and a “rimless” option.

When I first purchased the Rydon system I went with the full metal frame. It has served well over the years. Like the Rydon frame, it still functions like new. Occasionally a punch in the face will cause the insert to be knocked out of the Rydon, but that hasn’t caused any damage to the carrier, and it only takes a second to pop it back in.

This past spring, when I bought the new ImpactX-2 lenses, I also wanted to purchase another carrier to have my new prescription put in it. This time around I tried the “rimless” model. The “rimless” carrier is not actually rimless: the lenses are held in place by a thin wire that goes around the circumference of each lens. This can result in a thicker lens. With a rimless carrier, the lens need a groove cut into it to accept the wire. Prescription lenses are thinnest on the inside (near the nose) and thickest on the outside. If your prescription is weak enough that the outside of the lens is not already thick enough for the groove to be cut, the thickness will need to be increased.

I’ve not found that the lenses in my rimless carrier appear any thicker than the ones in my old carrier, but that’s something that you may want to keep in mind when deciding between the two carrier options.

When you’ve received the carrier, you can take it to any optometrist to have your prescription lenses filled. Finding an optometrist who has some experience with this kind of setup – whether they are actually a Rudy dealer or offer some other sport brand with an insert system – will like behoove you. With my first pair, I used a Rudy dealer. The optometrist that I used when filling the new carriers this year was not a Rudy dealer, nor had they ever dealt with something like this before. However, they actually grind their lenses in house, which is something I’ve never seen before. When placing the order I was able to talk with the lab manager who would actually be making the lenses, which gave me confidence that I wouldn’t be wasting my money5.

For the prescription lenses, I went with polycarbonate. With a dual lens system like this, both weight and thickness are a concern. While Trivex would have been lighter, we decided that the thinner polycarbonate would be better suited for my prescription. The polycarbonate prescription lenses would be behind the Rydon’s ImpactX(/NXT/Trivex) lenses, so I don’t have much concern about the lower impact resistance.

This time around I went with an anti-fog coating, which I did not have previously. While it was rarely ever an issue, I did occasionally experience fogging with the old lenses. It usually happens when walking into a sweaty gym when it is cold and dry outside. It’s not really the time of year for me to be able to evaluate if the anti-fog coating is doing anything on the new lenses.

I think an anti-glare coating on the prescription lens is unnecessary. The tinted Rydon lenses should take care of that problem whenever necessary.

I did also go with an edge polish on the new prescription lenses. Previously I opted to forgo that option with the old metal carriers, but with the rimless carrier I thought that it would help maintain a lower profile look – both from the outside looking in and the inside looking out. I think it was a smart decision.

Notes

  1. Personally, I think that wearing sunglasses which are not Z87.1 rated is stupid and a waste of money, outside of certain specialty requirements. Eyes are important. You can't fight what you can't see, unless you are a time travelling samurai.
  2. When you get down to it, why wouldn't you protect your eyeballs with the same technology used in gunships?
  3. Traditionally, one of the shortcomings of photochromic lenses is that they don't work well in cars. Windshields filter UV light. ImpactX-2 is supposed to handle that a little better. I can't comment on that -- I spend very little time in cars.
  4. I also believe that having a contrast lens that you can wear when it isn't necessarily bright enough for normal sunglasses is useful to combat color-based advertising intended to condition us to better suit our extraterrestrial overlords.
  5. With most optometrists you end up dealing with the people who sell lenses. Talking to someone who actually makes the things lets you dip into a different knowledge base.

I've been carrying the PHLster Flatpack Tourniquet Carrier for about a month.

It’s the first solution I’ve found that allows me to carry a SOFTT-W on-body, comfortably and unobtrusively. The Flatpack prevents the need to resort to a secondary tourniquet for first line carry, which makes it a valuable supplement to any EDC. BFE Labs offers an overview of the product in their first look.

PHLster Flatpack

Pocket Dump

Pocket Dump

I store batteries in a Pelican 1060 case.

The Pelican 1060 plus pre-cut foam from eBay makes for compact and environmentally secure battery storage. The foam I bought has 10 holes for AAA batteries and 40 holes for CR123 and AA batteries. This holds the CR123 batteries I keep on hand to feed devices and all of my spare AA/AAA Eneloops.

Battery Storage

Polyester sleeved Kevlar makes a good shoelace.

A diameter of 1.65 mm puts it in the same neighborhood as Type I Paracord, but with a little over twice the tensile strength. It fits through more eyelets than the typical Type III Paracord, making it appropriate for a wider range of footwear. It holds knots well, will pop through zip-ties in a jiffy, and the inner Kevlar can be broken down into three strands. I buy it from TwinLine.

Footwear

Electronic Support Package

I carry a selection of tools to support the electronic devices that I utilize throughout the day. This electronic support package is part of my level 2 EDC, which means it is carried in my bag. Specifically, the items are stored in a GPP1 pouch attached to my Litespeed. The pouch is a little larger than it needs to be for what I carry, and if size and weight constraints were more of a concern, the package could be further paired down without too great a loss in capability by removing some of the less frequently used items, but I find this selection works pretty well for my daily life.

GPP1

The electronic devices that this package supports are primarily my phone, helmet light, and the flashlight on my belt1. While these items serve multiple purposes, they tend to fall into the category of critical safety devices. As such, it is important to have the accessories needed to support their regular use.

I do carry a laptop between home and work, and to a lesser extent some of the items in this package support that, but for the most part the things needed to support the laptop (power adapter, peripherals, etc) live at both home and work. They’re not items that I carry.

Electronic Support Package

Battery Pack

The outer pocket of the pouch holds an AmazonBasics Portable Power Bank. This USB battery pack offers 5,600 mAh. I very rarely use this, but when I do need it, I’m extremely glad to have it. The ability to power devices away from other infrastructure is a valuable capability.

The profile of this particular battery makes it easy to carry and to use – it can easily slide into a small pocket on a pair of pants or a jacket when in use with a phone. In the pouch, it takes up no noticeable space.

Earphones

Immediately inside the main compartment of the pouch are a pair of Westone Adventure Series Beta earphones. I do not frequently listen to music when away from home or work (and I find the sound from these Westones to be less than desirable for music anyway), but I do value a hands-free interface to my phone. I use earphones for talking on the phone and (more frequently) navigation. One earphone placed in an ear combined with an OpenStreetMap application and offline routing makes for an improved bike trip in strange lands.

These particular earphones have an IPX-3 rating, which is about the weakest water resistant rating you can get, but makes me feel a bit better about sweating all over them and exposing them to rain.

Headlamp

While critical in the backcountry, a headlamp is less useful in normal daily life. I carry a flashlight on my belt. Between that and my helmet light, this headlmap rarely gets used. I keep it the package mostly just because I have space and don’t mind the additional weight.

I went with the Princeton Tech Remix Pro. It’s compact, lightweight, and offers both red and white LEDs. That set of criteria is critical to me, and fairly easy to satisfy. The reason I chose the Remix Pro over other offerings is that it uses a single CR123. I have mixed feelings about CR123 batteries, but the flashlight I carry uses one. This headlamp allows me to standardize on replaceable batteries for my every day carry.

Batteries

I carry 2 spare CR123 batteries in a Deep Carry Tube from OscarDelta.

Chargers

I backed the ChargeTech Wall and Car Charger on IndieGoGo a while back. The car charger is nothing special – I’ve had other car chargers the same size – but the wall charger is unusually small. I’ve carried a wall charger in my pack ever since getting my first smart phone, but this is the first one that didn’t suck to carry. It’s no bigger than it needs to be.

Chew Can

The Westone earphones came in a small hard-sided container that screws shut, providing some measure of protection from weather and crushing. I don’t care enough about the earphones to store them in the container, but it happens to be the right size to fit most of the smaller items in this package that I do care about.

It also looks like a tactical chew can, which amuses me2.

Electronic Support Package

Micro USB Cable

These days enough devices have micro USB ports that carrying a cable is pretty much required3. I carry a 6 ft MOS Spring Micro USB Cable, which is probably not worth the money, but has some cool features like a woven jacket and spring strain relief near the connector.

USB Condom

The USB Condom is the least used device in the whole package. Between the micro USB cable, battery pack and wall and car chargers, I can power my phone without much worry about data leakage. For those rare times when I do need to draw juice from an unknown USB port, the condom offers peace of mind. As with the headlamp, I have the space and don’t mind the weight, so I leave it in.

Card Reader

The Transcend USB 3.0 Card Reader is another device that I don’t use too frequently. Most of the time when I need to read a card, it is an SD card from a camera. My laptop has a built-in SD card reader. But occasionally it is useful to be able to read microSD cards, and occasionally it is useful to be able to do so on other machines. I choose to carry this rather than a microSD-SD adapter so that I may read any card on any machine.

USB Sticks

I carry 2 USB sticks. One is an old 8GB Verbatim stick that runs Tails.

The second is a 64GB Corsair Flash Voyager GO, which has a normal USB 3.0 male connector one end and micro USB on the other. I only recently learned that these type of sticks were a thing, but it certainly makes sense. This gives me an additional method to transfer data between my phone and laptop (in addition to a wireless network, the micro USB cable, and the card reader).

I have not performed any quantitative testing of the Corsair, but it seems to be slow compared to other USB 3.0 sticks. Still, it is large in capacity, small in size, well-built, and I bought it for a good price.

Notes

  1. Although not part of my EDC, I will throw a Kindle in my pack if I'm planning to be gone for more than a day. Fortunately, this creates no new support requirements in addition to those already set by the phone.
  2. I also have a set of S&S Precision Tactical Chew Cans, which are much nicer than the Westone container, but too small for this application.
  3. Nobody likes a cable moocher.

Lighting the Overtake

I recently purchased a Smith Overtake helmet. While most bicycle helmets on the market are made from styrofoam, the Overtake includes Koroyd, a new material that is supposed to revolutionize helmet safety. It also features MIPS, which reduces rotational forces on the brain by allowing the helmet to slide relative to the head during an angled impact.

So the Overtake offers exceptional protection, is comfortable and notable lighter than previous helmets, and it looks pretty good1. Unfortunately, it was not immediately compatible with my light system.

Overtake

I’ve been using a Light & Motion Vis 360+ for a couple years. Its a great light, offering 360 degree visibility and a nice beam wherever I happen to be looking. And its always with me, so I don’t have to worry about removing it from my bike whenever I lock up.

The rear light easily zip-ties to the back of the Overtake. The front light, however, mounts by running a rubber strap through the vents present on normal bicycle helmets. The overtake lacks these pass-through vents due to the Koroyd. I didn’t want to glue the light to the helmet, so I thought I’d try Velcro. I picked up some industrial strength 2” wide tape and stuck the loop to the helmet and the hook to the back of the light. I wasn’t sure if it would hold, but so far it seems to have worked out great. It hasn’t fallen off and I have not noticed the light being wobbly while in use.

While I was it, I put a piece of loop on the back of the helmet and stuck a ranger eye on it.

Ranger Eye

Notes

  1. Everything looks good in matte black.

APEK

I purchased one of SnakeDr‘s Advanced Personal Escape Kits (APEK) from OscarDelta on a whim about a year ago. At the time I wasn’t sure if the APEK would be anything more than a novelty, but it quickly proved its utility and has been a part of my EDC ever since.

APEK

The APEK I purchased was version 2.1. It included a split paw shim, a micro disc striker and a handcuff key key, all on a length of Technora 410 with a breakaway connector.

APEK Tools

The handcuff key is metal and works on a wide variety of cuffs. I’ve successfully used it on models from Peerless, Chicago, Smith & Wesson, ASP, and no-name Chinese knockoffs. It is connected to a small split ring, which provides a handle to more conveniently manipulate the key. The key is stored in one end of the breakaway connector, which makes it the real breakaway point of the necklace.

The split paw shim is your standard shim, and works everywhere you would expect a shim to work. It is stored underneath a piece of gutted paracord that the Technora has been threaded through.

The Technora itself has knots in it which make for pre-tied foot loops to be used when friction-sawing through restraints like zip-ties or flexicuffs. That simple trick is something I hadn’t thought of before, but I’ve come to greatly appreciate. The act of sawing through restraints tends to be very fast – particularly with a good, strong cord like Technora. What takes time is feeding the cord through the restraints, and then tying the loops for your feet. This does away with one of those time sinks.

APEK: Micro Disc Striker

The most unique component of the APEK is the micro disc striker. This is a ceramic disc made from zirconium dioxide. The hardness of the material means that it can be used to scrape a ferro rod, or to break tempered glass. This works on the same principle as broken spark plugs.

In later versions of the APEK, SnakeDr included a small glow stick. When I first saw this I thought it was a silly addition, but, at a Black Box course, Ed convinced me of the utility of a small light source. I now include a glow stick on my APEK. It is held on by 2 silicone retainers, which also keep the micro disc striker in place between them.

APEK: AHK and Bobby Pin

A photo of the most recent iteration of the APEK included a bobby pin. The way the bobby pin was shown stored on the APEK did not appeal to me, but I liked the addition. A bobby pin can be used to pick most handcuffs. More importantly, it can also be used to extend the reach of other tools. Hinged and rigid cuffs are a pain to escape from simply because they make it difficult to reach the keyhole. By putting the bobby pin through the split ring on the handcuff key, I gain another 2 inches of reach. This makes it easy to unlock rigid and hinged cuffs when handcuffed in front, both with the keyhole up (put the end of the bobby pin in your mouth) and with the keyhole down. It also works behind the back with the keyhole facing down, but with the keyhole facing up you’re still out of luck. Shimming or passing the cuffs to the front is the more likely strategy there. (Of course, this all assumes you’ve been cuffed with palms facing inward.)

I store the bobby pin attached to the split ring, with one leg through the same paracord sheath that holds the shim.

APEK: AHK and Bobby Pin

This all makes for a comfortable, compact escape package that can easily be carried everyday. It is carried in a way that is not terribly difficult to find – all of the escape tools included should have duplicates carried elsewhere on your body – but when it does get past an initial search, it is super convenient to use. The application of the APEK may be a bit of a niche, but we regularly do somewhat unconventional training at work, so that I actually find myself using the APEK with some regularity.