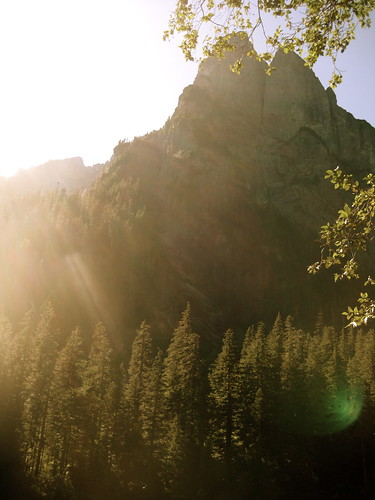
I hiked to the top of Mailbox Peak today, near Snoqualmie Pass. The trail has a reputation of being one of the toughest short day hikes in the Cascades: it’s only about 3 miles one way, but you gain 4,100 feet. That makes it a bit steep. The Mountaineers and the Washington Trail Association has this to say:
Wimpy hikers, turn the page. This trail offers nothing for you but pain and heartbreak. If you think you've got the goods to scramble up more than 1000 feet per mile, read on. Mailbox Peak brings a serious burn to the thighs of even the best-conditioned athletes, but the rewards make it all worthwhile.
Mailbox Peak Trail is a very steep, wet, unmaintained, difficult, challenging trail.
It is 2.5 miles one way to the top and gains 4,00 feet in elevation.
Search and rescue teams are frequently called to this trail to assist distressed hikers.
Please respect your own ability.
I figured it was all just a bunch of hype. It didn’t look that bad, standing at the bottom.
The trail starts out on an agreeably shallow grade for the first 100 meters or so. Then it gets steep. Then steeper. Then a bit steeper yet. Still, it’s not the challenge it’s made out to be. It may separate the obese, McDonald’s eating, TV watching, weekend warrior (1 in 4 people in the state, last I heard) from anyone who’s ever climbed a mountain before, but it certainly isn’t going to “bring a serious burn to the thighs of even the best-conditioned athletes”.
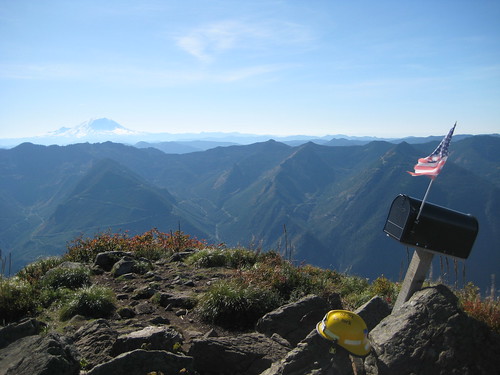
The view from the top, in contrast to the hike up, was not over-hyped. Today was a crisp, clear Autumn day and one could see for miles in all directions. Mount Si, Glacier Peak, and Mt. Rainier were all visible. And at the top, there is not one but two mailboxes. (I vote we change the name to Mailboxes Peak.) One contained something called a TerraCache, which is some sort of alternative to geocaching. The other held the log book and a number of odds-and-ends that people had left behind. At the base of one of the mailboxes was a firefighting helmet. The state’s Fire Training Academy sits just at the base of the peak and they often use the trail as part of their physical training. (I’m told that they once hauled a fire hydrant up the peak. That is quite a feat.)
I’d like to return to the trail with a fully loaded rucksack on my back. That would be some thigh burning!
This mash-up feed still exists, but you probably don't want to use it. As of May 2010, Twitter feeds are now integrated into the blog and thus are included in the normal feed. The mash-up feed now only mashes the blog feed and Flickr photos
When I first decided to add twitter posts to my site, I debated whether I would rather have them integrated into the actual blog posts or separated. Visually, I like to have the separation, but I always thought it would be neat to pull the twitter posts directly into Wordpress’ database, and so have them integrated into my RSS feed. Otherwise, for those who wish to follow my twitter posts, but are not on twitter, they have to subscribe to two different feeds – both my blog feed and twitter feed.
Today, I had the idea of keeping the actual separation of twitter and the blog, but simply creating a new RSS feed using some sort of RSS-mash-up-aggregator thingy. I thought Feedburner could do something like that, but apparently not. After searching around for other options and not finding anything that really excited me, I decided to just use Yahoo Pipes. After all, this is pretty much what it was made for.
Combining feeds in Pipes is pretty simple, but after mashing them together, I discovered that twitter’s RSS feed is kinda ugly. Luckily, editing feeds using regular expressions in Pipes is pretty simple, too. After polishing up the twitter feed a bit, I thought Why not toss my Flickr feed into this puppy? But occasionally I’ll upload a large group of photos to Flickr at a single time, and I didn’t want to totally bomb my new RSS feed. Plus, most of the time when I put photos on Flickr, I create an accompanying blog post, so I wasn’t sure that adding the Flickr feed to the mash-up was even necessary. I figured that I’d toss in the Flickr feed for now, but compromise by having Pipes truncate it to the 6 most recent items.
Then came the problem of what to do with it. I didn’t want to just toss up a link somewhere. I preferred the idea of replacing my normal blog feed with this new super-feed. But I also didn’t want to just edit the Wordpress template header. I new Feedburner had a plugin to integrate with Wordpress, so I thought about burning the new feed and then using the Feedburner plugin to pull it in, but that seemed a little excessive, particular since I don’t care about any of the click-tracking or monetizing features of Feedburner. Then I found the Feed Locations plugin, which does exactly what I wanted: allow me to specify the location of my feed in the Wordpress admin panel.
Now, if you ask Wordpress for this site’s RSS feed, you get the new feed. If you’re opposed to all this new fanciness and just want the plain old blog feed, it’s still up at the same location, just not linked to from anywhere.
Let me know what you think about having the Flickr photos in the feed. If it’s redundant, I’ll take them out.
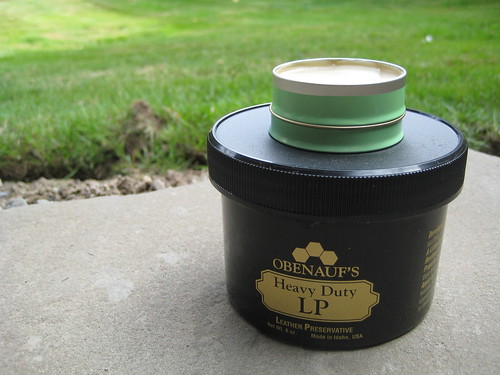
I’ve been using Obenauf’s products on my boots and other leather products since last spring and have been constantly pleased with the results. Though I’ve replaced their White Jaguar Leather Cleaner with my standard Dr. Bronner’s soap that I use to clean everything else, their oil and leather preservative are great products.
A couple days ago, I read an article which mentions that some people use Obenauf’s leather preservative as a skin care product. I was a bit shocked at first, but it makes perfect sense. All the LP consists of are “three different natural oils… suspended in Beeswax and Propolis.” And what makes a standard skin care balm? Beeswax, olive oil, and your minced up dried herbs and/or essential oils of choice. LP is pretty much a balm without the herbs. That may make it inferior to products that include the healing power of herbs, but LP is designed to protect skin – dead skin that you wear on your feet, but skin none-the-less.
(Arguably, this lack of herbal material in the LP could be a benefit: it means that the product has no strongly identifiable scent (a useful trait in the woods). If one did not care about the scent and wanted to add something extra to the LP, it would be a simple matter to melt it and put a few drops of essential oil in. Though that’s fine for skin care, I’m not sure I want my boots smelling like tea tree or lavender oil.)
I decided to experiment. This morning I cleaned out a small tin from a commercial balm and filled it with LP (by heating the LP until it liquefied, then pouring it into the smaller container). Now I have a convenient way of carrying the LP around with me, which should encourage me to try it on a regular basis.
I always carry some sort of skin balm with me, both in my urban EDC and in my wilderness gear. Usually, I opt for Badger Healing Balm or Burt’s Bees Res-Q Ointment. I’ve made my own herbal balms in the past, but, as with home-made soap, I have never felt that what I made was in any way superior to store-bought products nor that there was a significant financial savings by making my own stuff. If I decide that I like the LP product, I’ll probably end up carrying it in my larger rucksack in lieu of a normal balm. That would give me the ability to treat not only my own skin, but also take care of my boots in the wilderness. More functionality than what I have now, and it seems a good plan.
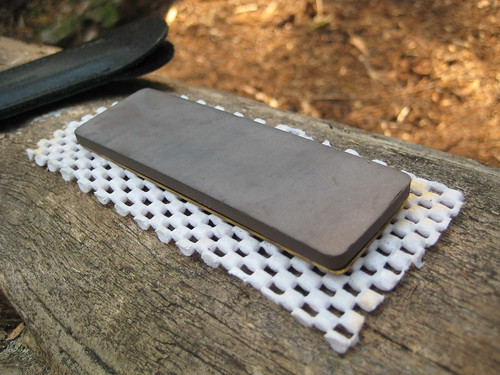
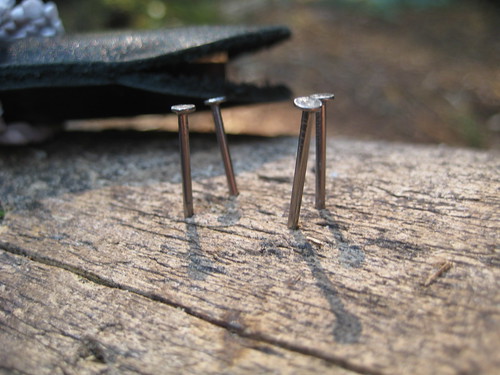
The Fallkniven DC4 is one of the more popular pocket-sized knife sharpeners, particulary among bushcrafters, due in no small part to patronage by Ray Mears.
The technique that Ray Mears uses to keep his stone from moving around is to create a frame by hammering 4 small nails around the stone into a log. This works, but, over on the Equipped to Survive Forums, I picked up a better idea: simply cut up a bit of non-stick rubber padding.
This padding is sold in rolls and meant to be placed between carpets and hard-wood floors to prevent the carpet from moving around. The stuff that I use is actually meant to line shelves and drawers. The only different between it and the carpet padding is that the shelf and drawer stuff has smaller squares and a tighter mesh.
I find the padding to be much more convenient that the nails. It’s easier to deploy – you don’t have to take the (albeit small amount) of time to hammer in and then remove the nails; the pad works just as well on a rock as it does on a log; and the pad does not get in the way when sharpening, as the nails will sometime do.
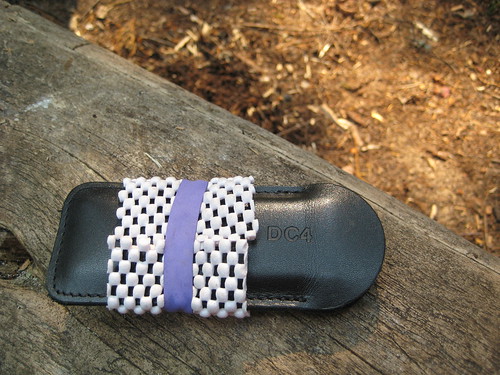
For storage and transportation, I simply wrap the pad around the DC4’s sheath and secure it with a rubber band.
I still carry the small nails in the bottom of the sheath just in case, but I think the pad is a better way to go.
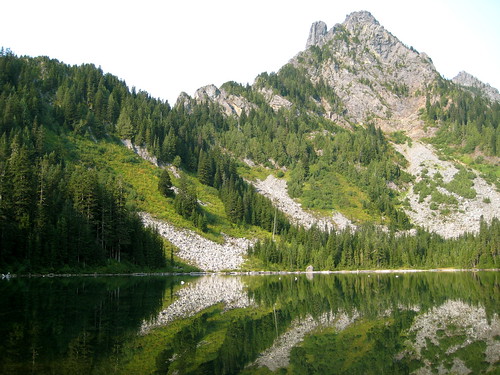
The Wild Sky Wilderness of the Baker-Snoqualmie National Forest is the newest wilderness area in these parts. It received a lot of hullabaloo last year when it was officially designated. There aren’t many trails, but the area offers much to explore.
Towards the end of this spring, I took my first trip into the Wild Sky, choosing to visit Eagle Lake. The lake is only at about 4,000 feet, but winter seemed to cling to it despite the season and conditions not a thousand feet below. On this first visit, the edges of the lake were still frozen over and the surrounding meadow covered by four feet of snow. I had not learned much about the area before venturing into it and so was surprised to find an old cabin on the eastern side of the lake. It was apparently built sometime around the 1950s for the Forest Service. They’ve since abandoned it, leaving the cabin to be maintained by locals who visit the area frequently. It houses a couple beds, wood stove, cooking implements, wood working tools, warm clothing, a bit of food, and other odds and ends that people have supplied. I spent one comfortable night in the cabin on my first visit and decided that I would like to visit the area again sometime after snow melt.
Earlier this week I made a short trip to accomplish that, spending two nights in the area to celebrate the Autumnal Equinox and the equality of day and night. I had no particular goals in mind for the trip and did not intend to log much distance over the few days.
It was pleasantly uneventful.
The hike in started on a short, 2-mile trail to Barclay Lake. I was surprised at how dry the lake had become since my previous visit. The lake looked to hold only half as much water as before, exposing logs and boulders on one end and a grassy meadow on the other. Baring Mountain still towered above the area, sunning its harsh, 3,000 foot northern face.
From Barclay, I left the trail and made my way north up a ridge to the small – and seemingly always extraordinarily cold – Stone Lake. After Stone Lake, I headed northwest a short distance through Paradise Meadow to my destination of Eagle Lake, all told only another 2 miles from Barclay.
The way from Stone Lake to Eagle Lake through Paradise Meadow was a much easier and more pleasant jaunt with a good covering of snow on the ground. Now, the meadow was a muddy bog that warranted careful attention be paid to each footstep, lest I find my boots submerged in mud. I was glad that I had not decided to come back to the area in July or August, as the meadow looked a perfect place for bugs. (Indeed, I thought to myself that Paradise Meadow was probably named by mosquitoes.) As it was, the year had aged enough that there were no biting insects about. But for that fact and the shortness of the day, it could easily have been midsummer. The skies were clear, the country green, and temperatures somewhere around 80 degrees Fahrenheit.
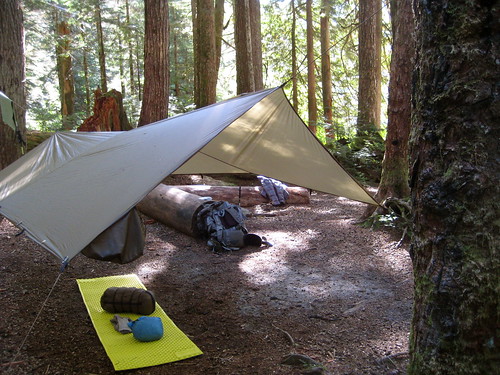
Arriving at the lake at mid-afternoon, I reported to the cabin and found it all in good order. But the day was warm and the night promised to be clear. I could find no reason to spend it in a box. So I left the cabin and found a well suited site for my tarp on the shore of the lake, a ways down from the cabin. The remainder of the afternoon and evening was spent with hatchet, knife, and saw, preparing the first fire of the season and kindling the blaze against the coming darker months.
That night, I cooked a small dinner on the fire, enjoyed the flame, and went to bed.
I slept in late the next morning, not crawling out of my sleeping bag till 9:30 AM. It looked to be another fine day. It was supposed to be the first day of Fall, but this country didn’t know it yet.
After breakfast, I lounged around the lake, explored the neighboring ridges and some more of the meadow. Near 1 PM, I thought about where I would like to spend the night. Initially I had thought that I would spend it at Eagle Lake once more, either in the cabin or in another spot near the lake, but this trip marked the second time I had walked past Barclay Lake without much of a pause there. It had always seemed a nice spot to me, despite its close proximity to the trailhead. There would be little chance of encountering many people at Barclay, it being the middle of the week and summer now over. I decided I would try a night down there.
Working my way back down to Barclay was a sweaty affair. I encouraged myself along the way by thinking that I could jump in the lake to wash and cool off at the end of it. When I finally made my way back down and arrived at Barclay it was still plenty light, but I was disappointed to find that the sun had already gone behind Baring Mountain. No matter, I thought, and, stripping down to my underwear, jumped in. It was cold. Cold enough to make me think it a surprise that there wasn’t any ice on the surface. My time in the lake was shorter than I had previously expected.
I had already laid out my nice, warm, merino wool baselayers before jumping in, and eagerly put them on after drying off. The lake had left me feeling refreshed, and I went off to find a suitable spot to hang my tarp for the night. I cooked and ate dinner as the land darkened. Just before dusk I heard a strange sound and looked up in time to see a chute open. Two people had jumped off the top of Baring and para-glided down to the meadow on the eastern side of the lake. Soon after, I retreated to bed and went off to another satisfying sleep.
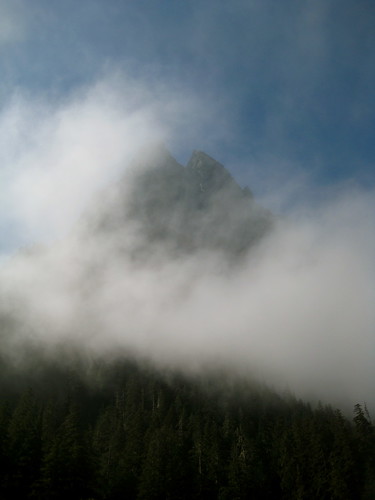
Next morning I woke up early, but stayed in my sleeping bag reading till around 9. It was another slow morning, with not much of anything occurring besides breakfast. Laying on the beach of the lake just before noon I spotted a small wisp of cloud in the west. It was creeping in on an otherwise spotless sky. No more than 15 minutes later, the valley was filled with fog. Fall had finally arrived, I thought, and took that as my cue to break camp and head off back to the trailhead.
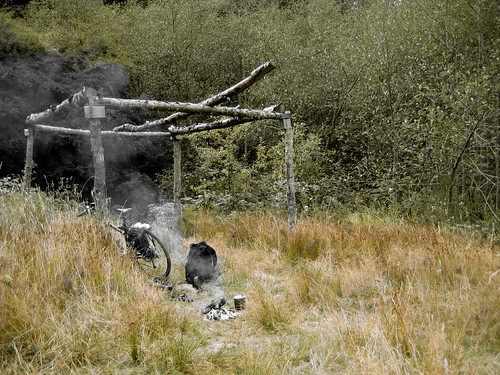
I went for a bike ride today, following a set of train tracks through the woods. Off to one side a small path led to a grassy clearing and this square structure. I stopped for a bit, processed a down log to start a small fire, and enjoyed a cup of kukicha tea while reading a book.
Last week I planned a loop through (and around) the Buckhorn Wilderness of Olympic National Forest. My previous visit had only provided a glimpse of the many mountains and valleys, all of which demanded further exploration. The loop was about 30 miles, which I thought I’d split into 3 or 4 leisurely days, allowing time for side trips and naps.
I entered the forest at the same trail head as before and climbed the same trail up to Marmot Pass.
I had arrived at the trail head later than intended, so it was already late-afternoon by the time I had made the climb to the top. My intended camp for the night, Home Lake, was another 5 miles (and 1,000 feet down, then 1,000 feet up) away, which I thought I could still easily make before dusk.
A couple miles down from the pass, I arrived at an area marked on the map as Boulder Camp: an open field with a stream running through it. I thought it would make a fine camp, but I had heard that Home Lake was a popular backcountry destination, and I wanted to see why.
As I continued down the trail, I thought about which of my meals I would fix up for dinner that night, and enjoyed the scenery of the forest. I was startled out of my serenity by a sign on the side of the trail informing me that I was entering Olympic National Park. Oops. Apparently I had not studied my map closely enough while planning the trip. I had no intention of leaving the National Forest, and certainly had not meant to cross the Park boundary. Without a permit from the National Park Service, it would be illegal for me to spend the night at Home Lake. Oh well, I thought. On the off chance that I met anyone official along the trail, I’ll just pull out the “I-used-to-do-backcountry-trail-patrol-for-the-NPS-too!” trick out of my hat and play on their sense of camaraderie.
As it turned out, I encountered no person along the trail that day and arrived at the Lake just as the sun set behind the westerly peaks. With the sky lit up red, I put on my long underwear and jacket and enjoyed a meal to end the fine day. The sky looked clear, with small chance of rain, so I left my tarp in my pack. A sleeping pad and bag in a clearing above the lake would be my home for the night. After hanging my food in a stand of trees beyond the camp, I settled into the bag and fell asleep watching the stars slowly pass by overhead. I was awoken once that night to the sound of rocks falling down the flank of neighboring Mount Constance. Satisfied to have been witness to the changing of the Earth, I slept once more.
Waking with the sun, I quickly broke my small camp and started on the trail back to Boulder Camp, from where I would take another trail that would continue my loop. Halfway back, I stopped at a waterfall for water and a small breakfast. Mid-morning found me back at Boulder Camp.
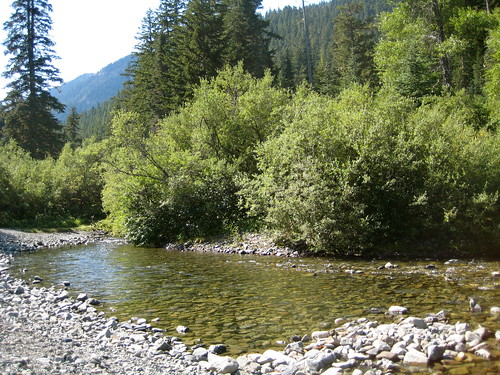
The rest of the morning was consumed by walking along the trail down into the valley carved by the upper reaches of the Dungeness River. Shortly after noon I arrived at a fine spot along the river with a rocky beach and an open field beyond. With no other demands on my time, I cooled my feet in river, fixed a lunch, and napped under the bright sun.
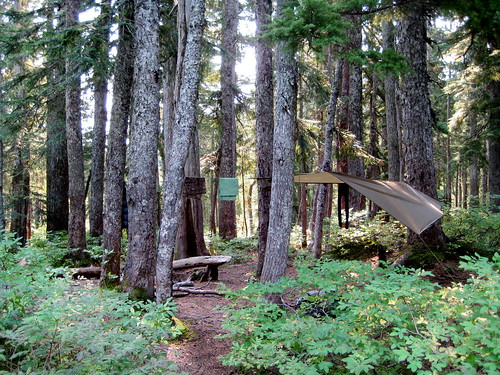
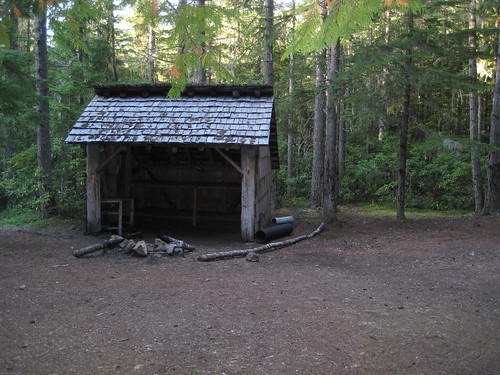
I had no planned campsite that night, intending instead to simply stop wherever I happened to be when the sun set. The rest of the day’s walk was easy going, not gaining or losing much elevation, along a trail and, at the end, a bit of an old Forest Service road. At the end of the dirt road I picked up the trail that would complete the loop. Soon thereafter I came upon a clearing and a shelter on the side of the trail.
The day was close to its end. I decided to camp near the shelter for the night. As the sun set, the sky slowly filled up with clouds, hinting at the possibility of rain that night. I decided I would place my pad and bag in front of the shelter, so as to enjoy once again what stars shone through the breaks in the clouds, but have a retreat close by in case rain did fall.
Sleep found me quickly once again that night, and I snoozed comfortably until the pleasant pitter-patter of water entered my dreams. Some conscious part of my brain recognized the sound as rain and waged a difficult battle to wake up the rest of my body enough to quickly move my bedroll under the shelter’s roof. Afterward, I slept soundly again until morning. Fog had filled up the valley overnight, blocking the sun’s wakeful rays and encouraging me to sleep well into the morning. Eventually I woke and completed the morning rituals of gathering water, retrieving my food bag, and cooking a breakfast.
On the trail again, I walked through the mist shrouded valley, wondering if the previous day had been the year’s last day of summer weather.
The day’s walk along the last part of the loop should have been a simple affair. It was on a trail, requiring no effort of navigation of my part, and close enough to the area around Buckhorn Mountain that I had scouted last time that I thought I could probably find my way without trail or much use of map or compass if I had to.
Around noon on that third day, I arrived at a fork in the trail. From looking at the map, I had expected a fork, but not for another mile or two. No matter, I thought, I have probably just been walking a bit faster than I thought. I took the right fork, which should have continued along the main trail back to Marmot Pass. The fork went slightly uphill for about a hundred feet and immediately entered a clearing in the trees. Trails, being rather fickle by nature, are often hard to mark when going from dense woods into a wide clearing. This right fork disappeared immediately on the boundary. I walked the perimeter of the clearing, thinking that I would pick up the trail again on the other side. To my surprise, I did not find what looked to be the main trail, but half a dozen smaller trails going off every which way instead. I explored them all and discovered that they had a disturbing habit of petering out into nothing very shortly after leaving the clearing. Deciding then that this right fork of the trail must not be the fork marked on my map, I backtracked to the junction and took the left fork. This trail also disappeared shortly after the junction, compounding my confusion.
I saw the sun poking through the fog and clouds a bit and decided to head back to the clearing down the right fork so as to enjoy the warmth and see if I could discover where I was. Setting my pack down beside a rock, I dug out my GPS, turned it on, and set it aside to acquire a satellite signal. Then I took the map out of my pocket and, judging from my gut feeling of my pace and length of time on the move, reckoned roughly where I thought I should be. Pulling out my compass, I attempted to get a bearing and corroborate the opinion of my location. The compass agreed with me, but, even though I was in a clearing, I was still down in the middle of a deep valley stuffed full of old growth forest and so had a difficult time getting an accurate bearing on any landmark with my compass. Still, at the very least I was comfortable of knowing that I was somewhere in a 100 meter box on the map. The GPS had acquired its signal by this time and was displaying my coordinates. I never put much faith in the device and generally refrain from using it for navigation as it has proved at times to be wildly inaccurate, but the coordinates it displayed agreed with my previous findings. Everything pointed to myself being where I was supposed to be. I was found, but the trail was most definitely lost.
Neither the right nor left fork of the trail had any evidence of continuing after the junction. The right fork had a small creek running along its western side, which matched the map, but the left fork also had a small creek, this one along its eastern edge, that was not supposed to exist. The creek along the right fork looked slightly larger. I reasoned that the left fork’s creek might be a new comer in the area and so not represented on my map. I knew that the trail that I was supposed to be following should follow a creek up to a lake. It seemed likely that this creek along the right fork of the trail was most likely the one that drained the lake. I thought I would try to follow it to the lake, from where the main trail should once again become obvious.
This planned proved well for the first hundred feet or so, but I was soon defeated by the valley. Increasingly dense plant life crowded around the stream, with frequent boulders and massive downed trees blocked my way. Without the large pack on my back, I might have attempted to continue, but, as it was, I did not think that attempting to climb, crawl, and push my way along the creek was a realistic or overly wise notion.
Accepting defeat, I sat down, pulled out the map once more, and considered my options. I knew that I could backtrack the entire loop, retracing my footsteps of the whole trip and come out that way. Another two days to do that, I figured. I had enough food to complete that with no lack of comfort, but the option did not appeal to me.
I also knew that I could make my way back down to the Forest Service road that I had used to make up part of the loop, and make my way out to the highway. But I had no guarantee that there would be anyone at all on this road to give me a lift and I judged that the road took about 45 miles to wind its way out of the forest. A worse option than the previous, this did not appeal to me either.
I was still not entirely convinced that this fork in the trail that was troubling me was not the same fork marked on the map. Looking at the map, I saw that after the split, the right fork made a couple rather wide switchbacks up to the top of the western ridge. Judging from where I thought I was, I reasoned that I could simply walk straight west up the slope and intersect the main trail. It was a steep climb, and proved my plan easier said than done.
A third of the way up, I decided to drop my pack and continue up less encumbered. The thick forest had ended up here, giving way to tall grasses and rocks, which made the going easier, but also completely hid my pack from view after I set it on the ground. I walked up a little higher, turned around, and did my best to make a mental picture of the area, hoping that I could find my way back to my pack on the way down.
Continuing up the slope (much faster than before) I resumed my search, but was discouraged when I failed to find the main trail. I thought I had gone far enough, but decided to travel up just a little bit further to make sure that I did not miss it. Slightly higher, I found a narrow channel cut through the grass. It looked like something made by the local goats. I was sure that it could not be the trail that I was looking for, but it ran in roughly the direction that I wished to go and was surely the path of least resistance. Deciding that I would see where it led, I went back down the slope to get my pack (which I found with little trouble). Then, back up again to the goat trail.
The small path continued to travel in the correct direction and was much easier than walking through the thick valley below. My spirits began to improve, but I was dismayed once more when the path split. Another fork! One path continued on, roughly in the same direction, while the other went up steeply and shortly disappeared from view. I had no idea which to take, but chose to climb the higher one. I would see where that one went, I thought, and, from up there, ought to be able to see where the lower path went as well. The decision proved well. After climbing the higher fork only a short distance, I saw above me what could only be the main trail. Wide, well maintained, and even defined on the edges by an old log here and there. I hurried onto the trail and continued on my way. In all, I had only been misplaced for about 2 hours.
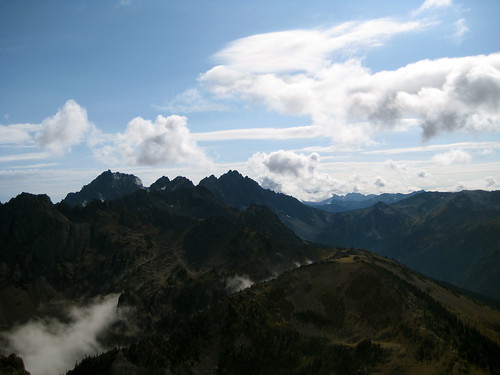
The main trail climbed high to the top of ridges, well above tree line, where the ground was covered only by rocks and the occasional hardy moss and lichens. In this sort of terrain, it’s difficult to mark out a trail, and I ended up losing it now and again. This didn’t worry me. Unlike when I lost the trail down in the valley, up here I was able to see where I was going and easily make my way along my own path.
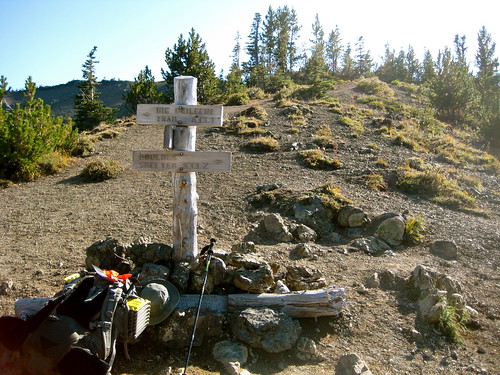
Giving up on the trail, which became only more and more faint as I went on, I marked what looked to be Marmot Pass and made my way towards it. The distance was not great, but it was steep. For some nonsensical reason, whenever I make my way cross country, I always choose a line as straight as possible, avoiding any switchbacks. It makes for a shorter overall distance, but a much more difficult climb. I did not much mind, as the views of the alpine environment made up for the difficulty of the hike.
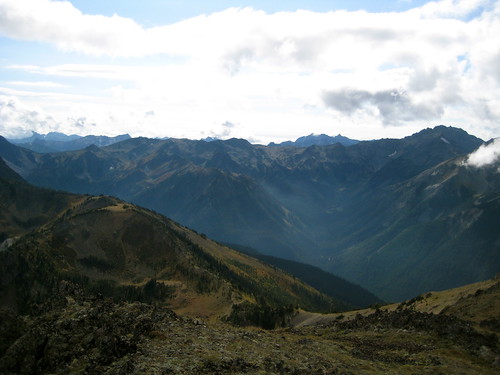
Climbing ever higher, I finally reached what I had thought would be the pass and my way out. I looked around and muttered to myself that this looked suspiciously like Buckhorn Mountain. In fact, I decided, it was Buckhorn Moutain. I had no intention of coming up here this trip and so had climbed a good thousand feet higher than I needed to. Oops. I looked down to the pass, and, with a sigh, began my descent.
Below me, I could see that the way down to the trail head, along with most the rest of the region, was covered by cloud. I marched on and, despite the day’s misadventures, found the end of the trail just before the sun began to set on the third day.