You are currently viewing all posts tagged with gear.

Luer Lock Lubing

Earlier this year I purchased the Occam Lube DIY Kit from Occam Defense. This is a simple but ingenious solution for carrying and applying oil and grease by utilizing the Luer lock system from the medical industry. I shoot tupperware that runs dirty, and I have not travelled enough with firearms to need to think about lubricating them away from home, but I have needed to pack chain lube for my bike on longer tours. In the past I’ve been disappointed by the bottles of both bicycle and firearm lubricant, which may either leak or make it difficult to apply the contents precisely. There’s nothing in the Occam kit that you couldn’t put together yourself, but it is very reasonably priced and I credit it with being my introduction to the idea of using Luer components for lubrication. As soon as I stumbled upon the kit I purchased it.

The Occam kit includes one 30ml Luer syringe, three 3ml Luer syringes, three 22 gauge Luer dispensing tips, three 14 gauge Luer dispensing tips, four Luer caps, and a Luer gender adapter. Oil is drawn up into the large syringe, which is then attached to one of the smaller syringes via the gender adapter. If using grease, the grease is simply packed into the large syringe after removing the plunger, and then pushed into one of the smaller syringes. About 1.5ml of oil (or grease) may be pushed into the small syringe from the large syringe. The remaining 1.5ml of space inside the small syringe is needed to store one of the dispensing tips and the plunger cap. The intent is for the filled, smaller syringes to be placed in various kits and be taken on the road, giving you the ability to store the oil in a leak-proof manner and dispense of small amounts of it in precise areas. For applications where you need very little lubrication, like firearms, this works great.

Luer Lock Lubing

I had never given much attention to what volume of oil I use when lubricating a bike chain, so I wasn’t sure if the smaller syringes would really be useful for this application. I’ve always been a one-drop-per-roller kind of guy, which I think results in the best lubrication with the least amount of waste. With my current oil of choice, I find that I use a bit over 3ml of oil when servicing my chain. When one of the dispensing tips is stored in the small syringe, the remaining 1.5ml capacity won’t work for me. But I can store the dispending tip separately, fill up the entire 3ml with oil, and still have a very compact, lightweight, and leak-proof option for lubricating on the go.

As happy as this makes me, I admit that carrying lube on a bike isn’t the most pressing concern. Good oil lasts, so unless you’re putting on a lot of miles in challenging conditions, you probably won’t find yourself needing to drop oil away from home. However, I have found that the Luer system is useful even at home, with a few additional purchases to supplement the contents of the Occam kit.

Chain-L for Chains

I purchased Luer lock bottle caps for 15-415 threading, 24-410 threading, and 20-410 threading. Between these three sets of caps I can convert most existing lube bottles to the Luer system. If I come across an oil in a bottle with some other type of threading (as is the case with Boeshield T-9), I transfer it into an appropriately sized bottle with standard threading.

I also purchased a few additional dispensing tips (the angled ones are nice), and a package of syringe tip caps to make the lids leak-proof when no dispensing tip is attached.

Tri-Flow for Derailleur Pivots

I can now be sure that none of my oils will leak, which is important to me whether the bottle is in a bag or a toolbox. Using a Luer gender adapter, I can easily transfer oil to a smaller travel sized container, be it one of the Occam syringes or simply a 0.5 oz bottle, or any other Luer-compatible container. Using a dispensing tip, I can accurately deposit precise amounts of lubricant, eliminating waste.

All of this is entirely unnecessary, but I find that small improvements in efficiency like this do translate to a higher quality of life. If you ever find yourself dispensing small amounts of a liquid, and you have a personality that values accuracy and precision (and tidiness), I’d definitely recommend picking up an assortment of Luer components. The Occam Lube DIY Kit is a great place to start.

Travel Tri-Flow

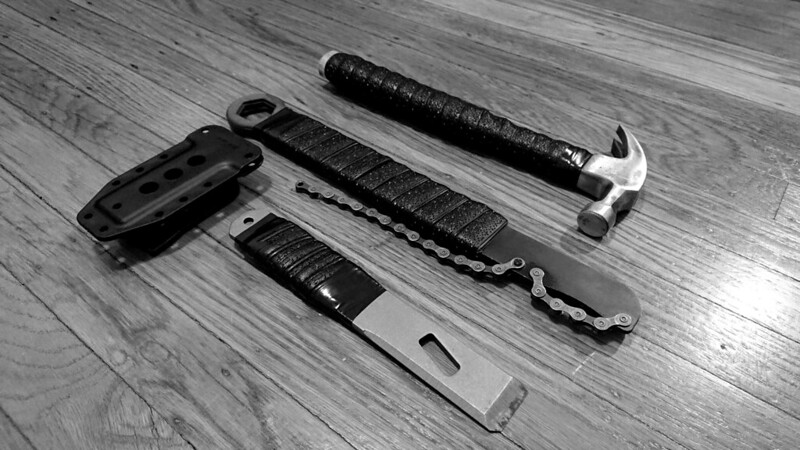
Old bar tape can be used to wrap various hand tools.

A few weeks ago I installed a new set of handlebars. My old tape was cut too short for the new bars, so I had to replace it. I used the old tape to improve the grip and padding of a hammer, chain whip, and breacher bar.

Recycled Bar Tape

Last year I bought a set of Orfos Pro lights.

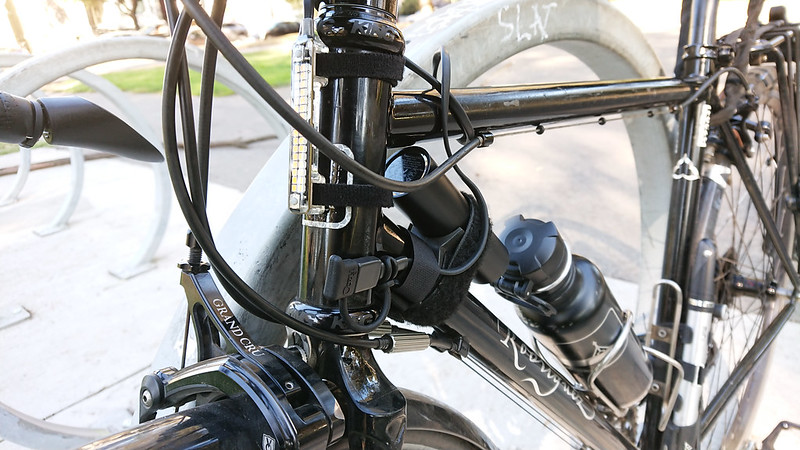
The Orfos Pro is a simple and flexible LED light that is powered by a separate USB battery. I use the white light model as my bike headlight. This means that, when not in use, the light has a male USB Type-A plug hanging off the bike. In inclement conditions I usually want light, so I’ll have the connector inserted into a battery. I haven’t been too worried about protecting the plug when not in use. Over the past 14 months I haven’t noticed any problems. But when I saw the CozyCaps USB Caps I decided they would be a worthwhile addition to the setup. I expect they will do a good job of protecting the connectors from dirt or light moisture.

Orfos Pro with CozyCap USB Cap

I power the headlight with an Anker PowerCore 5000, which mounts to the down tube via a Twofish Bikeblock.

Sof Sole Athlete Performance Insoles

Last year I mentioned replacing the insoles in the Altama OTB Boots with Ortholite Fusion Insoles. The Ortholite insoles fit well in the OTB boots, and make the footwear zero-drop (or at least close enough to it that I can’t tell the difference). It is a lower volume insole that Altama’s default rubber one, and so requires tighter lacing. Unfortunately, the availability of this insole appears to be limited. I’ve also decided that it is a little too soft for my taste. I like a firm footbed. The Ortholite Fusion, while thin, allows my foot to sink into it slightly more than I would prefer.

When I bought my ranger green OTB boots earlier this year I could not find the Ortholite Fusion insoles in stock in my size. So I went looking for alternatives and ended up with the Sof Sole Athlete Performance Insoles. I bought mine from The Insole Store. I mention this because The Insole Store actually provides measurements for heel thickness, forefoot thickness, and arch height. This is critical information for making an informed purchase of an insole, and yet very few retailers or manufacturers provide it. The Insole Store also supports filtering by characteristics, such as walking and running insoles without arch support, which makes it easy to narrow down the wide array of options. This kind of stuff seems like it would be common sense for anyone selling footwear, but it isn’t, so I give my money to The Insole Store.

The measurements provided by The Insole Store for the Sof Sole Athlete Performance Insoles are:

  • Thickness at heel: 7.75m
  • Thickness at forefoot: 4.6mm
  • Arch height: 20mm

I’m happy with anything up to a 4mm drop. These have a 3.15mm drop, which is close enough to zero that I can barely tell the difference. I wasn’t sure about the 20mm arch height. That’s a 12.25mm climb up from the heel, which sounded high, but I ordered the insole anyway. When wearing them, I don’t notice any rise in the arch. They feel flat, which is what I want.

It’s interesting to compare these Sof Sole insoles to something like the Superfeet Carbon Insoles. This is what Superfeet markets for low-volume, minimalist athletic footwear.

  • Thickness at heel: 5.5mm
  • Thickness at forefoot: 2.75
  • Arch height: 30mm

The heel and forefoot numbers are great. Nice and thin, with only a 2.75mm drop. But the 24.5mm climb from the heel to the arch is ridiculous. I tried a pair of these once, and it feel like standing on a golf ball.

I’ve been very happy with the Sof Sole Athlete Performance Insoles. I ended up buying a second pair. They are trim-to-fit, but the Men’s 9-10.5 size slid perfectly into my size 10 D Altama OTB boots without any trimming. They are thicker than the Ortholite Fusion Insoles, but firmer, which I think allows for better energy transfer. The higher volume translates to a fit that is much more similar to Altama’s stock rubber insoles, but with a material that makes more sense if you aren’t planning to take the boots under water. I’ve tried wearing one Sof Sole insole in one boot and one Altama rubber insole in the other, and the fit feels nearly identical. I recommend the Sof Sole insoles if you’re unhappy with the breathability or tackiness of the insole that came with the Altama OTBs, and I think they are worth consideration for other footwear in the lightweight hiking category. They are likely too thick for minimalist running shoes.

How I Patch

I build my own patch kits, consisting of a small re-sealable bag which holds:

DIY Patch Kit

This is stored in my EDC toolkit which, as previously mentioned also includes two reifenflicken and tire levers. Because these patch kits are so small, I also keep one in the tube roll underneath my saddle.

Rema has been making vulcanizing patches for about a century. They have a long held reputation for being one of the best. I haven’t experimented with much of their competition, but I’ve never had a Rema patch fail, and as a general rule when it comes to bicycle parts and components I find that if the Germans do a thing they probably do it at least as good as anybody else, if not better. So I buy their patches in bulk and I keep an 8 oz can of their fluid for use at home.

A quality vulcanizing patch is a permanent repair. If applied properly, it will leave the tube as good as new. In contrast, “glueless” or “pre-glued” patches have a reputation for being unreliable, temporary fixes. I’ve had good luck with Park Tool’s pre-glued patches from the GP-2 kit, but I still consider them a temporary solution.

The advantage of a pre-glued patch is that it is a nearly instant repair: buff the area with sandpaper, slap on the patch, rub it a bit with your fingers or roll it over your top tube or pump, and you’re ready to go. Patching with a permanent, vulcanizing patch is a longer procedure: buff the area with sandpaper, apply the vulcanizing fluid, wait around 3 minutes for the fluid to become dry and tacky, slap on the patch, rub it in, and then you’re rolling. (Some would argue that you shouldn’t inflate the tube immediately after patching, but I’ve never had a problem doing this. The key is allowing the vulcanizing fluid to sit for enough time prior to applying the patch.) In unpleasant weather, or when you have some place to be, the extra three minutes (or thereabouts) required is unattractive.

Carrying both types of patches, plus a spare tube, provides options. If I get a flat, and it’s a nice day out, and I don’t have any place to be, and I’m in a pleasant area, I’ll fix it with a vulcanizing patch. If conditions are not so idyllic, I’ll quickly swap out the tube and continue on my way. When I get to where I’m going, I’ll patch the punctured tube with a vulcanizing patch, reinstall the newly patched tube and put the new tube away. If I get a second flat before I can fix the tube that was originally punctured, I’ll slap on one of the pre-glued patches until I get to my destination. Then I’ll repair the first tube with a vulcanizing patch, and throw away the tube with the pre-glued patch as soon as I can acquire another spare.

I’ve also successfully used a Park Tool pre-glued patch to repair a leaky Therm-a-Rest mattress. It’s useful to know I can fix a mattress during a multi-day bike trip without needing to remember to pack an additional item.

Of course the best strategy is to not get a flat in the first place. As I am fond of pointing out, I buy good tires, which prevent me from getting a flat more than once or twice per year. A good tube costs around $10, but with proper care and feeding ought to have a service life measured in years.

Westcott Titanium EDC Scissors

I carry the Westcott Sewing Titanium Bonded Fine Cut Scissors, 2.5” everyday. Given the choice between a knife and a pair of scissors I’ll choose the knife, but these scissors are small and light enough that I feel I can carry both.

Westcott Titanium EDC Scissors

Scissors offer some additional utility compared to a knife. They’re useful for rounding the corners of medical tape to discourage peeling. They can clean up the area around a tear before repair with the expedition sewing awl. They can trim your nails. And they can go places a knife cannot. I’ve flown with these scissors in my carry-on. They are diminutive enough as to not frighten TSA agents.

I’ve tried carrying other scissors in the past. The popular Slip-N-Snip Folding Scissors (and the various knock-offs) are, I think, a piece of junk. They’re too stiff, the scissoring is too rough, and the blades too thick. The Nogent Folding Scissors look great, but are way beyond my price range. The Westcott scissors do not fold, but are still easily carried. Despite the product name, the overall length of the scissors is 3 inches. They weigh 5 grams (0.2 ounces). The blades are 1 inch long, agreeably sharp, pointy and thin. The scissors can disappear into a bag. I keep a small piece of heat shrink tubing over the blades of the scissors to prevent them from poking things. They get stored in my small EDC toiletry pouch.

Westcott Titanium EDC Scissors

Many reusable bags leave something to be desired when transporting bulk rice.

Bags intended for produce are often made of a mesh too coarse to contain granules of rice. Others have a weak drawstring closure that fails to resist a couple pounds of rice pressing against it when the bag gets tossed around. My solution to this problem is to use roll-top dry bags when I’m buying rice from the bulk bins. I’m partial to Sea to Summit Ultra-Sil Dry Sacks. At home I store these with my other grocery bags, so that I don’t have to remember to dig them out of my backpacking gear before heading to the market.

Rice Run

The cashiers are always impressed with my bags.

Sleeping with Silk

While in Yellowstone earlier this month I ripped my Cocoon Silk Mummy Liner. I had originally purchased this in 2005, in an attempt to eek out a little more warmth from the sleeping bag I had at the time (a Snugpak Special Forces 1 purchased from TAD Gear). The claim was that a silk liner would add around 10 degrees Fahrenheit to the sleeping bag rating. My experience was that it may have contributed 10 degrees to the survivability, but closer to 5 degrees to the comfort. Still, I continued to augment my sleeping bags with that same liner for the subsequent 14 years.

I find the primary benefit of a liner is cleanliness. Sleep systems get dirty – dirt, oil, sunblock, etc. all get transferred from your skin to whatever you’re crawling into. It is much easier to clean all of that out of a liner than the sleeping bag itself. A sleeping bag worth purchasing is an expensive investment, and I think liners can help extend the life of that investment. I’ve also carried my liner by itself when travelling internationally. It functions well when the guest house doesn’t provide sheets, or when their cleanliness is questionable (silk resists bed bugs and dust mites), or for a little warmth during unexpected stealth camps.

A liner may be purchased in a number of different materials, but the characteristics of silk make it the only material that interests me. It is easily packable, thanks to its low weight and ability to be compressed. It is breathable, quick drying, and comfortable against the skin. This last property is particularly important in a liner. I find synthetic materials like polyester and microfiber can be scratchy or grabby, which is unpleasant in bedding – especially in subfreezing temperatures when there is no moisture in the air.

So when the Cocoon liner ripped, I knew I would immediately replace it with another silk liner. I would have been happy with an identical replacement from Cocoon, but I decided to look around and see if there was anything new worth considering. I settled upon the Sea to Summit Premium Silk Travel Mummy Liner.

Sea to Summit makes their liner out of a ripstop silk, unlike my original Cocoon liner (though Cocoon does now offer a ripstop variant). It uses a thin shock cord and cord lock to cinch the hood, where my Cocoon liner offered a simple silk drawstring that was annoying to use (causing me to never cinch down the hood). But what I found most intriguing about the Sea to Summit offering is that it featured stretch Lycra panels down each side of the liner. If you move around at night, liners have a tendency to get somewhat twisted up. The silk itself has little stretch. The combination of these two characteristics is what led my liner to finally rip. The rip occurred along one of the side seams while I was turning in my sleep. I think that the Lycra panels on the Sea to Summit liner will reduce the likelihood of this happening again.

My initial impressions of the Sea to Summit liner have been positive. The silk is comfortable, though not as soft as the Cocoon liner. This may partially be due to the 14 years of wear placed on the Cocoon silk, but I suspect the presence of the ripstop grid on the Sea to Summit silk is a more significant factor. The dimensions of the two are pretty much the same. The Sea to Summit footbox and hood are both a little smaller than the Cocoon, but I don’t think this contributes to any practical difference. I’ve tried sleeping in the Sea to Summit liner and so far the stretch Lycra panels do seem effective at reducing the twisting and binding that I’ve come to expect from my silk liner. I purchased the new liner in the eucalyptus green color, which is acceptable, but I much prefer the greenish brown of the old Cocoon. The Sea to Summit liner weighs 142 grams (5 oz). This is slightly more than the 114 grams (4 oz) of the Cocoon, but close enough for me not to care. These weights are for the liners only. Both liners come with small mesh storage bags, which I never use.