She quit her job as a London bike messenger and left the UK in September of 2011. Currently she is in Korea, having cycled across Eurasia. I was made aware of her blog a couple months ago and was immediately hooked. I went back to the very beginning and read the blog all the way through. There are not very many blogs out there that I can say that about.
A laptop presents some problems for reliably backing up data. Unlike a server, the laptop may not always be turned on. When it is on, it may not be connected to the backup medium. If you’re doing online backups, the laptop may be offline. If you’re backing up to an external drive, the drive may not be plugged in. To address these issues I wrote a shell script called backitup.sh.
The Problem
Let’s say you want to backup a laptop to an external USB drive once per day with cryptshot.
You could add a cron entry to call cryptshot.sh at a certain time every day. What if the laptop isn’t turned on? What if the drive isn’t connected? In either case the backup will not be completed. The machine will then wait a full 24 hours before even attempting the backup again. This could easily result in weeks passing without a successful backup.
If you’re using anacron, or one of its derivatives, things get slightly better. Instead of specifying a time to call cryptshot.sh, you set the cron interval to @daily. If the machine is turned off at whatever time anacron is setup to execute @daily scripts, all of the commands will simply be executed the next time the machine boots. But that still doesn’t solve the problem of the drive not being plugged in.
The Solution
backitup.sh attempts to perform a backup if a certain amount of time has passed. It monitors for a report of successful completion of the backup. Once configured, you no longer call the backup program directly. Instead, you call backitup.sh. It then decides whether or not to actually execute the backup.
How it works
The script is configured with the backup program that should be executed, the period for which you want to complete backups, and the location of a file that holds the timestamp of the last successful backup. It can be configured either by modifying the variables at the top of the script, or by passing in command-line arguments.
$ backitup.sh -h
Usage: backitup.sh [OPTION...]
Note that any command line arguments overwrite variables defined in the source.

Options:
    -p      the period for which backups should attempt to be executed
            (integer seconds or 'DAILY', 'WEEKLY' or 'MONTHLY')
    -b      the backup command to execute; note that this should be quoted if it contains a space
    -l      the location of the file that holds the timestamp of the last successful backup.
    -n      the command to be executed if the above file does not exist
When the script executes, it reads the timestamp contained in the last-run file. This is then compared to the user-specified period. If the difference between the timestamp and the current time is greater than the period, backitup.sh calls the backup program. If the difference between the stored timestamp and the current time is less than the requested period, the script simply exits without running the backup program.
After the backup program completes, the script looks at the returned exit code. If the exit code is 0, the backup was completed successfully, and the timestamp in the last-run file is replaced with the current time. If the backup program returns a non-zero exit code, no changes are made to the last-run file. In this case, the result is that the next time backitup.sh is called it will once again attempt to execute the backup program.
The period can either be specified in seconds or with the strings DAILY, WEEKLY or MONTHLY. The behaviour of DAILY differs from 86400 (24-hours in seconds). With the latter configuration, the backup program will only attempt to execute once per 24-hour period. If DAILY is specified, the backup may be completed successfully at, for example, 23:30 one day and again at 00:15 the following day.
Use
You still want to backup a laptop to an external USB drive once per day with cryptshot. Rather than calling cryptshot.sh, you call backitup.sh.
Tell the script that you wish to complete daily backups, and then use cron to call the script more frequently than the desired backup period. For my local backups, I call backitup.sh every hour.
The default period of backitup.sh is DAILY, so in this case I don’t have to provide a period of my own. But I also do weekly and monthly backups, so I need two more entries to execute cryptshot with those periods.
All three of these entries are executed hourly, which means that at the top of every hour, my laptop attempts to back itself up. As long as the USB drive is plugged in during one of those hours, the backup will complete. If cryptshot is executed, but fails, another attempt will be made the next hour. Daily backups will only be successfully completed, at most, once per day; weekly backups, once per week; and monthly backups, once per month. This setup works well for me, but if you want a higher assurance that your daily backups will be completed every day you could change the cron interval to */5 * * * *, which will result in cron executing backitup.sh every 5 minutes.
What if you want to perform daily online backups with Tarsnapper?
At the top of every hour your laptop will attempt to run Tarsnap via Tarsnapper. If the laptop is offline, it will try again the following hour. If Tarsnap begins but you go offline before it can complete, the backup will be resumed the following hour.
The script can of course be called with something other than cron. Put it in your ~/.profile and have you backups attempt to execute every time you login. Add it to your network manager and have your online backups attempt to execute every time you get online. If you’re using something like udev, have your local backups attempt to execute every time your USB drive is plugged in.
The Special Case
The final configuration option of backitup.sh represents a special case. If the script runs and it can’t find the specified file, the default behaviour is to assume that this is the first time it has ever run: it creates the file and executes the backup. That is what most users will want, but this behaviour can be changed.
When I first wrote backitup.sh it was to help manage backups of my Dropbox folder. Dropbox doesn’t provide support client-side encryption, which means users need to handle encryption themselves. The most common way to do this is to create an encfs file-system or two and place those within the Dropbox directory. That’s the way I use Dropbox.
I wanted to backup all the data stored in Dropbox with Tarsnap. Unlike Dropbox, Tarsnap does do client-side encryption, so when I backup my Dropbox folder, I don’t want to actually backup the encrypted contents of the folder – I want to backup the decrypted contents. That allows me to take better advantage of Tarsnap’s deduplication and it makes restoring backups much simpler. Rather than comparing inodes and restoring a file using an encrypted filename like 6,8xHZgiIGN0vbDTBGw6w3lf/1nvj1,SSuiYY0qoYh-of5YX8 I can just restore documents/todo.txt.
If my encfs filesystem mount point is ~/documents, I can configure Tarsnapper to create an archive of that directory, but if for some reason the filesystem is not mounted when Tarsnapper is called, I would be making a backup of an empty directory. That’s a waste of time. The solution is to tell backitup.sh to put the last-run file inside the encfs filesystem. If it can’t find the file, that means that the filesystem isn’t mounted. If that’s the case, I tell it to call the script I use to automatically mount the encfs filesystem (which, the way I have it setup, requires no interaction from me).
backitup.sh solves all of my backup scheduling problems. I only call backup programs directly if I want to make an on-demand backup. All of my automated backups go through backitup.sh. If you’re interested in the script, you can download it directly from GitHub. You can clone my entire backups repository if you’re also interested in the other scripts I’ve written to manage different aspects of backing up data.
I’m no Bitcoin evangelist. I have my reservations about the currency. But one common critique that consistently angers me is that bitcoins are not secure because there have been instances of theft. This is equivalent to claiming that Federal Reserve Notes are insecure because people get mugged. Secure your shit.
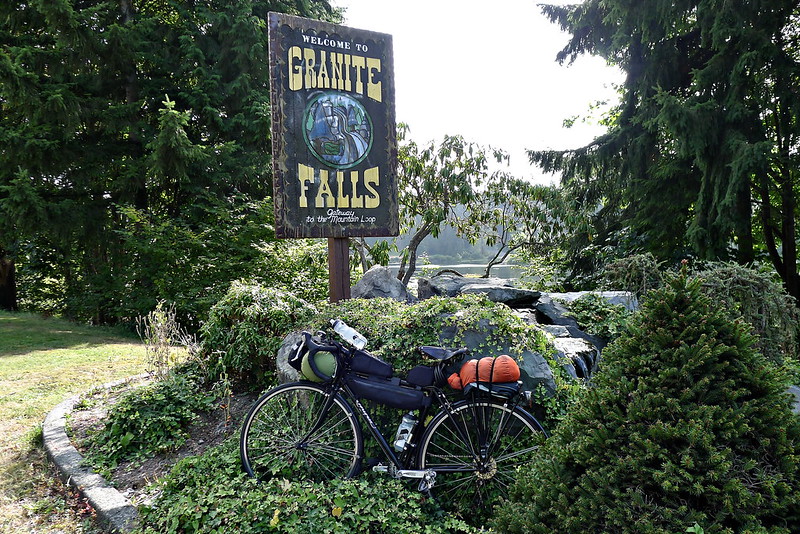
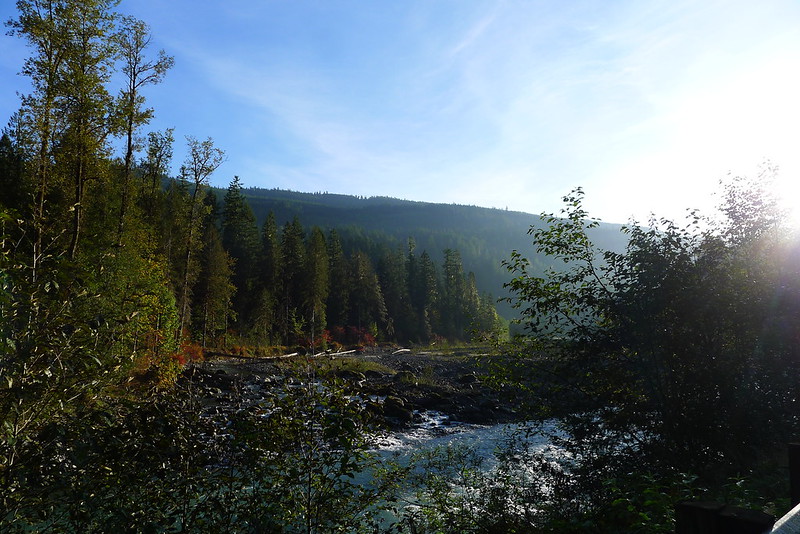
Late Saturday morning I loaded up my bike and took off for the mountains. The plan was to head out to Granite Falls, pick up the Mountain Loop Highway, and spend the night somewhere around Barlow Pass. The following day I would continue along the highway to Darrington and head back to Everett to complete the loop.
The way out of town is an unremarkable ride along the shoulders of two state highways. It doesn’t take long to reach Granite Falls, where the Mountain Loop Highway begins.
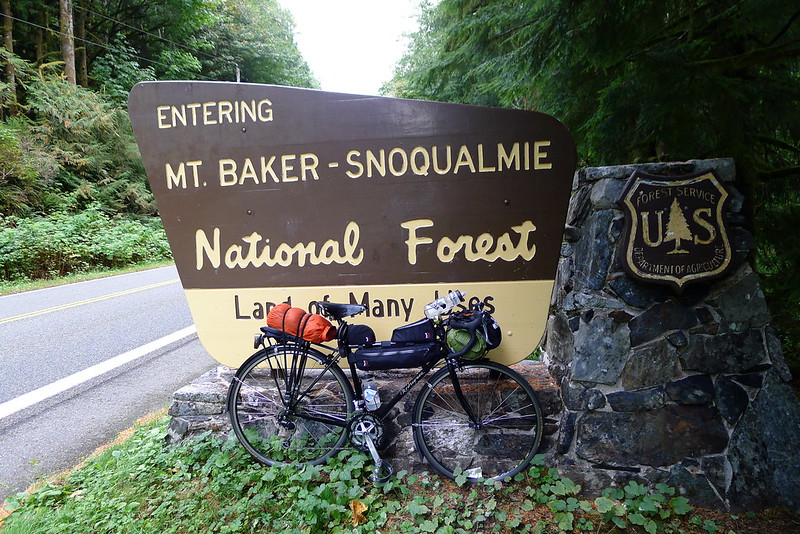
I’ve driven the highway into the mountains countless of times – many of my favorite trailheads are located off of it – but this was the first time I had pedalled it. The highway itself doesn’t get too high. The highest point is probably a little under 3,000 feet, but I was starting from sea-level, so there were a few hills to climb. I shifted down to my granny gear and prepared to spin my way up, past the quarries and mines and the masonic park that always gives me a slight feeling of discomfort. The National Forest begins near the top.
After entering the forest the highway follows along next to the south fork of the Sauk, which makes for a pleasant, flat-ish ride, with very little motorized traffic to interfere. Most of the established camp grounds are closed this time of year – “closed” being National Forest Service code for empty and free.
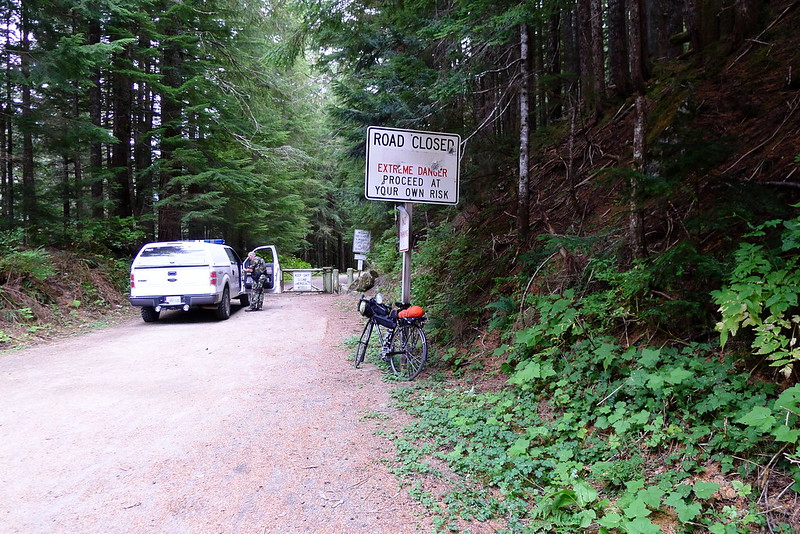
I had initially intended to spend the night somewhere along this stretch, but it was only mid-afternoon. I decided to head a bit further and camp around Barlow Pass. The pavement ends at the pass and the highway loops down and out of the mountains along a narrow gravel road. When I reached the pass the Sheriff was there, sorting through his ring of hundreds of keys, attempting to locate the one to unlock the gate at the start of the road to Monte Cristo. Apparently a young boy was hiking out there with his family and cut himself on a piece of old mining equipment. The search and rescue team were on their way up but would need to get through the gate. It must have been some cut to warrant the response.
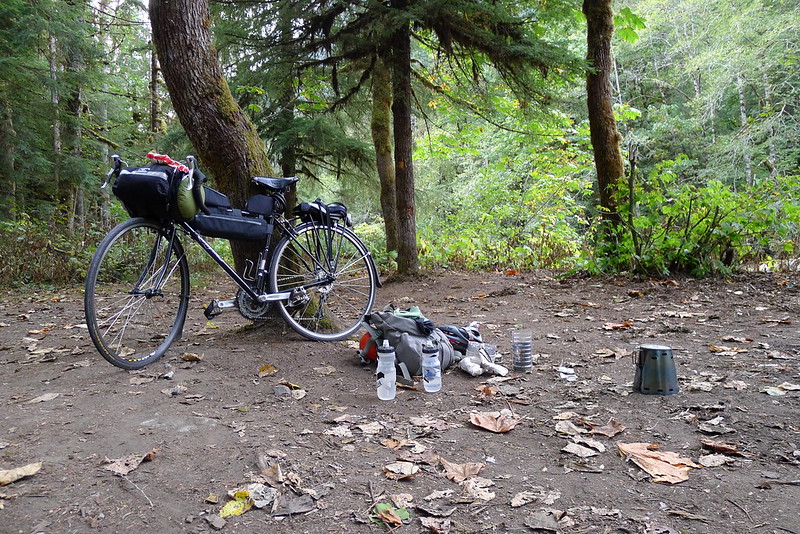
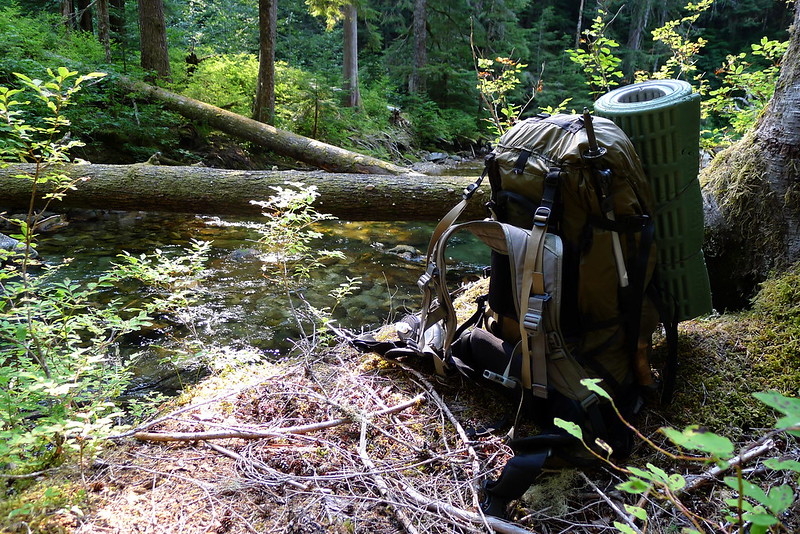
There was plenty of light left at the pass. I amended my plan once more and took off down the unpaved section of road, deciding to camp somewhere in the woods below. The road is in pretty decent condition, by Forest Service standards. There aren’t too many potholes and the gravel isn’t layed on too thick. It makes for a bumpy ride, but my skinny 700x25 tires handled it fine. I pulled over for a quick dinner at 6PM and then got back on the road, intending to ride till 7PM. That would give me about 30 minutes to make camp before it got dark.
At 7PM I found myself near a picnic area with a short trail that led into the woods to a small clearing with a table and enough room for a tarp. I pitched camp there and went to bed not long after.
The morning was chill. I rose with the sun. After fueling up with oatmeal I shook the frost off my tarp and packed everything back on the bike. I only had a couple bumpy miles to pedal before reaching the pavement again.
I was perhaps too optimistic when I packed only fingerless gloves. The cold air caused a sharp pain in my fingertips. I stoked the furnace a bit by breaking off a few hunks from a bar of dark chocolate that I kept readily accessible in my frame bag. Either the chocolate or the rising sun worked.
At Darrington I reached the end of the Mountain Loop Highway. The next leg of the trip would be along SR 530. It was the stretch I was looking forward to most. I had never ridden it before, but each time I drove along it the road struck me as a wonderful stretch of pavement to pedal. It travels through the foothills of the Cascades, along pastoral scenes set against mountain backdrops. Horses and cows outnumber motorized traffic.
The road lived up to my expectations. I cruised along the meandering highway until reaching Arlington in the late morning. There I stopped at the Shire Cafe (in the same building as the Mirkwood game store, Mordor tattoo, and Rivendell hair salon) for a breakfast burrito – enough fuel for 53 miles. A block away I picked up the Centennial Trail.
I pedalled down the trail, though the woods of the county, before cutting west out to Marysville, from where I went over the sloughs and the Snohomish river to complete my loop back in Everett. In town I detoured to the waterfront farmer’s market to conclude the trip with an apple and baguette of victory.
This is the best ride I’ve yet to do all within Snohomish County. The route looked roughly like this. I think that my mileage was closer to 130 miles. The trip could probably be done in a full day, but I enjoyed it as a leisurely overnight trip. It took me 26 hours, door to door.
Jacques Matthjeij discusses the history of computing as a pendulum swinging between closed, walled-gardens and open, free systems.
If my observations are correct then such a swing is about to happen, and this time we had better get it right. Things that point in the direction of a swing are an increasing awareness of ordinary computer users with respect to their privacy and who actually owns all that data. The fragmenting of the smartphone and tablet markets will lead to some more openness and at some point all the bits and pieces to create true open hardware will fall into place.
…
Remember that there are two possible outcomes, one where the internet successfully manages to cause a swing to the edge of freedom, and another where it is successfully co-opted by big money and governments in a concerted effort to give us all a subscription to online Life-As-A-Service where you will be beholden to some party for the ability to gain access to knowledge, information, the right to communicate and so on and where the act of programming will be as tightly regulated as the export of cryptography was.
Earlier this year I switched from Duplicity to rsnapshot for my local backups. Duplicity uses a full + incremental backup schema: the first time a backup is executed, all files are copied to the backup medium. Successive backups copy only the deltas of changed objects. Over time this results in a chain of deltas that need to be replayed when restoring from a backup. If a single delta is somehow corrupted, the whole chain is broke. To minimize the chances of this happening, the common practice is to complete a new full backup every so often – I usually do a full backup every 3 or 4 weeks. Completing a full backup takes time when you’re backing up hundreds of gigabytes, even over USB 3.0. It also takes up disk space. I keep around two full backups when using Duplicity, which means I’m using a little over twice as much space on the backup medium as what I’m backing up.
The backup schema that rsnapshot uses is different. The first time it runs, it completes a full backup. Each time after that, it completes what could be considered a “full” backup, but unchanged files are not copied over. Instead, rsnapshot simply hard links to the previously copied file. If you modify very large files regularly, this model may be inefficient, but for me – and I think for most users – it’s great. Backups are speedy, disk space usage on the backup medium isn’t too much more than the data being backed up, and I have multiple full backups that I can restore from.
The great strength of Duplicity – and the great weakness of rsnapshot – is encryption. Duplicity uses GnuPG to encrypt backups, which makes it one of the few solutions appropriate for remote backups. In contrast, rsnapshot does no encryption. That makes it completely inappropriate for remote backups, but the shortcoming can be worked around when backing up locally.
My local backups are done to an external, USB hard drive. Encrypting the drive is simple with LUKS and dm-crypt. For example, to encrypt /dev/sdb:
At this point, the drive will be encrypted with a passphrase. To make it easier to mount programatically, I also add a key file full of some random data generated from /dev/urandom.
There are still a few considerations to address before backups to this encrypted drive can be completed automatically with no user interaction. Since the target is a USB drive and the source is a laptop, there’s a good chance that the drive won’t be plugged in when the scheduler kicks in the backup program. If it is plugged in, the drive needs to be decrypted before calling rsnapshot to do its thing. I wrote a wrapper script called cryptshot to address these issues.
Cryptshot is configured with the UUID of the target drive and the key file used to decrypt the drive. When it is executed, the first thing it does is look to see if the UUID exists. If it does, that means the drive is plugged in and accessible. The script then decrypts the drive with the specified key file and mounts it. Finally, rsnapshot is called to execute the backup as usual. Any argument passed to cryptshot is passed along to rsnapshot. What that means is that cryptshot becomes a drop-in replacement for encrypted, rsnapshot backups. Where I previously called rsnapshot daily, I now call cryptshot daily. Everything after that point just works, with no interaction needed from me.
If you’re interested in cryptshot, you can download it directly from GitHub. The script could easily be modified to execute a backup program other than rsnapshot. You can clone my entire backups repository if you’re also interested in the other scripts I’ve written to manage different aspects of backing up data.
If you’re at all interested in bikes, lightweight backpacking, or a combination thereof, you must read this book.
In 1986, Dick and Nick rode lightweight, steel race bikes from the Bay of Bengal across Bangladesh, up and over the Himalaya, across the Tibetan Plateau, and through the Gobi desert to the point of the earth furthest from the sea. They were sawing their toothbrushes in half and cutting extraneous buckles off of their panniers before “bikepacking” (or “ultralight backpacking”) was a thing. The appendix includes a complete gear list and relevant discussion.