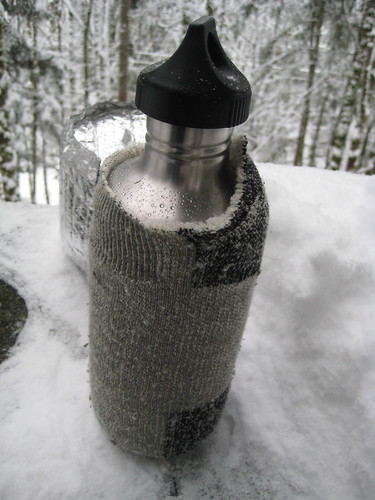
In one of my EDC photos last week, I showed that I carry a 40oz Klean Kanteen. I think the water tastes better from the stainless steel bottle than from a plastic Nalgene, and prefer carrying 40 ounces over just 32.
The main complaint many people express concerning a single-walled stainless steel bottle is that you can’t carry hot liquids in it. That’s not much of a detraction for me, since I have a different bottle for that. What does annoy me is that, in the cold, when the bottle is filled with cold water, the stainless steel can become too cold to touch without gloves. To address this, I took an old wool sock and cut it off at about the neck of the bottle. Instant insulation.
The only disadvantage is that the sock is just a little too thick for the bottle to nest inside my mug. Depending on how you carry the bottle, you might want to cut off a few inches from the bottom of the sock as well as the top.
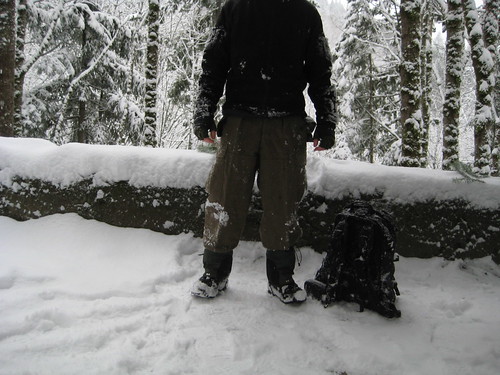
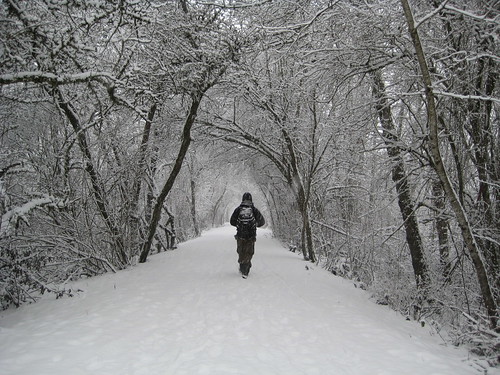
Winter arrived early last weekend, a week before the solstice. The daily temperatures have been hovering in the low 20s Fahrenheit (that’s somewhere around -5 for you centigrade folks), with high winds and plenty of snow. I’ve been out hiking every day, practicing winter fire lighting and taking advantage of the snow for tracking. It’s also provided ample opportunity to test out the wool pants I bought a few months ago.
They’re surplus from the West German army, circa 1976. I acquired them on ebay for $20.
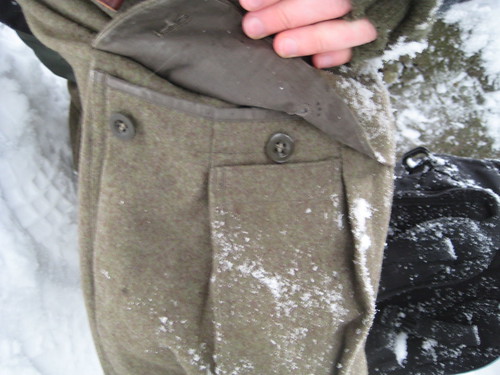
They have a standard 6 pocket design. The back pockets and two side pockets have button closure flaps. The cargo pockets have flaps with two button closures: one in the middle and one on the back. The front edge of the pocket flap is actually sewn onto the pants, which prevents the flap from, you know, flapping. It encourages the flap to stay closed, even when both the buttons are undone, providing for somewhat secure storage while still having instant access. On the outside of each cargo pocket is a smaller, 3” wide pocket with no closure. It was probably originally meant for a magazine, but is a perfect size for a cell phone or camera. It’s a little small for my compass or GPS.
The front of the pants is reinforced roughly 7” above the knee to 7” below. The butt is not reinforced
The crotch is closed via four buttons, rather than a zip. Buttons are easier to replace in the field, but makes access a little slower. Annoying when nature calls. There’s also a series of buttons along the waistband, both on the inside and the outside. Some of these can be used to make minute adjustments to the waist size, others just seem to be spares. In all, there’s probably about 10 buttons that could be salvaged to repair the crotch or pocket closures. On the inside back of the waist band, there’s also attachments for suspenders.
On the hem of each leg, there’s are snaps that allow the legs to be tightened and the excess material folded, useful for blousing the pants with boots or for wearing under gaiters.
I love these pants. I received them in new condition, and their worth could easily be placed upward of $60. My only complaint is the button crotch, which I would prefer to be zippered.
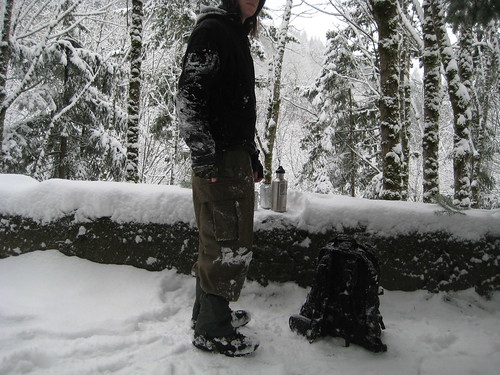
In the cold (and somewhat wet) snow, I’ve been staying perfectly warm and dry with these and a pair of merino wool long underwear worn underneath. In slightly warmer weather, I’ve found the wool to be soft enough to be worn without the underwear underneath. (I haven’t ever worn US Army surplus wool, but I’m told that the West German stuff is softer. I’ve also been told that wool from the former Eastern Bloc is the itchiest, and warned to stay well away from it.)
I’d recommend the West German wool to anyone. When passing someone on the trail decked out in plastic from head-to-toe, making that annoying swish-swish-swish sound as they walk by, you can chuckle to yourself, content in the knowledge that you are warmer, quieter and more comfortable in your wool.
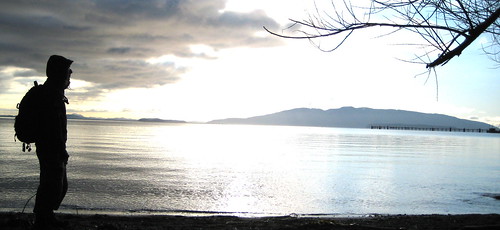
I took some photos of my EDC pack today. I live in an urban area and commute on my bike, but I also use the pack during day hikes, so the pack includes an odd mix of urban, bicycle, and wilderness tools. All the items are identified by comments and notes on flickr.
The pack itself is a TAD Gear FAST Pack EDC, which is probably evident to most of you. It’s been my every day carry pack for a little over a year now. I’m very pleased with it.
The gear that I EDC on my person is probably more interesting. Maybe someday I’ll take pictures of that.
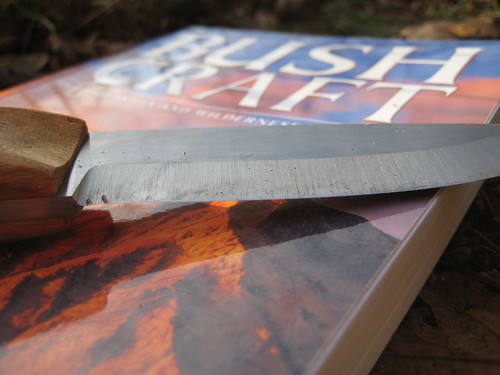
After a long wait, the end of last week brought with it the arrival of my new BCNW-O1 bushcraft knife.
In late August, I had put aside some money for a new bushcraft knife. For quite some time, I had had my eye on a Skookum Bush Tool. Yet, over the summer I discovered Mike Lummio’s Bushcraft Northwest through his YouTube channel. One of his videos features his knife, the BCNW-O1. It has a very similar design to the slightly larger Skookum, which make it difficult for me to decide which I preferred.
The knife was listed as back-ordered on Mike’s web page, so in the beginning of September I emailed him, asking when the knives would become available. My intention was that I would purchase whichever of the two knives became available first. Mike initially told me 2 weeks. That got delayed to 2 months, due to a batch of special order knives with a sharper grind coming in first and his moving the school to a new location. Still, it was available sooner than the Skookum, so I decided on the BCNW-O1.
It was well worth the wait. I couldn’t be happier with the knife.
(The plus side of the knife being back ordered is that the money had been sitting in a savings account, gaining interest since August.)
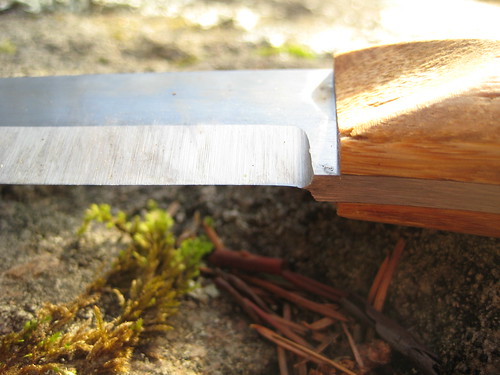
As the name implies, the BCNW-O1 is made of O1 tool steel. O1 is a relatively high maintenance material, somewhat soft when compared to other metals such as A2, and more prone to rust if not properly cared for. But the steel can be more easily sharpened to a razor edge than others, and can strike a spark off the backspine with a piece of flint (in addition to the more common ferrocerium rod). Because of this, O1 is quite popular in many bushcraft knives, including the famed Woodlore knife.
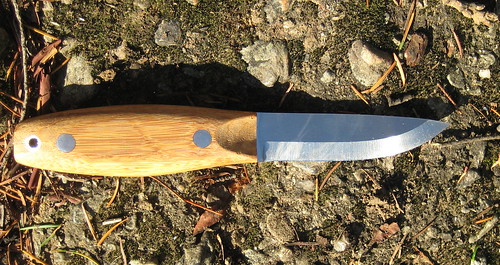
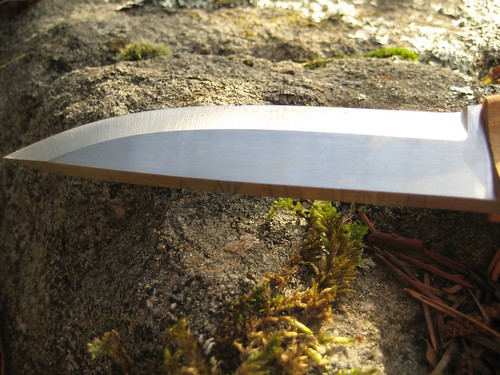
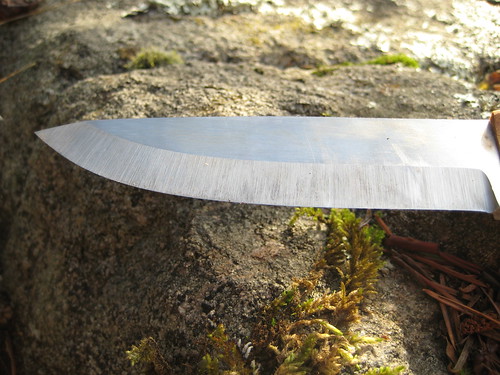
The knife is of the classic, Scandinavian design preferred by bushcrafters. The specs, taken from the product page, are as followed:
5/32" (3.9 mm) thick O1 tool steel
RC 59
3 5/8" (9.3cm) Scandi grind blade (grind done by Daniel Koster)
8" (20.3cm) overall length
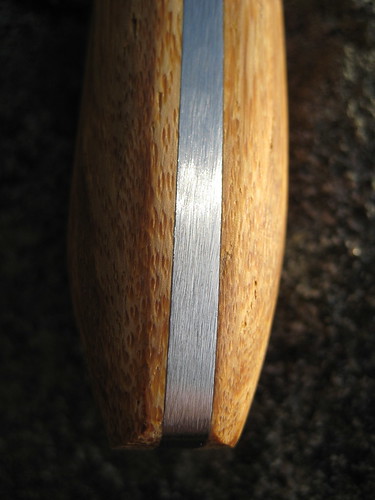
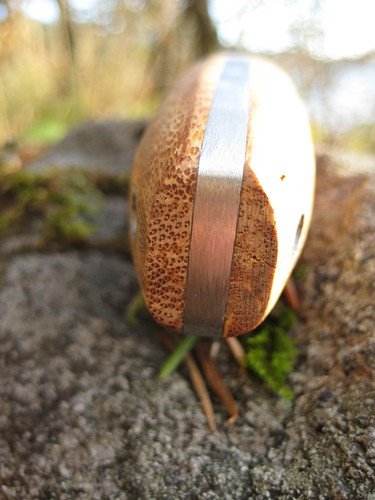
Full tang
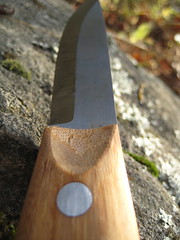
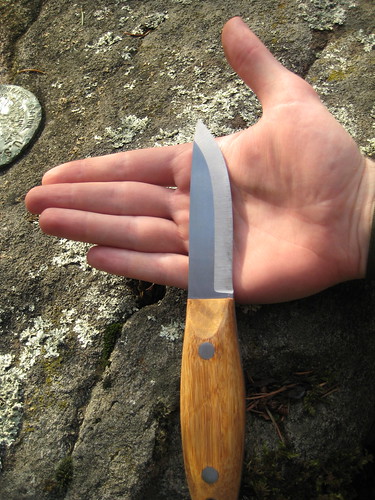
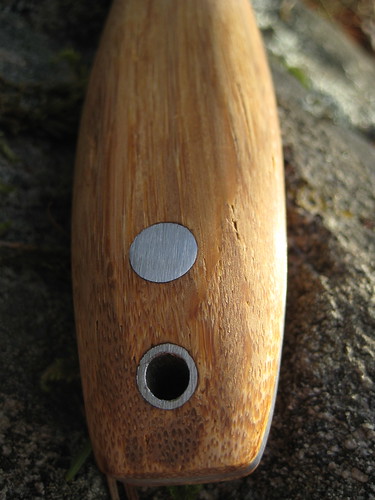
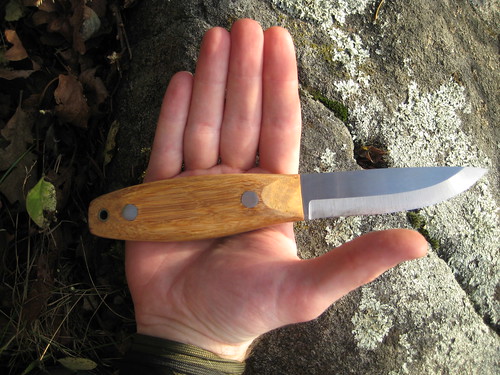
Perhaps the most unique aspect of the knife is the handle. It’s made of bamboo “that has been processed much like micarta. The individual fibers are separated and then bound together under pressure with an industrial strength, formaldehyde-free adhesive. This material can withstand 3,000 psi and is very resistant to the elements while being made from a sustainable resource.” The handle is very smooth, lacking the unique texture of micarta. It feels more like a normal wooden handle, which I love. One of the things that I don’t think is demonstrated very well by the photos on the Bushcraft Northwest site is the size of the handle. It’s a bit bigger and chunkier than what it looks like, which provides for a very comfortable grip. It fits perfectly in my hand.
(While Bamboo can be grown and harvested sustainably, many of the processing methods that go into turning it into clothing are extremely toxic and environmentally destructive. I have no idea about the process that goes into making this handle, but I don’t figure it to be any more environmentally friendly than micarta. Maybe I’m wrong, but I think you should probably avoid any synthetic or processed handle material if you’re concerned about such things.)
In addition the the handle material, the thumb scallops that are carved into either side of the handle are rather unique. This is an excellent feature that assists in certain carving grips, as demonstrated in Mike’s video.
The knife comes with a leather Scandinavian style sheath (available either with or without a firesteel holder) made by JRE Industries. I’ve used one of these with my Mora knives for a couple years and greatly prefer them over any other style I’ve tried.
Most any bushcraft knife made today owes its design, in some part, to Mors Kochanski. Though not as well known as Ray Mears, Kochanski in generally considered to be the father of modern bushcraft. In the spirit of Schwert’s introduction to the Skookum Bush Tool in Outdoors Magazine, I’ll introduce the BCNW-O1 with excerpts from the Knifecraft chapter of Mors Kochanski’s Bushcraft.
The general-purpose bush knife should have a blade as long as the width of the palm, although blades half or twice this length are within acceptable limits. A blade five centimeters long would be an excellent survival knife except for being too small to fall and limb trees of wrist-thickness. A blade 10 to 15 centimeters long will do intricate work like carving a netting needle, yet be large enough to present a good target for a baton when cutting down small trees. A blade 20 centimeters long is a superior tool for heavy work, but awkward to use for fine work.
All general-use knives should have the blade tip close to the profile centerline of the handle. The back of the handle and the back of the blade should be on the same line. The back of the blade should not be thinned down or sharpened so that a baton can be used more effectively without being cut up. There is no advantage to a two-edged blade in bush living.
The blade should be of a good quality carbon steel, from two and a half to three millimeters thick and about two to two and a half centimeters wide. This size of blade is light in weight, yet difficult to break. The steel should be soft enough to be maintained at a shaving edge with common sharpening tools, without frequent sharpening. Such steel is found in Mora (Sweden), Solingen (Germany) or Sheffield (England) knives. Carbon, unlike stainless steel, can be used as the striker in the flint and steel method of fire-lighting. Inexpensive stainless steels have had a bad reputation with respect to producing a keen edge let alone holding it. The Mora stainless steels however, are every bit as good as their carbon steels.
The metal of the knife blade should extend for the full-length of the handle (a full tang) for strength.
The handle should be a durable, water-resistant material that can be shaped to the user's hand if necessary.
The knife should have a strong pommel that will protect the handle if the knife is driven tip first deep into wood.
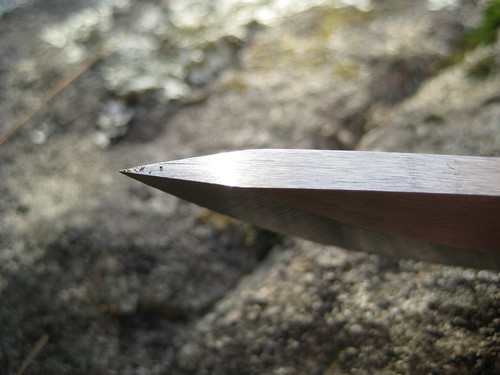
The curvature of the cutting edge should extend for the full-length of the blade. This cuts well and is one of the best shapes that quickly sharpens to a razor's edge. The knife blade should have a sharp enough point to penetrate deep into wood with a minimum of effort.
The knife handle should be about as long as the width of your palm. A handle that is too thick or too thin fatigues the hand and causes blisters. The cross-section of the handle should be an oval instead of round or rectangular. An oval handle provides an adequate indication of the direction of the cutting edge and raises fewer blisters than handles with angular or rounded corners.
A guard on a bush knife is in the way and detracts from many operations. It prevents the use of a simple, secure deep sheath. Some people prefer a guard for fear of slipping forward onto the knife edge, but unless the knife is used for stabbing, the hand should never slip in this way. In all my years of instructing I do not recall an injury due to the lack of a guard.
The BCNW-O1 clearly meets all of Kochanski’s criteria for the perfect bush knife, as well as introducing new innovations of its own. Though I’ve not had it long enough to perform a full review, I am extremely pleased with the knife. It has exceeded my expectations. I can safely say that I wouldn’t trade it for any other knife.
Outdoors Magazine went down a few weeks ago. The website used to be one of the best sources for bushcraft and survival techniques and tool reviews. In addition to the wayback machine and other caching websites, all the old content has been turned into PDFs and made available here. A 275 MB zip file of all the PDFs is also available, which I am mirroring here.
Update:
Here is another source for the individual articles in PDF format.
The whole of the site, with the articles in html, is mirrored here.
Last month, Vavrek and I began researching gravity powered water filtration systems. The British Berkefeld and Berkey filter systems dominate this market (British Berkefeld refers to systems using the Doulton Super Sterasyl filter elements, Berkey refers to filter systems using the Black Berkey filter elements). I had been set on purchasing a Berkey filter until Vavrek discovered AquaRain Natural Water Filtration Systems, a lesser known (and cheaper) alternative.
The AquaRain systems are all built in the USA from stainless steel. The filter elements are from Marathon Filters, the same used by MSR in their portable filters. They’re ceramic with carbon which, as illustrated in this table, filters organic and microbiological organisms, but not heavy metals, radioactivity, or inorganics. (More information on different filter types is available here.) These filters have been shown to filter down to the .2-.3 micron range, where British Berkefeld units claim an absolute rating of .5 microns.
Nitro-Pak, a seller of AquaRain filters, has the following to say concerning manufacturer claims of “absolute” micron ratings:
There is a great deal of confusion regarding “absolute” micron ratings. Just how much of a reduction efficiency should be considered adequate for an “absolute” rating? Is 99.9% (3 log) sufficient, or would 99.9999% (6 log) be more appropriate, since it matches the EPA bacteria requirement? Should a filter be rated by its ability to remove particles of a certain size, or shouldit be challenged with live organisms of a particular size? Should a filter be tested only when it is new, or should the ratings be based on its end-of-life performance? The fact is that there is no industry or government standard for “absolute” filtration performance.
The Marathon filter elements used in the AquaRain Gravity Water Filter have been extensively tested against live organisms using expended end-of-life elements. We believe this form of testing to be the most stringent, since it tests the filters in a manner similar to the way they would actually be used under worst case conditions. When testing against the .5-.6 micron organism Klebsiella terrigena, EXPENDED Marathon elements demonstrated a 6.6 log reduction (they achieved 8.9 log reduction when new). The EPA only requires a 6 log reduction from NEW elements, which AquaRain greatly exceeded under extreme pressures of up to 90 psi, well above normal test pressure. At the very low pressure of 1/2 psi found in our gravity filter, the efficacy would be far greater still. Does this mean that the Marathon filter elements have an “absolute” rating of only .5-.6 microns? Expended Marathon filter elements have also been tested against the Health Industry Manufacturing Association’s (HIMA) test organism, Brevundimonas diminuta, and achieved a 99.99815% reduction (99.9999% when new). Since this organism is .2-.3 micron, should we claim this as our “absolute” rating? British Berkefeld Filter literature lists the “absolute” rating of their filter at .9 microns and their U.S. dealers claim “absolute” performance at .5 microns. Their own factory literature claims only 99.9% efficiency at the .5 micron level. Is 99.9% sufficient for claiming an “absolute” rating? The bottom line is that the AquaRain Gravity Water Filter System, using Marathon filter elements, will outperform all other gravity-fed ceramic water filter systems. Since there is no standard for “absolute,” YOU will have to decide what level of protection you want for yourself and your family.
The AquaRain, British Berkefeld, and Berkey filter systems are all worthy investments. Finding a clear winner between the three can prove a challenge. Based partly on the above quote concerning micron ranges, partly on the price, and partly on the country of origin, I decided to purchase an AquaRain.
I went with the AquaRain 202 model. It includes two filter elements and holds roughly 1.5 gallons of clean water. I purchased it from CampingSurvival.com, who, after factoring in shipping costs and using the coupon code “savings” for a 5% discount, had the 202 for the cheapest I could find. I’d never dealt with them before, but their shipping and email response was prompt, so I’d recommend them if you’re looking to pick up an AquaRain.
When you first receive the AquaRain, all the parts should be thoroughly cleaned and the filter elements “cultured” by rinsing them under water and running your hands along them. The system is then assembled, which is a simple process of installing the spigot on the lower reservoir, the two filter elements in the top reservoir, and the handle on the lid. Finally, stack the top reservoir atop the lower, dump in some water, put on the lid, and you’re done.
Regardless of the actual micron measurement, pores in the AquaRain’s Marathon filters are smaller than those in the Berkefeld, which makes for a slower flow rate. AquaRain claims a 1/4 gallon per hour per element flow rate under ideal conditions. New filter elements are nowhere near this fast. When I first put my system together, I filled the top reservoir and left for 5 hours. Upon returning, only about 1/6th of the water had made it through the two filters. I emailed AquaRain to confirm that this was normal behavior.
Yes this may very well fit into the normal range when first starting it up....
The filters are DRY and the pores on the surface of the ceramics are very small. The water follows a tortuous path to get to the bed of the granulated activated carbon....also DRY… and then it drips into the lower container.
Within a couple of days, the filters will have become fully saturated. When you keep the container filled (adding water every ten or so minutes) you can then achieve the optimum filtration rate. Most people will not give the unit this kind of attention....most will fill it before they go to bed at night and by morning you should have a gallon or so. Fill again for more water. Even when keeping the unit full and striving for the high filtration rate, the water has a nominal contact time of 11 minutes with the carbon…this is good! You want it slow so that it can do its job. (Another factor, especially with cold weather coming, that affects speed of filtration is the temperature of the water....the warmer the faster....the colder the slower.
It is important to note that the top reservoir simply sits on top of the lower, with no rubber “O” ring to make the connection water tight. This means that it is possible for the lower reservoir to overflow if you attempt to keep the top constantly full for maximum flow rate without emptying the bottom (I discovered this the hard way).
The water filtered through the AquaRain does have a distinctly different taste. I live in a city that has some of the cleanest water in the state, and I’ve always used a Brita water filter for drinking water. I expected the AquaRain to do a much better job than the cheap Brita, but I did not expect a significant difference in taste. The water from the AquaRain tastes much smoother, for lack of a better descriptor. I’ve also noticed the water comes to a boil faster when cooking.
I keep a 1 gallon glass jug full of filtered water in the fridge for chilled drinking water. For cooking and for tea, I take the water directly from the AquaRain. I lift up the upper reservoir periodically throughout the day to check the water level, and dump a bit in the top when the lower is lacking. (I prefer to fill the top at night, so that I can go to sleep to the “drip drip” sound of the filtered water falling into the pool in the bottom). Because I never completely fill the top, I don’t achieve the maximum flow rate.
For 1-2 people looking for clean drinking and cooking water, I think the AquaRain 202 model is ideal. For 3-4 people, I would certainly opt for the larger 404 model. If you’re looking to provide water for more than 4 people, I’d speculate that you would need to either pick up multiple 404 models or acquire a couple of large buckets and build your own filter with perhaps 6-8 filter elements to achieve an optimum flow rate.
In an off-grid (or grid-down survival) situation where clean water is needed not only for drinking and cooking but also for cleaning, I would certainly want to invest in some large water storage containers and perhaps a 404 model for the faster filtration rate achieved by the 4 filter elements. But that would be for 1-2 people. If you’re looking for a system to provide drinking, cooking, and cleaning water for 4 or more people, I don’t think an AquaRain system is practical. Ideally, I would try for a large scale rain-water fed rapid-sand filter leading to a slow-sand filter (described in Aric McBay’s Peak Oil Survival) – and if you happen to have an AquaRain, perhaps using that for final filtration of drinking water.
AquaRain recommends dumping the first 1-2 gallons filtered through new filter elements, “as it may contain loose material washed from the filter elements.” This, along with the extremely slow flow-rate of new filter elements creates an interesting conundrum. Because the new filters are dry, it takes a significant amount of time for the first couple gallons of water to be filtered. The two filter elements in my AquaRain 202 took a little over 24 hours. If I were off-grid and completely dependent on the AquaRain, that’s 24 hours without the ability to produce usable water every time I change the filter elements. Storing enough water for 24 hours isn’t a big deal (and really ought to be a minimum requirement), but what if some event were to arise that requires me to use more than the usual amount of water? It seems to me that one should strive for two different filter systems – to be used concurrently, but staggered – so that when new filters are being installed and conditioned in one, you can fall back to the other.
One of the main concerns many city-dwellers hold about their water supply these days is the possibility of it being contaminated with fluoride. (There’s a rather heated debate as to whether fluoride is good or bad. Personally, I believe it to be a poison, but I think the debate is mute. Cities should provide the cleanest, purest water possible to its citizens. If an individual wishes to add some additional chemical to their water, they can do that themselves, at their own risk, in their own homes.) Because of this, a popular addition to Berkey filters are the Post Filter Arsenic and Fluoride Reduction Elements, which screw on to the Black Berkey filter elements. In my city, we voted down the attempt to fluoridate our water supply, so it isn’t an immediate concern for me. But chances are that at some point I’ll live in a place that does poison its water. Before deciding on the AquaRain over the Berkey filters, I emailed AquaRain and asked if the Post Filter elements would also fit onto their Marathon filters. They replied in the negative:
Fluoride is a difficult thing to remove from water, and gravity carbon filter systems may not be the most efficient or effective way to do the job. If you use a gravity water filter system that has carbon in its operation, a more accurate word would be reduce rather than remove. Carbon is generally not the accepted media for fluoride reduction and our unit has not been specifically tested again fluoride to see how significant the reduction can be. There are variables involved with certain chemicals. For example: We do not know how much fluoride has been added to your water system; there would be a sliding scale of effectiveness as the carbon ages, etc.
However, we know the water passes slowly through the AquaRain (which is positive since you want the contact time to be as long as possible.) We have found documents that say carbon will reduce fluoride enough (up to 80%) that pro-fluoride people are alarmed and want you to add it back into your diet. If your main concern is fluoride removal/reduction, there may be better options out there than a gravity water filter system. (Reverse Osmosis).
Not to discount the danger of fluoride, sadly and statistically, all of the strengths found in the AquaRain filter system…bacteria, cysts, protozoan removal, VOC contaminants, chlorine, benzene, pharmaceutical drug removal can be accomplished with the AquaRain but most people do not even know of these dangers.
Due to the thread pattern found on the stems of the AquaRain Ceramics, there are no post filters that will fit our candles.
This wasn’t enough to dissuade me from the AquaRain systems. Up to 80% reduction ain’t bad, but I think some sort of reverse osmosis system (or just going for rain collection) would be justified if I find myself in a fluoride-friendly city.
I’ve been very pleased with the AquaRain for the week that I’ve been using it. Tangibles such as water filters are not only wise investments of wealth in uncertain economic times, they also allow a further degree of self-sufficiency. Though I currently fill the AquaRain with tap water, I can just as easily fill it with water from the more-than-abundant rains we receive here in the Pacific Northwest. I’m no longer fully dependent on city water, nor subject to another’s whims as to what should be in my water.
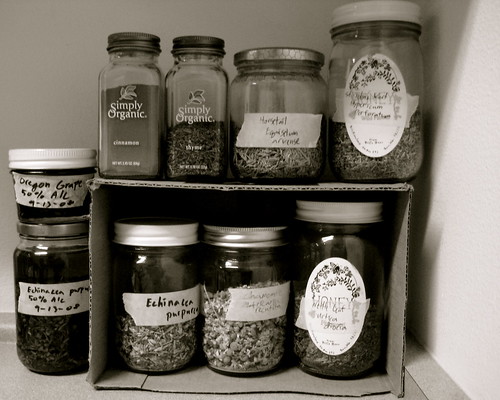
A friend asked me which herbs I have in my kitchen right now.
Chamomile (Matricaria recutita)
Cinnamon (Cinnamomum verum)
Echinacea (Echinacea purpurea)
Horsetail (Equisetum arvense)
Nettle (Urtica dioica)
Peppermint (Mentha piperita) (not pictured)
St. John's Wort (Hypericum perforatum)
Thyme (Thymus vulgaris)
I’ve also got an Echinacea tincture and locally wild-crafted Oregon Grape tincture in the making. They’ll probably both be decanted next week, just in time for cold and flu season.
OpenSSH has a history of security. Only rarely are holes found in the actual program. It’s much more likely that a system will be compromised through poor configuration of the SSH daemon. Ideally, an SSH config would allow only protocol 2 connections, allow only specified users to connect (and certainly not root), disable X11 forwarding, disable password authentication (forcing ssh keys instead), and allowing connections only from specified IPs. These config options would look like this:
Protocol 2
PermitRootLogin no
AllowUsers demo
X11Forwarding no
PasswordAuthentication no
Allowing connections from only specified IP addresses would be accomplished by adding something like the following to /etc/hosts.deny:
(You could also accomplish this with iptables, but I think editing the above file is simpler.)
But the last two options – disabling password auth and allowing only certain IP addresses – limits mobility. I constantly login to my slice from multiple IPs, and I also need to login during travel when I may or may not have my key on me.
The main thing these two options protect against is a brute force attack. By allowing password logins from any IP, we give the attacker the ability to exploit the weakest part of SSH. This is where DenyHosts comes in.
DenyHosts is a python script which attempts to recognize and block brute force attacks. It has many attractive features and is included in the default Ubuntu repositories.
1
$ sudo aptitude install denyhosts
The config file is located at /etc/denyhosts.conf. It is very simply and readable. I recommend reading through it, but most of the default options are acceptable. If any changes are made, the daemon must be restarted:
1
$ sudo /etc/init.d/denyhosts restart
Default Ports
Many people also advocating changing SSH’s default port to something other than 22 (more specifically, something over 1024, which won’t be scanned by default by nmap). The argument in support of this is that many automated attack scripts look for SSH only on port 22. By changing the port, you save yourself the headache of dealing with script kiddies. Opponents to changing the port would argue that the annoyance of having to specify the port number whenever using ssh or scp outweighs the minute security benefits. It’s a heated argument. I lean toward leaving SSH on the default port.