A CLO value is a measurement of the warmth provided by a garment. It serves as a means of comparing the relative warmth of various clothing insulated with synthetic materials.
Developed in 1941, [CLO] was the first real attempt to explain the insulation value of clothing so people would know how much clothing they might need to stay warmer or cooler in a given temperature environment. A CLO value of 1 is defined as the amount of clothing required by a resting human (in other words, sitting, lying down or standing, but not moving) to be comfortable at a room temperature of 21 degrees C, or approximately 71 degrees F. That single value of CLO is equivalent to a typical business suit worn by a man -- shirt, undershirt, trousers and suit jacket. The higher the CLO number, the more insulating value is provided.
I recently put together a list comparing the CLO values of various synthetic puffy pants for a forum that I belong to. Some of you may find it useful as well, so I’m posting it here.
All of the weights given are manufacture weights. They might not be entirely accurate. I found the CLO values for the various insulating materials by searching online. Some of them are provided by the manufacturer, some by third parties.
I previously had 782 Gear's Chaps listed as using Climashield Combat. Now I'm told by a retailer that they actually use Primaloft (what type of Primaloft wasn't specified). This agrees with 782's technology page, which lists Primaloft as one of the products that they use. Yet 782 has recently updated the Chaps' product page to specify that the pants use "Climashield" (what type of Climashield isn't specified). Until this is cleared up, I'm leaving the Smokin' Chaps off this list.
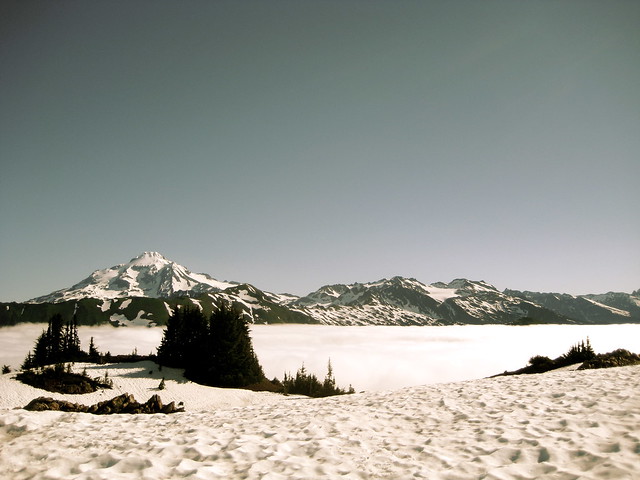
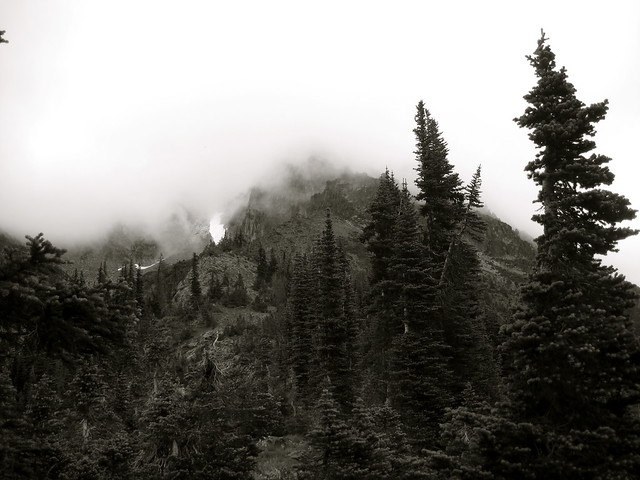
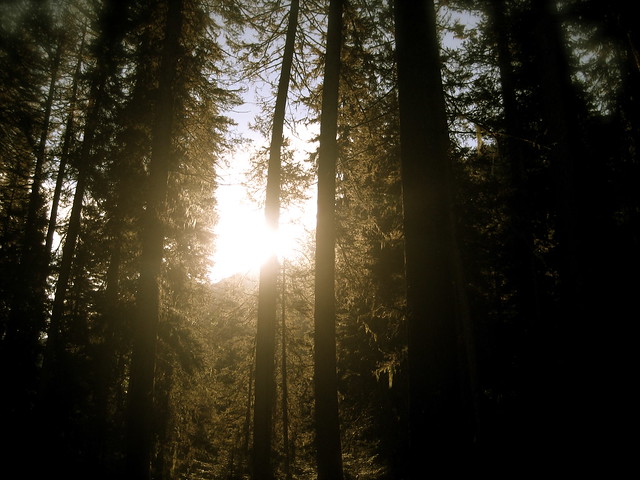
As the light increased, I discovered around me an ocean of mist, which by chance reached up exactly to the base of the tower, and shut out every vestige of the earth, while I was left floating on this fragment of the wreck of a world, on my carved plank, in cloudland...
All around beneath me was spread for a hundred miles on every side, as far as the eye could reach, an undulating country of clouds, answering in the varied swell of its surface to the terrestrial world it veiled. It was such a country as we might see in dreams, with all the delights of paradise.
- Henry David Thoreau, A Week on the Concord and Merrimack Rivers
I’ve been vaguely interested in amateur radio for a few years. The idea of decentralized, low-infrastructure communications appeals to me, but knowing nothing about radios, I was somewhat overwhelmed by it all and didn’t know where to start. I didn’t pursue the interest until now. In case anyone else is in the same position, I thought I would outline what worked for me.
A couple weeks ago I saw that the local library had a copy of the ARRL Ham Radio License Manual. The Manual is meant to teach beginners the basics of radio and help them to pass the Technician license exam: a 35-question multiple choice test. The entire question and answer pool is publicly available.
My method for using the book was to read one chapter every morning. Immediately afterwards I would quiz myself on all the relevant questions for that chapter (included in the back of the book). For the rest of the day, I wouldn’t think at all about radios, until the evening, when I would once again quiz myself on all the questions from that day’s chapter. The book consists of nine chapters. I combined chapters seven and eight into one day, and so finished the book in 8 days. Over the course of the ninth day I took a dozen or so practice tests on QRZ.com. The following day I took the real exam.
Thanks to the book, in little more than a week I went from knowing absolutely nothing about radios (and near to nothing about electronics) to being confidently able to ace the Technician exam and earn my amateur radio license.
One could just memorize the question pool and probably easily pass the test the same way. I’m not much interested in licenses. I didn’t start this venture just to be awarded a slip of paper by the FCC. I’m after the knowledge. Using a resource like the book to help me in comprehending all of the relevant topics appealed to me much more than rote memorization of the exam’s answers.
Of course all I possess now is book knowledge. That needs to be supplemented with experience. But once I buy a radio, I feel that I have a solid base from which to leap.
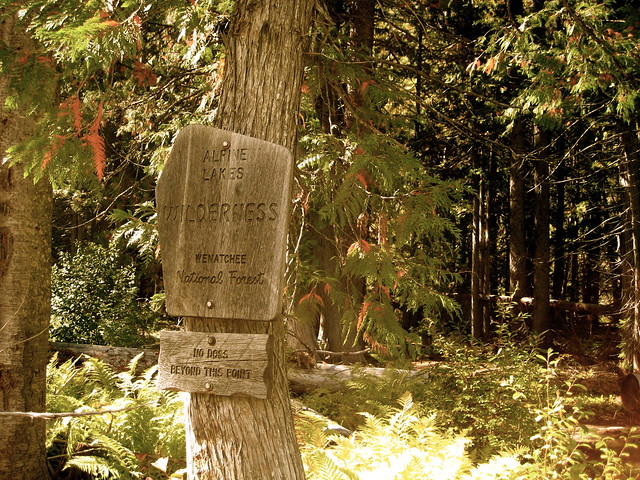
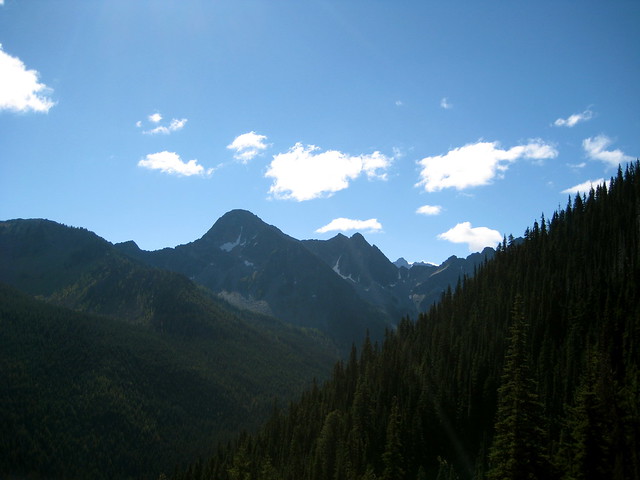
The Alpine Lakes Wilderness is located east of the Cascade crest, over by the town of Leavenworth. A small section of the area, called The Enchantments, became a popular tourist destination a few decades ago, resulting in much overuse. To address the damage the Forest Service instituted a restrictive permit system. To access a normal wilderness area, you generally just fill out a free permit at the trailhead. For the Enchantments, similar free permits are available at trailheads for day use only. To sleep there, you must apply for a permit the previous winter, send in a little cash to grease the wheels, and then hope for the best. Permits are rewarded on a lottery system.
I’m not a big fan of permits. 1 With a system as restrictive as this – and requiring as much forethought as this – it goes without saying that I haven’t spent much time in the Enchantments. But last week I planned a trip in the Alpine Lakes that would begin in the restricted zone.
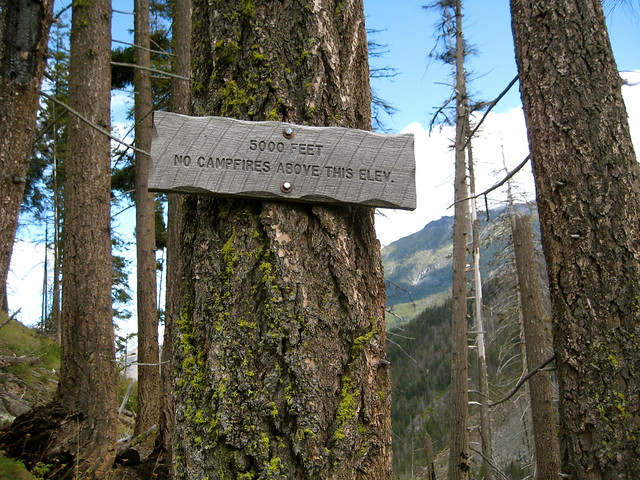
I arrived at the trailhead near noon, where I met my first setback. The plan was to start out on the Enchantment-area trail to Eightmile lake, take the junction west to Lake Caroline, and head on over Windy Pass, which forms the boundary between the Enchantments and the normal Alpine Lakes Wilderness. I would be in the restricted area for about 6 miles. As I had assumed, day use permits for the Enchantments were available at the trailhead. But normal permits for the Alpine Lakes Wilderness? Of course not! I was slightly perturbed. It wasn’t as if I was planning a cross country trip. I was going in on a trail that started here, at this very trailhead, and continued straight through the Enchantments into the Alpine Lakes Wilderness. Why would they not have permits for the Alpine Lakes here? Is the Forest Service operating under the assumption that nobody is going to walk over Windy Pass on the trail that the Forest Service maintains for that very purpose? Must be. No matter. I wouldn’t feel right about letting a little thing like legality get in the way of my rambling. I took a day use permit and filled it out for the Enchantment part of the trip. On the back I began to write a note telling them of the plan for my trip, the impracticality of trying to control people moving by foot, and the inanity of this system in particular. I ran out of room, so I tore out a few pieces of paper from my journal and attached them. With my public service done for the day, I hit the trail.
I had gotten to the trailhead later than planned, and the permit fiasco set me back a bit further. Since I couldn’t legally sleep till I gained Windy Pass, I set a quick pace and was unable to enjoy much of the Enchantments.
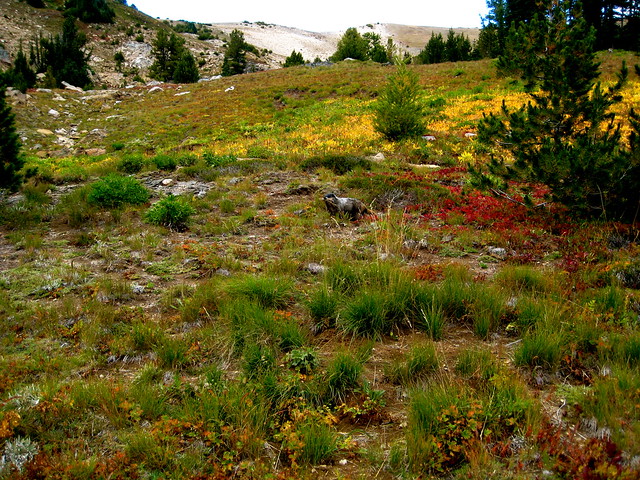
I slowed as I neared the pass. The trail climbing up takes a meandering route through the beautiful basin. Most flowers were gone on this, the last full day of summer, but the bright reds and oranges made up for the lack of scented petals.
Just before gaining the pass, I spotted a very busy (and very fat) marmot. He was scampering all over the basin, yanking out grass with his mouth. A sure sign of the changing seasons. He was no doubt gathering material for his winter shelter.
I paused at the top of the pass. I was now safely out of the Enchantments and could once again safely sleep wherever I wished. 2 It is a comfort.
The trail on the west side of Windy Pass is starkly different from the east. It takes a much narrower and steeper path, heading directly down. Starting in alpine meadows, it quickly enters into forests that continue for the remainder of the descent. It had been sunny and dry the whole day, but the thick bush was still covered in dew, wetting my pants. I was grateful for my gaiters.
Initially I had thought to aim for Trout Lake and make my camp there. But at 7PM I was still north of it. The sun was due to set in another half hour. I decided to camp in a clearing and visit the lake for breakfast the following morning.
I woke once during the night. The thermometer read 25°F.
It seemed like a good morning to sleep in, so I did. I crawled out of the bag at 9:00 AM and left camp a half hour later.
It turns out I was only a mile north of Trout Lake. When I arrived the sun was just climbing over the ridge in the east, melting the frost off the lake’s surrounding meadow, filling the air with mist. A fine start to the equinox.
I attempted to make a breakfast of oatmeal with chia seeds, but accidentally dumped in most of the bag of chia seeds. Breakfast became chia seeds with oatmeal.
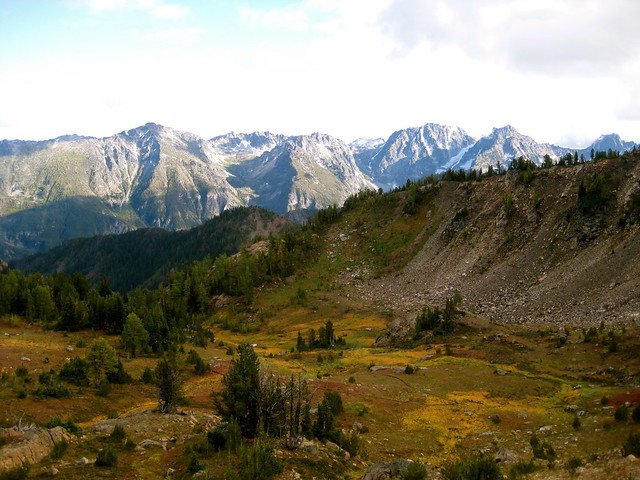
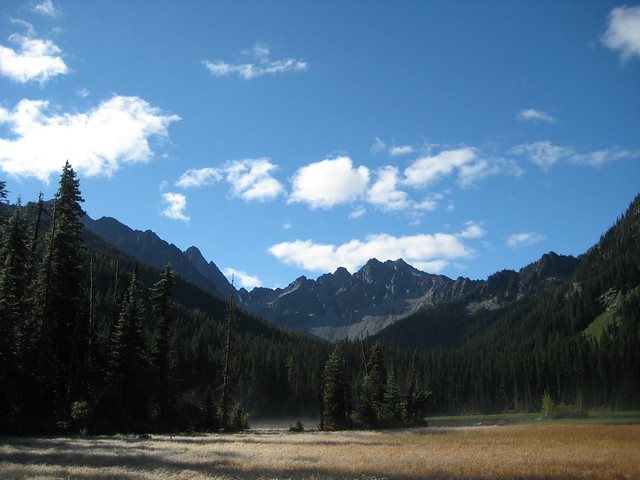
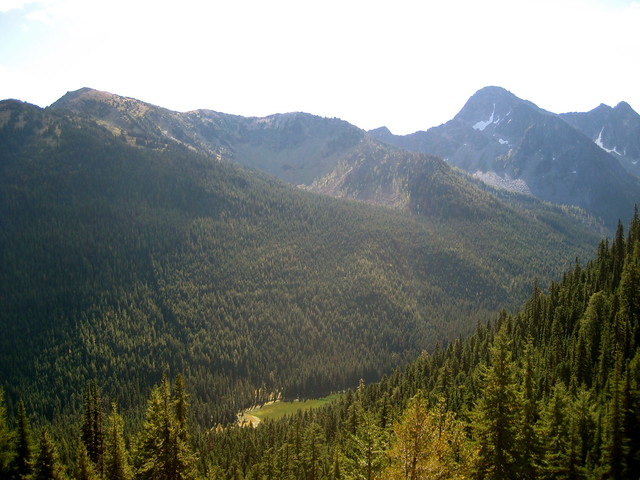
With the meal finished and the sun climbing high, it was time for me to continue west. The climb to the top of Jack Ridge offered splendid views of the Trout Creek valley, back towards Windy Pass, and the many peaks of the Alpine Lakes Wilderness.
At the top of the ridge the obvious tread continued south. Had I looked at my map I would have seen that the real trail turns sharply north before beginning its descent down the opposite side – but why take out a map when there is fine tread below my feet?
I lost the trail shortly and decided that it must have been only a game trail. Turning back to scout out the proper path was the obvious solution, but backtracking always seems depressing. Besides, I only needed to descend into the valley on the opposite side of the ridge till I reached Jack Creek and the obvious trail that parallels it. I would make my own way.
At first I was able to find other game trails that seemed to be heading down. But the trouble with deer is that they don’t organize themselves into trail crews to maintain their highways. The paths always petered out. I soon gave up on them in favor of a more direct descent. It was steep, and lacking a trail, I have the tendency to always aim for a direct descent (or ascent, as the case may be), making nary a switchback.
The areas thick with trees slowed progress further. I was glad when I reached a small open meadow. Until I was stung by a bee. At that point my gladness evaporated. I retreated back to the trees. Having been stung before and never experiencing a reaction, I wasn’t much concerned, but the venom still hurt.
The descent continued. I soon noticed that when I clenched my left hand there was some tightness on the outside, near where I had been stung. It was not yet visible, but the area was clearly swelling. There was nothing to do but continue the descent.
The last stage was the steepest. I often fell and slid down on my rear. Two hours after I had left the top of the ridge I spotted a man with a rifle and orange hat. He yelled a hello. I return the greeting and commented that he must be on the trail. The hunter replied with a thumbs up.
It was good to be back on trail. We chatted while I recovered my breath and sucked down a bit of water. Apparently it was high buck season. The hunter lamented that his ruck was much too heavy for this trip. I observed that he still had to pack out the meat – or, at least, hopefully he would. Luckily he had two friends further ahead of him that could help with that job.
Now on the Jack Creek trail, I turned south and resumed my walk. At the junction with Meadow Creek I stopped for lunch and water. My hand was now visibly swollen, but I experienced no other symptoms. The swelling did not appear to be traveling up my arm. To be safe I switched my watch and paracord bracelet to the other wrist. Gazing at the contrast between my two hands, I thought it funny, like I was slowly (or perhaps quickly) becoming fat. Anyway, the hand still worked fine, doing everything that a hand is supposed to do, so I wasn’t worried.
That afternoon I only traveled a few miles further, a bit past the junction with Van Epps Creek. It didn’t make much mileage for the day, but I was tired from the journey down the ridge, and unsure if there would be any decent spots to camp till the opposite side of the upcoming pass.
Off to one side of the trail was a burned area where I was able to find a decently flat spot for the tarp. I enjoyed dinner while watching the sun set in the west, taking with it the last few moments of this year’s summer. It had been well spent, I thought. I brought to mind waking up in the Glacier Peak Wilderness, with the valleys below me filled with clouds and only the snow-capped peaks visible above. Or throwing my bedroll in the dust in the high country of Oregon’s Cascades, spending the whole night watching the Perseid meteor shower, tossing oohs and aahs back and forth across camp. Or yelling at bears down by the Tucannon.
Camp was at a lower elevation that night, and I slept warmer. But the dry spell was broke by a light morning rain. It didn’t matter: Jack Creek was running a hundred feet from my camp and had to be forded first thing, so I was getting wet anyway.
On the other side I exchanged sandals for boots (tying my shoe laces with one still swollen hand). The rain had stopped, but the forest was still damp. I kept my rain gear on.
The trail crossed back to the other side of the creek, then started heading up, aiming for Stuart Pass. It was forested, providing few views of the destination, until a sudden break provided a stunning view of Mount Stuart. “Well, shit,” I thought. I’ve seen a lot of mountains, but Stuart is an awesome sight. One of the largest pieces of exposed granite in the States, carved by multiple ice ages, the only way to describe it is rugged. I had a strong temptation to abandon the trail for the mountain, but time – or, rather, my food supply – was against me. I continued on up to the pass.
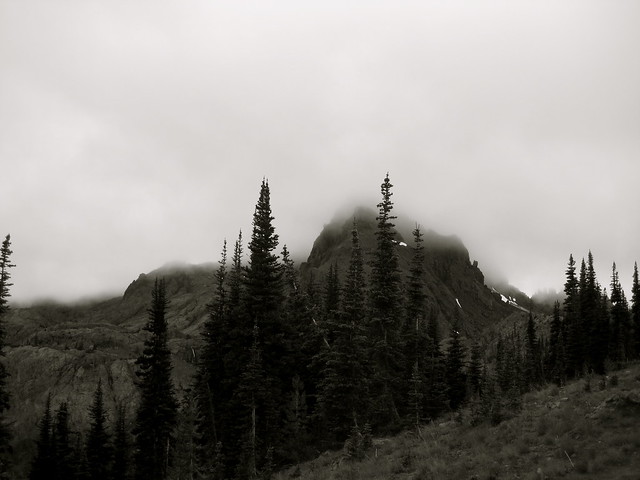
Stuart pass connects Mount Stuart to neighboring Ingalls Peak, but by the time I reached the top, clouds had rolled in and obscured both mountains. Snow began to fall. I sat down for a congratulatory lunch.
I was nearly out of the wilderness now, with nothing left to do but descend the pass and walk through the 20 mile valley of Ingalls Creek. I thought I would do only a few more miles today, and save the bulk for tomorrow. But after I left the pass the flatness of the terrain deceived me. At 4:00 PM I was only 5 miles from the end. Not wanting to end the trip that early, I stopped at the next likely spot and made camp, settling in for another warm night.
The sun wakened the valley in the morning, a welcome change from yesterday’s clouds and rain. I set out a few things to dry while the oats boiled and decided to enjoy a bit more of my book before breaking camp.
The last few miles of trail went quickly. I arrived at the trailhead at noon, but the trip wasn’t over: this wasn’t the trailhead where I had parked. The trip was a one way hike, not a loop. So I walked out the small road to where it met US 97 in one mile, stuck out my thumb, and began the second stage of the journey.
Hitchhiking is a completely different experience from wilderness rambling. I’m at ease with solo travel in the middle of nowhere, depending only on myself. I know what I can do, what I can’t do, and I’m comfortable betting my life on it. But thumbing my way down the highway is the opposite. I barely factor into the equation. Instead I’m completely dependent on everybody else.
Before reaching the highway I had put away my trekking pole and taken off the rain gear that I had been forced to wear down the wet trail. This, I hoped, would make me look a bit more normal. Perhaps it worked. I only had my thumb out for 10 minutes before a middle aged couple pulled over and asked me where I was headed. I told them Leavenworth, which is about 8 miles north on US 97 and then 10 or 12 miles west on US 2. They were going to head east on US 2, but offered to take me up to the junction.
They were Seattleites, heading to the east side to escape the rain for a few days. Both were interested in my travels, so I told them a few tales. When we reached US 2 the driver said he’d head into Leavenworth and drop me off wherever I wanted. Great! That was the bulk of the trip over with. Initially I hadn’t been sure how long it would take me to get back into Leavenworth. I planned for an extra day or two in case I needed to stealth camp along the highway, but now it looked like I would reach my own car that same day.
I was dropped off at the western edge of town. Now I had to get 8 miles down Icicle Creek Road. The first mile or two consisted of suburbs, but after that it was only a small country road. I somewhat doubted my chances of getting a ride all the way.
The second ride took longer. This time a whole 15 minutes before a pickup truck stopped. The driver was an old man, probably in his eighties, blasting music from a country music station. After I hopped in I discovered that the seat belt on the passenger side was broken. Whoops.
I had to strain to make out anything he said. He offered me a bottle of whiskey, saying it would keep me warm, but I told him it wasn’t that cold yet. Then he said something about getting me a woman, ogling at a jogger on the side of the road.
Eventually I made out that he lived just a couple miles down the road. He’d just gone into town for the whiskey and was on his way back. But he too decided to go out of his way to drop me off 8 miles down the road. I decided I must be a pretty ok guy.
I had first stuck my thumb out on US 97 two hours ago and was almost at my destination. This last bit was a small, dirt Forest Service road. I doubted if I’d see any cars going in the right direction, but it was only 3 miles and a few thousand feet to the car. I didn’t mind the walk.
A little over halfway I passed a group of guys chopping wood at the side of the road. “That looks like a lot of work,” I said. “I think I’ll just keep on walking.” One of them joked that he’d give me a ride back down if I wanted to help, but I told him my car was at the top of the hill. “I need a ride in the other direction!” The man replied that they were almost done with the wood and he’d give me a ride up there anyway, but I only had another mile to go and was enjoying the walk. I declined.
Three hours and about 30 miles after leaving the wilderness I was back at the car.
Notes
↵ Regardless of the benefits of permits, or the political ideas behind them, I find them to be completely impractical for wilderness areas. Controlling people in cars is easy, since, for the most part, they're limited to roads. But controlling people on foot? Not so much. (Hence why I equate mobility with freedom.) You can place a permit station at the trailheads closest to the area you want to control. That covers people driving to it. And how about those of us who walk in? Now you need permit stations on every trail leading into the area. But wait! Why assume that foot travelers are limited to trail? To effectively control access, you either need to have permit stations dotted across the entire border every quarter mile or so, or you need to surround the area with a large, unscalable wall or fence with only a select few entrances. Impractical, you say? I agree. (Incidentally, the same thing goes for national borders. They seem to operate on the premise that everybody trying to cross will do so on the roads that you ask them to cross on. As if people are sealed in their tin cans and can't, you know, walk.
↵ Of course there were no signs up here, warning travelers heading in the other direction that they were now entering an area were they were not allowed to lay their head. Once again: the impracticality of wilderness permits.
"Anyhow, let's get down to it, Hig," Mack went on. "I don't understand. What is it that really tempts you? What's the trouble with there?"
"There? Well, I figure this way. There is there all right, until a man gets to it. Then it ain't there. It's here, and here is what you wanted to get away from in the first place."
Mack shook his head. "The only way out that I can see for you is for you to shoot yourself."
"Not as long as there's trails I never took. Not while there be yonders and yonders."
- A.B. Guthrie, Jr., Fair Land, Fair Land
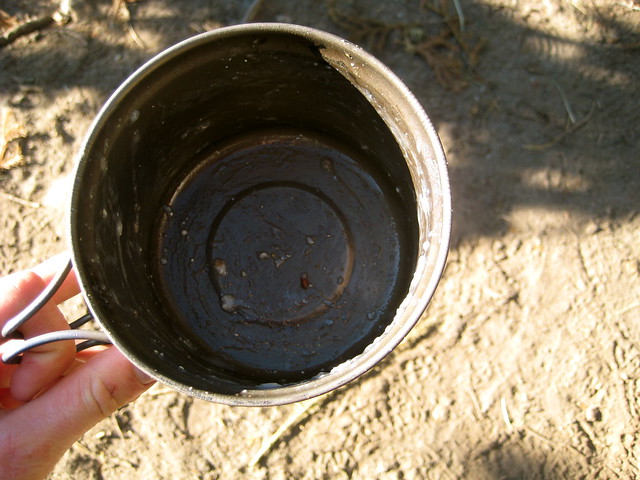
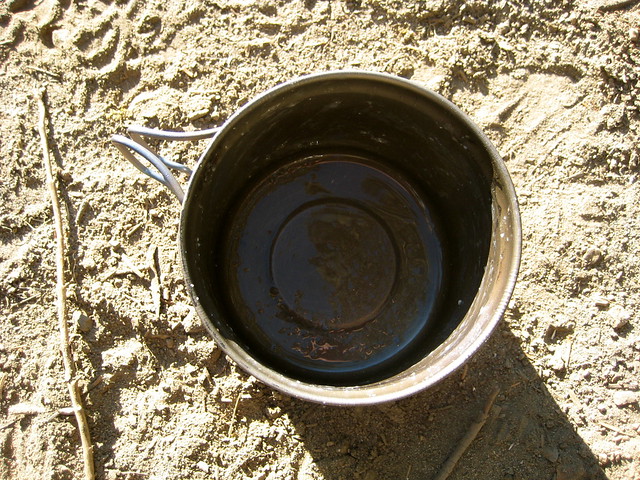
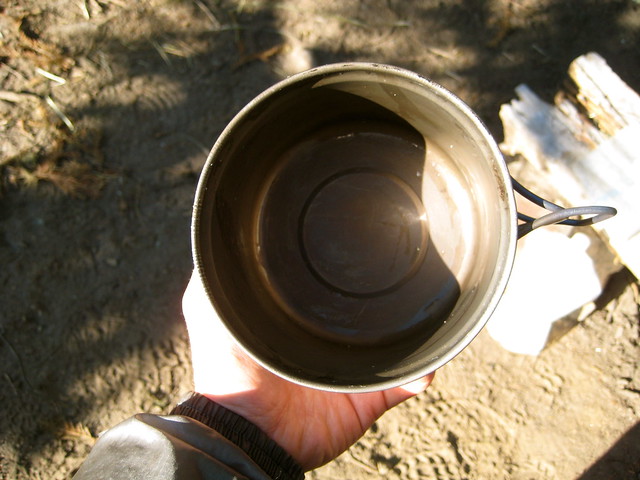
Cleaning my pot in the wilderness has always proved a challenge. I’m not hugely concerned with completely sanitizing it – that would not be realistic – but I do like to get all the food remnants out of the pot after every meal. A few extra ants in my ramen? No problem. Fungi and bacteria in the oatmeal? I’d rather avoid that.
Getting every last bit of food out of the pot with a spork doesn’t work. If I’m in a desert or on the beach, sand can be used to scrub the pot. The Equisetum family (Horsetails) are also good scrapers, due to their high silica content. But neither sand nor Horsetails are available frequently enough on my trips to make them realistic solutions. As well, cleaning the pot with those means that I’m dumping food remnants onto the ground, rather than into my belly. If I’ve humped it, I’d rather eat it.
I used to carry a piece of a green scouring pad. Those work great when the sun is available to dry them out after use. Here in Cascadia that means they work about 3 months of the year. The other 9 months – especially in winter – it proves a challenge and a hassle to dry them fully. I don’t like storing the pad with any moisture in it. Doing so would create the perfect incubator for bacteria.
Clean pot with spatula, licking food remnants off of spatula as you go
Boil water in pot
Pour heated water from pot into bottle for tea
The pot is cleaned with the spatula. Afterward, boiling water in the pot helps to kill any nasties that might be hanging about.
I discovered this idea on Crow’s blog about a year ago. At first I took a small kitchen spatula and cut the handle off. It worked, but there was about 2” of the plastic handle inside of the head that couldn’t be removed, which translated to dead weight. Later I discovered that people actually sell spatulas with removable heads (to make them dishwasher safe, I think). I bought one of those online, but when it arrived the head was a little too small for my tastes. (In the wilderness I always treat my hands as dirty. If I’m licking the spatula, I want it to be big enough where I can hold it with my fingers near the top and lick near the bottom. I do not want to lick where my fingers are.)
About a month after I had started to use the sawed-off spatula, I discovered that GSI made exactly what I wanted: a compact scraper.
At 16 grams (0.5 oz), it’s not the lightest possible solution. But it’s lighter than my first attempt, and the perfect size for my needs. The blue part is a soft rubber, like a normal spatula head. The white bit is hard plastic, meant for scraping burnt foods. (Burning your meal, I think, is a mistake you only make once. So far I’ve not actually used the white part to scrape the pot. It’s where I keep my fingers.)
My method of using the scraper differs slightly from Crow’s. I eat the meal with my spork, attempting to get as much of the food as possible. Afterward, there will still be plenty left in the pot.
When the spork is of no more use, I pour some water into the pot, swish it around, and drink. (A habit I picked up in southern Idaho’s desert. Water was scarce, so if you used it to clean your pot, you still had to drink it afterward. The taste is not always entirely pleasant, but you get used to it, and are wasting no resource.) This takes care of some of the left over food, but with meals like oatmeal, there’s still gunk left over.
After this precursory cleaning, I go to work with the scraper: scraping the pot clean, licking clean the spatula as I go (leave no calorie behind, I say). The pot will then be visibly clean.
At this point, I may or may not boil water in the pot. If I have brought enough fuel for an after-meal drink, I’ll boil the water in the pot to finish cleaning it, then dump the water into an old Vitamin Water bottle for a drink. Most of the time I don’t plan on warm drinks. Either way, at the end of the process the pot will still have a little moisture in it. If I’ve just had dinner, the cleaning is complete: I’ll leave the pot till breakfast. On the other hand, if I’m moving again after the meal, I don’t like to pack my pot away wet, so I’ll wipe it down with a small piece of an absorbent camp towel.
The GSI Compact Scraper is now a permanent part of my kitchen. Since I started using it at the end of last year, it’s also the piece of gear that people request to borrow the most! (It goes in my mouth. I never lend it.) I’d recommend any wilderness traveler pick up some sort of cheap spatula or scraper.
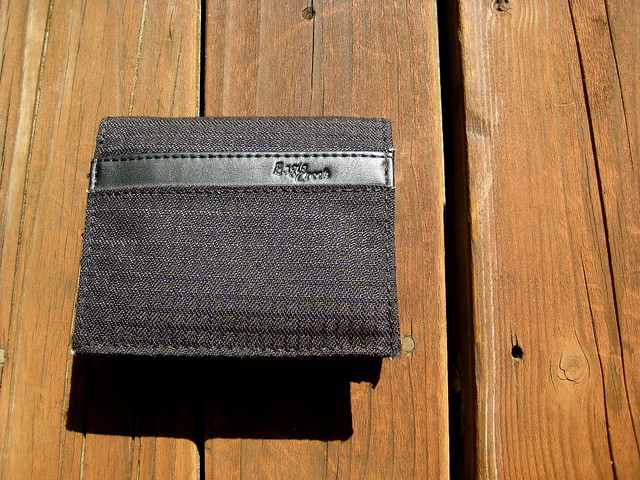
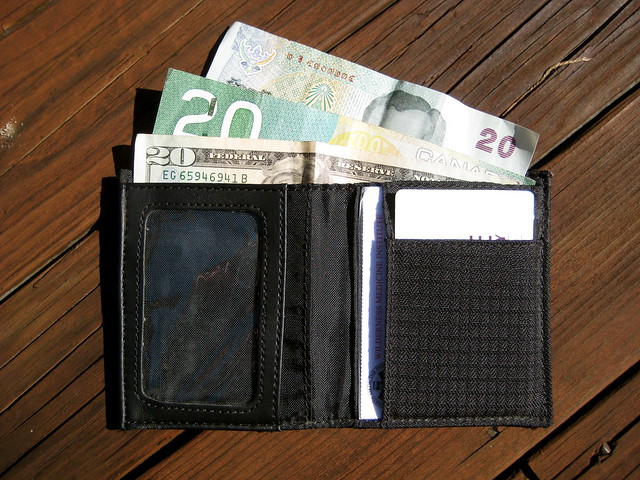
I carried the Spec-Ops THE Wallet Jr for four or five years. It’s certainly well made and, other than the tags I cut off of it, looks the same as the day I bought it. But it’s bulky, heavy, and carries more than I need. Primarily because of the bulk, I went looking for a slimmer wallet, settling on the Eagle Creek Slim Wallet (which now seems to be a discontinued product). In another couple months it will have seen a year of use.
The Slim Wallet is made out of 420D Double Box HT nylon, which so far seems tough enough to survive my pocket: there is, as of yet, no noticeable damage to the wallet. It’s simple interior consists of a billfold, clear pastic ID window, and three card slots. There are actually three additional slots inside the wallet. I don’t think these were intended as such (instead they seem to just be byproducts of how the wallet was sewn), but they work to carry additional cards or hide small items.
As the name implies, the wallet is incredibly thin. Perhaps not as thin as an ALL-ETT wallet (I considered one of those, but wasn’t convinced as to the durability), but a huge improvement over the Spec-Ops wallet. This took some getting used to. After years of carrying a bulky wallet, I was accustomed to feeling the wallet in my pocket, which provides some sense of security. The Slim Wallet is slim enough so that you don’t always notice that it’s there.
My only complaint about the wallet is that the billfold is just as wide as a Federal Reserve Note, which makes it somewhat tricky to get the bills in there. If the wallet was half an inch or so wider, bills could be more easily slid inside.
I carry a few items in the wallet in addition to the normal cash, few cards, and ID.
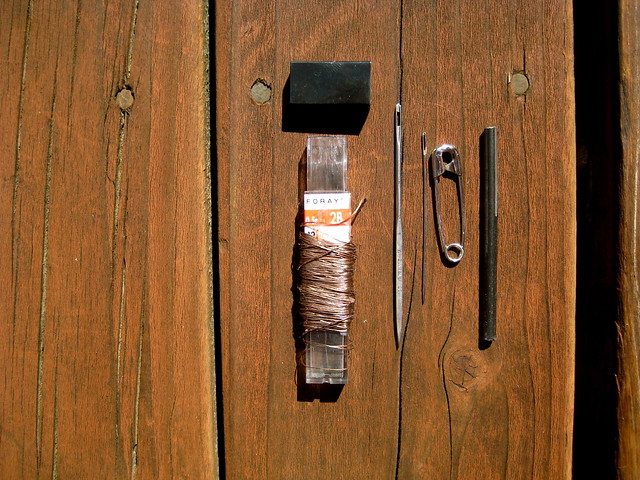
There is a small repair kit, which consists of a #17 sailmaker’s needle, a #5 crewel needle, kevlar thread, a small safety pin, and a very small misch-metal ferro rod.
In addition to the repair kit are two AquaMira water purification tabs, two emergency $20 bills (to be used only if I’m lying half dead in a ditch), and a small piece of Rite-in-the-Rain paper with my GPGkey fingerprint. (If this sounds familiar, it’s because I keep almost identical items in my hat.)
All of these items tuck nicely inside the wallet’s hidden slots and add no noticeable weight or bulk.
For more ideas about urban wallet survival kits, check out TEOTWAWKI blog.