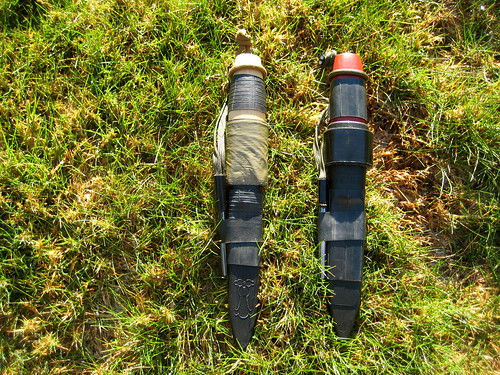
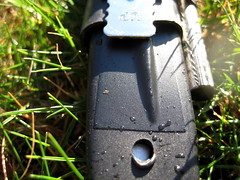
The greatest disappointment about any Mora knife is the sheath: a flimsy, plastic thing that won’t easily fit on a decent sized belt and does not even hold the knife very securely. As they come, I consider them unusable. But a few simple modifications and additions make them quite acceptable.
The Mora knife sheaths are designed to be mounted either on a button on a pair of coveralls or through a belt. Apparently people wear very small, skinny belts in Sweden. Over here in the United States of Gun Belts, that doesn’t fly. The belt slot on the sheath can be forcefully enlarged by shoving in a piece of wood, such as a ruler, and applying heat to cause the plastic to expand, but I don’t trust that such an act will not over weaken the plastic. I’m not a big fan of carrying a Mora directly on my belt, anyway. Usually, I’ll carry the knife either on a lanyard around my neck or as a dangler off my belt. But both of these setups allow the possibility of the knife and sheath to swing freely, accentuating the problem of an insecure fit.
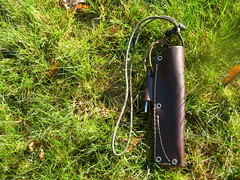
Both the problem of how to carry the sheath and the problem of the insecure fit can be addressed with a single piece of paracord.
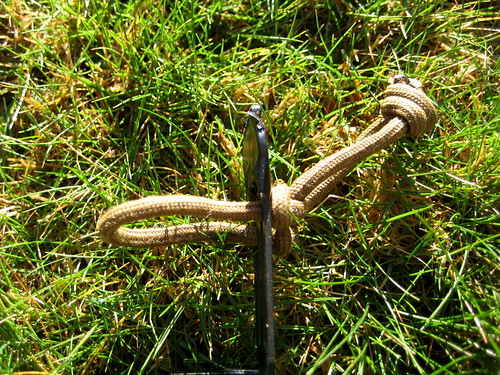
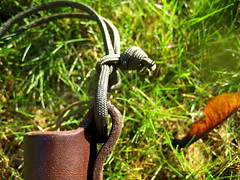
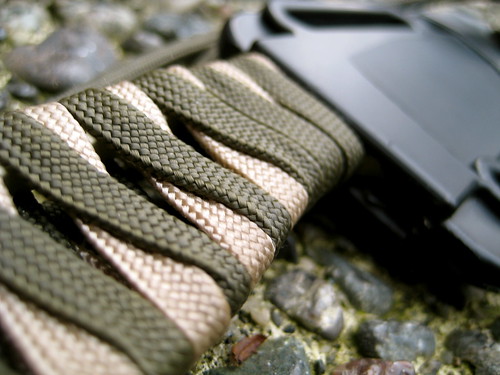
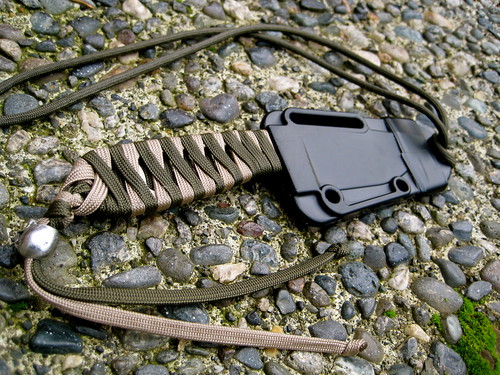
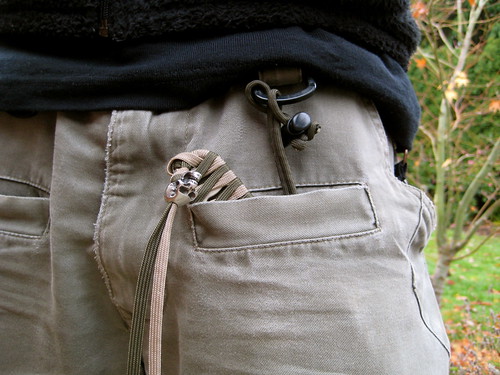
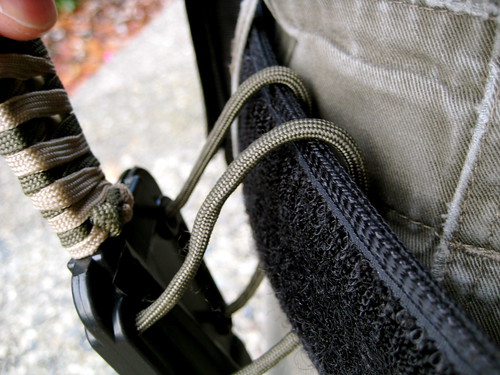
With the knife in the sheath, I take a piece of paracord and run both ends around the handle and through the slot for the belt. Then, tight against the back of the sheath, I tie an overhand knot in either end of the cord. This creates a loop of paracord on the front of the sheath that can be made smaller, but cannot become any wider than the bottom third of the handle. Because the handles on Mora knifes are somewhat tapered – fatter in the middle than on either end – this loop prevents the knife from being removed from the sheath. Even if the knife is only lightly dropped into the sheath rather than securely pressed, it cannot be removed without first sliding off the loop of paracord.
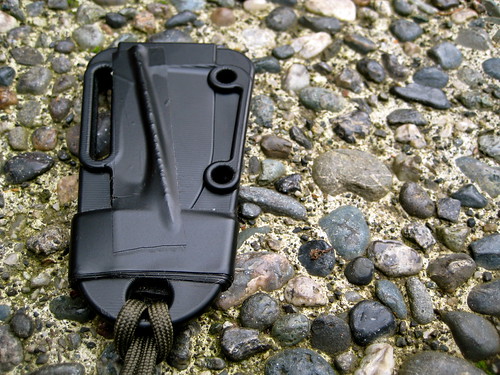
After tying the two knots against the back of the sheath in either end of the paracord, I take both ends and tie them together, forming a loop on the back of the sheath. This provides my carry options.
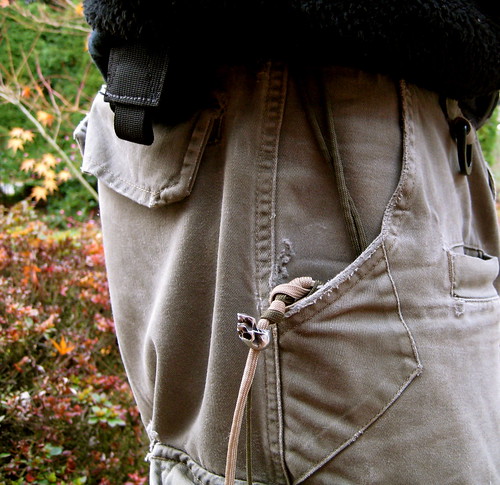
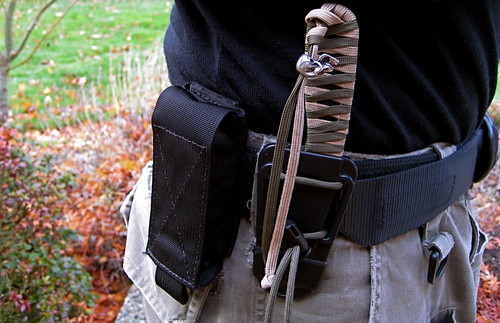
To carry the knife in a dangler system, I prefer to use a Maxpedition Keyper rather than a carabiner. The Keyper is mounted on my belt and clipped into the loop of paracord on the sheath. (To reduce movement in this setup, I’ll stick the knife and sheath in my pocket.)
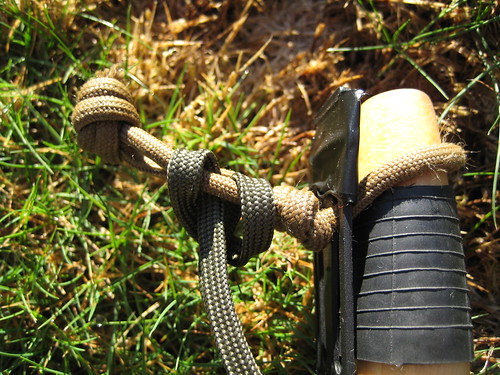
The last thing that I do to this part of the sheath is add a small wrap of electrical tape around the very top, covering the upper bit of the belt loop and the button hole. This prevents the paracord from sliding to the top of the sheath and forces the securing loop to be about .75” from the very end of the handle. I’ve found that if this is not done, the securing loop is like to slip off the handle.
That’s all that is needed to make the sheath usable, but a few other additions can be made to increase its utility.
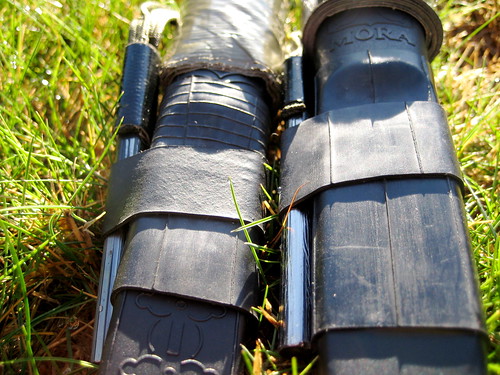
Around the top of the sheath, I wrap tape. In the sheaths pictured here, one has 2” olive drab duct tape, the other has 1” black Gorilla Tape (which is like duct tape, but thicker and stickier). One can never carry enough tape. I imagine, also, that the tape likely increases the structural integrity of the sheath.
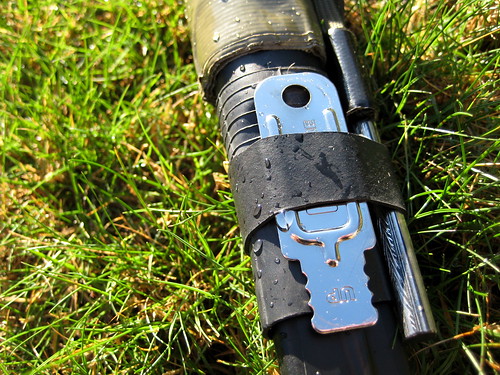
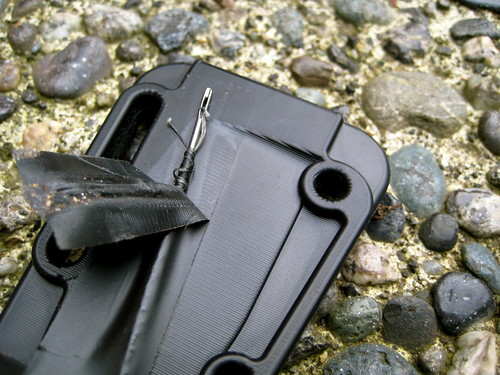
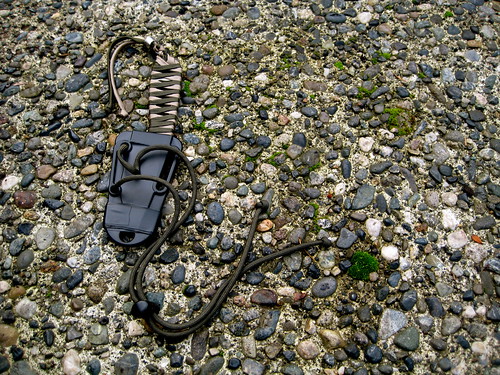
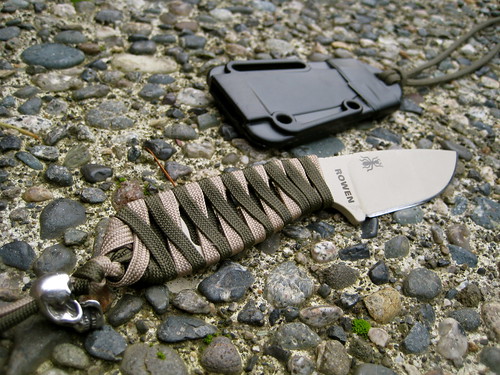
On the back of both sheaths, I have a #17 sailmaking needle, pre-threaded with black kevlar thread, taped down with some electrical tape. As I mentioned in my review of the RAT Izula, this is an idea I first picked up from one Dave Canterbury’s videos. The extra needle and thread adds no noticeable weight and could be a welcome addition to the sheath if you ever find yourself separated from your pack, with the knife and sheath as your only piece of gear.
The next modification on the body of the sheath was also inspired by Dave Cantebury. In another of his videos, he showed how he had layered different width pieces of inner-tube on a machete sheath to create pockets that could store small items, such as a sharpening stone and magnesium fire starter. With that in mind, I add a wide piece of inner-tube onto the middle of the Mora sheath (which also serves to cover and further secure the taped down needle). Then, on top of that, I put a skinnier piece of inner-tube. Slid between both pieces is a backup ferro rod. Because the rod has rubber below it and rubber atop, there is an incredible amount of friction. The ferro rod becomes difficult to remove. I have carried blank rods in these “pockets” and they have never fallen out. Still, I prefer to carry rods with a lanyard of some sort on them. I loop the rod through its lanyard around the paracord loop on the top of the sheath, guaranteeing that the rod is secured.
The sheath for my KJ #1 knife has only a ferro rod. That knife is carbon steel and can generate sparks off the spine. On the sheath for the larger SL-2, however, I have added a small striker slid between the two pieces of inner-tube on the back. The SL-2 is made of laminated steel, which is too soft to reliably produce sparks.
These modifications made to the Mora sheath help to secure the knife, allow for different carry options, guarantee a source of fire, and provide a needle, thread and tape for repairs. They turn what is otherwise a near useless sheath into a functional item worthy of being matched with the Mora blade.
(I also own a high-quality leather sheath made by JRE Industries for the KJ #1 knife. I tie a loop of paracord through the top loop of leather on the sheath so that the knife may be carried around the neck or on a dangler, similar to the modified plastic sheath. The leather sheath does not require a loop of paracord on the front to secure the handle. Nor does it need pieces of inner-tube to create a pocket for a ferro rod. The only thing that it lacks is a repair needle, but I have found that most tape does not adhere very well to leather, so I cannot stick one on the back.)
My primary EDC knife for the past few years has been a plain-edge Emerson Mini-Commander. It’s a great little knife: an ideal size for EDC and extraordinarily tough for a folder. I’ve used it as a pry-bar a few different times on objects that I would be afraid to pry with some fixed-blade knives. The Mini-Commander is no worse for the wear.
Still, I’ve often thought that I would like to EDC a fixed blade. After all, despite it’s toughness, the Mini-Commander is a folder and that gives it some limitations. I’ve also found that the grind and shape of the blade is not ideal for some wood-working and wilderness survival tasks. Making feather sticks with it isn’t easy.
I have carried a small Nemesis Hellion around my neck most every day for the past couple years. It’s a fixed blade, but quite small. As I’ve stated elsewhere, I think of the Hellion as a novelty item and a fun toy more than a tool. It’s extremely concealable due to its size, but could by no means replace the Mini-Commander.
Folding knives are fairly common and tend not to frighten many people. Fixed blades, on the other hand, are not so common out of the wilderness and rural areas. Now, I’ll admit that I have no idea concerning the legality of carrying a fixed blade in urban environments. I tried reading up on knife laws a number of years ago and quickly gave up – they are so convoluted and contradictory as to be meaningless. And so, for me, they are. I ignore them. So far that seems to work out pretty well. I don’t seem to recall granting any government the right to regulate a tool such as a knife, anyways. Still, I do concern myself with other people’s feelings and, as odd as it is, some people feel nervous around folks with fixed blade knives strapped to their hips. Even something like a nice 4-5” bushcraft blade on the belt doesn’t seem to fly in a city. I needed something more concealable, but still of a size large enough to be of some use.
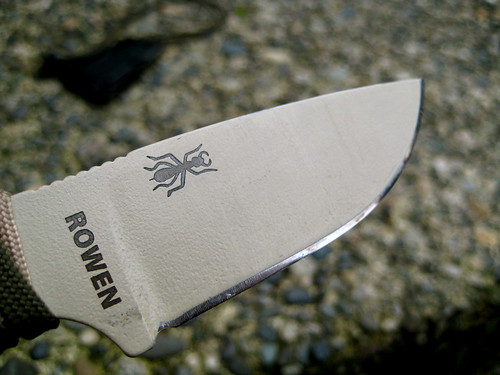
Two products immediately jump out as a perfect solution (well, three, but I can’t afford another Chris Reeve knife): the RAT Izula and the Becker Necker. Both knives are small and flat, which lends them to a number of different carry options, but large enough to function as utilitarian tools. The Izula is 6.25” over all, with a 2.88” blade and 3.37” handle. The Becker Necker comes in with a larger 3.25” blade and 3.5” handle for an overall length of 6.75”. For the slight difference in overall length, one would think that jumping on the Becker Necker for the larger blade would be the way to go. After all, that extra .37” of blade could equate to more utility. But in searching around the internet and reading a number of comparisons, it became evident that the RAT Izula was the favored knife. It seems to be the consensus that, comparatively, the Becker Necker has too little handle for its length of blade. I don’t consider my hands to be large, but they certainly aren’t small, and I know that having too small a handle could completely ruin a knife for me, regardless of the quality of the blade. So, I chose the Izula.
Izula Options
The Izula can be purchased in two different packages: either the standard knife and sheath, which RAT asks around $80 for (way overpriced) but can easily be got for closer to $50 (a reasonable price) or as part of a “survival kit”. The “survival kit” starts with the same knife and sheath, but also includes a MOLLE lock, paracord, cord lock, snap, split ring, ferro rod, and whistle. RAT asks $100 for this complete kit (crazy) though $60-$70 seems the going rate for most merchants. The “survival kit” did not appeal to me. I already have paracord, ferro rods, cord locks, and split rings. The only useful item in the kit seemed to be the MOLLE lock. I decided to save the money and get only the basic knife and sheath.
The Izula also comes in four different colors, which is a bit fun: black, desert tan, olive drab, and, best of all, pink. I was quite tempted to get the pink, especially given my concern over other people’s feelings of fixed blades. Who could be afraid of a man with a pink knife? But it turns out that I was able to find the desert tan knife for less money on eBay than I could get the pink knife for, so I went with tan.
Edge
The flat ground 1095 steel takes an edge very easily on my Japanese water stones. With the stones and a leather strop, I can get Izula as sharp as my high-carbon, scandi-grind, bushcraft blades. Scary sharp. In fact, the knife is very, very impressive in what it can do. Its only limitation is its short blade and, for longer sessions of use, the bare, skeletonized handle.
Handle
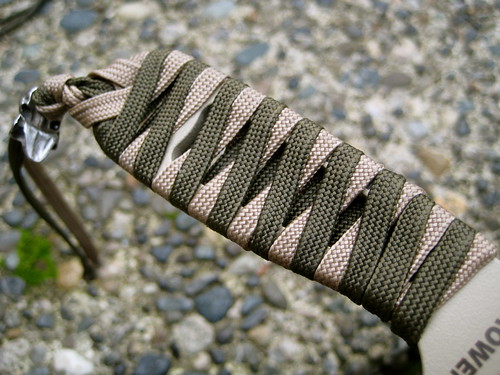
When I first got the knife, I took some olive drab paracord and wrapped it in the way instructed on the back of the Izula instruction sheet. The current paracord wrap that I have on the handle is a 180 degree katana wrap. I first did this with normal paracord, but found that it made the handle a little too thick, so I went back and did it again with gutted paracord. That worked out better, but, being gutted, the paracord does not add a whole lot of extra padding. At the end of the day, the katana wrap is more for looks. The wrap that RAT recommends is a more practical way to pad the handle and carry spare paracord, but it doesn’t look anywhere near as cool!
At the end of the handle, I finished the wrap with a simple overhand knot. I had a unused skull bead laying around, so I decided to leave the two tail ends of paracord a bit long and thread the skull bead through them. By sliding the skull bead to the end, I create a loop for my wrist. Rather than tying the ends of the cord together, I tied an overhand knot in each one separately, which prevents me from accidentally pulling the bead off, but also means that I can slide the bead to the top and just have two loose ends of cord, rather than a loop that will no doubt get caught on things. Honestly, I’m not a big fan of wrist lanyards on knives. I rarely ever use them. But I am a fan of skull beads. Like the rest of the wrap, this lanyard bit is on there just because it looks cool.
Sheath
The sheath itself was the surprise in this whole package. It is some sort of “injection molded thermoplastic” that is supposed to be more cold tolerant than Kydex. I’ve never had a problem with Kydex in the winter, but apparently extreme cold makes the Kydex brittle and prone to crack. The fit of the sheath was what most impressed me. It is, without doubt, the best fitting sheath I have ever had for a knife. The knife pops right in there and is completely locked – no wiggling or movement what-so-ever.
Mods
I’ve taken a size 14 sail-making needle pre-threaded with a length of black Kevlar thread and taped this to the back of the sheath with a piece of electrical tape. Dave Cantebury did this in a video on a Mora knife sheath a few months back. I thought it was a great idea.
It doesn’t add any noticeable weight. Even though I carry a sewing kit in my possibles pouch, I’ve since taped a prethreaded needle to the back of all my plastic knife sheaths. (Tape doesn’t stick too well to leather, so I haven’t figured out how to carry a needle on my leather sheaths). Around the bottom of the sheath, I wrapped a bit more electrical tape (I was out of 1” duct tape at the time). There probably isn’t more than 2 or 3 feet. It never hurts to carry extra tape!
Carry Options
Some people have complained about the sheath because it doesn’t come with a belt clip of any sort. This worried me as well. I wasn’t sure that I would want to carry it around the neck all the time and, since I didn’t go for the expensive kit that included the MOLLE clip, I did not know what other mounting options I would be able to come up with. It turns out that with only a cord lock (self supplied out of my repair box, since I didn’t get the “survival kit”) and a little over two feet of paracord, the sheath becomes remarkably configurable.
Neck Carry
To carry it around the neck, I simply slide the cord lock over both ends of the paracord, put the cord through the top hole in the sheath, and loop it through itself. The cord lock allows me to adjust how high or low it sits on my chest. As with the wrist lanyard, I put an overhand knot in each end of the paracord to prevent me from accidentally pulling the cord lock off, but refrain from tying the two ends of cord together. I don’t want to create a secondary, smaller loop on the back of my neck for things to get caught on when I adjust the cord lock up.
As I mentioned above, I initially thought that I might not want to carry the Izula around my neck. It’s a good deal bigger, heavier, and bulkier than the Nemesis Hellion neck knife that I’m used to. But I was pleasantly surprised. The profile of the knife is slim enough so that it can almost completely disappear under only a t-shirt. Unlike the Hellion, you are probably not going to forget that it’s there because of the weight, but it is by no means uncomfortable.
A lot of folks who carry a neck knife go on about the danger of using knotted paracord as a lanyard. Paracord is very strong. Someone sneaking up from behind could grab the cord and strangle the wearer rather easily. If this concerns you, you could use some weaker cord (or chain), tie a slip knot, or invest in some sort of break away device. Personally, I’m more concerned with the security of the knife around my neck (which sort of rules out slip knots) and I like the simplicity of this system. In the years that I have been carrying the Nemesis Hellion around my neck on gutted paracord, I have yet to be strangled. But it is something to be aware of – especially if you find yourself getting in a tussle fairly frequently. Do remember, though, that the paracord around you neck is attached to a knife, and knives cut things.
Front Pocket (TAD style)
My favorite way to carry the Izula is in one of the two front pockets that Triple Aught Design places on their pants. In my Legionnaires, I carry the knife in the left front pocket. It sits in the pocket rather securely, with only the top half of the handle exposed, leaning to the right. This allows for a very fast, right-handed cross draw. I have the paracord and cord lock setup and attached to the sheath the same as in the above neck carry option, but in this setup I’ll put the cord through the plastic D-ring above the front pocket and loop it through itself so that the sheath and knife are securely attached me. Normally, when I draw from this setup, I’ll grab the handle and push against the sheath with my thumb, popping the knife free. But because the cord is attached to the D-ring, I can also just grab the handle and yank it to my right, extending the cord till it reaches its full length and pops the knife free. Personally, I feel that this is too obtuse a movement, so I prefer popping the knife free of the sheath with my thumb. If you prefer the latter option of yanking the knife, you could move the cord lock a few inches up the cord, thus shortening the distance you have to pull before fully extending the cord and popping the knife free. I will usually leave the cord lock all the way against the knots at the end of the cord and stuff the excess amount of cordage in the bottom of the same front pocket.
Side Pocket
As much as I prefer the above option, not all of us wear TAD pants every single day. When wearing another pair of pants, I will carry the Izula in the right side pocket, tip down. I found that most pockets are sized so that the tip of the sheath reaches the bottom of the pocket with only about the top 1/4” of the handle sticking out. Again, I keep the paracord and cord lock attached as before, with the cord lock slid all the way against the knots at the end, creating a big loop. This loop I run through my belt, guaranteeing the the sheath and knife are securely attached to me. To draw, I reach my hand in the pocket, grab the handle, and push against the sheath with my thumb, popping free the knife. I’m required to get my whole hand into the pocket to grasp the handle, which makes the knife slightly slower to draw than a folding pocket knife clipped into the same pocket (especially compared to an Emerson with the wave feature, such as the Mini-Commander).
Because the cord is attached to my belt I could just grab the handle and pull out or up, extending the cord till the knife pops free, but this is even more obtuse a movement than when drawing in the same manner from a front pocket. I’m not a fan.
Belt
The paracord and cord lock really become useful when you decide you want to carry the Izula on your belt. The first step is to unloop the cord from the sheath. Then remove the knot in either end of the cord so that the cord lock can be removed. Next, thread either end of the cord through the two holes in the side of the sheath and the reinstall the cord lock, retying the same knot in either end of the cord to prevent the cord lock from being removed.
Move the cord lock about halfway up the cord, grab a bit of the cord and pull it through the large slit opposite the two holes on the sheath. What you now have on the front of the sheath is a line of paracord crossing the top horizontally and, on the bottom, the cord coming together horizontally to the cord lock. On the back of the sheath you have two vertical loops that you can thread your belt through.
With the sheath attached to your belt, you can then move the cord lock tight against the sheath, pulling as much paracord through the lock as you can. The Izula will then be mounted on your belt.
When I first saw this carry option pictured in the manual that RAT provides with the Izula, I was skeptical of using the paracord this way. I didn’t think that you could could get the paracord tight enough to eliminate any wiggling or movement. I’ve now carried the knife a good deal like this and I am perfectly happy with it. The sheath is just as secure as a sheath with a belt clip or malice clip (albeit easier to cut off). If you keep it attached to your belt consistently for a few days, the cord lock will eventually slide down a bit, loosening up the cord and causing the sheath to move a little when the knife is drawn. This can be addressed by checking the tightness of the lock once a day every time you put on your pants, which I don’t think is too much to ask.
The downside to this method is that, because we’re using the same piece of paracord as we use when wearing the knife around our neck, the paracord is necessarily long. You will have 6” or so or cord dangling below the lowest point of the sheath. This would be a problem if the two ends of the cord had been tied together, forming a loop, but because they have not been tied thusly, the two ends are loose and will not get caught on anything. They don’t bother me.
Spine
The spine itself is .156” thick, with about 1/2” of a grooved thumb ramp at the start of the blade. I’ve never found these thumb ramps to be necessary on any knife, but they don’t get in the way, either.
Initially, I found that I could not generate any sparks by sparking the spine of the Izula against a ferro rod. I know 1095 is high-carbon, so I figured it must either be the tan-colored paint that was preventing me from getting any sparks, or the corner of the spine was slightly rounded. To address both potential problems I set the spine flat on top of a coarse silicon-carbide stone and slowly ground down the first 2” from the tip. This removes the paint and squares off the edge, giving a 90 degree angle that should be ideal for striking sparks. With that change made, the Izula will throw a decent shower of sparks.
Overall
I’ve been EDCing the RAT Izula for just over two months now. So far, I have been extremely impressed with the knife. Unless I am for some reason forced to carry a folder instead of a fixed blade, I doubt that I will go back to carrying the Emerson Mini-Commander. Direct comparison between a fixed blade and a folder is not exactly fair since they have both been designed with different intentions and are markedly different tools, but I find the Izula to be a superior knife. If I woke up in the zombie apocalypse, I’d much rather find the Izula in my pocket than the Mini-Commander.
If you think you can get away with EDCing a fixed blade, I’d strongly urge you to consider the Izula. As I mentioned in the beginning, the $80 that RAT asks for the knife is overpriced, but it’s not hard to pick up an Izula for closer to $50, which I think is a very good value. (It’s certainly cheaper than a quality folder like an Emerson!)
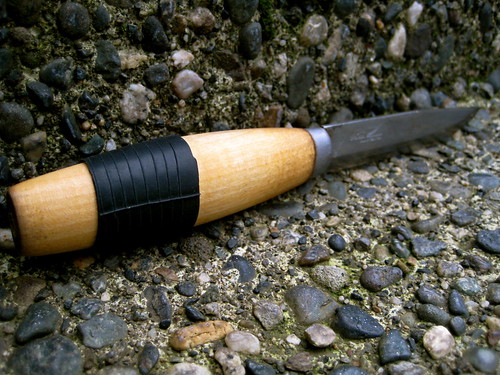
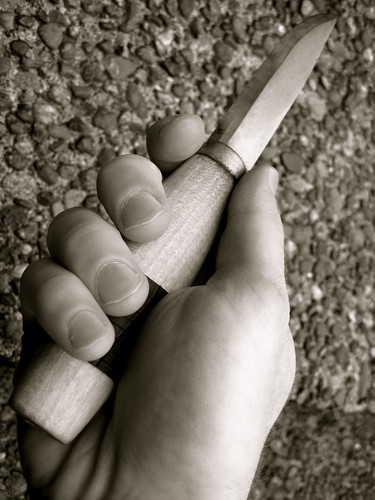
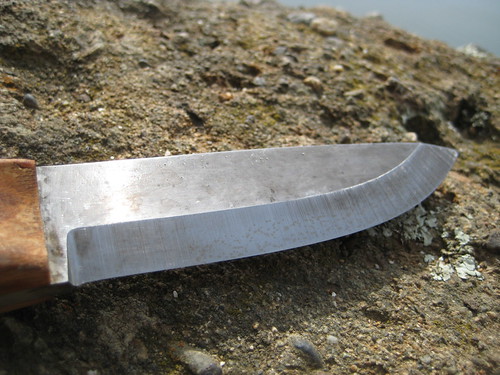
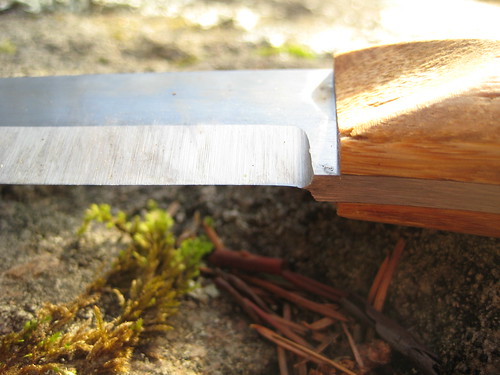
One of the pesky traits of the wooden handled Mora knives is their lack of grip when wet. One could acquire a Mora with a rubber handle, but, let’s face it: those are ugly. Instead, I cut a piece of 700x35 bicycle inner-tube about an inch wide and slide this just less than halfway on to the handle. The grip is immediately improved. If you were so inclined, you cut a piece the length of the handle and cover the whole thing, but so far it seems that this small piece is enough.
As with the rubberized BIC, this also provides another way to carry tinder that will work even when wet (though it will require a lighter or candle to start).
Linseed oil is a popular product used to coat and protect wooden handles on knives, axes, and other tools. I’ve tried it a couple times, but I’m not a big fan of the stuff. It takes multiple coatings over a long period of time to get a decent finish, it seems to rub off easily with use, and that whole spontaneous-ignition-of-linseed-oil-soaked-rags thing makes me a little nervous.
My preference is with Howard Citrus-Shield Premium Natural Paste Wax. I first stumbled upon this stuff in a hardware store while I was looking for linseed oil. The store didn’t seem to stock the oil, but the “Citrus Shield” can caught my eye. I remembered reading that Ragnar sometimes used some sort of orange-scented wax on certain wooden knife handles, so I brought the can home to try it out.
It turns out that the stuff works really well. All it consists of is a mixture of natural wax and oil. Initially, there is a very strong citrus scent, but this quickly wears off after application. I use it on all my wooden handled blades now, including the specially processed bamboo handle on the BCNW-O1 (which is supposed to be water resistant, but I found that it would swell some when damp before I treated it with the wax).
The application is very simple. The instructions on the can say to apply a thin coat with a clean rag, but I just use my fingers. After rubbing it into handle, I let it sit for 5 minutes before wiping it off with a clean rag. If this is the first time I’m treating the wood, I’ll apply and wipe off the wax about 3 times. After the final wipe down, I rub the handle with fine 0000 steel wool. I don’t put a whole lot of time or effort into this buffing, though. I’m not seeking a shiny finish, just practical protection.
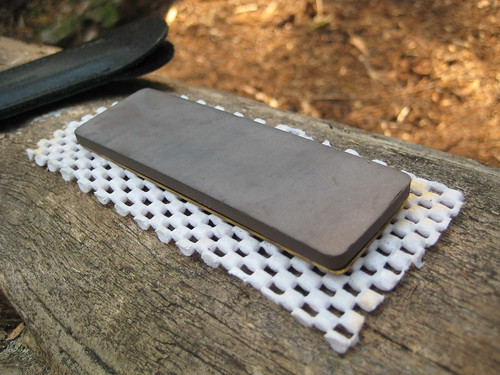
The Fallkniven DC4 is one of the more popular pocket-sized knife sharpeners, particulary among bushcrafters, due in no small part to patronage by Ray Mears.
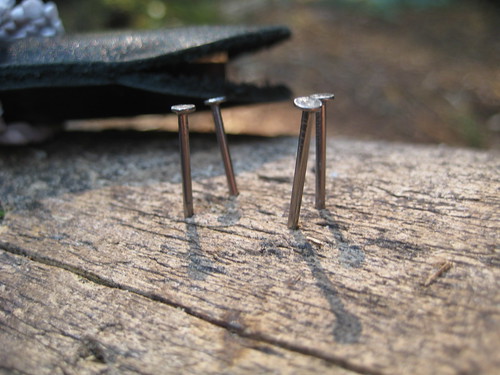
The technique that Ray Mears uses to keep his stone from moving around is to create a frame by hammering 4 small nails around the stone into a log. This works, but, over on the Equipped to Survive Forums, I picked up a better idea: simply cut up a bit of non-stick rubber padding.
This padding is sold in rolls and meant to be placed between carpets and hard-wood floors to prevent the carpet from moving around. The stuff that I use is actually meant to line shelves and drawers. The only different between it and the carpet padding is that the shelf and drawer stuff has smaller squares and a tighter mesh.
I find the padding to be much more convenient that the nails. It’s easier to deploy – you don’t have to take the (albeit small amount) of time to hammer in and then remove the nails; the pad works just as well on a rock as it does on a log; and the pad does not get in the way when sharpening, as the nails will sometime do.
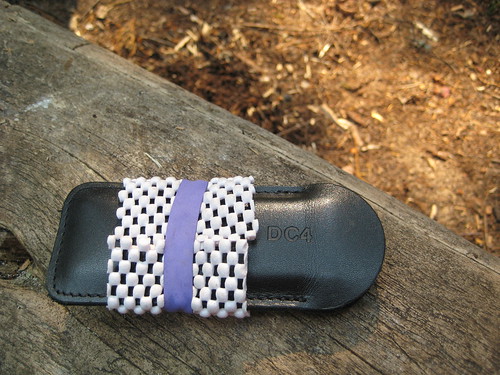
For storage and transportation, I simply wrap the pad around the DC4’s sheath and secure it with a rubber band.
I still carry the small nails in the bottom of the sheath just in case, but I think the pad is a better way to go.
High carbon steels have a tendency to rust without proper care. This is especially true of knives made from O1 tool steel, such as my BCNW-O1.
A patina is a thin film that develops on some metals due to oxidation. It is a type of rust, but a good one, that protects the blade rather than corroding and eating away at the metal. Over time, most knives will develop a patina, regardless of the material that they’re made from. Many people are attracted to the distinctive and aged look that a patina imparts onto a knife, and will make an effort to force a patina onto their blades. The easiest way to do so is to use the knife to prepare acidic foods: potatoes, onions, tomatoes, pickles, and the like all work well. Some people will soak a rag in vinegar and wrap it around the blade, or coat the blade with mustard and leave it overnight.
I wanted to force a patina onto my BCNW-O1, for both the aged look and the extra protection that it gives. The first step I took was to take a slightly-moldy potato out of my fridge and stab the blade into it, up to the handle. I left this in overnight. In the morning, I took the blade out, rinsed it, and stabbed it into another spot on the potato. I repeated this through-out the day, leaving the blade in one spot for a few hours at a time. This sort of approach adds a multi-layered texture to the patina.
After the blade had been in and out of the potato for about 24 hours, I tossed the potato, cleaned the knife, and used it to slice an orange. After the orange was sliced, I left the knife on the plate with the orange as I ate, so that the juices could soak into the blade a bit. After this, I rinsed and dried the blade again, then sliced another orange the next day.
I figured all of this would probably be good enough, so, after slicing the final orange, I rinsed the blade once more, then gave it a good scrubbing with a soapy sponge to clean off any bacteria that might be growing on it after all the exposure to food. This removed a lot of the rust – more than I thought it would – but, after I dried the knife off, I had a beautiful patina on the blade.
Since the patina is a type of rust, it does eat away the sharp edge of the knife a bit. So, after it was all clean, I gave the knife a session on my 6000 grit japanese water stone, which sharpened it back up again.
Usually after the sharpening the knife, I coat it in camellia oil, which was used in Japan by samurais to protect their blades. It is a non-toxic oil that is often used for skin care, and can even be cooked with, so I have no problem using it on a knife that I will prepare food with and eat with. The main purpose of the oil is to protect the blade from rust so, with the patina applied, it is not strictly as necessary as before. Still, I apply it so that both it and the patina can ward away any bad rust.
Using a fine-grit Japanese water stone with a nagura stone to sharpen the blade creates a slightly abrasive cleaner that can be purposefully rubbed into the blade to clean off the beginnings of a patina, if one so desires. I do not do this on purpose, but I have sharpened my knife multiple times since applying the patina and, as a result, the bevel of the blade is much shinier and less-rusted than the upper part.
You can tell this patina is forced, because it terminates at the handle (I couldn’t stab it into the potato any deeper!) of the BCNW-O1. The exposed part of the tang is shiny clean, like new.
After a long wait, the end of last week brought with it the arrival of my new BCNW-O1 bushcraft knife.
In late August, I had put aside some money for a new bushcraft knife. For quite some time, I had had my eye on a Skookum Bush Tool. Yet, over the summer I discovered Mike Lummio’s Bushcraft Northwest through his YouTube channel. One of his videos features his knife, the BCNW-O1. It has a very similar design to the slightly larger Skookum, which make it difficult for me to decide which I preferred.
The knife was listed as back-ordered on Mike’s web page, so in the beginning of September I emailed him, asking when the knives would become available. My intention was that I would purchase whichever of the two knives became available first. Mike initially told me 2 weeks. That got delayed to 2 months, due to a batch of special order knives with a sharper grind coming in first and his moving the school to a new location. Still, it was available sooner than the Skookum, so I decided on the BCNW-O1.
It was well worth the wait. I couldn’t be happier with the knife.
(The plus side of the knife being back ordered is that the money had been sitting in a savings account, gaining interest since August.)
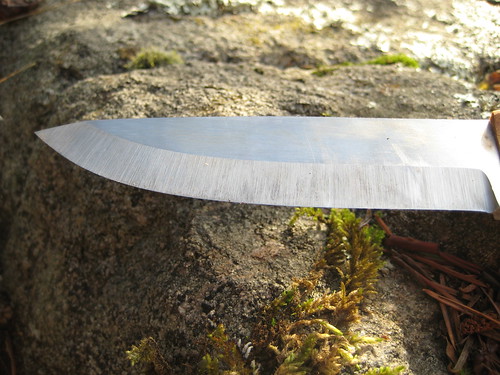
As the name implies, the BCNW-O1 is made of O1 tool steel. O1 is a relatively high maintenance material, somewhat soft when compared to other metals such as A2, and more prone to rust if not properly cared for. But the steel can be more easily sharpened to a razor edge than others, and can strike a spark off the backspine with a piece of flint (in addition to the more common ferrocerium rod). Because of this, O1 is quite popular in many bushcraft knives, including the famed Woodlore knife.
The knife is of the classic, Scandinavian design preferred by bushcrafters. The specs, taken from the product page, are as followed:
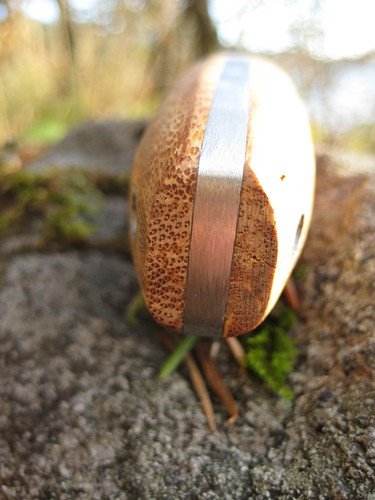
5/32" (3.9 mm) thick O1 tool steel
RC 59
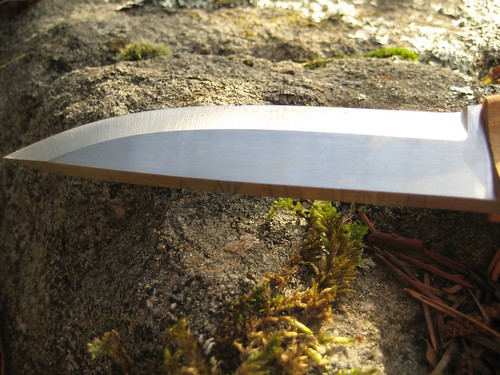
3 5/8" (9.3cm) Scandi grind blade (grind done by Daniel Koster)
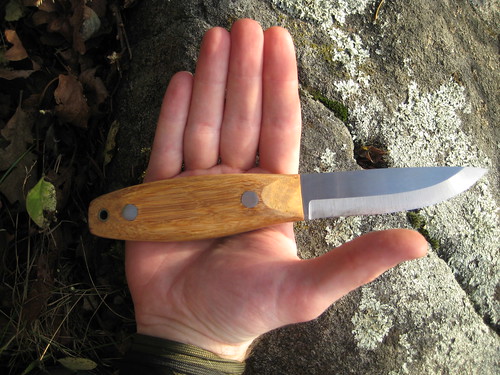
8" (20.3cm) overall length
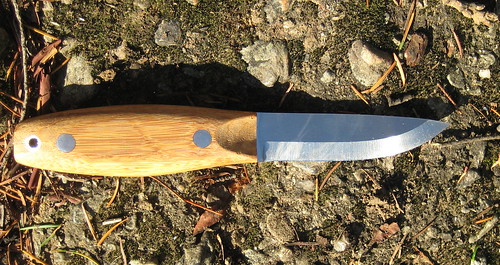
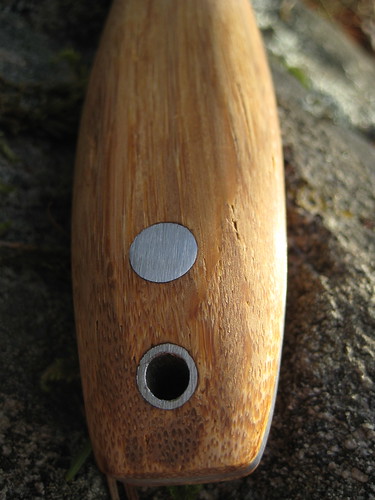
Full tang
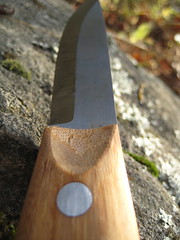
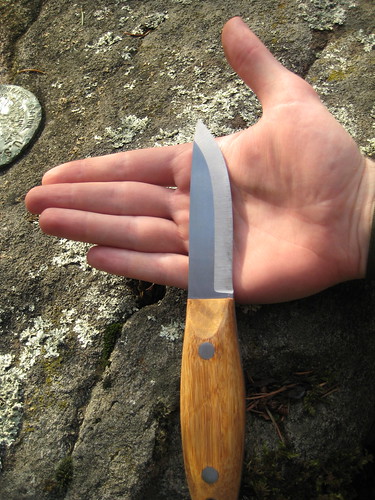
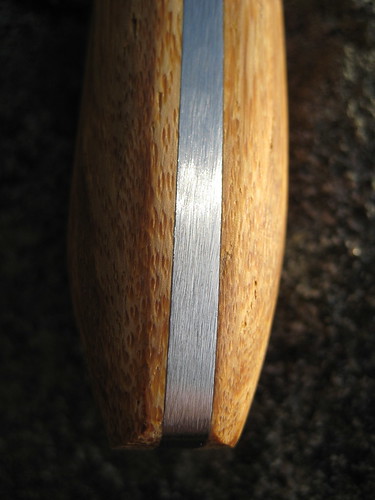
Perhaps the most unique aspect of the knife is the handle. It’s made of bamboo “that has been processed much like micarta. The individual fibers are separated and then bound together under pressure with an industrial strength, formaldehyde-free adhesive. This material can withstand 3,000 psi and is very resistant to the elements while being made from a sustainable resource.” The handle is very smooth, lacking the unique texture of micarta. It feels more like a normal wooden handle, which I love. One of the things that I don’t think is demonstrated very well by the photos on the Bushcraft Northwest site is the size of the handle. It’s a bit bigger and chunkier than what it looks like, which provides for a very comfortable grip. It fits perfectly in my hand.
(While Bamboo can be grown and harvested sustainably, many of the processing methods that go into turning it into clothing are extremely toxic and environmentally destructive. I have no idea about the process that goes into making this handle, but I don’t figure it to be any more environmentally friendly than micarta. Maybe I’m wrong, but I think you should probably avoid any synthetic or processed handle material if you’re concerned about such things.)
In addition the the handle material, the thumb scallops that are carved into either side of the handle are rather unique. This is an excellent feature that assists in certain carving grips, as demonstrated in Mike’s video.
The knife comes with a leather Scandinavian style sheath (available either with or without a firesteel holder) made by JRE Industries. I’ve used one of these with my Mora knives for a couple years and greatly prefer them over any other style I’ve tried.
Most any bushcraft knife made today owes its design, in some part, to Mors Kochanski. Though not as well known as Ray Mears, Kochanski in generally considered to be the father of modern bushcraft. In the spirit of Schwert’s introduction to the Skookum Bush Tool in Outdoors Magazine, I’ll introduce the BCNW-O1 with excerpts from the Knifecraft chapter of Mors Kochanski’s Bushcraft.
The general-purpose bush knife should have a blade as long as the width of the palm, although blades half or twice this length are within acceptable limits. A blade five centimeters long would be an excellent survival knife except for being too small to fall and limb trees of wrist-thickness. A blade 10 to 15 centimeters long will do intricate work like carving a netting needle, yet be large enough to present a good target for a baton when cutting down small trees. A blade 20 centimeters long is a superior tool for heavy work, but awkward to use for fine work.
All general-use knives should have the blade tip close to the profile centerline of the handle. The back of the handle and the back of the blade should be on the same line. The back of the blade should not be thinned down or sharpened so that a baton can be used more effectively without being cut up. There is no advantage to a two-edged blade in bush living.
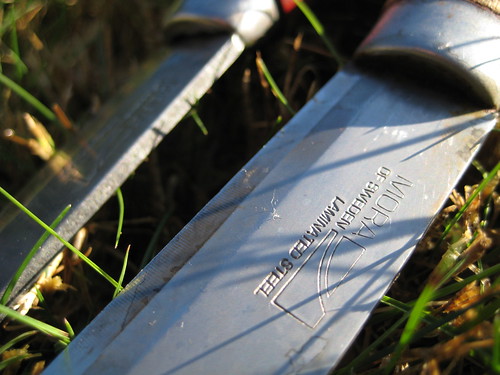
The blade should be of a good quality carbon steel, from two and a half to three millimeters thick and about two to two and a half centimeters wide. This size of blade is light in weight, yet difficult to break. The steel should be soft enough to be maintained at a shaving edge with common sharpening tools, without frequent sharpening. Such steel is found in Mora (Sweden), Solingen (Germany) or Sheffield (England) knives. Carbon, unlike stainless steel, can be used as the striker in the flint and steel method of fire-lighting. Inexpensive stainless steels have had a bad reputation with respect to producing a keen edge let alone holding it. The Mora stainless steels however, are every bit as good as their carbon steels.
The metal of the knife blade should extend for the full-length of the handle (a full tang) for strength.
The handle should be a durable, water-resistant material that can be shaped to the user's hand if necessary.
The knife should have a strong pommel that will protect the handle if the knife is driven tip first deep into wood.
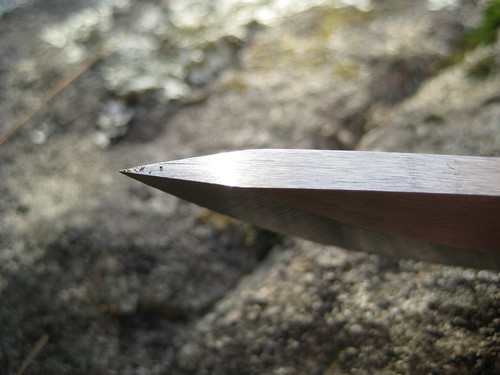
The curvature of the cutting edge should extend for the full-length of the blade. This cuts well and is one of the best shapes that quickly sharpens to a razor's edge. The knife blade should have a sharp enough point to penetrate deep into wood with a minimum of effort.
The knife handle should be about as long as the width of your palm. A handle that is too thick or too thin fatigues the hand and causes blisters. The cross-section of the handle should be an oval instead of round or rectangular. An oval handle provides an adequate indication of the direction of the cutting edge and raises fewer blisters than handles with angular or rounded corners.
A guard on a bush knife is in the way and detracts from many operations. It prevents the use of a simple, secure deep sheath. Some people prefer a guard for fear of slipping forward onto the knife edge, but unless the knife is used for stabbing, the hand should never slip in this way. In all my years of instructing I do not recall an injury due to the lack of a guard.
The BCNW-O1 clearly meets all of Kochanski’s criteria for the perfect bush knife, as well as introducing new innovations of its own. Though I’ve not had it long enough to perform a full review, I am extremely pleased with the knife. It has exceeded my expectations. I can safely say that I wouldn’t trade it for any other knife.