The ideal off-road journey? I'll tell you: under water. I would like to see every four-by-four on earth, every three-wheeler, every dirt bike, trail bike and Big Foot truck driven straight into the Marianas Trench, three thousand feet below the surface of the Pacific Ocean, and parked there -- left there -- for the duration.
For the duration of what? For the duration of this techno-industrial-commercial slime-mold that is transforming our planet into one vast battleground of Cretins against Nature. With the Cretins winning.
What's wrong with the horse? Or the burro? Or the bicycle? Or even, God help us, the human foot? Why should not Americans especially learn to walk again? There is this to be said for walking: it is the one method of human locomotion by which a man or woman proceeds erect, upright, proud and independent, not squatting on the haunches like a frog.
Little boys love machines. Grown-up men and women like to walk.
-Edward Abbey
I tossed another 10lb weight in my pack and headed out to the Mount Pilchuck area. I ended up walking out to (the creatively named) Lake Twenty Two at the base of Pilchuck and bushwhacked around the research natural area a bit.
There was very little snow. It’s going to be a dry summer.
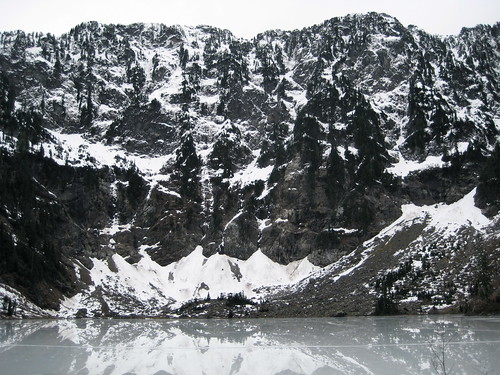
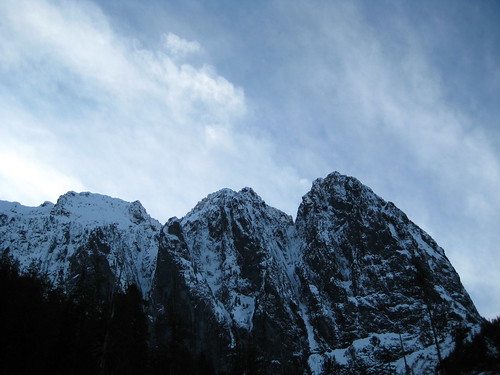
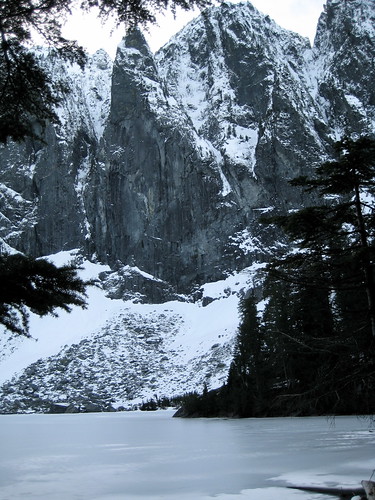
I’ve been doing a few training hikes lately: loading the old rucksack up with 55-60lb, walking through forests and scrambling up peaks. The winter has been unusually warm, which has allowed me to access places that are usually off-limits this time of year without technical equipment. Yesterday I ventured out to Lake Serene, at the base of Mt. Index (just the other side of the Skykomish valley from Baring Mountain).
At a little over 7 miles (round trip) and only 2,000 feet elevation gain, this was a relaxing walk; a bit of an award to myself for completing the other, more difficult climbs.
The trail was snow free till about a mile or so before the lake. After that, there was a dusting of crusty snow – no more than an inch – and quite a bit of ice.
I ate lunch at the frozen lake, watched an avalanche on Index’s north peak, and raced the sun back home.
"...a well-lived life means striving for personal, moral, and physical autonomy: self-direction, intellectual and spiritual independence, self-control, self-responsibility -- in sum, self-realization through self-determination. As a dues-paying member of this unintentionally masochistic minority, I can testify that the price of personal freedom and soulful individuality today -- the cost of living a self-determined life -- is often social, material, physical, and even geographical marginalization all of which can act themselves out in a big city as well as a small town or a rural homestead and must be construed as culture's punishment for being different. Or perhaps, as some will say, such are the just deserts of freaks and other sinners. Humankind, said Henry through its own inventions and lust for comfort is invariably driven to desperation. Misery loves company and the dominant culture, jealous of those who evade desperate angst, is never happy with mavericks, those of us who, even in the most liberal social realms, are barely tolerated."
-David Peterson, On the Wild Edge: In Search of a Natural Life
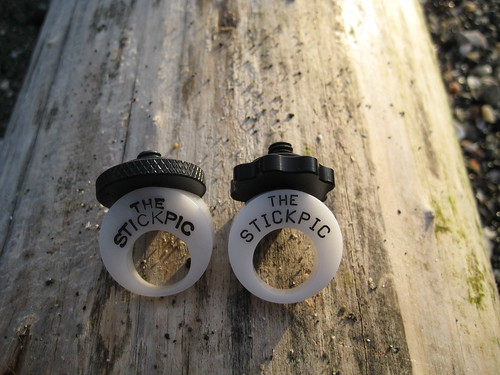
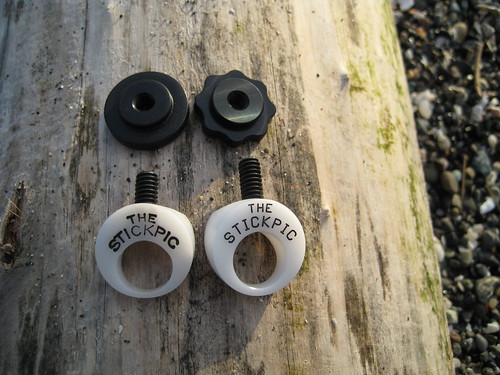
This past summer, I reviewed the StickPic, which Rodney Java, the inventor, was kind enough to send me. Last week Rodney sent me one of his new and slightly improved StickPic models.
The first change is in how the markings are applied to the StickPic. According to Rodney,
We now have a new machine shop producing the StickPic who cnc engraves our name and model numbers. In the past, we used a metal die stamp and stamped every StickPic by hand. This produced inconsistent results.
The difference is noticeable. In the old model, pictured on the left, you can see how the thickness of the lettering varies. The new engraving looks more professional, but this is only a cosmetic difference, and not one that I think really matters.
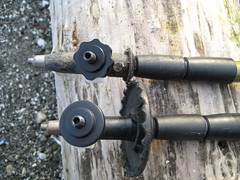
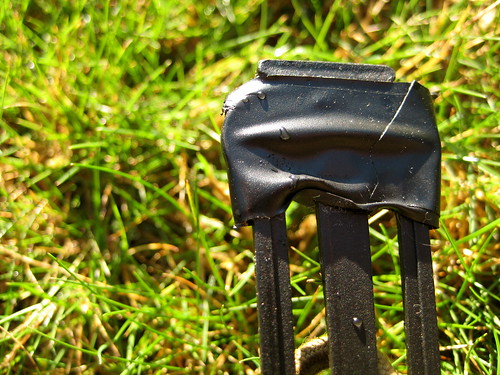
The next immediately noticeable difference is the nut:
A new 8 star jam nut is now used which allows the user, while wearing gloves, to easily attach the StickPic to the camera.
This is certainly a more significant change than the engraving. I find that it makes the StickPic easier to both attach and deattach even when not wearing gloves. The new nut is not only easier to grab, but it also spins more freely than the old.
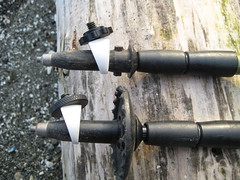
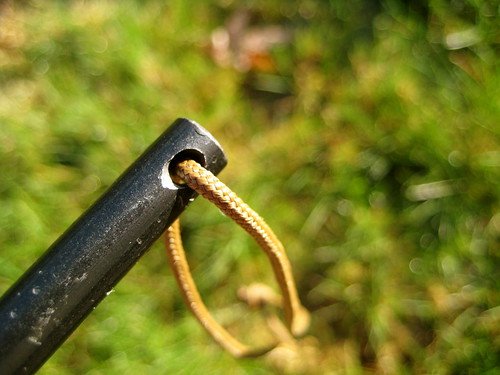
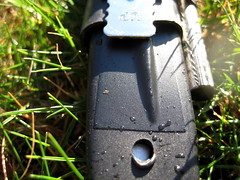
The third and final change is the hole itself:
The through hole on the new model is also slightly tapered to ensure it stays on the trekking pole more securely; it wedges in a little better.
You can see in the photos that the new Stickpic slides much further down the tip of the pole than does the old one. I’m not sure how much this contributes to security: I installed both StickPics on either one of my poles and shook them around violently. Neither came off. Granted, I didn’t have the extra weight of a camera attached to either StickPic. But I’ve also never had my camera fall off the pole during normal use with the old StickPic.
The weight of the new StickPic has been slightly increased – probably due to the winged nut. My scale puts the old model at 8 grams and the new one at 10 grams. (Though my scale is only accurate down to 1 gram, so it isn’t the best for measuring such lightweight items.) Personally, I think the new nut is worth an additional 2 grams!
I think that all three changes to the StickPic are marked improvements, with the new nut being the most significant of the lot. I do not think that any of the changes are enough to warrant purchasing the new model if you are happy with the old one, but they will improve the device for new users.
Note:
In the above photos, the new StickPic is installed on a trekking pole without a basket. It is not necessary to remove the pole’s basket to use the StickPic. I simply lost the basket for that pole a while back and never replaced it. Even though it slides much further down the tip of the pole than does the old model, the new StickPic will fit on the other pole without interfering with the basket.
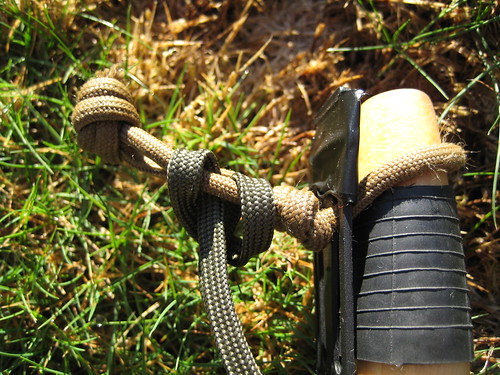
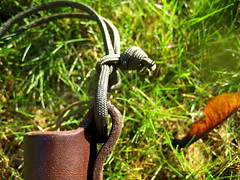
I don’t like paying for brand-name ferrocerium rods with handles when blanks can be got for much cheaper – usually $5 less than their handled counterparts. But I do like to have a handle on the rod, and I require some sort of lanyard. When it comes to something as important as a ferro rod, I find comfort in knowing that it is secured to this-or-that.
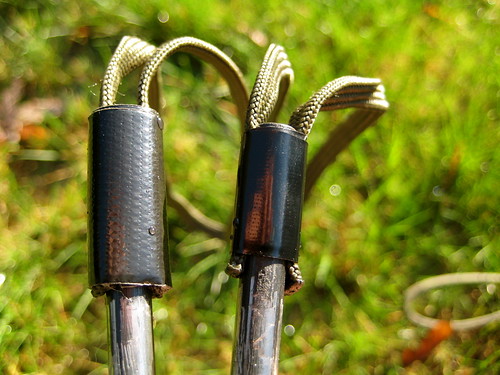
The simplest solution is to tape a loop of paracord to one end of the rod. I use gutted paracord. The tape can be wrapped a few extra times to make a handle however thick I like.
The other rod in the above photo has a similar lanyard attached in a different manner. The paracord is first taped to the rod with a small piece of electrical tape. Then, on top of that, I slid a small piece of heat-shrink tubing (the kind used for electrical wiring). That was blasted with a hair dryer, causing it to shrink.
A small hole could also be drilled in one end of the rod. This is something of a fire hazard: the drill and rod will be throwing a whole lot of sparks as the drill works its way through. And it requires access to power tools, which isn’t always practical.
My favorite method is the tape. The lanyard is secure and the tape provides a thick, padded handle.
I like to buy my blanks from Ben’s Backwoods. If you like misch metal blanks, Going Gear is the place to be.
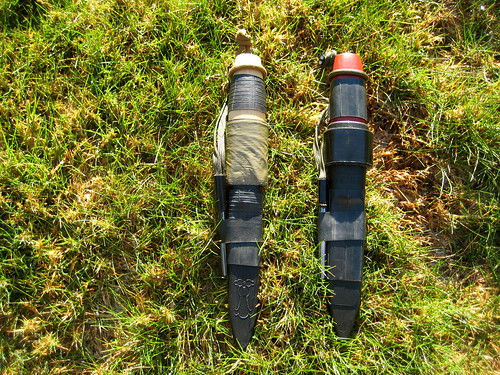
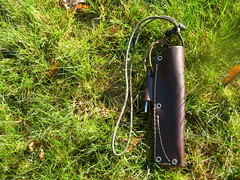
The greatest disappointment about any Mora knife is the sheath: a flimsy, plastic thing that won’t easily fit on a decent sized belt and does not even hold the knife very securely. As they come, I consider them unusable. But a few simple modifications and additions make them quite acceptable.
The Mora knife sheaths are designed to be mounted either on a button on a pair of coveralls or through a belt. Apparently people wear very small, skinny belts in Sweden. Over here in the United States of Gun Belts, that doesn’t fly. The belt slot on the sheath can be forcefully enlarged by shoving in a piece of wood, such as a ruler, and applying heat to cause the plastic to expand, but I don’t trust that such an act will not over weaken the plastic. I’m not a big fan of carrying a Mora directly on my belt, anyway. Usually, I’ll carry the knife either on a lanyard around my neck or as a dangler off my belt. But both of these setups allow the possibility of the knife and sheath to swing freely, accentuating the problem of an insecure fit.
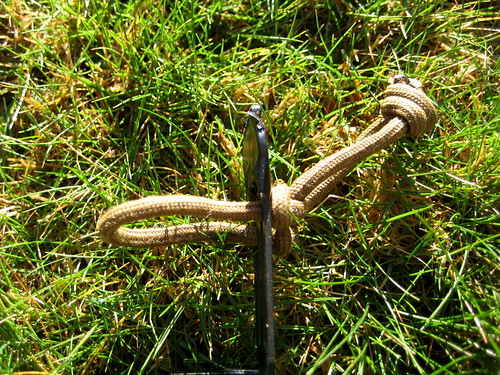
Both the problem of how to carry the sheath and the problem of the insecure fit can be addressed with a single piece of paracord.
With the knife in the sheath, I take a piece of paracord and run both ends around the handle and through the slot for the belt. Then, tight against the back of the sheath, I tie an overhand knot in either end of the cord. This creates a loop of paracord on the front of the sheath that can be made smaller, but cannot become any wider than the bottom third of the handle. Because the handles on Mora knifes are somewhat tapered – fatter in the middle than on either end – this loop prevents the knife from being removed from the sheath. Even if the knife is only lightly dropped into the sheath rather than securely pressed, it cannot be removed without first sliding off the loop of paracord.
After tying the two knots against the back of the sheath in either end of the paracord, I take both ends and tie them together, forming a loop on the back of the sheath. This provides my carry options.
To carry the knife in a dangler system, I prefer to use a Maxpedition Keyper rather than a carabiner. The Keyper is mounted on my belt and clipped into the loop of paracord on the sheath. (To reduce movement in this setup, I’ll stick the knife and sheath in my pocket.)
The last thing that I do to this part of the sheath is add a small wrap of electrical tape around the very top, covering the upper bit of the belt loop and the button hole. This prevents the paracord from sliding to the top of the sheath and forces the securing loop to be about .75” from the very end of the handle. I’ve found that if this is not done, the securing loop is like to slip off the handle.
That’s all that is needed to make the sheath usable, but a few other additions can be made to increase its utility.
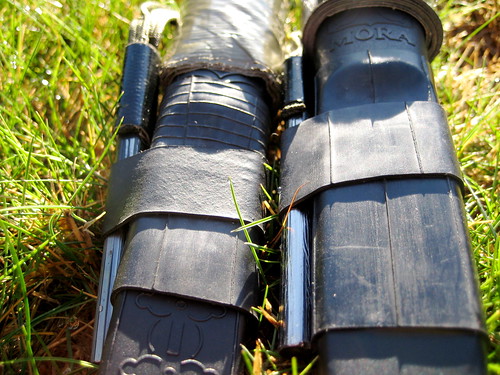
Around the top of the sheath, I wrap tape. In the sheaths pictured here, one has 2” olive drab duct tape, the other has 1” black Gorilla Tape (which is like duct tape, but thicker and stickier). One can never carry enough tape. I imagine, also, that the tape likely increases the structural integrity of the sheath.
On the back of both sheaths, I have a #17 sailmaking needle, pre-threaded with black kevlar thread, taped down with some electrical tape. As I mentioned in my review of the RAT Izula, this is an idea I first picked up from one Dave Canterbury’s videos. The extra needle and thread adds no noticeable weight and could be a welcome addition to the sheath if you ever find yourself separated from your pack, with the knife and sheath as your only piece of gear.
The next modification on the body of the sheath was also inspired by Dave Cantebury. In another of his videos, he showed how he had layered different width pieces of inner-tube on a machete sheath to create pockets that could store small items, such as a sharpening stone and magnesium fire starter. With that in mind, I add a wide piece of inner-tube onto the middle of the Mora sheath (which also serves to cover and further secure the taped down needle). Then, on top of that, I put a skinnier piece of inner-tube. Slid between both pieces is a backup ferro rod. Because the rod has rubber below it and rubber atop, there is an incredible amount of friction. The ferro rod becomes difficult to remove. I have carried blank rods in these “pockets” and they have never fallen out. Still, I prefer to carry rods with a lanyard of some sort on them. I loop the rod through its lanyard around the paracord loop on the top of the sheath, guaranteeing that the rod is secured.
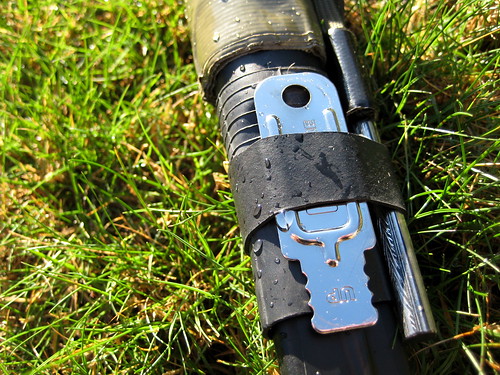
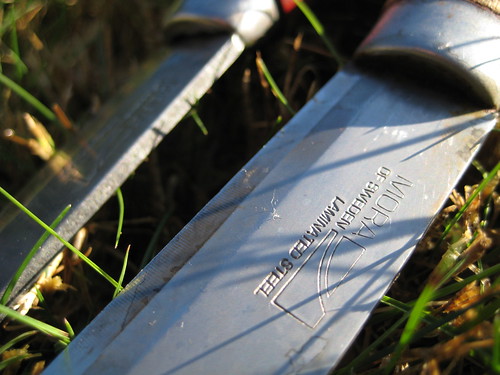
The sheath for my KJ #1 knife has only a ferro rod. That knife is carbon steel and can generate sparks off the spine. On the sheath for the larger SL-2, however, I have added a small striker slid between the two pieces of inner-tube on the back. The SL-2 is made of laminated steel, which is too soft to reliably produce sparks.
These modifications made to the Mora sheath help to secure the knife, allow for different carry options, guarantee a source of fire, and provide a needle, thread and tape for repairs. They turn what is otherwise a near useless sheath into a functional item worthy of being matched with the Mora blade.
(I also own a high-quality leather sheath made by JRE Industries for the KJ #1 knife. I tie a loop of paracord through the top loop of leather on the sheath so that the knife may be carried around the neck or on a dangler, similar to the modified plastic sheath. The leather sheath does not require a loop of paracord on the front to secure the handle. Nor does it need pieces of inner-tube to create a pocket for a ferro rod. The only thing that it lacks is a repair needle, but I have found that most tape does not adhere very well to leather, so I cannot stick one on the back.)
Yesterday, Avagdu asked me if the Vargo Triad XE stove could be burned inside the cone of my Trail Designs Ti-Tri Stove System. I’ve used it in the cone a couple of different times, but never performed any direct comparisons between it and the 12-10 alcohol stove that comes with the Ti-Tri system. Today, I spent some time with both stoves to do just that. Temperatures were around 42 degrees Fahrenheit.
I burned both stoves with the same amount of fuel. One of the downsides of the Triad XE stove is that because the main fuel source is enclosed within the inner container, it cannot be directly lit. Instead, some fuel must be placed within the outer section of the stove. This is then lit to prime the main fuel source. On an alcohol stove where the main fuel is directly accessible, such as the 12-10, the outer priming ring is not always required. It will usually be used when operating in colder temperatures. To be fair for these tests, I primed both stoves with the same amount of alcohol.
The Triad XE stove had to be tested in two different modes: with support legs extended and with support legs collapsed. With the legs collapsed, the stove sits a little lower than the 12-10. With legs extended, it’s a bit higher. The tests were done on a hard, solid surface so that when the legs were extended they were not pushed into the ground (as they might be when using the stove on dirt). The Triad XE took longer to bring the 2 cups of water to a boil with the legs collapsed, which is to be expected, since the flames are further from the pot.
Interestingly, when the Triad XE’s legs were extended, it took a significantly shorter period of time than the 12-10 stove to bring the same amount of water to a boil. One would think that the 12-10 stove, being designed by Trail Designs specifically to work within the Ti-Tri cone, would be superior to a general-purpose stove like the Triad XE burning inside the same cone. The Triad XE also had a longer burn time than the 12-10, suggesting that it makes more efficient use of the same amount of fuel (although, in practice, it may require more fuel than the 12-10 since the Triad XE must always be primed and the 12-10 must not).
All in all, it seems that leaving the 12-10 at home and bringing the Triad XE with the rest of the Ti-Tri system would be a smart move. But then, there are the weights. The Triad XE weighs three times as much as the 12-10 – certainly a significant amount. Though it must be remembered that the Triad XE is not just an alcohol stove: it is designed to burn solid fuel tabs (Esbit) as well. So, to be fair, if I switched out the 12-10 with the Triad XE, I would also leave Trail Design’s GramCracker burner at home. But the GramCracker tips my scale at 0.1 oz, so it does not really factor in to the decision much. (I also think that the GramCracker most likely burns fuel tabs slightly more efficiently than the Triad XE, but I haven’t done this comparison yet.)
The other factor in comparing the two stoves is durability. The Triad XE, being made out of titanium is a tough little guy, not phased by the occasional drop or riding around loose in my pack. In contrast, the 12-10 stove is made out of two thin aluminum cans, making it very delicate. Even though it lives within the protective plastic caddy of the Ti-Tri, it has numerous scratches and dents to show for its year in use.
I’m not sure what conclusion to draw. If the Triad XE weighed closer to 1.0 oz, it would be without doubt superior.