You are currently viewing all posts tagged with backups.

Cold Storage

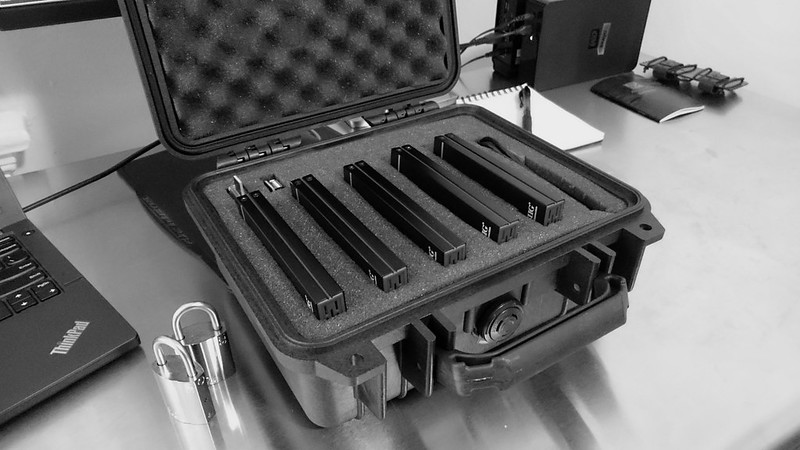
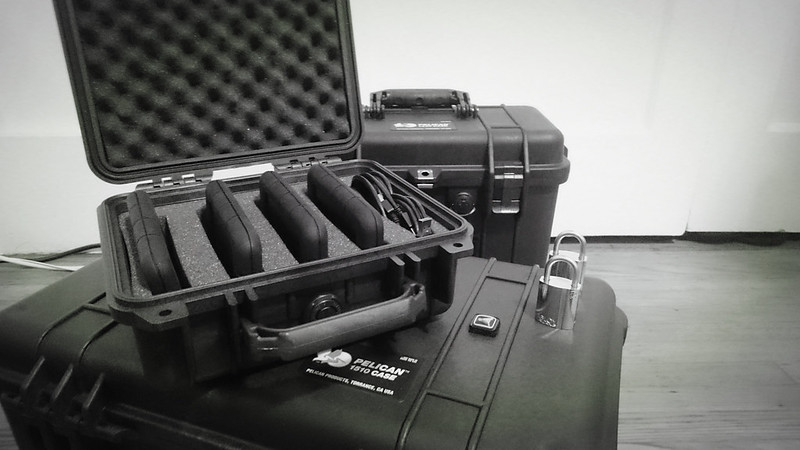
This past spring I mentioned my cold storage setup: a number of encrypted 2.5” drives in external enclosures, stored inside a Pelican 1200 case, secured with Abloy Protec2 321 locks. Offline, secure, and infrequently accessed storage is an important component of any strategy for resilient data. The ease with which this can be managed with git-annex only increases my infatuation with the software.

Data Data Data Data Data

I’ve been happy with the Seagate ST2000LM003 drives for this application. Unfortunately the enclosures I first purchased did not work out so well. I had two die within a few weeks. They’ve been replaced with the SIG JU-SA0Q12-S1. These claim to be compatible with drives up to 8TB (someday I’ll be able to buy 8TB 2.5” drives) and support USB 3.1. They’re also a bit thinner than the previous enclosures, so I can easily fit five in my box. The Seagate drives offer about 1.7 terabytes of usable space, giving this setup a total capacity of 8.5 terabytes.

Setting up git-annex to support this type of cold storage is fairly straightforward, but does necessitate some familiarity with how the program works. Personally, I prefer to do all my setup manually. I’m happy to let the assistant watch my repositories and manage them after the setup, and I’ll occasionally fire up the web app to see what the assistant daemon is doing, but I like the control and understanding provided by a manual setup. The power and flexibility of git-annex is deceptive. Using it solely through the simplified interface of the web app greatly limits what can be accomplished with it.

Encryption

Before even getting into git-annex, the drive should be encrypted with LUKS/dm-crypt. The need for this could be avoided by using something like gcrypt, but LUKS/dm-crypt is an ingrained habit and part of my workflow for all external drives. Assuming the drive is /dev/sdc, pass cryptsetup some sane defaults:

$ sudo cryptsetup --cipher aes-xts-plain64 --key-size 512 --hash sha512 luksFormat /dev/sdc

With the drive encrypted, it can then be opened and formatted. I’ll give the drive a human-friendly label of themisto.

$ sudo cryptsetup luksOpen /dev/sdc themisto_crypt
$ sudo mkfs.ext4 -L themisto /dev/mapper/themisto_crypt

At this point the drive is ready. I close it and then mount it with udiskie to make sure everything is working. How the drive is mounted doesn’t matter, but I like udiskie because it can integrate with my password manager to get the drive passphrase.

$ sudo cryptsetup luksClose /dev/mapper/themisto_crypt
$ udiskie-mount -r /dev/sdc

Git-Annex

With the encryption handled, the drive should now be mounted at /media/themisto. For the first few steps, we’ll basically follow the git-annex walkthrough. Let’s assume that we are setting up this drive to be a repository of the annex ~/video. The first step is to go to the drive, clone the repository, and initialize the annex. When initializing the annex I prepend the name of the remote with satellite :. My cold storage drives are all named after satellites, and doing this allows me to easily identify them when looking at a list of remotes.

$ cd /media/themisto
$ git clone ~/video
$ cd video
$ git annex init "satellite : themisto"

Disk Reserve

Whenever dealing with a repository that is bigger (or may become bigger) than the drive it is being stored on, it is important to set a disk reserve. This tells git-annex to always keep some free space around. I generally like to set this to 1 GB, which is way larger than it needs to be.

$ git config annex.diskreserve "1 gb"

Adding Remotes

I’ll then tell this new repository where the original repository is located. In this case I’ll refer to the original using the name of my computer, nous.

$ git remote add nous ~/video

If other remotes already exist, now is a good time to add them. These could be special remotes or normal ones. For this example, let’s say that we have already completed this whole process for another cold storage drive called sinope, and that we have an s3 remote creatively named s3.

$ git remote add sinope /media/sinope/video
$ export AWS_ACCESS_KEY_ID="..."
$ export AWS_SECRET_ACCESS_KEY="..."
$ git annex enableremote s3

Trust

Trust is a critical component of how git-annex works. Any new annex will default to being semi-trusted, which means that when running operations within the annex on the main computer – say, dropping a file – git-annex will want to confirm that themisto has the files that it is supposed to have. In the case of themisto being a USB drive that is rarely connected, this is not very useful. I tell git-annex to trust my cold storage drives, which means that if git-annex has a record of a certain file being on the drive, it will be satisfied with that. This increases the risk for potential data-loss, but for this application I feel it is appropriate.

$ git annex trust .

Preferred Content

The final step that needs to be taken on the new repository is to tell it what files it should want. This is done using preferred content. The standard groups that git-annex ships with cover most of the bases. Of interest for this application is the archive group, which wants all content except that which has already found its way to another archive. This is the behaviour I want, but I will duplicate it into a custom group called satellite. This keeps my cold storage drives as standalone things that do not influence any other remotes where I may want to use the default archive.

$ git annex groupwanted satellite "(not copies=satellite:1) or approxlackingcopies=1"
$ git annex group . satellite
$ git annex wanted . groupwanted

For other repositories, I may want to store the data on multiple cold storage drives. In that case I would create a redundantsatellite group that wants all content which is not already present in two other members of the group.

$ git annex groupwanted redundantsatellite "(not copies=redundantsatellite:2) or approxlackingcopies=1"
$ git annex group . redundantsatellite
$ git annex wanted . groupwanted

Syncing

With everything setup, the new repository is ready to sync and to start to ingest content from the remotes it knows about!

$ git annex sync --content

However, the original repository also needs to know about the new remote.

$ cd ~/video
$ git remote add themisto /media/themisto/video
$ git annex sync

The same is the case for any other previously existing repository, such as sinope.

Redundant File Storage

As I’ve mentioned previously, I store just about everything that matters in git-annex (the only exception is code, which is stored directly in regular git). One of git-annex’s many killer features is special remotes. They make tenable this whole “cloud storage” thing that we do now.

A special remote allows me to store my files with a large number of service providers. It makes this easy to do by abstracting away the particulars of the provider, allowing me to interact with all of them in the same way. It makes this safe to do by providing encryption. These factors encourage redundancy, reducing my reliance on any one provider.

Recently I began playing with rclone. Rclone is a program that supports file syncing for a handful of cloud storage providers. That’s semi-interesting by itself but, more significantly, there is a git-annex special remote wrapper. That means any of the providers supported by rclone can be used as a special remote. I looked through all of rclone’s supported providers and decided there were a few that I had no reason not to use.

Hubic

Hubic is a storage provider from OVH with a data center in France. Their pricing is attractive. I’d happily pay €50 per year for 10TB of storage. Unfortunately they limit connections to 10 Mbit/s. In my experience they ended up being even slower than this. Slow enough that I don’t want to give them money, but there’s still no reason not to take advantage of their free 25 GB plan.

After signing up, I setup a new remote in rclone.

$ rclone config
n) New remote
s) Set configuration password
q) Quit config
n/s/q> n
name> hubic-annex
Type of storage to configure.
Choose a number from below, or type in your own value
 1 / Amazon Drive
   \ "amazon cloud drive"
 2 / Amazon S3 (also Dreamhost, Ceph)
   \ "s3"
 3 / Backblaze B2
   \ "b2"
 4 / Dropbox
   \ "dropbox"
 5 / Google Cloud Storage (this is not Google Drive)
   \ "google cloud storage"
 6 / Google Drive
   \ "drive"
 7 / Hubic
   \ "hubic"
 8 / Local Disk
   \ "local"
 9 / Microsoft OneDrive
   \ "onedrive"
10 / Openstack Swift (Rackspace Cloud Files, Memset Memstore, OVH)
   \ "swift"
11 / Yandex Disk
   \ "yandex"
Storage> 7
Hubic Client Id - leave blank normally.
client_id> 
Hubic Client Secret - leave blank normally.
client_secret> 
Remote config
Use auto config?
 * Say Y if not sure
 * Say N if you are working on a remote or headless machine
y) Yes
n) No
y/n> y
If your browser doesn't open automatically go to the following link: http://127.0.0.1:53682/auth
Log in and authorize rclone for access
Waiting for code...
Got code
--------------------
[remote]
client_id = 
client_secret = 
token = {"access_token":"XXXXXX"}
--------------------
y) Yes this is OK
e) Edit this remote
d) Delete this remote
y/e/d> y

With that setup, I went into my ~/documents annex and added the remote.

$ git annex initremote hubic type=external externaltype=rclone target=hubic-annex prefix=annex-documents chunk=50MiB encryption=shared rclone_layout=lower mac=HMACSHA512

I want git-annex to automatically send everything to Hubic, so I took advantage of standard groups and put the repository in the backup group.

$ git annex wanted hubic standard
$ git annex group hubic backup

Given Hubic’s slow speed, I don’t really want to download files from it unless I need to. This can be configured in git-annex by setting the cost of the remote. Local repositories default to 100 and remote repositories default to 200. I gave the Hubic remote a high cost so that it will only be used if no other remotes are available.

$ git config remote.hubic.annex-cost 500

If you would like to try Hubic, I have a referral code which gives us both an extra 5GB for free.

Backblaze B2

B2 is the cloud storage offering from backup company Backblaze. I don’t know anything about them, but at $0.005 per GB I like their pricing. A quick search of reviews shows that the main complaint about the service is that they offer no geographic redundancy, which is entirely irrelevant to me since I build my own redundancy with my half-dozen or so remotes per repository.

Signing up with Backblaze took a bit longer. They wanted a phone number for 2-factor authentication, I wanted to give them a credit card so that I could use more than the 10GB they offer for free, and I had to generate an application key to use with rclone. After that, the rclone setup was simple.

$ rclone config
n) New remote
s) Set configuration password
q) Quit config
n/s/q> n
name> b2-annex
Type of storage to configure.
Choose a number from below, or type in your own value
 1 / Amazon Drive
   \ "amazon cloud drive"
 2 / Amazon S3 (also Dreamhost, Ceph)
   \ "s3"
 3 / Backblaze B2
   \ "b2"
 4 / Dropbox
   \ "dropbox"
 5 / Google Cloud Storage (this is not Google Drive)
   \ "google cloud storage"
 6 / Google Drive
   \ "drive"
 7 / Hubic
   \ "hubic"
 8 / Local Disk
   \ "local"
 9 / Microsoft OneDrive
   \ "onedrive"
10 / Openstack Swift (Rackspace Cloud Files, Memset Memstore, OVH)
   \ "swift"
11 / Yandex Disk
   \ "yandex"
Storage> 3
Account ID
account> 123456789abc
Application Key
key> 0123456789abcdef0123456789abcdef0123456789
Endpoint for the service - leave blank normally.
endpoint> 
Remote config
--------------------
[remote]
account = 123456789abc
key = 0123456789abcdef0123456789abcdef0123456789
endpoint = 
--------------------
y) Yes this is OK
e) Edit this remote
d) Delete this remote
y/e/d> y

With that, it was back to ~/documents to initialize the remote and send it all the things

$ git annex initremote b2 type=external externaltype=rclone target=b2-annex prefix=annex-documents chunk=50MiB encryption=shared rclone_layout=lower mac=HMACSHA512
$ git annex wanted b2 standard
$ git annex group b2 backup

While I did not measure the speed with B2, it feels as fast as my S3 or rsync.net remotes, so I didn’t bother setting the cost.

Google Drive

While I do not regularly use Google services for personal things, I do have a Google account for Android stuff. Google Drive offers 15 GB of storage for free and rclone supports it, so why not take advantage?

$ rclone config
n) New remote
s) Set configuration password
q) Quit config
n/s/q> n
name> gdrive-annex
Type of storage to configure.
Choose a number from below, or type in your own value
 1 / Amazon Drive
   \ "amazon cloud drive"
 2 / Amazon S3 (also Dreamhost, Ceph)
   \ "s3"
 3 / Backblaze B2
   \ "b2"
 4 / Dropbox
   \ "dropbox"
 5 / Google Cloud Storage (this is not Google Drive)
   \ "google cloud storage"
 6 / Google Drive
   \ "drive"
 7 / Hubic
   \ "hubic"
 8 / Local Disk
   \ "local"
 9 / Microsoft OneDrive
   \ "onedrive"
10 / Openstack Swift (Rackspace Cloud Files, Memset Memstore, OVH)
   \ "swift"
11 / Yandex Disk
   \ "yandex"
Storage> 6
Google Application Client Id - leave blank normally.
client_id> 
Google Application Client Secret - leave blank normally.
client_secret> 
Remote config
Use auto config?
 * Say Y if not sure
 * Say N if you are working on a remote or headless machine or Y didn't work
y) Yes
n) No
y/n> y
If your browser doesn't open automatically go to the following link: http://127.0.0.1:53682/auth
Log in and authorize rclone for access
Waiting for code...
Got code
--------------------
[remote]
client_id = 
client_secret = 
token = {"AccessToken":"xxxx.x.xxxxx_xxxxxxxxxxx_xxxxxxxxxxxxxxxxxxxxxxxxxxxxxxxxxxxxxxxxxxxxx","RefreshToken":"1/xxxxxxxxxxxxxxxx_xxxxxxxxxxxxxxxxxxxxxxxxxx","Expiry":"2014-03-16T13:57:58.955387075Z","Extra":null}
--------------------
y) Yes this is OK
e) Edit this remote
d) Delete this remote
y/e/d> y

And again, to ~/documents.

$ git annex initremote gdrive type=external externaltype=rclone target=gdrive-annex prefix=annex-documents chunk=50MiB encryption=shared rclone_layout=lower mac=HMACSHA512
$ git annex wanted gdrive standard
$ git annex group gdrive backup

Rinse and repeat the process for other annexes. Revel in having simple, secure, and redundant storage.

I celebrated World Backup Day by increasing the resiliency of data in my life.

Four encrypted 2TB hard drives, stored in a Pelican 1200, with Abloy Protec2 PL 321 padlocks as tamper-evident seals. Having everything that matters stored in git-annex makes projects like this simple: just clone the repositories, define the preferred content expressions, and watch the magic happen.

Cold Storage

Optical Backups of Photo Archives

I store my photos in git-annex. A full copy of the annex exists on my laptop and on an external drive. Encrypted copies of all of my photos are stored on Amazon S3 (which I pay for) and box.com (which provides 50GB for free) via git-annex special remotes. The photos are backed-up to an external drive daily with the rest of my laptop hard drive via backitup.sh and cryptshot. My entire laptop hard drive is also mirrored monthly to an external drive stored off-site.

(The majority of my photos are also on Flickr, but I don’t consider that a backup or even reliable storage.)

All of this is what I consider to be the bare minimum for any redundant data storage. Photos have special value, above the value that I assign to most other data. This value only increases with age. As such they require an additional backup method, but due to the size of my collection I want to avoid backup methods that involve paying for more online storage, such as Tarsnap.

I choose optical discs as the medium for my photo backups. This has the advantage of being read-only, which makes it more difficult for accidental deletions or corruption to propagate through the backup system. DVD-Rs have a capacity of 4.7 GBs and a cost of around $0.25 per disc. Their life expectancy varies, but 10-years seem to be a reasonable low estimate.

Preparation

I keep all of my photos in year-based directories. At the beginning of every year, the previous year’s directory is burned to a DVD.

Certain years contain few enough photos that the entire year can fit on a single DVD. More recent years have enough photos of a high enough resolution that they require multiple DVDs.

Archive

My first step is to build a compressed archive of each year. I choose tar and bzip2 compression for this because they’re simple and reliable.

1
2
$ cd ~/pictures
$ tar cjhf ~/tmp/pictures/2012.tar.bz 2012

If the archive is larger than 3.7 GB, it needs to be split into multiple files. The resulting files will be burned to different discs. The capacity of a DVD is 4.7 GB, but I place the upper file limit at 3.7 GB so that the DVD has a minimum of 20% of its capacity available. This will be filled with parity information later on for redundancy.

1
$ split -d -b 3700M 2012.tar.bz 2012.tar.bz.

Encrypt

Leaving unencrypted data around is bad form. The archive (or each of the files resulting from splitting the large archive) is next encrypted and signed with GnuPG.

1
2
$ gpg -eo 2012.tar.bz.gpg 2012.tar.bz
$ gpg -bo 2012.tar.bz.gpg.sig 2012.tar.bz.gpg

Imaging

The encrypted archive and the detached signature of the encrypted archive are what will be burned to the disc. (Or, in the case of a large archive, the encrypted splits of the full archive and the associated signatures will be burned to one disc per split/signature combonation.) Rather than burning them directly, an image is created first.

1
$ mkisofs -V "Photos: 2012 1/1" -r -o 2012.iso 2012.tar.bz.gpg 2012.tar.bz.gpg.sig

If the year has a split archive requiring multiple discs, I modify the sequence number in the volume label. For example, a year requiring 3 discs will have the label Photos: 2012 1/3.

Parity

When I began this project I knew that I wanted some sort of parity information for each disc so that I could potentially recover data from slightly damaged media. My initial idea was to use parchive via par2cmdline. Further research led me to dvdisaster which, despite being a GUI-only program, seemed more appropriate for this use case.

Both dvdisaster and parchive use the same Reed–Solomon error correction codes. Dvdidaster is aimed at optical media and has the ability to place the error correction data on the disc by augmenting the disc image, as well as storing the data separately. It can also scan media for errors and assist in judging when the media is in danger of becoming defective. This makes it an attractive option for long-term storage.

I use dvdisaster with the RS02 error correction method, which augments the image before burning. Depending on the size of the original image, this will result in the disc having anywhere from 20% to 200% redundancy.

Verify

After the image has been augmented, I mount it and verify the signature of the encrypted file on the disc against the local copy of the signature. I’ve never had the signatures not match, but performing this step makes me feel better.

1
2
3
$ sudo mount -o loop 2012.iso /mnt/disc
$ gpg --verify 2012.tar.bz.gpg.sig /mnt/disc/2012.tar.bz.gpg
$ sudo umount /mnt/disc

Burn

The final step is to burn the augmented image. I always burn discs at low speeds to diminish the chance of errors during the process.

1
$ cdrecord -v speed=4 dev=/dev/sr0 2012.iso

Similar to the optical backups of my password database, I burn two copies of each disc. One copy is stored off-site. This provides a reasonably level of assurance against any loss of my photos.

Password Management with Vim and GnuPG

The first password manager I ever used was a simple text file encrypted with GnuPG. When I needed a password I would decrypt the file, read it in Vim, and copy the required entry to the system clipboard. This system didn’t last. At the time I wasn’t using GnuPG for much else, and this was in the very beginning of my Vim days, when the program seemed cumbersome and daunting. I shortly moved to other, purpose-built password managers.

After some experimentation I landed on KeePassX, which I used for a number of years. Some time ago I decided that I wanted to move to a command-line solution. KeePassX and a web browser were the only graphical applications that I was using with any regularity. I could see no need for a password manager to have a graphical interface, and the GUI’s dependency on a mouse decreased my productivity. After a cursory look at the available choices I landed right back where I started all those years ago: Vim and GnuPG.

These days Vim is my most used program outside of a web browser and I use GnuPG daily for handling the majority of my encryption needs. My greater familiarity with both of these tools is one of the reasons I’ve been successful with the system this time around. I believe the other reason is my more systematic approach.

Structure

The power of this system comes from its simplicity: passwords are stored in plain text files that have been encrypted with GnuPG. Every platform out there has some implementation of the PGP protocol, so the files can easily be decrypted anywhere. After they’ve been decrypted, there’s no fancy file formats to deal with. It’s all just text, which can be manipulated with a plethora of powerful tools. I favor reading the text in Vim, but any text editor will do the job.

All passwords are stored within a directory called ~/pw. Within this directory are multiple files. Each of these files can be thought of as a separate password database. I store bank information in financial.gpg. Login information for various shopping websites are in ecommerce.gpg. My email credentials are in email.gpg. All of these entries could very well be stored in a single file, but breaking it out into multiple files allows me some measure of access control.

Access

I regularly use two computers: my laptop at home and a desktop machine at work. I trust my laptop. It has my GnuPG key on it and it should have access to all password database files. I do not place complete trust in my machine at work. I don’t trust it enough to give it access to my GnuPG key, and as such I have a different GnuPG key on that machine that I use for encryption at work.

Having passwords segregated into multiple database files allows me to encrypt the different files to different keys. Every file is encrypted to my primary GnuPG key, but only some are encrypted with my work key. Login credentials needed for work are encrypted to the work key. I have no need to login to my bank accounts at work, and it wouldn’t be prudent to do so on a machine that I do not fully trust, so the financial.gpg file is not encrypted to my work key. If someone compromises my work computer, they still will be no closer to accessing my banking credentials.

Git

The ~/pw directory is a git repository. This gives me version control on all of my passwords. If I accidentally delete an entry I can always get it back. It also provides syncing and redundant storage without depending on a third-party like Dropbox.

Keys

An advantage of using a directory full of encrypted files as my password manager is that I’m not limited to only storing usernames and passwords. Any file can be added to the repository. I keep keys for backups, SSH keys, and SSL keys (all of which have been encrypted with my GnuPG key) in the directory. This gives me one location for all of my authentication credentials, which simplifies the locating and backing up of these important files.

Markup

Each file is structured with Vim folds and indentation. There are various ways for Vim to fold text. I use markers, sticking with the default {{{/}}} characters. A typical password entry will look like this:

1
2
3
4
5
Amazon{{{
    user:   foo@bar.com
    pass:   supers3cr3t
    url:    https://amazon.com
}}}

Each file is full of entries like this. Certain entries are grouped together within other folds for organization. Certain entries may have comments so that I have a record of the false personally identifiable information the service requested when I registered.

1
2
3
4
5
6
7
8
Super Ecommerce{{{
    user:   foobar
    pass:   g0d
    Comments{{{
        birthday:   1/1/1911
        first car:  delorean
    }}}
}}}

Following a consistent structure like this makes the file easier to navigate and allows for the possibility of the file being parsed by a script. The fold markers come into play with my Vim configuration.

Vim

I use Vim with the vim-gnupg plugin. This makes editing of encrypted files seamless. When opening existing files, the contents are decrypted. When opening new files, the plugin asks which recipients the file should be encrypted to. When a file is open, leaking the clear text is avoided by disabling viminfo, swapfile, and undofile. I run gpg-agent so that my passphrase is remembered for a short period of time after I use it. This makes it easy and secure to work with (and create) the encrypted files with Vim. I define a few extra options in my vimrc to facilitate working with passwords.

 1
 2
 3
 4
 5
 6
 7
 8
 9
10
11
12
13
14
15
16
17
18
19
20
21
22
23
24
25
26
27
""""""""""""""""""""
" GnuPG Extensions "
""""""""""""""""""""

" Tell the GnuPG plugin to armor new files.
let g:GPGPreferArmor=1

" Tell the GnuPG plugin to sign new files.
let g:GPGPreferSign=1

augroup GnuPGExtra
" Set extra file options.
    autocmd BufReadCmd,FileReadCmd *.\(gpg\|asc\|pgp\) call SetGPGOptions()
" Automatically close unmodified files after inactivity.
    autocmd CursorHold *.\(gpg\|asc\|pgp\) quit
augroup END

function SetGPGOptions()
" Set updatetime to 1 minute.
    set updatetime=60000
" Fold at markers.
    set foldmethod=marker
" Automatically close all folds.
    set foldclose=all
" Only open folds with insert commands.
    set foldopen=insert
endfunction

The first two options simply tell vim-gnupg to always ASCII-armor and sign new files. These have nothing particular to do with password management, but are good practices for all encrypted files.

The first autocmd calls a function which holds the options that I wanted applied to my password files. I have these options apply to all encrypted files, although they’re intended primarily for use when Vim is acting as my password manager.

Folding

The primary shortcoming with using an encrypted text file as a password database is the lack of protection against shoulder-surfing. After the file has been decrypted and opened, anyone standing behind you can look over your shoulder and view all the entries. This is solved with folds and is what most of these extra options address.

I set foldmethod to marker so that Vim knows to look for all the {{{/}}} characters and use them to build the folds. Then I set foldclose to all. This closes all folds unless the cursor is in them. This way only one fold can be open at a time – or, to put it another way, only one password entry is ever visible at once.

The final fold option instructs Vim when it is allowed to open folds. Folds can always be opened manually, but by default Vim will also open them for many other cases: if you navigate to a fold, jump to a mark within a fold or search for a pattern within a fold, they will open. By setting foldopen to insert I instruct Vim that the only time it should automatically open a fold is if my cursor is in a fold and I change to insert mode. The effect of this is that when I open a file, all folds are closed by default. I can navigate through the file, search and jump through matches, all without opening any of the folds and inadvertently exposing the passwords on my screen. The fold will open if I change to insert mode within it, but it is difficult to do that by mistake.

I have my spacebar setup to toggle folds within Vim. After I have navigated to the desired entry, I can simply whack the spacebar to open it and copy the credential that I need to the system clipboard. At that point I can whack the spacebar again to close the fold, or I can quit Vim. Or I can simply wait.

Locking

The other special option I set is updatetime. Vim uses this option to determine when it should write swap files for crash recovery. Since vim-gnupg disables swap files for decrypted files, this has no effect. I use it for something else.

In the second autocmd I tell Vim to close itself on CursorHold. CursorHold is triggered whenever no key has been pressed for the time specified by updatetime. So the effect of this is that my password files are automatically closed after 1 minute of inactivity. This is similar to KeePassX’s behaviour of “locking the workspace” after a set period of inactivity.

Clipboard

To easily copy a credential to the system clipboard from Vim I have two shortcuts mapped.

1
2
3
4
5
" Yank WORD to system clipboard in normal mode
nmap <leader>y "+yE

" Yank selection to system clipboard in visual mode
vmap <leader>y "+y

Vim can access the system clipboard using both the * and + registers. I opt to use + because X treats it as a selection rather than a cut-buffer. As the Vim documentation explains:

Selections are “owned” by an application, and disappear when that application (e.g., Vim) exits, thus losing the data, whereas cut-buffers, are stored within the X-server itself and remain until written over or the X-server exits (e.g., upon logging out).

The result is that I can copy a username or password by placing the cursor on its first character and hitting <leader>y. I can paste the credential wherever it is needed. After I close Vim, or after Vim closes itself after 1 minute of inactivity, the credential is removed from the clipboard. This replicates KeePassX’s behaviour of clearing the clipboard so many seconds after a username or password has been copied.

Generation

Passwords should be long and unique. To satisfy this any password manager needs some sort of password generator. Vim provides this with its ability to call and read external commands I can tell Vim to call the standard-issue pwgen program to generate a secure 24-character password utilizing special characters and insert the output at the cursor, like this:

1
:r!pwgen -sy 24 1

Backups

The ~/pw directory is backed up in the same way as most other things on my hard drive: to Tarsnap via Tarsnapper, to an external drive via rsnapshot and cryptshot, rsync to a mirror drive. The issue with these standard backups is that they’re all encrypted and the keys to decrypt them are stored in the password manager. If I loose ~/pw I’ll have plenty of backups around, but none that I can actually access. I address this problem with regular backups to optical media.

At the beginning of every month I burn the password directory to two CDs. One copy is stored at home and the other at an off-site location. I began these optical media backups in December, so I currently have two sets consisting of five discs each. Any one of these discs will provide me with the keys I need to access a backup made with one of the more frequent methods.

Of course, all the files being burned to these discs are still encrypted with my GnuPG key. If I loose that key or passphrase I will have no way to decrypt any of these files. Protecting one’s GnuPG key is another problem entirely. I’ve taken steps that make me feel confident in my ability to always be able to recover a copy of my key, but none that I’m comfortable discussing publicly.

Shell

I’ve defined a shell function, pw(), that operates exactly like the function I use for notes on Unix.

 1
 2
 3
 4
 5
 6
 7
 8
 9
10
11
# Set the password database directory.
PASSDIR=~/pw

# Create or edit password databases.
pw() {
    cd "$PASSDIR"
    if [ ! -z "$1" ]; then
        $EDITOR $(buildfile "$1")
        cd "$OLDPWD"
    fi
}

This allows me to easily open any password file from wherever I am in the filesystem without specifying the full path. These two commands are equivalent, but the one utilizing pw() requires fewer keystrokes:

1
2
$ vim ~/pw/financial.gpg
$ pw financial

The function changes to the password directory before opening the file so that while I’m in Vim I can drop down to a shell with :sh and already be in the proper directory to manipulate the files. After I close Vim the function returns me to the previous working directory.

This still required a few more keystrokes than I like, so I configured my shell to perform autocompletion in the directory. If financial.gpg is the only file in the directory beginning with an “f”, typing pw f<tab> is all that is required to open the file.

Simplicity

This setup provides simplicity, power, and portability. It uses the same tools that I already employ in my daily life, and does not require the use of the mouse or any graphical windows. I’ve been happily utilizing it for about 6 months now.

Initially I had thought I would supplement the setup with a script that would search the databases for a desired entry, using some combination of grep, awk and cut, and then copy it to my clipboard via xsel. As it turns out, I haven’t felt the desire to do this. Simply opening the file in Vim, searching for the desired entry, opening the fold and copying the credential to the system clipboard is quick enough. The whole process, absent of typing in my passphrase, takes me only a couple of seconds.

Resources

I’m certainly not the first to come up with the idea of managing password with Vim. These resources were particularly useful to me when I was researching the possibilities:

If you’re interesting in other ideas for password management, password-store and KeePassC are both neat projects that I follow.

2013 June 30: larsks has hacked together a Python script to convert KeepassX XML exports to the plain-text markup format that I use.

Back It Up: A Solution for Laptop Backups

A laptop presents some problems for reliably backing up data. Unlike a server, the laptop may not always be turned on. When it is on, it may not be connected to the backup medium. If you’re doing online backups, the laptop may be offline. If you’re backing up to an external drive, the drive may not be plugged in. To address these issues I wrote a shell script called backitup.sh.

The Problem

Let’s say you want to backup a laptop to an external USB drive once per day with cryptshot.

You could add a cron entry to call cryptshot.sh at a certain time every day. What if the laptop isn’t turned on? What if the drive isn’t connected? In either case the backup will not be completed. The machine will then wait a full 24 hours before even attempting the backup again. This could easily result in weeks passing without a successful backup.

If you’re using anacron, or one of its derivatives, things get slightly better. Instead of specifying a time to call cryptshot.sh, you set the cron interval to @daily. If the machine is turned off at whatever time anacron is setup to execute @daily scripts, all of the commands will simply be executed the next time the machine boots. But that still doesn’t solve the problem of the drive not being plugged in.

The Solution

backitup.sh attempts to perform a backup if a certain amount of time has passed. It monitors for a report of successful completion of the backup. Once configured, you no longer call the backup program directly. Instead, you call backitup.sh. It then decides whether or not to actually execute the backup.

How it works

The script is configured with the backup program that should be executed, the period for which you want to complete backups, and the location of a file that holds the timestamp of the last successful backup. It can be configured either by modifying the variables at the top of the script, or by passing in command-line arguments.

$ backitup.sh -h
Usage: backitup.sh [OPTION...]
Note that any command line arguments overwrite variables defined in the source.

Options:
    -p      the period for which backups should attempt to be executed
            (integer seconds or 'DAILY', 'WEEKLY' or 'MONTHLY')
    -b      the backup command to execute; note that this should be quoted if it contains a space
    -l      the location of the file that holds the timestamp of the last successful backup.
    -n      the command to be executed if the above file does not exist

When the script executes, it reads the timestamp contained in the last-run file. This is then compared to the user-specified period. If the difference between the timestamp and the current time is greater than the period, backitup.sh calls the backup program. If the difference between the stored timestamp and the current time is less than the requested period, the script simply exits without running the backup program.

After the backup program completes, the script looks at the returned exit code. If the exit code is 0, the backup was completed successfully, and the timestamp in the last-run file is replaced with the current time. If the backup program returns a non-zero exit code, no changes are made to the last-run file. In this case, the result is that the next time backitup.sh is called it will once again attempt to execute the backup program.

The period can either be specified in seconds or with the strings DAILY, WEEKLY or MONTHLY. The behaviour of DAILY differs from 86400 (24-hours in seconds). With the latter configuration, the backup program will only attempt to execute once per 24-hour period. If DAILY is specified, the backup may be completed successfully at, for example, 23:30 one day and again at 00:15 the following day.

Use

You still want to backup a laptop to an external USB drive once per day with cryptshot. Rather than calling cryptshot.sh, you call backitup.sh.

Tell the script that you wish to complete daily backups, and then use cron to call the script more frequently than the desired backup period. For my local backups, I call backitup.sh every hour.

@hourly backitup.sh -l ~/.cryptshot-daily -b "cryptshot.sh daily"

The default period of backitup.sh is DAILY, so in this case I don’t have to provide a period of my own. But I also do weekly and monthly backups, so I need two more entries to execute cryptshot with those periods.

@hourly backitup.sh -l ~/.cryptshot-monthly -b "cryptshot.sh monthly" -p MONTHLY
@hourly backitup.sh -l ~/.cryptshot-weekly -b "cryptshot.sh weekly" -p WEEKLY

All three of these entries are executed hourly, which means that at the top of every hour, my laptop attempts to back itself up. As long as the USB drive is plugged in during one of those hours, the backup will complete. If cryptshot is executed, but fails, another attempt will be made the next hour. Daily backups will only be successfully completed, at most, once per day; weekly backups, once per week; and monthly backups, once per month. This setup works well for me, but if you want a higher assurance that your daily backups will be completed every day you could change the cron interval to */5 * * * *, which will result in cron executing backitup.sh every 5 minutes.

What if you want to perform daily online backups with Tarsnapper?

@hourly backitup.sh -l ~/.tarsnapper-lastrun -b tarsnapper.py

At the top of every hour your laptop will attempt to run Tarsnap via Tarsnapper. If the laptop is offline, it will try again the following hour. If Tarsnap begins but you go offline before it can complete, the backup will be resumed the following hour.

The script can of course be called with something other than cron. Put it in your ~/.profile and have you backups attempt to execute every time you login. Add it to your network manager and have your online backups attempt to execute every time you get online. If you’re using something like udev, have your local backups attempt to execute every time your USB drive is plugged in.

The Special Case

The final configuration option of backitup.sh represents a special case. If the script runs and it can’t find the specified file, the default behaviour is to assume that this is the first time it has ever run: it creates the file and executes the backup. That is what most users will want, but this behaviour can be changed.

When I first wrote backitup.sh it was to help manage backups of my Dropbox folder. Dropbox doesn’t provide support client-side encryption, which means users need to handle encryption themselves. The most common way to do this is to create an encfs file-system or two and place those within the Dropbox directory. That’s the way I use Dropbox.

I wanted to backup all the data stored in Dropbox with Tarsnap. Unlike Dropbox, Tarsnap does do client-side encryption, so when I backup my Dropbox folder, I don’t want to actually backup the encrypted contents of the folder – I want to backup the decrypted contents. That allows me to take better advantage of Tarsnap’s deduplication and it makes restoring backups much simpler. Rather than comparing inodes and restoring a file using an encrypted filename like 6,8xHZgiIGN0vbDTBGw6w3lf/1nvj1,SSuiYY0qoYh-of5YX8 I can just restore documents/todo.txt.

If my encfs filesystem mount point is ~/documents, I can configure Tarsnapper to create an archive of that directory, but if for some reason the filesystem is not mounted when Tarsnapper is called, I would be making a backup of an empty directory. That’s a waste of time. The solution is to tell backitup.sh to put the last-run file inside the encfs filesystem. If it can’t find the file, that means that the filesystem isn’t mounted. If that’s the case, I tell it to call the script I use to automatically mount the encfs filesystem (which, the way I have it setup, requires no interaction from me).

@hourly backitup.sh -l ~/documents/.lastrun -b tarsnapper.py -n ~/bin/encfs_automount.sh

Problem Solved

backitup.sh solves all of my backup scheduling problems. I only call backup programs directly if I want to make an on-demand backup. All of my automated backups go through backitup.sh. If you’re interested in the script, you can download it directly from GitHub. You can clone my entire backups repository if you’re also interested in the other scripts I’ve written to manage different aspects of backing up data.

Hey yo but wait, back it up, hup, easy back it up

Cryptshot: Automated, Encrypted Backups with rsnapshot

Earlier this year I switched from Duplicity to rsnapshot for my local backups. Duplicity uses a full + incremental backup schema: the first time a backup is executed, all files are copied to the backup medium. Successive backups copy only the deltas of changed objects. Over time this results in a chain of deltas that need to be replayed when restoring from a backup. If a single delta is somehow corrupted, the whole chain is broke. To minimize the chances of this happening, the common practice is to complete a new full backup every so often – I usually do a full backup every 3 or 4 weeks. Completing a full backup takes time when you’re backing up hundreds of gigabytes, even over USB 3.0. It also takes up disk space. I keep around two full backups when using Duplicity, which means I’m using a little over twice as much space on the backup medium as what I’m backing up.

The backup schema that rsnapshot uses is different. The first time it runs, it completes a full backup. Each time after that, it completes what could be considered a “full” backup, but unchanged files are not copied over. Instead, rsnapshot simply hard links to the previously copied file. If you modify very large files regularly, this model may be inefficient, but for me – and I think for most users – it’s great. Backups are speedy, disk space usage on the backup medium isn’t too much more than the data being backed up, and I have multiple full backups that I can restore from.

The great strength of Duplicity – and the great weakness of rsnapshot – is encryption. Duplicity uses GnuPG to encrypt backups, which makes it one of the few solutions appropriate for remote backups. In contrast, rsnapshot does no encryption. That makes it completely inappropriate for remote backups, but the shortcoming can be worked around when backing up locally.

My local backups are done to an external, USB hard drive. Encrypting the drive is simple with LUKS and dm-crypt. For example, to encrypt /dev/sdb:

$ cryptsetup --cipher aes-xts-plain --key-size 512 --verify-passphrase luksFormat /dev/sdb

The device can then be opened, formatted, and mounted.

$ cryptsetup luksOpen /dev/sdb backup_drive
$ mkfs.ext4 -L backup /dev/mapper/backup_drive
$ mount /dev/mapper/backup_drive /mnt/backup/

At this point, the drive will be encrypted with a passphrase. To make it easier to mount programatically, I also add a key file full of some random data generated from /dev/urandom.

$ dd if=/dev/urandom of=/root/supersecretkey bs=1024 count=8
$ chmod 0400 /root/supersecretkey
$ cryptsetup luksAddKey /dev/sdb /root/supersecretkey

There are still a few considerations to address before backups to this encrypted drive can be completed automatically with no user interaction. Since the target is a USB drive and the source is a laptop, there’s a good chance that the drive won’t be plugged in when the scheduler kicks in the backup program. If it is plugged in, the drive needs to be decrypted before calling rsnapshot to do its thing. I wrote a wrapper script called cryptshot to address these issues.

Cryptshot is configured with the UUID of the target drive and the key file used to decrypt the drive. When it is executed, the first thing it does is look to see if the UUID exists. If it does, that means the drive is plugged in and accessible. The script then decrypts the drive with the specified key file and mounts it. Finally, rsnapshot is called to execute the backup as usual. Any argument passed to cryptshot is passed along to rsnapshot. What that means is that cryptshot becomes a drop-in replacement for encrypted, rsnapshot backups. Where I previously called rsnapshot daily, I now call cryptshot daily. Everything after that point just works, with no interaction needed from me.

If you’re interested in cryptshot, you can download it directly from GitHub. The script could easily be modified to execute a backup program other than rsnapshot. You can clone my entire backups repository if you’re also interested in the other scripts I’ve written to manage different aspects of backing up data.

Tarsnapper: Managing Tarsnap Backups

Tarsnap bills itself as “online backups for the truly paranoid”. I began using the service last January. It fast became my preferred way to backup to the cloud. It stores data on Amazon S3 and costs $0.30 per GB per month for storage and $0.30 per GB for bandwidth. Those prices are higher than just using Amazon S3 directly, but Tarsnap implements some impressive data de-duplication and compression that results in the service costing very little. For example, I currently have 67 different archives stored in Tarsnap from my laptop. They total 46GB in size. De-duplicated that comes out to 1.9GB. After compression, I only pay to store 1.4GB. Peanuts.

Of course, the primary requirement for any online backup service is encryption. Tarsnap delivers. And, most importantly, the Tarsnap client is open-source, so the claims of encryption can actually be verified by the user. The majority of for-profit, online backup services out there fail on this critical point.

So Tarsnap is amazing and you should use it. The client follows the Unix philosophy: “do one thing and do it well”. It’s basically like tar. It can create archives, read the contents of an archive, extract archives, and delete archives. For someone coming from an application like Duplicity, the disadvantage to the Tarsnap client is that it doesn’t include any way to automatically manage backups. You can’t tell Tarsnap how many copies of a backup you wish to keep, or how long backups should be allowed to age before deletion.

Thanks to the de-duplication and compression, there’s not a great economic incentive to not keep old backups around. It likely won’t cost you that much extra. But I like to keep things clean and minimal. If I haven’t used an online backup in 4 weeks, I generally consider it stale and have no further use for it.

To manage my Tarsnap backups, I wrote a Python script called Tarsnapper. The primary intent was to create a script that would automatically delete old archives. It does this by accepting a maximum age from the user. Whenever Tarsnapper runs, it gets a list of all Tarsnap archives. The timestamp is parsed out from the list and any archive that has a timestamp greater than the maximum allowed age is deleted. This is seamless, and means I never need to manually intervene to clean my archives.

Tarsnapper also provides some help for creating Tarsnap archives. It allows the user to define any number of named archives and the directories that those archives should contain. On my laptop I have four different directories that I backup with Tarsnap, three of them in one archive and the last in another archive. Tarsnapper knows about this, so whenever I want to backup to Tarsnap I just call a single command.

Tarsnapper also can automatically add a suffix to the end of each archive name. This makes it easier to know which archive is which when you are looking at a list. By default, the suffix is the current date and time.

Configuring Tarsnapper can be done either directly by changing the variables at the top of the script, or by creating a configuration file named tarsnapper.conf in your home directory. The config file on my laptop looks like this:

1
2
3
4
5
6
[Settings]
tarsnap: /usr/bin/tarsnap

[Archives]
nous-cloud: /home/pigmonkey/work /home/pigmonkey/documents /home/pigmonkey/vault/
nous-config: /home/pigmonkey/.config

There is also support for command-line arguments to specify the location of the configuration file to use, to delete old archives and exit without creating new archives, and to execute only a single named-archive rather than all of those that you may have defined.

$ tarsnapper.py --help
usage: tarsnapper.py [-h] [-c CONFIG] [-a ARCHIVE] [-r]

A Python script to manage Tarsnap archives.

optional arguments:
  -h, --help            show this help message and exit
  -c CONFIG, --config CONFIG
                        Specify the configuration file to use.
  -a ARCHIVE, --archive ARCHIVE
                        Specify a named archive to execute.
  -r, --remove          Remove archives old archives and exit.

It makes using a great service very simple. My backups can all be executed simply by a single call to Tarsnapper. Stale archives are deleted, saving me precious picodollars. I use this system on my laptop, as well as multiple servers. If you’re interested in it, Tarsnapper can be downloaded directly from GitHub. You can clone my entire backups repository if you’re also interested in the other scripts I’ve written to manage different aspects of backing up data.