Since chronic restriction of sleep to 6 h or less per night produced cognitive performance deficits equivalent to up to 2 nights of total sleep deprivation, it appears that even relatively moderate sleep restriction can seriously impair waking neurobehavioral functions in healthy adults. Sleepiness ratings suggest that subjects were largely unaware of these increasing cognitive deficits, which may explain why the impact of chronic sleep restriction on waking cognitive functions is often assumed to be benign. Physiological sleep responses to chronic restriction did not mirror waking neurobehavioral responses, but cumulative wakefulness in excess of a 15.84 h predicted performance lapses across all four experimental conditions. This suggests that sleep debt is perhaps best understood as resulting in additional wakefulness that has a neurobiological “cost” which accumulates over time.
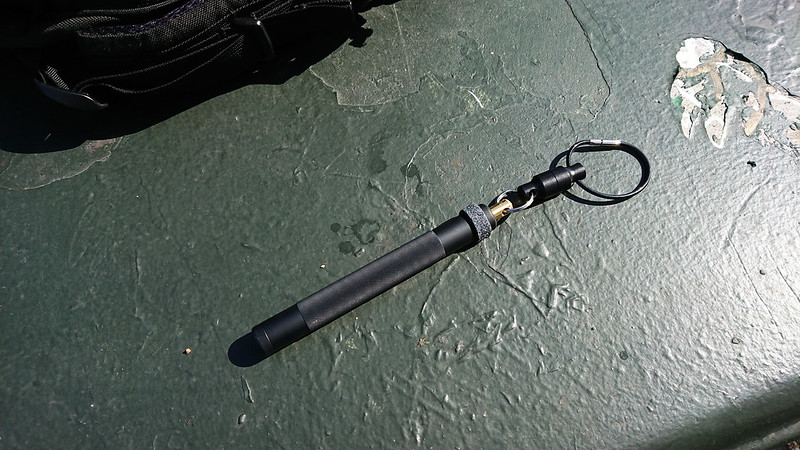
While I prefer pocket-carry for everyday, I’ve often thought about something that would allow for quicker access – especially on the bike. I’ve looked at a number of solutions for mounting a capsicum delivery mechanism to a bike, but never found one I liked. Instead, I ended up purchasing a second ASP Key Defender and mounting it to the shoulder strap of my backpack, which I wear frequently when in the saddle.
A small split ring connects the Defender to a magnetic clasp. This in turn is attached to a Lucky Line Flex-o-loc (the same thing I’ve been using on my keychain for seven years), which connects the whole setup to the webbing on my shoulder strap. To prevent the Defender from swinging around, I attach an IWB Soft Loop around the shoulder strap and shove the Defender through that.
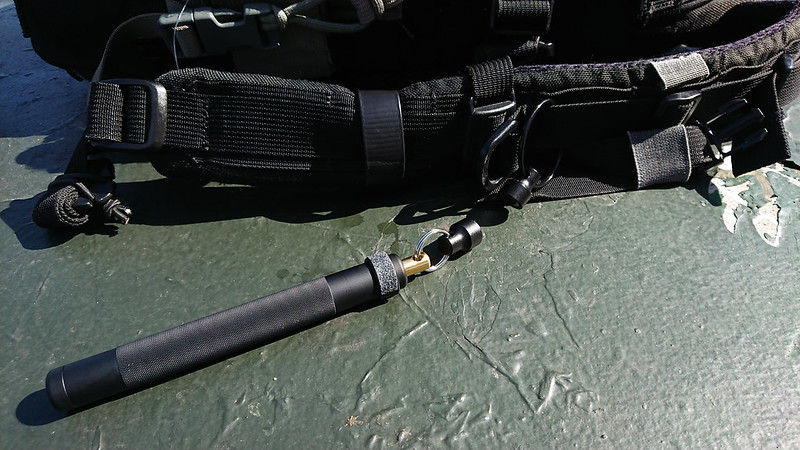
The Soft Loop holds the Defender tight enough against the strap that it doesn’t spin around during daily carry. When mounting the Defender, I orientate it so that safety clasp (which I still cover with grip tape) is against the shoulder strap. This eliminates any chance of the safety somehow accidentally becoming released and the trigger actuating. It also keeps the safety in a known, consistent position when the Defender is drawn.
Enough of the shaft of the Defender is left below the Soft Loop that it can be easily gripped. It is deployed by simply ripping downward. The magnetic clasp breaks away and the top of the device slides through the Soft Loop. This is very quick and very easy to do, with either hand, even when wearing gloves.
Another neat benefit to the magnetic clasp is that it allows you to easily reattach the Defender, if you decide you quickly want both hands free. The magnet is strong enough that it will connect if you simply wave the top of the Defender within a couple inches of the half of the clasp still attached to the shoulder strap. This can be done without looking. Of course, the Defender will swing around as you move until you shove it back underneath the Soft Loop – a procedure which does take two hands and at least one eye.
I’m happy with this setup as a supplement to the OC carried in my pocket. It can move easily to different backpacks. It could probably be made to work with any pepper spray intended to be attached to a keychain, though it works especially well with the ASP Defender series thanks to the hammer grip used to deploy them.
If an internet search doesn’t come up with a copy of the manual, I’ll scan the dead tree version and OCR it. The document is then stored in an annex at ~/documents/manuals/. I rarely reference the product manual after initial setup, but when I need it, it’s extremely valuable to have it available – immediately and offline – as a PDF with a searchable text layer.
Some products don’t have manuals, but do have specification sheets. I store these in the same location. Sometimes I’ll just save the product page from the manufacturer’s website as a PDF. This allows me to easily lookup the dimensions of a thing I bought 14 years ago, despite the product being long discontinued by the manufacturer, or the manufacturer no longer existing.
Crow is a woman who spent the summers hiking (mostly all or part of the PCT) and the winters as a cabin hermit (mostly in north-central Washington). Her interests in long-distance travel and off-grid living share many commonalities and resulted in much valuable information and insight. Long time readers here will remember her from The Vagabond’s Spatula.
I don’t remember how I first heard about The Art of Shen Ku, but it’s a book that has managed to survive every purge of my dead tree library since I bought it seventeen years ago.
Selling itself as “The First Intergalactic Artform of the Entire Universe”, Shen Ku is a difficult thing to describe. I suppose that in a bookstore you might find it in the “Self Help” section, which is unfortunate. The book jumps between topics such as travel, navigation, diet, fitness, and knots, all colored with a healthy dose of vaguely Asian cultural appropriation and new-agey fluff. Prior to mobile networked computing becoming widespread, I thought of the book as being the closest thing available to The Hitchhiker’s Guide to the Galaxy. Flipping through it today, it is clear that the book has informed and directed a lot of my interests in life. There are sections of the book that I’ve always ignored as irrelevant or not applicable to my reality, but on the whole the signal-to-noise ratio of the book is high. The author, Steve “Zeke” Dolby, is also an illustrator, and fills the pages with cartoon illustrations that are both entertaining and descriptive.
Despite its focus on travel, the large form factor of the book makes it impractical to actually carry around. When I discovered book scanning services a few years ago, Shen Ku was one of the first books I had scanned. After receiving the OCRed PDF I told myself I would get rid of my original paper copy, but have so far failed to do so. Shen Ku is the kind of book that lends itself to being pulled out and opened to a random page, with no expectation beyond education and entertainment. Unfortunately e-books don’t satisfy that experience.
Rarely has a technology generated so much industry hype and met with such a blasé response from the broader market. Watch your neighbor’s eyes glaze over when you describe its higher speeds and lower latency. Note how he fails to share your excitement when you tell him it will provide extra capacity and reduce costs for service providers.
…5G is neither fixing a consumer problem nor delivering a new experience. And therein lies a big issue. For all its failings, 3G sounded exciting back in the 1990s, when mobile phones were for only calls and texts and even fixed-line Internet services were young. To match that excitement, 5G would have to promise something just as revolutionary. To the average person, it doesn’t.
Despite all this, policymakers now sound as intoxicated as the telecom industry. Governments everywhere have bought into the story that 5G is the most important invention since a few ancient Greeks realized a circular object on an axle would be great for transport. Suddenly, there is a 5G “race” whose winners will inherit the planet – shortly before some of it disappears under rising seas.
Back when I was maybe 14 years old I had exhausted everything William Gibson had published, but I read an interview someplace where he cited William Burroughs as one of his literary influences. So I started reading Burroughs, which then of course led to Kerouac, Ginsberg, et al. From the Beats it was a logical progression to read books by Tim Leary and his crowd, progress on down the timeline to Terrence McKenna, and then come full circle from there back to cyberpunk via Douglas Rushkoff. Anyway, my Burroughs takeaway was: avoid opioids.
Scientific American proposes a solution to the Fermi Paradox by using the European exploration of the South Pacific as an analog.
When the frequency of occurrence of settleable worlds in a galaxy is intermediate between high and very low, fascinating things can happen. Specifically, ordinary statistical fluctuations in the number and location of suitable worlds in patches of galactic space can create clusters of systems that are continually visited or resettled by wave after wave of interstellar explorers. Think of it as an archipelago, a group or chain of islands. The flip side to the existence of these clusters is that they are typically surrounded by large unsettled regions of space, places just too far and too sparsely distributed to bother setting out for.