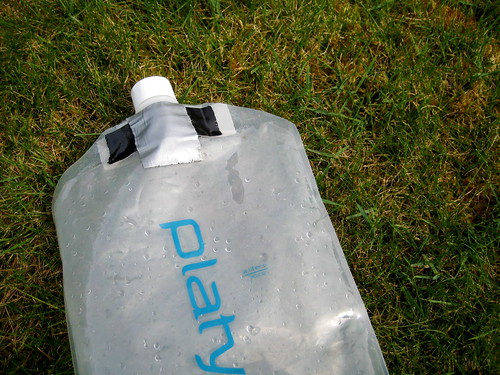
Although I have misgivings about their durability, Platypus‘ 2L+ bottles remains the primary water reservoirs in my pack. It’s been a bit over a year now since I started using them. At the same time I switched over to Platypus, I also started treating my water with chemicals rather than filtering it. Both methods of treatment have their advantages and disadvantages, but lately I have been using chemicals almost exclusively.
A water filter, of course, filters out not only the invisible nasties that upset the stomach, but also the visible things things that don’t cause much harm but aren’t altogether pleasant: dirt, dead bugs, small rocks, and the like. When I moved to using chemicals I was just dumping the water into my drinking vessel direct from the source. Without any sort of filter, the water could sometimes be a bit gritty. Too textured for my taste.
As a first attempt to solve this I started to place a bandanna over the opening of the Platypus, and then poured the source water over that. That worked great for getting out the sediment, but then I had the problem of having a wet rag. If the sun is out, it dries, but the other 307 days of the year, the bandanna – even a synthetic Buff – became a bit of a hassle to dry. I wanted some sort of pre-filter that I could get wet without worrying about it.
The solution (like more than a few before it) came while browsing the BackpackingLight forums.
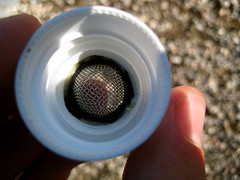
A filter washer is a rubber washer with a mesh screen in the middle. Apparently they’re used in garden hoses and washing machines to remove sediment. I was able to find them easily in the plumbing section of a local hardware store.
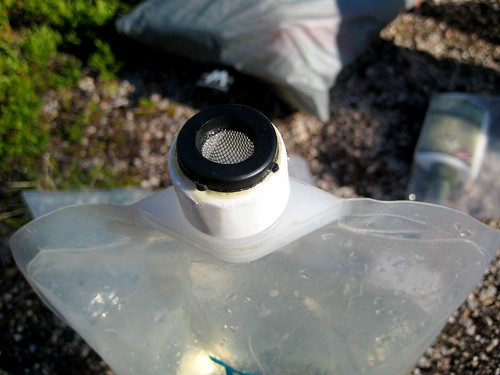
I took an old Platypus cap and drilled out the center of it. Then, with a little Gorilla Glue, glued the filter washer onto the cap. That’s all there is to it! The new pre-filter cap weighs 2 grams (0.07 oz) and shouldn’t cost much more than $1 to make.
The downside to the pre-filter cap is that it does noticeably decrease the flow rate of the water. To fill the Platypus, I use a scoop made out of an older Platypus bottle with the top cut off. Without the pre-filter cap, it takes all of 30 seconds to fill the Platypus bottle. With the pre-filter cap, it takes something more like 2 minutes to fill up the bottle. I have to pour the water out of the scoop much more slowly. Because of this I’ll sometimes forgo using the pre-filter cap if the water looks very clean, but the majority of the time I do use the cap. It’s become a permanent addition to my pack.
If I could only carry one first aid specific item in the wilderness, it would be an irrigation syringe.
There’s a lot that can be done with bandannas, duct tape, and paracord. A multitool, spare clothing, sleeping pad, tarp, poles – pretty much everything in a pack, including the pack itself, can be fashioned into some kind of medical implement with a little ingenuity. But cleaning a wound will always remain difficult. It also remains extremely important. Infection is both very common and very inconvenient in the wilderness, where you’re well away from definitive care.
Clean water should always available and irrigation is a simple and effective method of cleaning a wound. But water just poured over a wound won’t do much good. Pressure is needed. Occasionally you might hear people claim that you can fill up a ziploc bag with water, cut or poke a hole in one corner, and squeeze the bag to force out a stream of water. That’s certainly better than nothing, but in my experience the pressure from that is not comparable to the pressure from a syringe. With an irrigation syringe, you can take the cleanest water available (usually your drinking water) and shoot it into the wound. Pressure washing the wound like this allows you to easily clean out all the grit and dirt. There’s no need to go poking around in there with unsanitary tools, probably causing more harm than good. A 12cc syringe like the one I carry costs $1, weighs 8 grams (0.28 oz), and takes up very little room. I can’t think of a reason not to have one in your pack!
Remember: a clean wound is a happy wound. You can put all the effort you want into the perfect bandage, but if the wound isn’t clean, you’re going to have some problems down the line.
When I purchased my Trail Designs Ti-Tri Titanium Stove System, I bought it with a 900mL pot from Titanium Goat. I like the pot, but it has one shortcoming: there are no measuring marks on it. I’m not comfortable just pouring a little water into a pot and saying “Well, that looks like 2 cups.” I prefer a slightly higher level of accuracy.
Originally I addressed this by scoring the handle of my spork to mark 1, 2, and 3 cups measured in the pot – an idea which I think originally came to me from somewhere on the BackpackingLight Forums. This method works ok – though making the marks deep enough to be visible on the titanium was a bit tough with my knife – but I’ve never felt that it is very accurate. It will tell me if I have roughly 1 cup of water in the pot, but I could really be anywhere between 3/4 of a cup to 1 1/4 cups. That’s the difference between nice, fluffy couscous and overly soggy (or dry and undercooked) couscous, you know.
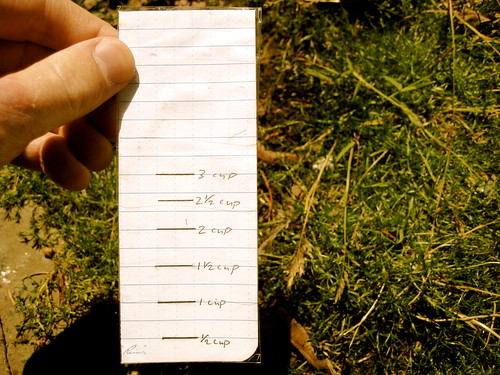
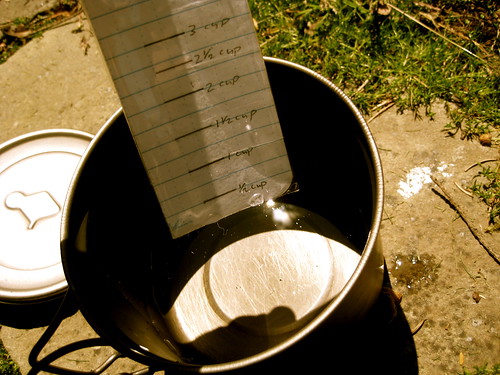
As a more accurate replacement, I came up with the idea for the Water Measuring Doohicky: a piece of paper with marks on it. Ingenious, isn’t it?
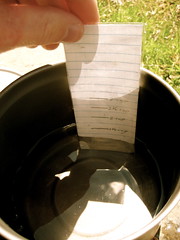
For the paper, I chose a cut a piece out of a page in one of my Rite in the Rain notebooks. Then I put 1/2 cup of water into the pot, set in the paper, noted the water line, took out the paper and marked the water line. This was repeated at 1/2 cup increments up to 3 cups. (The pot holds 4 cups when filled to the rim, so 3 cups is the most I would ever want to cook with.) After I had all the marks determined, I cut an identical piece of paper and put marks at the same levels. Then I tossed the soggy paper and was left with a fresh, dry piece of waterproof paper with the appropriate marks.
As a poor-man’s lamination, I wrapped it with clear packing tape. Even though the Rite in the Rain paper is waterproof, it gets a little soggy when submerged and takes a while to dry out. Water doesn’t cling to the tape at all. I can give it a shake or two after taking it out of the pot and it is immediately dry. The tape also adds a little stiffness, which helps achieve more accurate measurements.
I made two of these doohickeys at the same time, but have been using only one since last Fall. It works great. I am somewhat embarrassed it took me almost a year to come up with the idea. Even though I only made marks at 1/2 cup increments, the grid on the paper allows me to easily measure with 1/4 cup accuracy. As opposed to the marks on the spork, this paper is one extra thing to carry, but when placed on my scale it doesn’t register. I don’t think it weighs me down any.
I had done the lamination before I thought of this, but next time around I think I will write common cooking ratios on the back: water to couscous, water to dehydrated brown rice, etc. Usually I write those ratios on the ziploc freezer bags that hold my food, but the bags get replaced and rotated fairly frequently. The Water Measuring Doohickey has proved that it will last for a longer period of time.
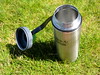
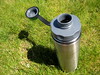
I bought one of the newer 27oz wide mouth Klean Kanteens back in March. My favorite bottle is still the old 40oz Klean Kanteen that I keep in my EDC bag, but I’ve been wanting something a bit skinnier that could fit in the bottle cage on my bike. I also was looking for an excuse to try out one of the newfangled wide mouth Klean Kanteens. I prefer a wide mouth opening on my bottles, but my 40oz Klean Kanteen (despite being beat on fairly heavily for the past few years) is in too good a shape to justify replacing it with a 40oz wide mouth. A new 27oz wide mouth bottle that would fit on my bike (not to mention in most car cup holders) and so supplement the 40oz bottle was easier to talk myself into!
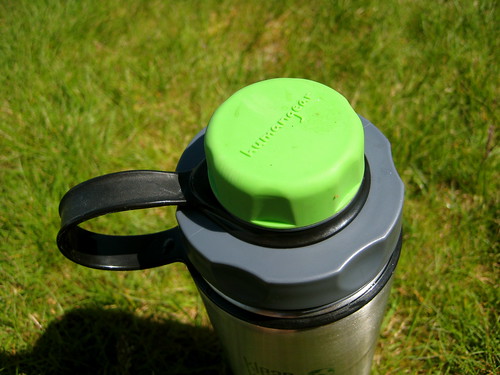
To go along with the wide mouth bottle, I also purchased a humangear capCAP. This product of questionable capitalization addresses the same problem as Guyot Design’s Splashguard: how to drink from a wide mouth bottle while moving without ending up with half the bottle’s contents on your face and the other half up your nose. The capCAP allows the user to take advantage of the wide mouth for filling and cleaning (as well as water filter integration), but also provides a smaller opening for drinking.
The wider cap has indentations on it making it easy to grab and turn. The smaller cap, in addition to the indentations of the larger cap, is made of rubber, which makes for an easy grip while wearing gloves. The rubber has a tendency to pick up small amounts of dirt and sand, but so far I have not found this to be an annoyance.
My habit in unscrewing bottle lids is to hold the body of the bottle in my left hand and unscrew the lid with my right. The problem with doing this with the capCAP is that attempting to unscrew the small lid tends to start to loosen the larger lid as well. All that’s needed to rectify this is to hold the larger cap in my left hand rather than the body of the bottle itself. This forces a change of habit, which took me a couple weeks to get used to, but I now grab the larger cap with my left hand while unscrewing the smaller cap without thinking. I haven’t had a problem with it since.
When using the capCAP with my wide mouth Klean Kanteen, I find that it does leak slightly. If the bottle lays down on its side for a bit, a couple drops of water will escape from underneath the larger cap. The threads on the bottle’s lip must not match up perfectly with those on the capCAP. If the bottle was to be thrown loosely into the body of the pack where it could shift around and potentially get a drop or two on some form of paper, I would opt for the more secure closure of the standard Klean Kanteen lid. But when the bottle is in the cage on my bike or stored upright in a pouch on my pack’s waist belt, this small leak is no problem.
The capCAP can of course be used on other wide mouth bottles. I also use it on my 32oz HDPE Nalgene as well as my 32oz Guyot Designs Backpacker and have not noticed any leaking with those bottles. It’s a pretty neat product that I think makes a great addition to any wide mouth bottle.
Here are the weights of various lids, measured on my scale:
In the past, I used Camelbak bladders as my primary water reservoir. I’ve had three of their military hydration systems and never experienced a leak – except once when I neglected to fully close the bladder’s lid. In snowy, alpine conditions I would chuckle at others whose hydration hoses were frozen shut, while I confidently sucked on my insulated Camelbak hose. The Camelbak mouthpiece always insured a high flow-rate, unlike some other brands, and the hose could be shut off at either end, providing further protection against the accidental leaks that have been known to plague other bladders.
But the Camelbak’s durability comes at a price. My 100oz Omega Reservoir (including bite valve and insulated tube) weigh in at 10oz. Not exactly light. So last year, I decided to give Platypus bladders a shot. I had been critical of their toughness in the past, but their 2 liter bottle weighed in at only 1.4oz. With optional drink tube kit and bite valve cover, the full system weighed 3.6oz. It had been referred to as the “gold standard” in ultralight bottles. Too enticing not to pick up.
Of course, the low weight of the Platypus system also comes at a price. The small opening makes the bladder less convenient to fill. The tube is uninsulated, and so inappropriate for much cold weather use. The bite valve has a low flow rate and is prone to leaking. The bite valve cover is cumbersome and difficult to close. And the bladder itself is made of a much thinner and less durable plastic than the Camelbaks. Still, I have been very happy overall with the 2L Platypus bottle. I have not touched the Camelbak once since making the conversion.
But now my Platypus has begun to leak. I’ve patched it with Gorilla Tape, which seems to be an effective fix, but it is only temporary. I need to replace the bottle. Nowadays, all the rage seems to be for the new bottles with their ugly colors. The largest of these is 1 liter, and so not an option for me.
Platypus also now offers two newer hydration systems. The first is the Hoser, which is similar to the old bottle, but with a grab loop at one end and an angled port at the other. The manufacturer’s weight for this system is 3.6oz, which is the same weight that I have measured for my old bottle, hose, and valve. The trouble with the Hoser is that the bottom does away with the traditional expanding bottom of the old bottles in favor of a grab loop. Because of the small opening of the bladders, the best way that I have found to fill it is to scoop up water with something else and pour it into the standing bladder (a method made popular by Jason Klass). For one person to achieve this, the bladder has to stand on its own. The Hoser bladder will not, so it isn’t an option for me.
The other new offering from Platypus is the Big Zip SL. The zipper closer on this addresses the difficulty of filling. The manufacturer’s listed weight is listed at 5.5oz (though I’ve heard reports that it is actually heavier): still a good deal lighter than the Camelbak, but significantly heavier than the old bottle system.
I could go back to the old Camelbak, but the weight deters me. It is also difficult to pour precise amounts of water out of the Camelbak bladder for cooking, which is a disadvantage now that I’m used to the Platypus bottles.
The other option is a bladder from Source. I first heard of these with MilitaryMoron’s review. They have many features that are attractive to me, but I haven’t seen anybody post an accurate weight. Source themselves list their 2L bladder at 0.53lbs (8.48 oz), but they have the same weight listed for the 1.5L and 3L bladders. It seems highly improbable to me that three different sized objects weigh exactly the same. More likely, the manufacturer’s listed weights are inaccurate. I am assuming that the Source bladders will be heavier than the comparable Platypus Big Zip SL and that they have the potential to be slightly lighter than a Camelbak, but that is only a guess. I would rather not purchase a Source bladder without knowing an accurate weight.
For now, I think I will buy another 2L Platypus bottle to replace my leaky one. Despite the durability issues, they seem to be the best mix of price, performance, and weight. They must be thought of as disposable, but that is true of all plastic water carriers. I’m not sure why they have lately become more difficult to acquire from large retailers.
Does anybody know of any other options that I have overlooked?
Last year, Backpacking Light published a review of the MSR Hyperflow filter. It was one of their subscription-only articles, so I never read it. Apparently, the reviewer attempting to filter only slightly-less-than-clear water and experienced a very quick build-up of material in the filter element that could not be removed by back-flushing and vastly deteriorated the flow-rate of the filter. Since the review, MSR has acknowledged the problem and released a new filter cartridge to address the problem.
I have had a MSR Hyperflow for a little under a year and have never experienced the clogging problem or the lack of effectiveness of back-flushing. I do tend to be judicial about selecting my water sources and filter the clearest water I can find, which may be why I have not experienced the reviewer’s problem. (In fact, I could probably get away without using any filtering on many of the water sources I choose, but I, like most, have been indoctrinated with the need to fear all wild water sources.)
What caught my eye in the second review was that MSR was offering free replacement filter cartridges to those who had filters manufactured prior to November, 2008. The cartridge is the most substantial component of the filter, and getting a new one is a bit like getting a whole new filter for free. This afternoon I called Cascade Designs (MSR’s parent company) at 1-800-531-9531, read them the serial number on my filter, and there is now a new filter cartridge in the mail for me! MSR customer service gets two thumbs up, even if there may be issues with the product.
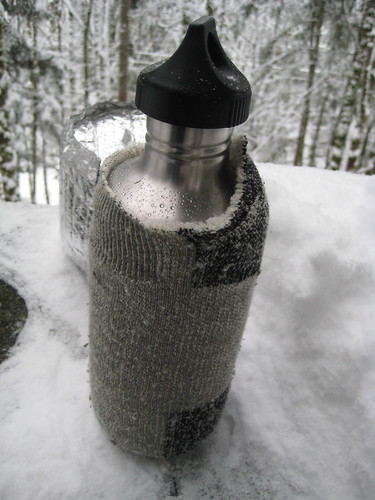
In one of my EDC photos last week, I showed that I carry a 40oz Klean Kanteen. I think the water tastes better from the stainless steel bottle than from a plastic Nalgene, and prefer carrying 40 ounces over just 32.
The main complaint many people express concerning a single-walled stainless steel bottle is that you can’t carry hot liquids in it. That’s not much of a detraction for me, since I have a different bottle for that. What does annoy me is that, in the cold, when the bottle is filled with cold water, the stainless steel can become too cold to touch without gloves. To address this, I took an old wool sock and cut it off at about the neck of the bottle. Instant insulation.
The only disadvantage is that the sock is just a little too thick for the bottle to nest inside my mug. Depending on how you carry the bottle, you might want to cut off a few inches from the bottom of the sock as well as the top.
Last month, Vavrek and I began researching gravity powered water filtration systems. The British Berkefeld and Berkey filter systems dominate this market (British Berkefeld refers to systems using the Doulton Super Sterasyl filter elements, Berkey refers to filter systems using the Black Berkey filter elements). I had been set on purchasing a Berkey filter until Vavrek discovered AquaRain Natural Water Filtration Systems, a lesser known (and cheaper) alternative.
The AquaRain systems are all built in the USA from stainless steel. The filter elements are from Marathon Filters, the same used by MSR in their portable filters. They’re ceramic with carbon which, as illustrated in this table, filters organic and microbiological organisms, but not heavy metals, radioactivity, or inorganics. (More information on different filter types is available here.) These filters have been shown to filter down to the .2-.3 micron range, where British Berkefeld units claim an absolute rating of .5 microns.
Nitro-Pak, a seller of AquaRain filters, has the following to say concerning manufacturer claims of “absolute” micron ratings:
There is a great deal of confusion regarding “absolute” micron ratings. Just how much of a reduction efficiency should be considered adequate for an “absolute” rating? Is 99.9% (3 log) sufficient, or would 99.9999% (6 log) be more appropriate, since it matches the EPA bacteria requirement? Should a filter be rated by its ability to remove particles of a certain size, or shouldit be challenged with live organisms of a particular size? Should a filter be tested only when it is new, or should the ratings be based on its end-of-life performance? The fact is that there is no industry or government standard for “absolute” filtration performance.
The Marathon filter elements used in the AquaRain Gravity Water Filter have been extensively tested against live organisms using expended end-of-life elements. We believe this form of testing to be the most stringent, since it tests the filters in a manner similar to the way they would actually be used under worst case conditions. When testing against the .5-.6 micron organism Klebsiella terrigena, EXPENDED Marathon elements demonstrated a 6.6 log reduction (they achieved 8.9 log reduction when new). The EPA only requires a 6 log reduction from NEW elements, which AquaRain greatly exceeded under extreme pressures of up to 90 psi, well above normal test pressure. At the very low pressure of 1/2 psi found in our gravity filter, the efficacy would be far greater still. Does this mean that the Marathon filter elements have an “absolute” rating of only .5-.6 microns? Expended Marathon filter elements have also been tested against the Health Industry Manufacturing Association’s (HIMA) test organism, Brevundimonas diminuta, and achieved a 99.99815% reduction (99.9999% when new). Since this organism is .2-.3 micron, should we claim this as our “absolute” rating? British Berkefeld Filter literature lists the “absolute” rating of their filter at .9 microns and their U.S. dealers claim “absolute” performance at .5 microns. Their own factory literature claims only 99.9% efficiency at the .5 micron level. Is 99.9% sufficient for claiming an “absolute” rating? The bottom line is that the AquaRain Gravity Water Filter System, using Marathon filter elements, will outperform all other gravity-fed ceramic water filter systems. Since there is no standard for “absolute,” YOU will have to decide what level of protection you want for yourself and your family.
The AquaRain, British Berkefeld, and Berkey filter systems are all worthy investments. Finding a clear winner between the three can prove a challenge. Based partly on the above quote concerning micron ranges, partly on the price, and partly on the country of origin, I decided to purchase an AquaRain.
I went with the AquaRain 202 model. It includes two filter elements and holds roughly 1.5 gallons of clean water. I purchased it from CampingSurvival.com, who, after factoring in shipping costs and using the coupon code “savings” for a 5% discount, had the 202 for the cheapest I could find. I’d never dealt with them before, but their shipping and email response was prompt, so I’d recommend them if you’re looking to pick up an AquaRain.
When you first receive the AquaRain, all the parts should be thoroughly cleaned and the filter elements “cultured” by rinsing them under water and running your hands along them. The system is then assembled, which is a simple process of installing the spigot on the lower reservoir, the two filter elements in the top reservoir, and the handle on the lid. Finally, stack the top reservoir atop the lower, dump in some water, put on the lid, and you’re done.
Regardless of the actual micron measurement, pores in the AquaRain’s Marathon filters are smaller than those in the Berkefeld, which makes for a slower flow rate. AquaRain claims a 1/4 gallon per hour per element flow rate under ideal conditions. New filter elements are nowhere near this fast. When I first put my system together, I filled the top reservoir and left for 5 hours. Upon returning, only about 1/6th of the water had made it through the two filters. I emailed AquaRain to confirm that this was normal behavior.
Yes this may very well fit into the normal range when first starting it up....
The filters are DRY and the pores on the surface of the ceramics are very small. The water follows a tortuous path to get to the bed of the granulated activated carbon....also DRY… and then it drips into the lower container.
Within a couple of days, the filters will have become fully saturated. When you keep the container filled (adding water every ten or so minutes) you can then achieve the optimum filtration rate. Most people will not give the unit this kind of attention....most will fill it before they go to bed at night and by morning you should have a gallon or so. Fill again for more water. Even when keeping the unit full and striving for the high filtration rate, the water has a nominal contact time of 11 minutes with the carbon…this is good! You want it slow so that it can do its job. (Another factor, especially with cold weather coming, that affects speed of filtration is the temperature of the water....the warmer the faster....the colder the slower.
It is important to note that the top reservoir simply sits on top of the lower, with no rubber “O” ring to make the connection water tight. This means that it is possible for the lower reservoir to overflow if you attempt to keep the top constantly full for maximum flow rate without emptying the bottom (I discovered this the hard way).
The water filtered through the AquaRain does have a distinctly different taste. I live in a city that has some of the cleanest water in the state, and I’ve always used a Brita water filter for drinking water. I expected the AquaRain to do a much better job than the cheap Brita, but I did not expect a significant difference in taste. The water from the AquaRain tastes much smoother, for lack of a better descriptor. I’ve also noticed the water comes to a boil faster when cooking.
I keep a 1 gallon glass jug full of filtered water in the fridge for chilled drinking water. For cooking and for tea, I take the water directly from the AquaRain. I lift up the upper reservoir periodically throughout the day to check the water level, and dump a bit in the top when the lower is lacking. (I prefer to fill the top at night, so that I can go to sleep to the “drip drip” sound of the filtered water falling into the pool in the bottom). Because I never completely fill the top, I don’t achieve the maximum flow rate.
For 1-2 people looking for clean drinking and cooking water, I think the AquaRain 202 model is ideal. For 3-4 people, I would certainly opt for the larger 404 model. If you’re looking to provide water for more than 4 people, I’d speculate that you would need to either pick up multiple 404 models or acquire a couple of large buckets and build your own filter with perhaps 6-8 filter elements to achieve an optimum flow rate.
In an off-grid (or grid-down survival) situation where clean water is needed not only for drinking and cooking but also for cleaning, I would certainly want to invest in some large water storage containers and perhaps a 404 model for the faster filtration rate achieved by the 4 filter elements. But that would be for 1-2 people. If you’re looking for a system to provide drinking, cooking, and cleaning water for 4 or more people, I don’t think an AquaRain system is practical. Ideally, I would try for a large scale rain-water fed rapid-sand filter leading to a slow-sand filter (described in Aric McBay’s Peak Oil Survival) – and if you happen to have an AquaRain, perhaps using that for final filtration of drinking water.
AquaRain recommends dumping the first 1-2 gallons filtered through new filter elements, “as it may contain loose material washed from the filter elements.” This, along with the extremely slow flow-rate of new filter elements creates an interesting conundrum. Because the new filters are dry, it takes a significant amount of time for the first couple gallons of water to be filtered. The two filter elements in my AquaRain 202 took a little over 24 hours. If I were off-grid and completely dependent on the AquaRain, that’s 24 hours without the ability to produce usable water every time I change the filter elements. Storing enough water for 24 hours isn’t a big deal (and really ought to be a minimum requirement), but what if some event were to arise that requires me to use more than the usual amount of water? It seems to me that one should strive for two different filter systems – to be used concurrently, but staggered – so that when new filters are being installed and conditioned in one, you can fall back to the other.
One of the main concerns many city-dwellers hold about their water supply these days is the possibility of it being contaminated with fluoride. (There’s a rather heated debate as to whether fluoride is good or bad. Personally, I believe it to be a poison, but I think the debate is mute. Cities should provide the cleanest, purest water possible to its citizens. If an individual wishes to add some additional chemical to their water, they can do that themselves, at their own risk, in their own homes.) Because of this, a popular addition to Berkey filters are the Post Filter Arsenic and Fluoride Reduction Elements, which screw on to the Black Berkey filter elements. In my city, we voted down the attempt to fluoridate our water supply, so it isn’t an immediate concern for me. But chances are that at some point I’ll live in a place that does poison its water. Before deciding on the AquaRain over the Berkey filters, I emailed AquaRain and asked if the Post Filter elements would also fit onto their Marathon filters. They replied in the negative:
Fluoride is a difficult thing to remove from water, and gravity carbon filter systems may not be the most efficient or effective way to do the job. If you use a gravity water filter system that has carbon in its operation, a more accurate word would be reduce rather than remove. Carbon is generally not the accepted media for fluoride reduction and our unit has not been specifically tested again fluoride to see how significant the reduction can be. There are variables involved with certain chemicals. For example: We do not know how much fluoride has been added to your water system; there would be a sliding scale of effectiveness as the carbon ages, etc.
However, we know the water passes slowly through the AquaRain (which is positive since you want the contact time to be as long as possible.) We have found documents that say carbon will reduce fluoride enough (up to 80%) that pro-fluoride people are alarmed and want you to add it back into your diet. If your main concern is fluoride removal/reduction, there may be better options out there than a gravity water filter system. (Reverse Osmosis).
Not to discount the danger of fluoride, sadly and statistically, all of the strengths found in the AquaRain filter system…bacteria, cysts, protozoan removal, VOC contaminants, chlorine, benzene, pharmaceutical drug removal can be accomplished with the AquaRain but most people do not even know of these dangers.
Due to the thread pattern found on the stems of the AquaRain Ceramics, there are no post filters that will fit our candles.
This wasn’t enough to dissuade me from the AquaRain systems. Up to 80% reduction ain’t bad, but I think some sort of reverse osmosis system (or just going for rain collection) would be justified if I find myself in a fluoride-friendly city.
I’ve been very pleased with the AquaRain for the week that I’ve been using it. Tangibles such as water filters are not only wise investments of wealth in uncertain economic times, they also allow a further degree of self-sufficiency. Though I currently fill the AquaRain with tap water, I can just as easily fill it with water from the more-than-abundant rains we receive here in the Pacific Northwest. I’m no longer fully dependent on city water, nor subject to another’s whims as to what should be in my water.